
:max_bytes(150000):strip_icc():format(webp)/GettyImages-1065028028-8e770c58918e4cf8b0852e81cff60ed6.jpg)
2024 Approved AVI Video Editing Essentials Top T
AVI Video Editing Essentials: Top T
With the growing fame of video-sharing and social media applications like Twitter, Instagram, and TikTok, the demand for simple and fast video cutting and trimming tools has dramatically increased. Nowadays, you don’t have to play with complex video editing tools to produce high-quality videos.
Thanks to several user-friendly editing software to make things easy for everybody. However, finding the right programs to trim/cut videos is still challenging, especially in AVI format.
But, guess what? These top 16 AVI video cutters for Windows, MAC, Android, iPhone, and online will make video cutting and trimming fun, especially when you learn to do it using Filmora.
In this Article
Part 1: Best AVI Video Cutter to Trim/Cut AVI Video on Windows and MAC – Filmora Video Cutter [with steps}
Part 2: Top 3 Free AVI Video Cutter on Windows
Part 3: Top 3 Free AVI Video Cutter on MAC
Part 4: Top 3 Free AVI Video Cutter on Android
Part 5: Top 3 Free AVI Video Cutter on iPhone
Part 6: Top 3 Free AVI Video Cutter Online
Part 7: Bottom Line
Part 8: FAQs
Part 1: Best AVI Video Cutter to Trim/Cut AVI Video on Windows and MAC – Filmora Video Cutter [with steps]
Filmora by Wondershare is a star video editor with outstanding outcomes. Whether you have a MAC or Windows PC, you can download Filmora regardless of your operating system. The program best serves those who intend to make high-quality videos. The software provides editing support for all video formats, including AVI.
Although Filmora is an affordable editor with tons of audio and video editing options, you can still download the software for free and create projects if watermarks don’t bother you. Moreover, you can count this tool’s capabilities in cropping, resizing, and Chroma screen support. But that’s not the only sweet fruit.
In fact, Filmora is equipped with many jaw-dropping features, including preset templates, auto beat sync, split-screen, speed ramping, motion tracking, keyframing, creative transitions, titles, filters, and much more. And the best part is, you can learn and understand Filmora in no time. That’s why the program is loved and supported by all types of users.
So does Filmora helps cut and trim AVI videos? Yes! It does if you follow these steps correctly.
Step 1: Download Filmora Video Editor
First, download Filmora Video Editor by choosing your operating system, as seen in the screenshot below.
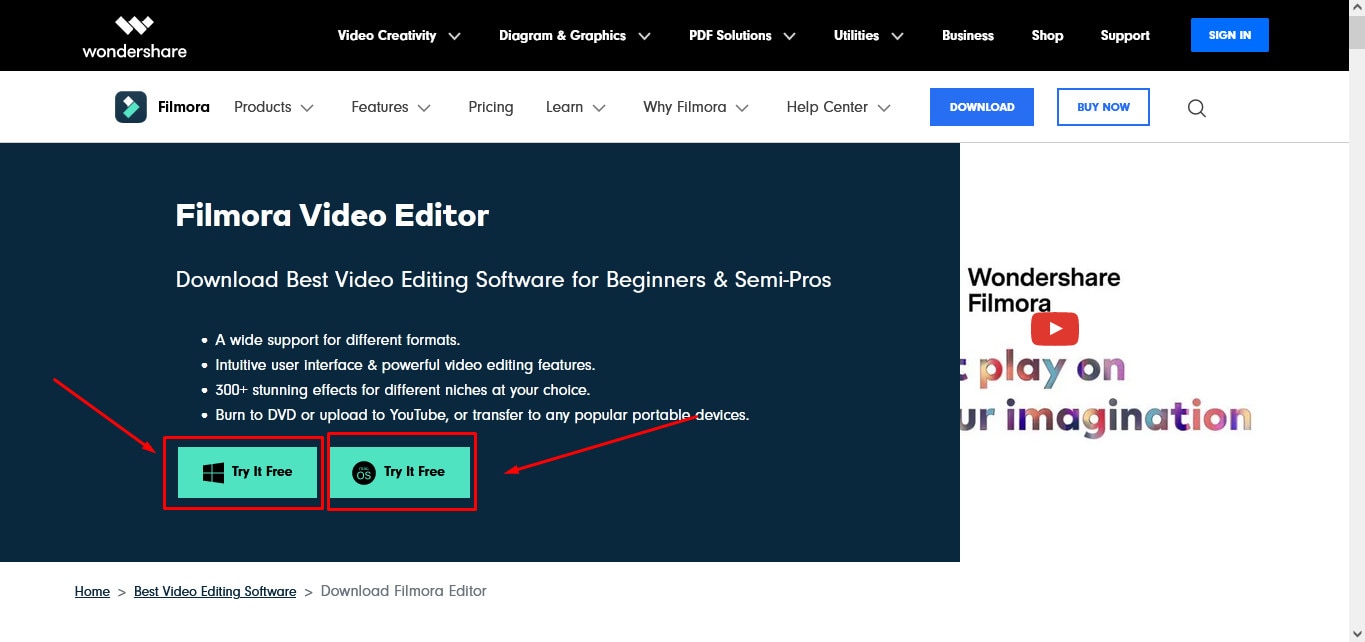
Run the setup and let it finish without any pause or break.
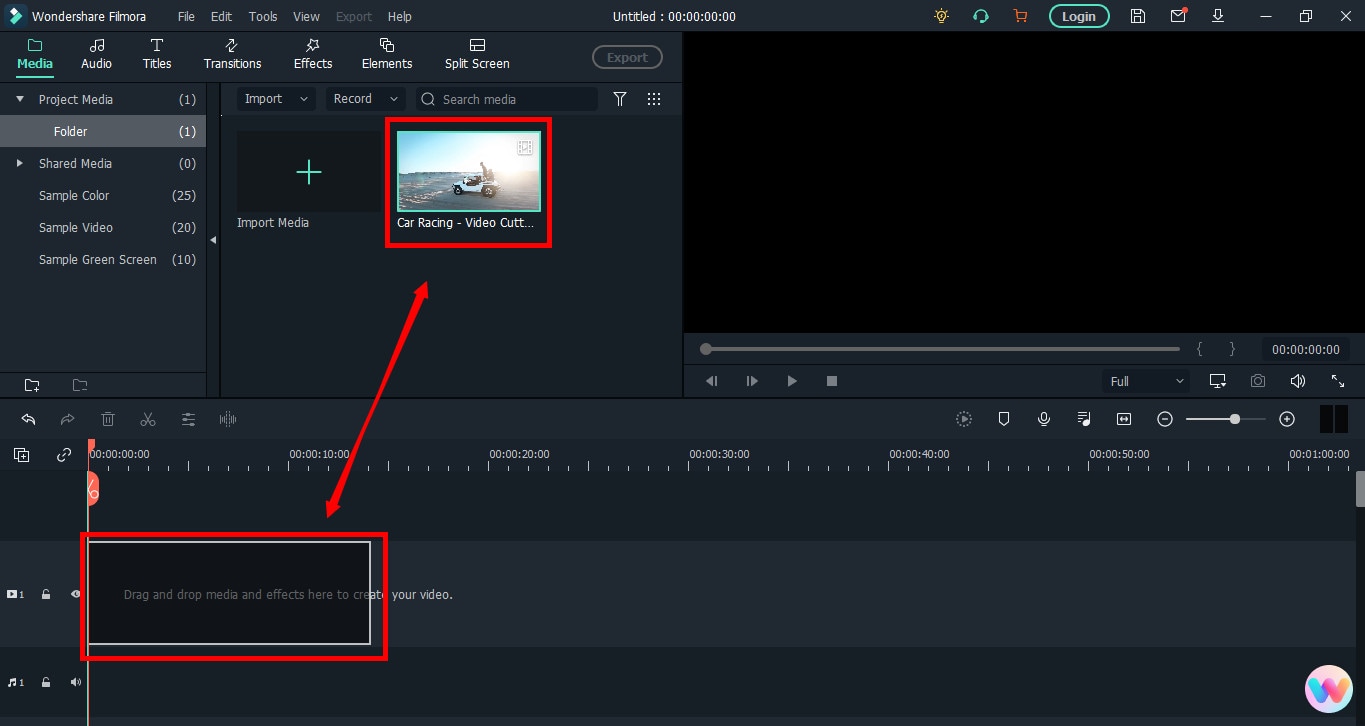
Step 2: Import Your Video to Filmora Video Editor
Importing your AVI video is a very simple process. Just click on the “Film Clip” icon.
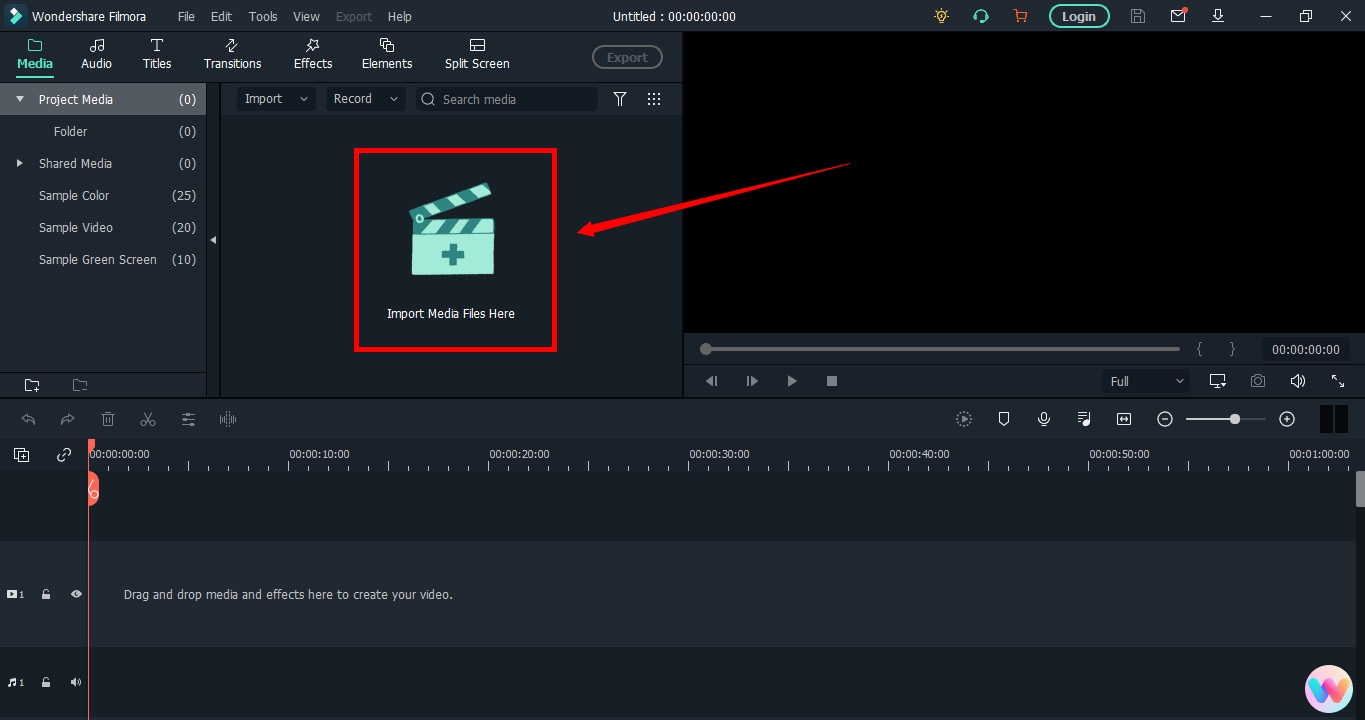
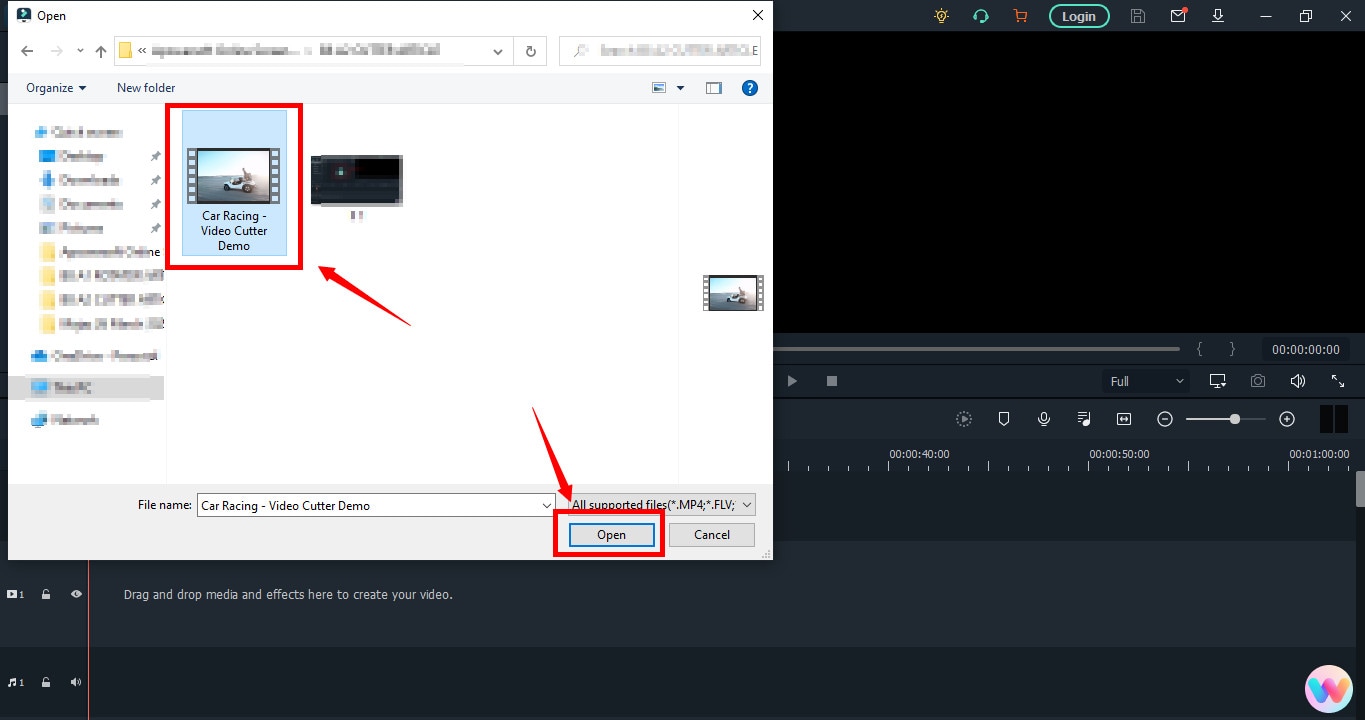
It will open a new window screen on your computer to select the video from the directory. Find the clip you want to import and cut. Use your mouse to select it and click the “Open” button.
The video will be loaded in the “Media” folder of Filmora. The clip’s thumbnail should be visible to assure you have done everything correctly.
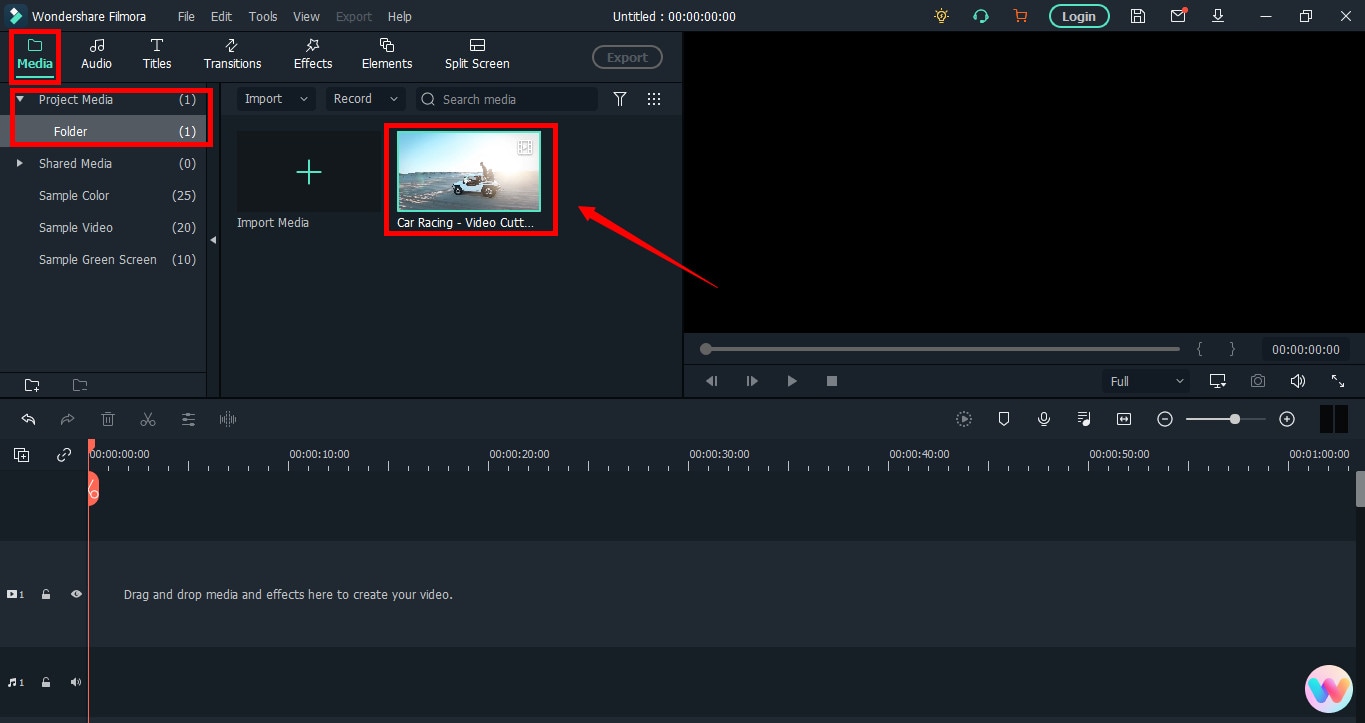
If you can see that, let’s go to the next step.
Step 3: Drag and Drop Video to Filmora’s Timeline
Select the video in the media folder by clicking over it once. Now, without leaving the hold of the left button of your mouse, slide the video down to the track in the timeline.
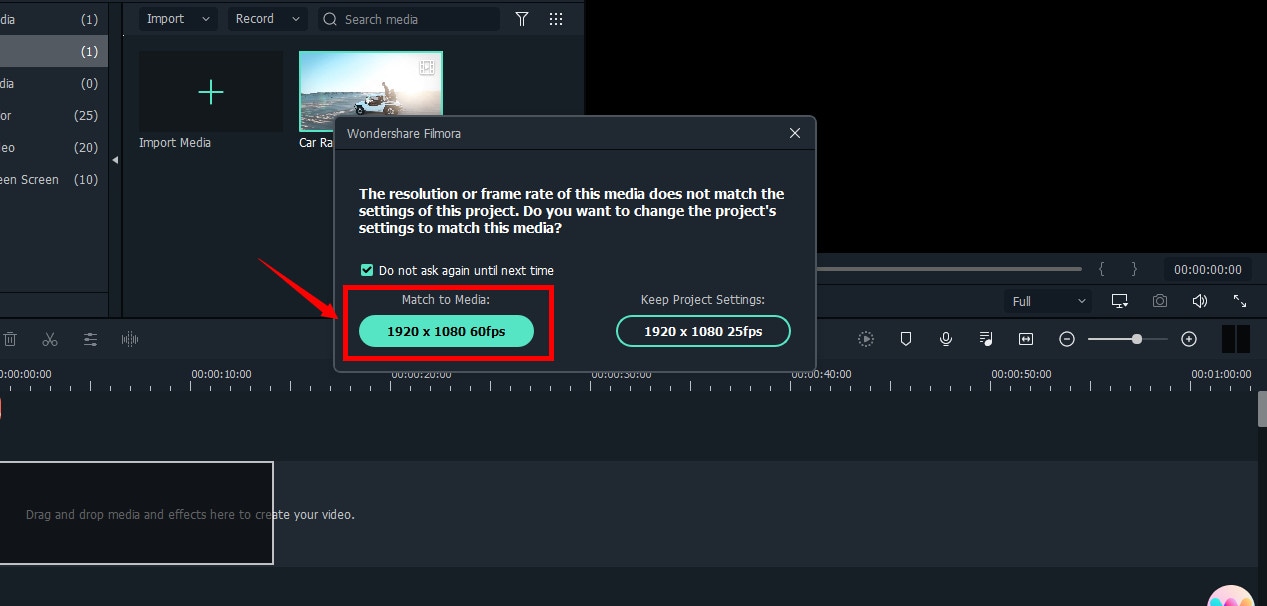
After that, a message will pop up, asking about your preference for the project settings. It is recommended to choose the “Match to Media” option unless you’re an experienced video editor who knows how to play with the resolution and frame rates.
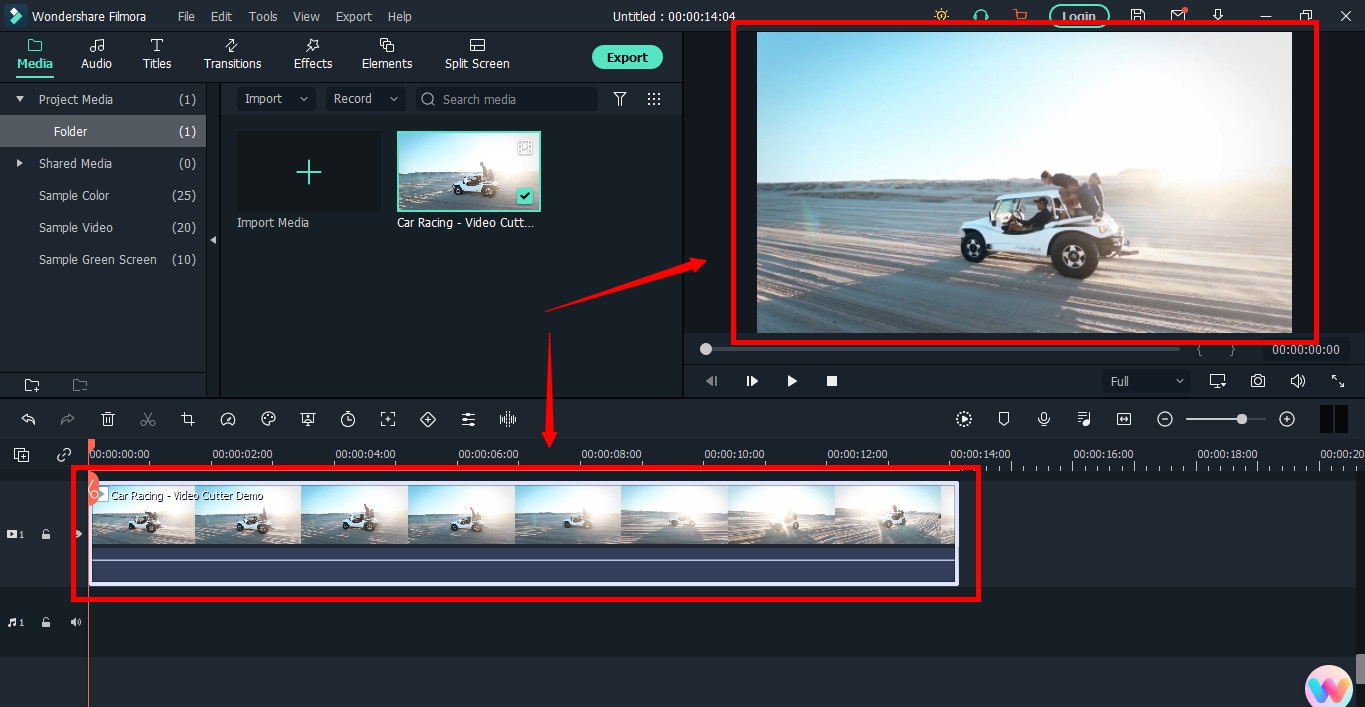
You will see the video on the timeline with its preview on the “Preview Screen” on the right side of the interface.
Step 4: Cutting Your Video in Filmora
Here comes the core step you have been waiting for. But before you go any further, you need to know about the “Playhead.”
Playhead is an orange-reddish marker you can find on the timeline.
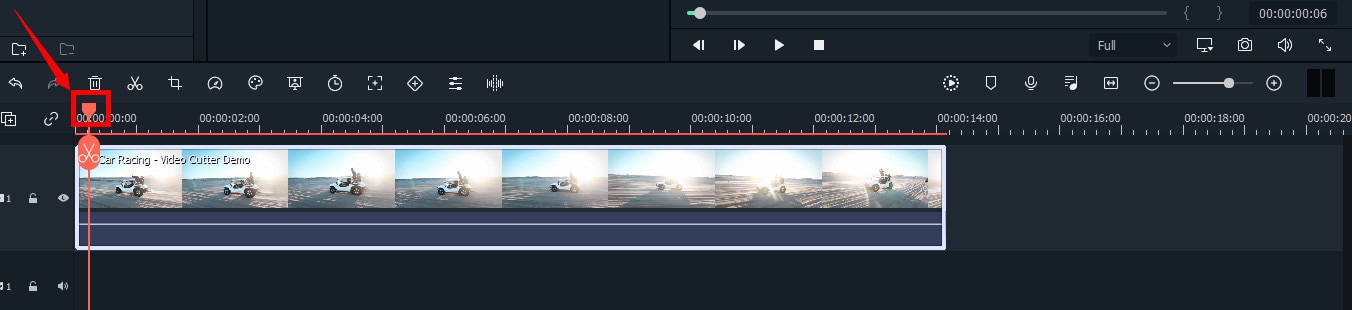
It has an important role in cutting your videos.
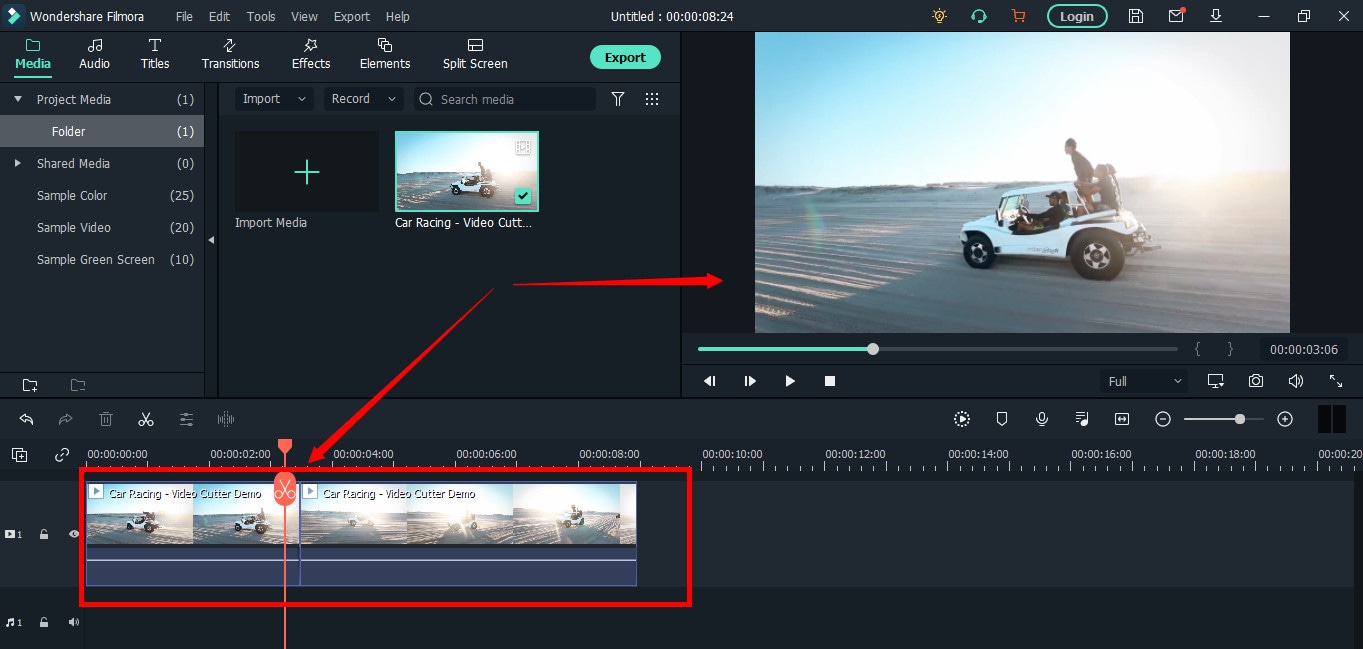
So, move the playhead to your desired frame and click on the “scissor” icon to make the “starting” cut.
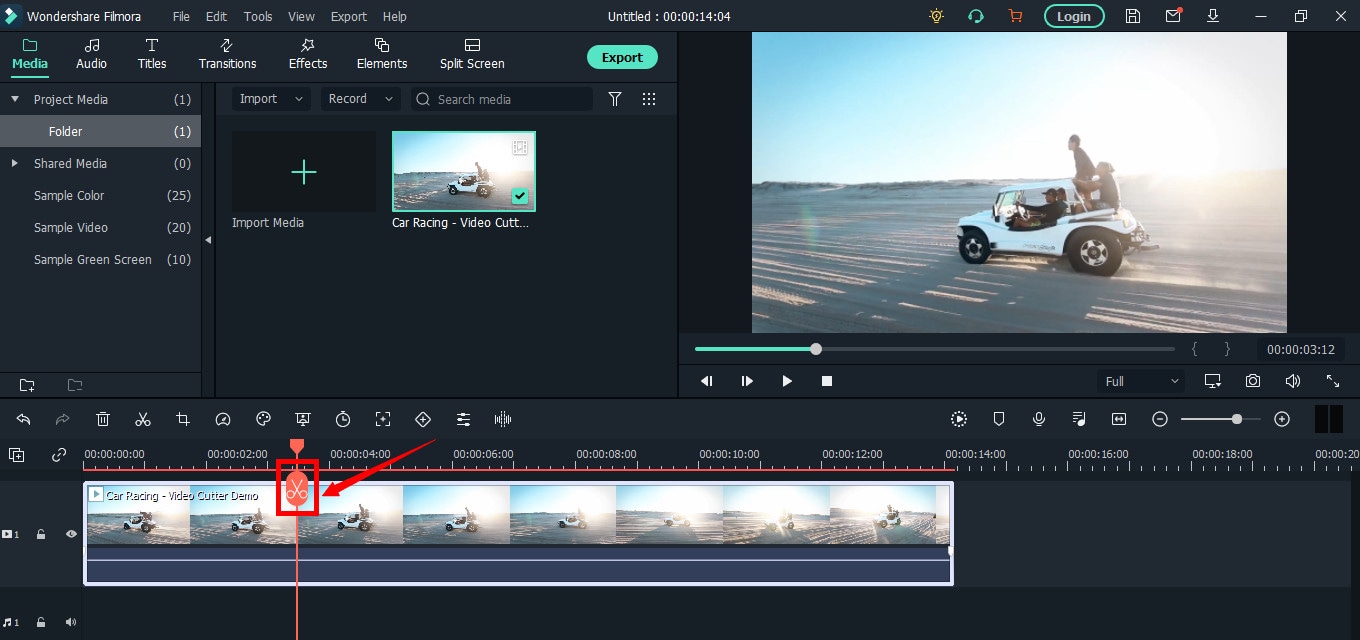
As soon as you do it, you will see that the single clip is now divided into two parts similar to this image.
The “Red” marked area in the above screenshot ensures a gap between the clips on the timeline. The “Yellow” arrows confirm two separate clips of the same video.
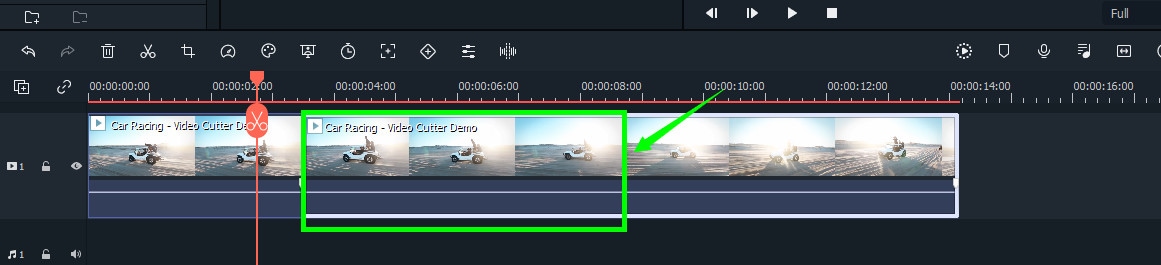
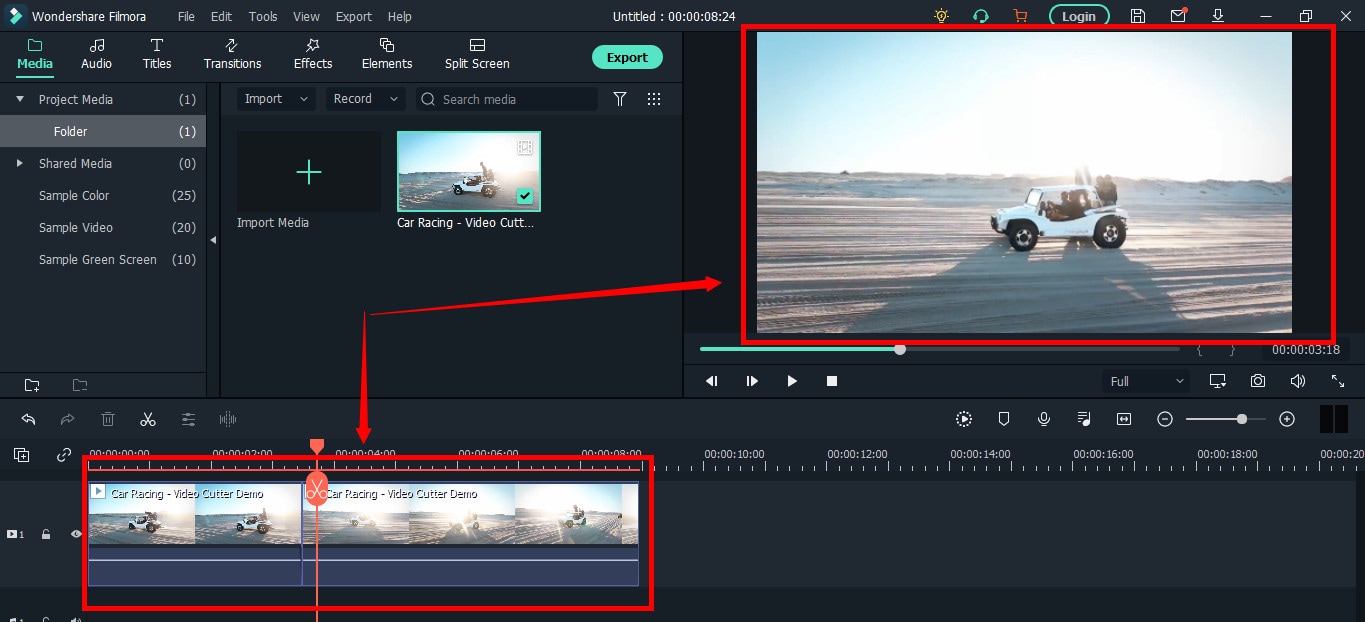
Place the two clips together as seen in this “Green” area.
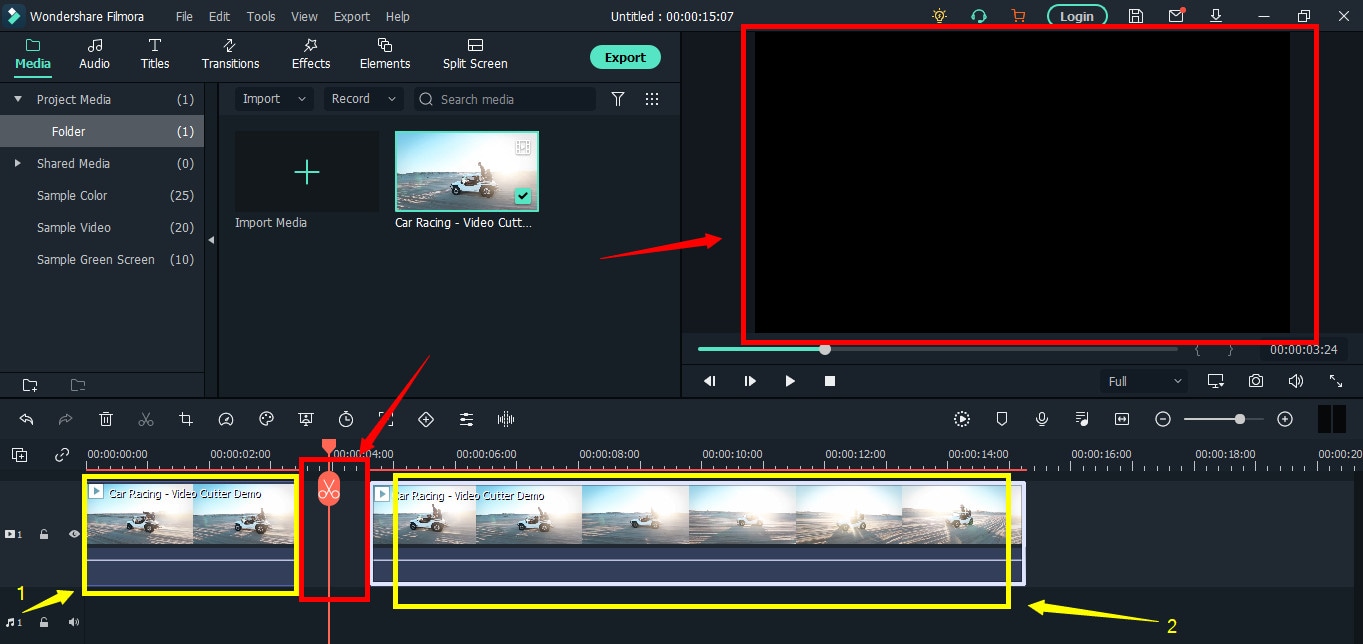
And place the playhead anywhere on the clip. And click on the “scissor” icon once again to make the “ending” cut (second cut).
If done correctly, there should be three clips now of the same video, as you can observe in this screenshot.
Again, the “Red” area in the above photo indicates the gap, and the “Yellow” area ensures a third segment of the video.
Note: The gaps you can see in the divided clips are made intentionally for understanding. Practically, Filmora doesn’t move the clip or make gaps in between after you have made the cuts.
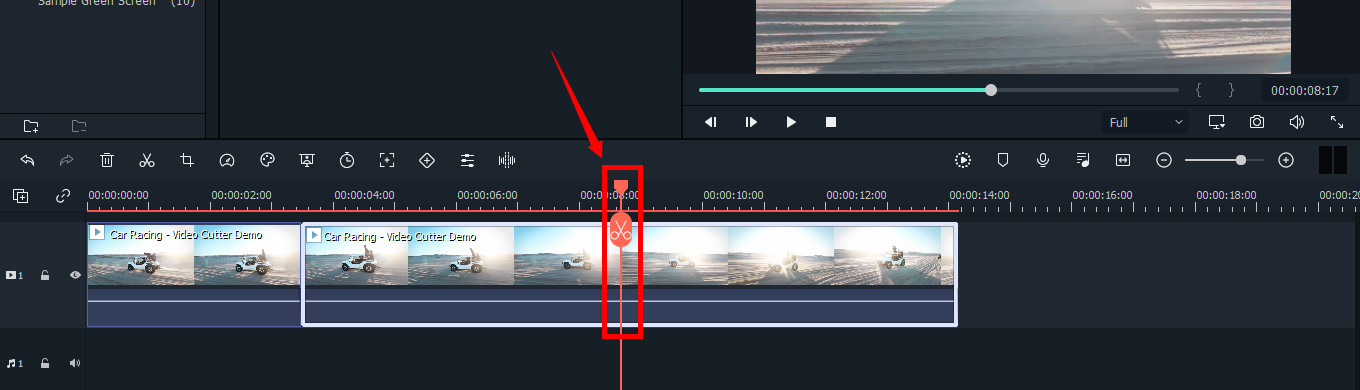
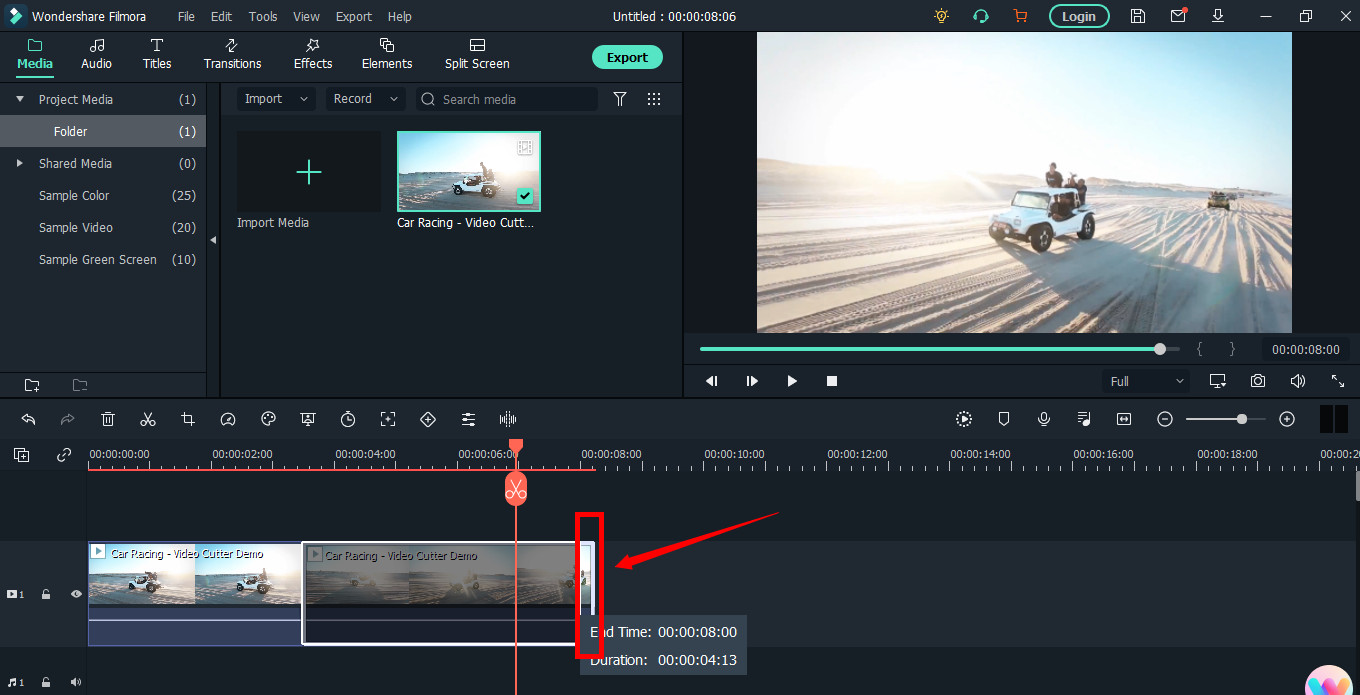
Keep in mind that there are three clips on the timeline. Now, if you want to remove the second clip from the video, you need to select that portion first by clicking on it.
Then, right-click on the mouse and choose “Cut” from the menu.
Within a semi-second, the selected portion will be removed from the timeline. And you will be able to see the remaining parts of the video. Now, pull the second clip using your mouse and place it at the end of the first clip without leaving a gap in between.
Then, click the “Play” button under the preview screen to see the results.
You can see in the above two screenshots that there’s a jump between the scenes due to cuts, confirming that video has been cut significantly.
Step 5: Trimming Your Video in Filmora
Remember that cutting and trimming in Filmora are two different things. Trimming allows you to remove a particular video part from visibility without deleting the portion.
So feel free to skip this step if you’re happy learning the cutting technique. But if you’re interested in trimming, here’s how you do it.
Take your mouse cursor at the beginning or end of the clip you want to trim. Keep holding the clip’s corner and slide the mouse back or front to trim the part
Note: Since the trim tool doesn’t delete the video, the final project based on trimming will be of a larger size. Therefore, it is advised to cut videos rather than trimming for fast rendering, better results, and small video size.
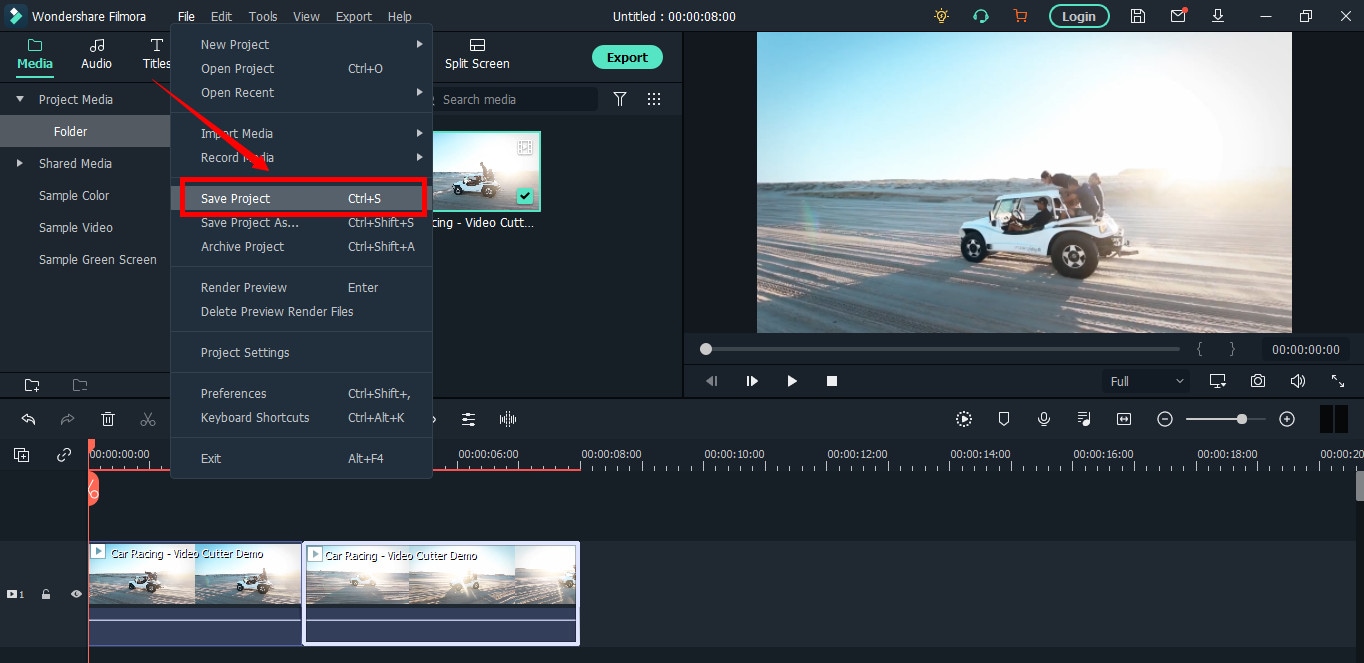
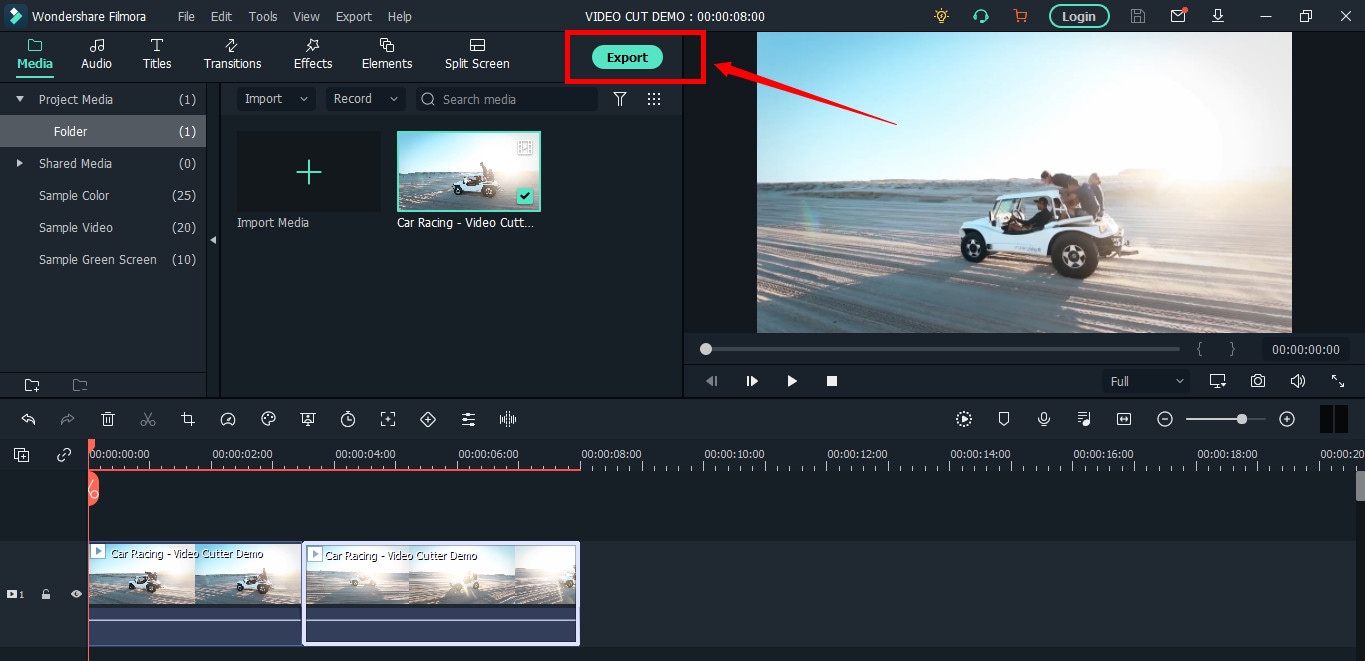
Step 6: Save Project and Export Your Cut/Trimmed AVI Video
Choose “Save Project” from the “File” menu.
Select the directory to save the project, rename the new video, and click the “Save” button.

Click on the “Export” button to save the video in AVI or any other video format of your choice on your computer.
Part 2: Top 3 Free AVI Video Cutter on Windows
As a Windows user, finding an excellent video cutter is relatively easy. However, not all software permits importing AVI videos. In the same way, some video trimmers come at a price. So if you really don’t want to pay and enjoy cutting your AVI files, try using these three video cutting tools.
Microsoft Photos (Windows 10)
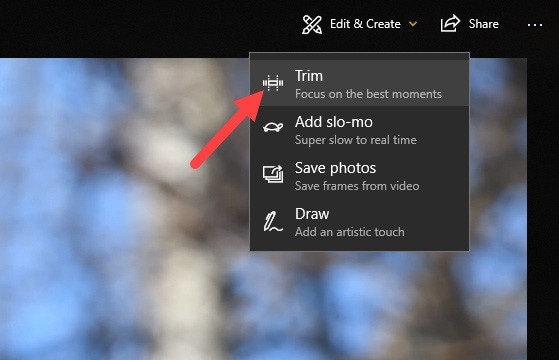
Microsoft Photos or Photo App is a free photo viewer and editor with your Windows 10. It offers incredible photo editing and enhancement along with different tools for organizing and editing videos in a very friendly way. Likewise, you can create drawings over the videos and add 3D effects and background music to your clips.
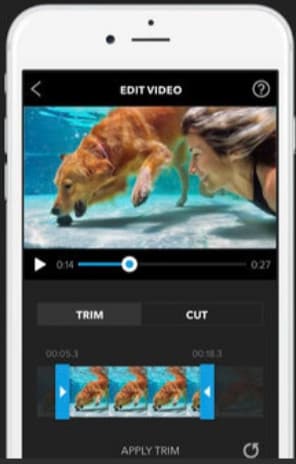
You can also trim AVI videos with Microsoft Photos quickly. All you need to do is open your clip with the Photo App, choose the “Trim” option, select a portion of the video you want to trim, and go ahead.
That’s it!
Features
- Quick video trimming
- Cool text effects
- 3D library and effects
- It has a clear interface
- You can find and tag people’s faces
- The program has 15+ filters for editing
- Motion tracking option for drawing on videos
- Allows you to view and organize your files easily
Pros
- Microsoft Photos is free for Windows users
- It automatically creates albums
- The program has a touch-friendly interface
- You can integrate your OneDrive with the software
Cons
- Lacks before and after view
- Not included in older Windows versions
- It doesn’t support selective focus or panorama stitching
Handbrake
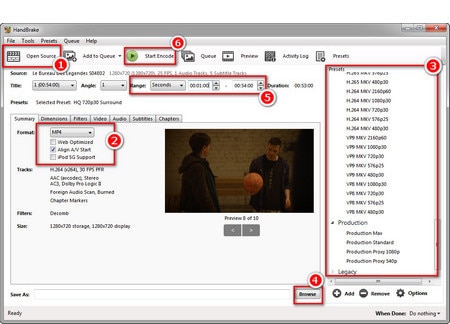
Handbrake is best-known for its video transcoding traits. Unlike typical video editors, this open-source tool includes limited options to rip Blu-rays and DVDs. Moreover, you can mix the 5.1 soundtracks and convert them to stereo to make the audio compatible with your TV speakers.
But the exciting thing about Handbrake is that you can use this software on your macOS 10.13 or later versions to cut AVI videos for free. However, it’s a bit technical process, as there’s no timeline to help you trim or make cuts on the clips directly with the help of your mouse.
You are required to mention a time range (seconds, minutes, or hours) to keep a specific part of the video while the software removes the non-ranged parts of the clip. For instance, you have a video of 10 seconds. You start the range from 5 seconds and end it at 10 seconds. So, the first four seconds of the video will be cut from the entire clip.
Features
- Video cutting, cropping, and resizing
- Low-quality and old video restoration
- Video conversion from any format to MKV or MP4
Pros
- Handbrake is free
- You can convert batch videos with ease
- It supports MAC, Windows, and Linux OS
- Allows you to import video files in all major formats
- The software comes with various video conversion presets
Cons
- Handbrake is not a user-friendly tool
- The video file output is limited to two formats (MKV and MP4) only
Gihosoft Video Cutter
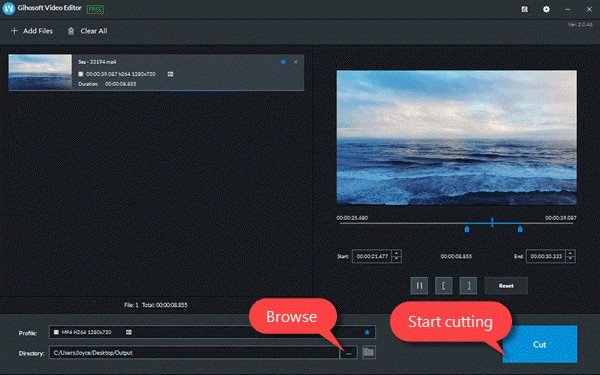
Gihosoft is a clean, free, lossless video cutter on your Windows PC. It’s a simple tool that helps you cut video files into various output formats. So be it AVI, MPEG, or any other file, with Gihosoft, everything becomes handy.
Another fascinating fact about this software is that it allows you to cut videos in three simple steps without losing the quality. So right after installing the program, you simply need to import your file, choose the start and end time, and click the “Cut” button to remove the part of the video.
Features
- Fast video and audio cutting
- Easy drag and drop audio/video files
- It supports most audio and video formats
Pros
- Free for both Windows and MAC operating systems
- The cutter saves video in original quality
Cons
- It does not include basic video editing features
Part 3: Top 3 Free AVI Video Cutter on MAC
Are you looking for a great AVI video cutter for your MAC? Sadly, you have limited product choices as compared to Windows users. But to ensure you don’t waste time looking for a suitable tool, here’s a list of three AVI video cutting programs you can use on your Macintosh.
iMovie
The first and foremost recommended software for free video cutting on MAC is Apple’s own tool, iMovie . It is a built-in program that comes with your system, so there is no need to spend extra on a video editor. iMovie allows you to browse and import most video files, including AVI, right from your computer. Also, this tool is equipped with multiple functions, such as audio editing, video quality enhancement, and much more.
This MAC’s video editor is ideal for beginners. Many home users and small business owners find this tool extremely simple, as they don’t like to be confused with complex features. So, if you want to make cuts to your video clips, start working on iMovie. And within a few clicks, you can trim or cut your videos for free.
Features
- Video cutting and trimming
- Cropping and rotation
- Effects and transitions
- Built-in themes
- HD and 4K video support
- Movie sharing
- Audio adjustments
- Chroma screen controls
- Character tracking
Pros
- Free to use for MAC users
- Clean timeline
- One-click video cutting and trimming
- Easy-to-remember keyboard shortcuts
- Direct share projects to your social media, like YouTube
Cons
- It takes a lot of time to export videos
- iMovie needs high HDD storage space
VideoPad by NCH

VideoPad by NCH is a beginner-level video editor with all the basic features. The software is specifically designed for home movie makers. That is why VideoPad is easy to understand and use.
VideoPad is entirely free of cost for non-commercial purposes, but it has limited features. On the other hand, if you want to enjoy full traits, you can purchase the tool.
VideoPad supports video files, including AVI, WMV, MPEG, MOV, MP4, ASF, and XviD. Likewise, you can also burn movies to Blu-ray, DVD, HD-DVD, or CD. And most importantly, you can easily cut or trim AVI videos on your MAC, as the software is available on both MAC and Windows systems.
Features
- Audio tools
- Video rotation
- Video sharing
- Visual effects
- Video transitions
- 3D Video editing
- Color correction
- Overlays and texts
- Video optimization
- Great plugin support
- Direct video uploading
- Multiple video resolutions
- Video cutting and trimming
- Files exportation to various devices
- Stereoscopic conversion from 2D to 3D
Pros
- You can use the basic tools for free
- Allows 360-degree video production
- It supports a wide range of video formats
- Compatible with MAC and Windows computers
Cons
- The auto speech feature performs poorly
- The free version has annoying notifications
Xilisoft Video Cutter
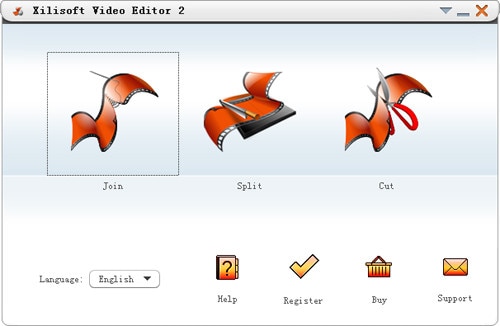
Xilisoft Video Cutter is the simplest tool to cut videos on MAC. This software has a straightforward option to cut the clip after importing it to the timeline. The program is fast and has a user-friendly interface.
Moreover, you can polish your videos by merging multiple clips or increasing the video quality once you’re done with the cutting process. At the same time, this video cutter allows you to import all video formats, including XviD, DivX, MOV, FLV, MP4, MPEG-4/, MKV, MPEG, WMV, and AVI.
Features
- Video joining
- Support multiple output video formats, including HD
Pros
- Easy video cutting and merging
- It doesn’t require a large storage space
- Extremely uncomplicated interface
- Real-time preview to make better cuts
- Available on both MAC and Windows systems
Cons
- The trial version is free to use but limits you from enjoying extra features
Part 4: Top 3 Free AVI Video Cutter on Android
After capturing nice videos with your Android mobile phone, you may need to cut unnecessary scenes to make your clips look professional. While there are numerous Android cutters, not all support the AVI format. So below, you will find the 3 best AVI video cutters for Android, which are free to use.
Quick – Video Editor & Maker
Quick – Video Editor & Maker is a free video editor with PRO results. Many photographers and vloggers love using this app to cut clips immediately. Furthermore, the application offers a wide range of options to assure you don’t have to look to any other tool to rotate or compress video. Quick – Video Editor & Maker lets you import videos in all major formats, including AVI, MPEG, WMA, and more.
Features
- Video cutting, fading, and rotation
- Speed control tools
- Conversion from video to GIF
Pros
- Free app
- Simple interface
Cons
- Lack of updates
- Some users complain about app crash
Funimate Video Editor & Maker
If you want to make some professional-grade video edits quickly, you are welcome to download and use Funimate Video Editor & Maker on your Android device. It’s a free tool to cut videos. It has an easy procedure, and you can cut AVI videos in a few seconds.
Plus, you can use the app to add custom animations, effects, and many other exciting elements. You can share your makes on social media like TikTok, Instagram, and other platforms. Contrarily, the app itself is a community with millions of Funimate-users who share their creations daily. You can also join or watch videos from other creators to learn more about new techniques and trends in video editing.
Features
- Video trimming and splitting
- Animation and cropping
- Filters and AI effects
- Speed adjustment
- Keyframing and video merging
Pros
- Free Android application with several editing tools
- Easy trimming, splitting, and cropping
- Aspect ratio, border, and color customization
- Direct social media sharing
Cons
- Free users cannot use templates
- The free version stamps watermarks on each project
Part 5: Top 3 Free AVI Video Cutter on iPhone
No wonder iPhone’s camera captures high-quality videos. But the problem begins when there’s no free app to cut AVI videos. So if you’re recording great spots, but deep inside, you really want to remove some parts, then these 3 free AVI video cutters will work smoothly on your iPhone.
Cut, Trim, Split Video Editor
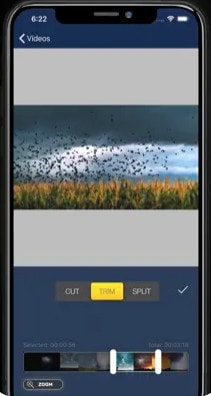
Download Cut, Trim, Split Video Editor on your iPhone to delete/cut unwanted portions of your video clips. The tool is also best for trimming iPhone-recorded clips without messing with the frames. Or, if you just want to split the video into multiple parts for your next WhatsApp status, this iPhone app can do that job for you.
The app supports multiple video file types, including MOV, MP4, AVI, MPEG, MPEG-2, and 3GPP
Features
- Easy trimming and cutting video clips
- Splitting big-sized videos into two smaller clips
- Import video from file-sharing platforms, like iCloud, using Wi-Fi
Pros
- Free app for fast video cutting and sharing
- Simple UI interface
Cons
- The free version shows advertisements
Splice - Video Editor & Maker
Splice is an extraordinary video editor that makes it easy to make fully customized and professional videos from your iPhone. The app is also best for video cutting. Besides, it has many interesting features, which you can use from your device.
Features
- Cutting, trimming, and cropping your videos
- Exposure, saturation, and exposure adjustment
- Slow and fast motion with speed ramping option
- Video masking and overlay
- Color correction and text overlays
Pros
- Free basic features, such as video cutting
- iTunes integration
- Supports AVI video input
- User-friendly application
- Access to the music library
- Quick and simple social sharing
Cons
- Output videos require high mobile storage space
Part 6: Top 3 Free AVI Video Cutter Online
Don’t want to install video cutters on your MAC, Windows, smartphone, or any other device? No problem! You can use online video cutters and trimmers to split, cut, or trim your clips for free.
However, the problem still exists in online tools, as not all web-based editors allow importing AVI files. So to save your time and energy, you can directly go to the following online AVI cutters to complete your tasks.
Kapwing
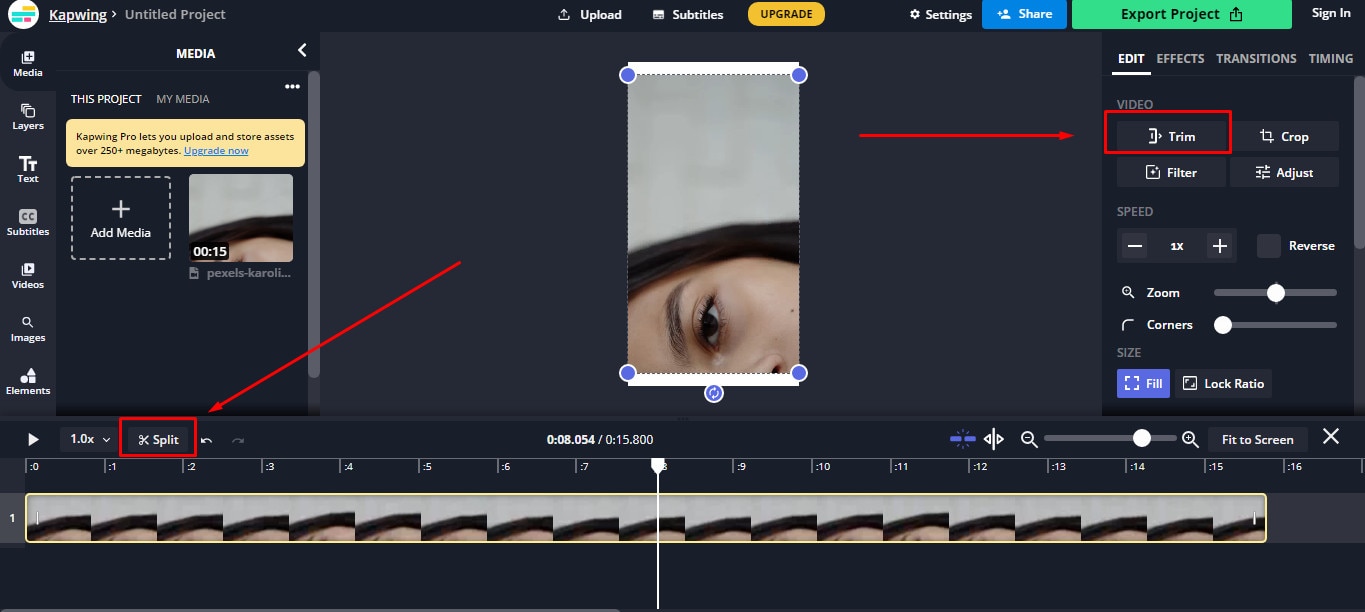
Kapwing is an online video editor best for casual creatives, such as Vloggers and YouTubers. You can use this web-based platform to cut your videos. Gladly, Kapwing supports all AVI incomings. You can upload your AVI video files to this platform and use its trim or split feature. To do that, you need to upload your AVI video and choose the “Trim” or “Split” tool to see the magic. Once done with the trimming process, you can explore Kapwing’s other incredible traits and apply them to your project.
Features
- Video splitting, trimming, and merging
- Audio capturing
- Speed adjustment
- Image and video library
- Text editing and overlay
- Auto-generated subtitles
- Several collaboration tools
- Video creation from scratch
- Templates, shapes, and emojis
- Simple drag-and-drop interface
- Video transitions, plugins, and elements
Pros
- Free online video trimmer
- User-friendly interface
- You can export 30-minutes long projects
- Allows you to export unlimited videos with a watermark
- One watermark-free video export is available each month
Cons
- Cannot export long videos with a free account
- Only 10 minutes transcription limit is available for free users
- You need to purchase a monthly or annual subscription to remove the watermark from multiple videos
Clideo
Clideo is not just a video cutter but an online solution to all your video editing problems. The tool is super popular, with 4 million+ users a month. And why not? This is one of those web-based platforms that allow AVI video files to be imported and exported without converting them into any other formats.
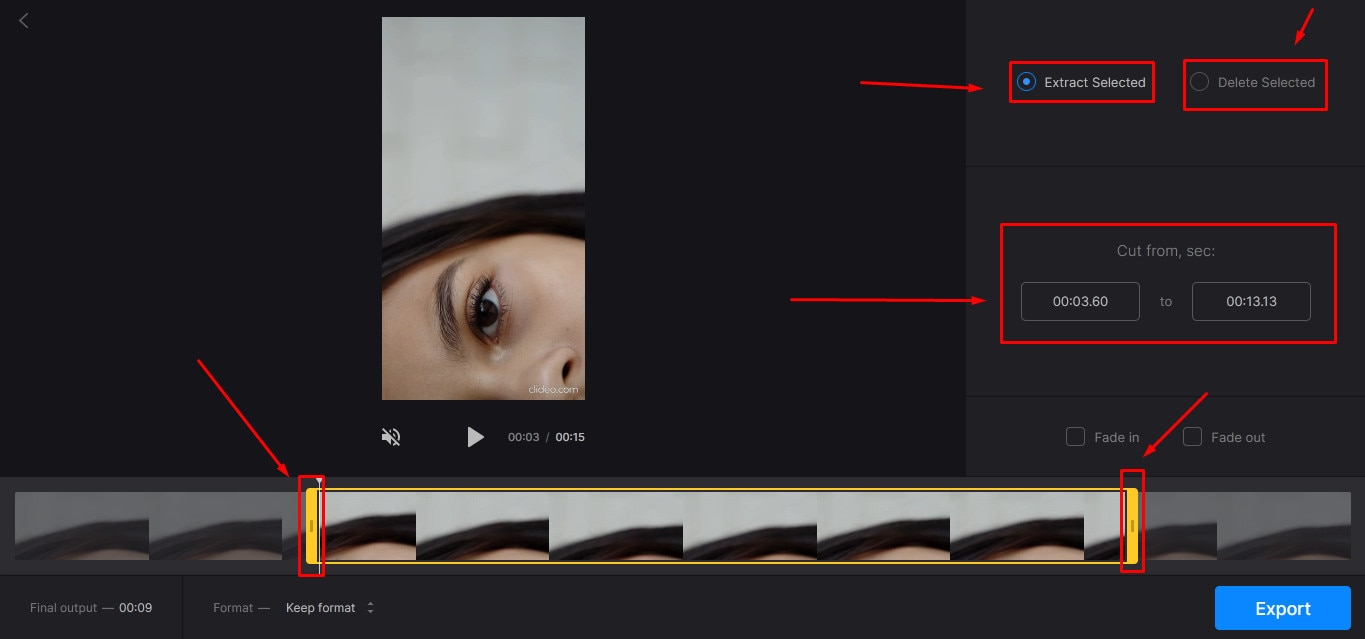
Nevertheless, if you’re only looking for video cutting options, this tool makes your life easy. Simply upload your video, and select the portion of it by setting start and end times. Choose whether you want to delete or extract the selected part from the clip, and hit the “Export” button.
And within a few moments, you can enjoy a trimmed video clip. And if you plan to be more creative, you can look for other Clideo features to make videos more fascinating.
Features
- Video combining and cutting
- Resize and crop clips
- Compress your videos
- Add text and subtitles
- Add music to your video files
- Filters and color correction tools
- Audio mute, cutting, and muting
- Video rotation, flipping, and speed adjustment
Pros
- Basic tools can be used for free
- Best for beginners and intermediate users
- Ideal for AVI videos and also supports other video formats
Cons
- You cannot use the free version regularly
Aspose
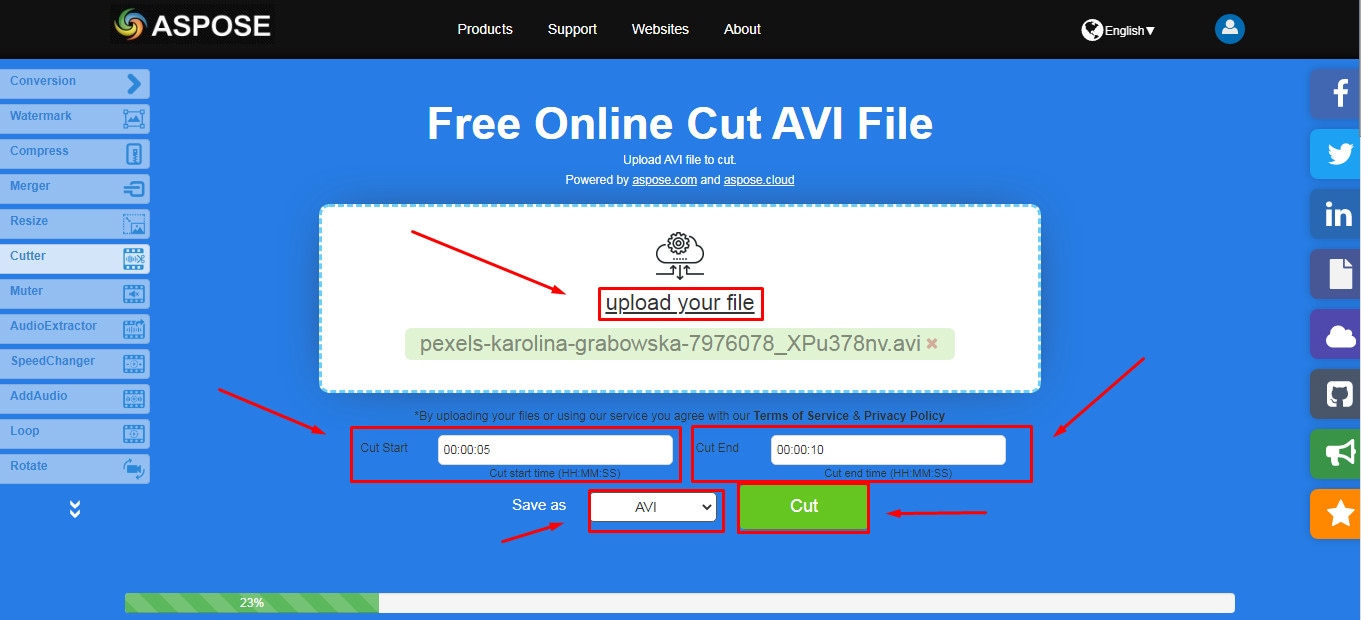
Aspose is a free web-based application to cut clips. You can use this tool on any operating system. It supports all major video file formats, including AVI, MKV, MOV, MP4, FLV, WMV, WEBM, and GIF. Additionally, you can use Aspose for various other reasons, such as audio extraction, video resizing, and more.
Features
- Video cutting and compressing
- Looping, rotation, and video merging
- Adding watermarks on videos
- Sound muting
- Speed change and audio addition
Pros
- Aspose is a free online tool
- It offers straightforward options to cut and edit videos
Cons
- No color correction option
- Slow video cutting process
- Lacks timeline and other valuable features
Part 7: Bottom Line
Tired of finding AVI cutters? Relax and try these top 16 AVI video cutters for Windows, MAC, iPhone, Android, and online. Almost all these tools are free to use and are extremely handy. On the other hand, if you want to cut and trim videos professionally, download Filmora and follow the step-by-step guide in this article for making clean cuts.
Part 8: FAQs
Q1. How do I trim an AVI video?
To trim an AVI video file, ensure that the software or tool you use supports AVI input. Generally, you need to upload or import a clip on the program, select the portion of the video, and apply the cut/trim feature to make it happen.
Q2. Which is the best online video cutter?
Kapwing and Clideo are the two best online video cutters you can use for free. Both web-based tools also allow you to cut your AVI videos.
Q3. Which is the best video cutter and joiner software?
Filmora, iMovie, and Kapwing are some of the best video cutters and joiner tools. These video editors are also free to use and come with different features.
Q4. How do I trim an AVI file in Windows 10?
Trimming an AVI video file in Windows 10 is very simple. Launch the Microsoft Photos (Photo App) application on your computer, add clip, and select the “Trim” tool to trim a specific video part.
Q5. How can I cut a video on my computer for free?
MAC and Windows users can download Filmora to cut videos for free. Filmora also offers a wide range of other features to make your clips exciting. Contrarily, Windows users can use the built-in Photo App in Windows 10 or download Gihosoft or Handbrake software to cut clips. Likewise, MAC users can download VideoPad, Xilisoft Video Cutter, or iMovie for free.
With the growing fame of video-sharing and social media applications like Twitter, Instagram, and TikTok, the demand for simple and fast video cutting and trimming tools has dramatically increased. Nowadays, you don’t have to play with complex video editing tools to produce high-quality videos.
Thanks to several user-friendly editing software to make things easy for everybody. However, finding the right programs to trim/cut videos is still challenging, especially in AVI format.
But, guess what? These top 16 AVI video cutters for Windows, MAC, Android, iPhone, and online will make video cutting and trimming fun, especially when you learn to do it using Filmora.
In this Article
Part 1: Best AVI Video Cutter to Trim/Cut AVI Video on Windows and MAC – Filmora Video Cutter [with steps}
Part 2: Top 3 Free AVI Video Cutter on Windows
Part 3: Top 3 Free AVI Video Cutter on MAC
Part 4: Top 3 Free AVI Video Cutter on Android
Part 5: Top 3 Free AVI Video Cutter on iPhone
Part 6: Top 3 Free AVI Video Cutter Online
Part 7: Bottom Line
Part 8: FAQs
Part 1: Best AVI Video Cutter to Trim/Cut AVI Video on Windows and MAC – Filmora Video Cutter [with steps]
Filmora by Wondershare is a star video editor with outstanding outcomes. Whether you have a MAC or Windows PC, you can download Filmora regardless of your operating system. The program best serves those who intend to make high-quality videos. The software provides editing support for all video formats, including AVI.
Although Filmora is an affordable editor with tons of audio and video editing options, you can still download the software for free and create projects if watermarks don’t bother you. Moreover, you can count this tool’s capabilities in cropping, resizing, and Chroma screen support. But that’s not the only sweet fruit.
In fact, Filmora is equipped with many jaw-dropping features, including preset templates, auto beat sync, split-screen, speed ramping, motion tracking, keyframing, creative transitions, titles, filters, and much more. And the best part is, you can learn and understand Filmora in no time. That’s why the program is loved and supported by all types of users.
So does Filmora helps cut and trim AVI videos? Yes! It does if you follow these steps correctly.
Step 1: Download Filmora Video Editor
First, download Filmora Video Editor by choosing your operating system, as seen in the screenshot below.
Run the setup and let it finish without any pause or break.
Step 2: Import Your Video to Filmora Video Editor
Importing your AVI video is a very simple process. Just click on the “Film Clip” icon.
It will open a new window screen on your computer to select the video from the directory. Find the clip you want to import and cut. Use your mouse to select it and click the “Open” button.
The video will be loaded in the “Media” folder of Filmora. The clip’s thumbnail should be visible to assure you have done everything correctly.
If you can see that, let’s go to the next step.
Step 3: Drag and Drop Video to Filmora’s Timeline
Select the video in the media folder by clicking over it once. Now, without leaving the hold of the left button of your mouse, slide the video down to the track in the timeline.
After that, a message will pop up, asking about your preference for the project settings. It is recommended to choose the “Match to Media” option unless you’re an experienced video editor who knows how to play with the resolution and frame rates.
You will see the video on the timeline with its preview on the “Preview Screen” on the right side of the interface.
Step 4: Cutting Your Video in Filmora
Here comes the core step you have been waiting for. But before you go any further, you need to know about the “Playhead.”
Playhead is an orange-reddish marker you can find on the timeline.
It has an important role in cutting your videos.
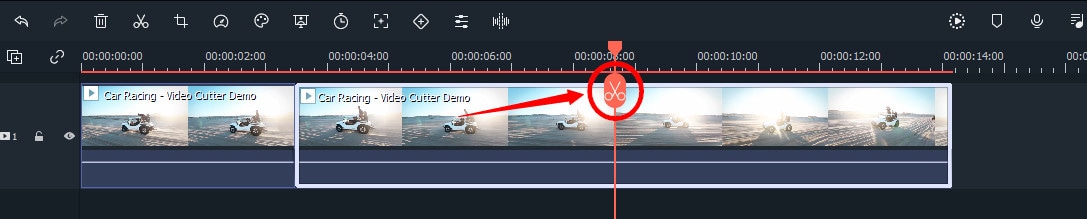
So, move the playhead to your desired frame and click on the “scissor” icon to make the “starting” cut.
As soon as you do it, you will see that the single clip is now divided into two parts similar to this image.
The “Red” marked area in the above screenshot ensures a gap between the clips on the timeline. The “Yellow” arrows confirm two separate clips of the same video.
Place the two clips together as seen in this “Green” area.
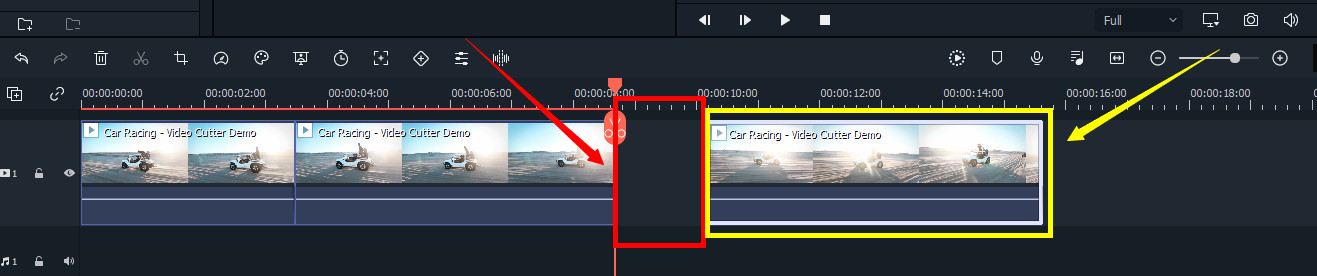
And place the playhead anywhere on the clip. And click on the “scissor” icon once again to make the “ending” cut (second cut).
If done correctly, there should be three clips now of the same video, as you can observe in this screenshot.
Again, the “Red” area in the above photo indicates the gap, and the “Yellow” area ensures a third segment of the video.
Note: The gaps you can see in the divided clips are made intentionally for understanding. Practically, Filmora doesn’t move the clip or make gaps in between after you have made the cuts.
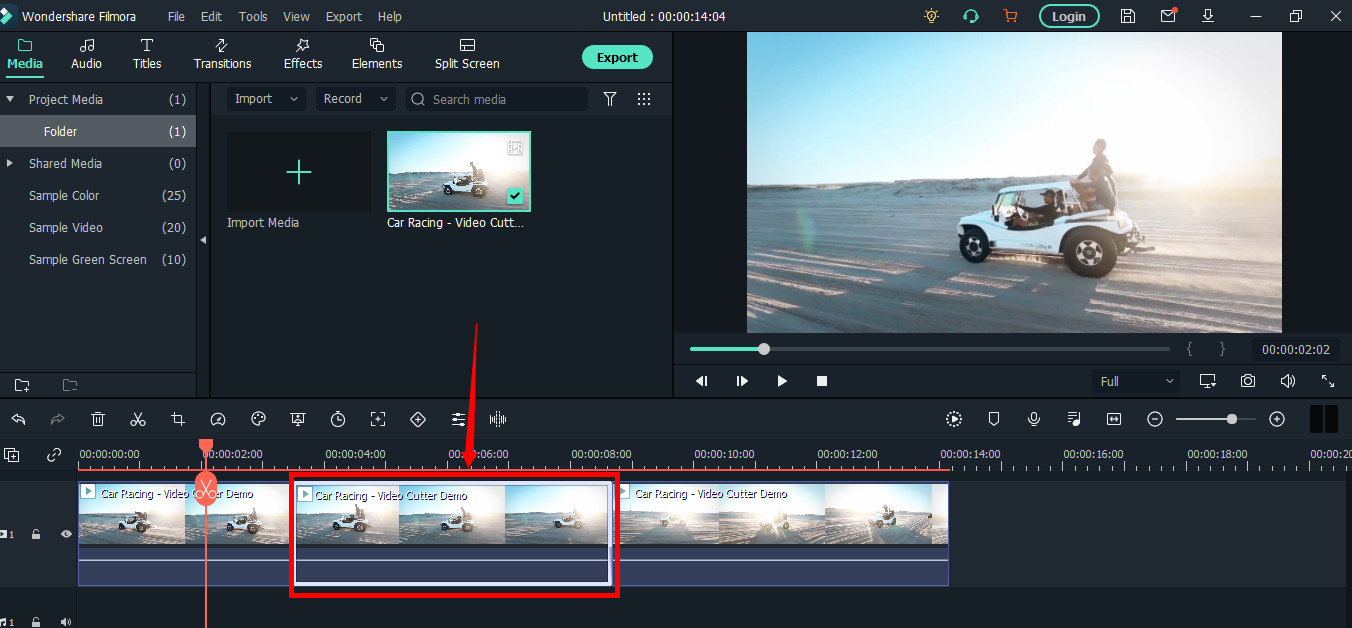
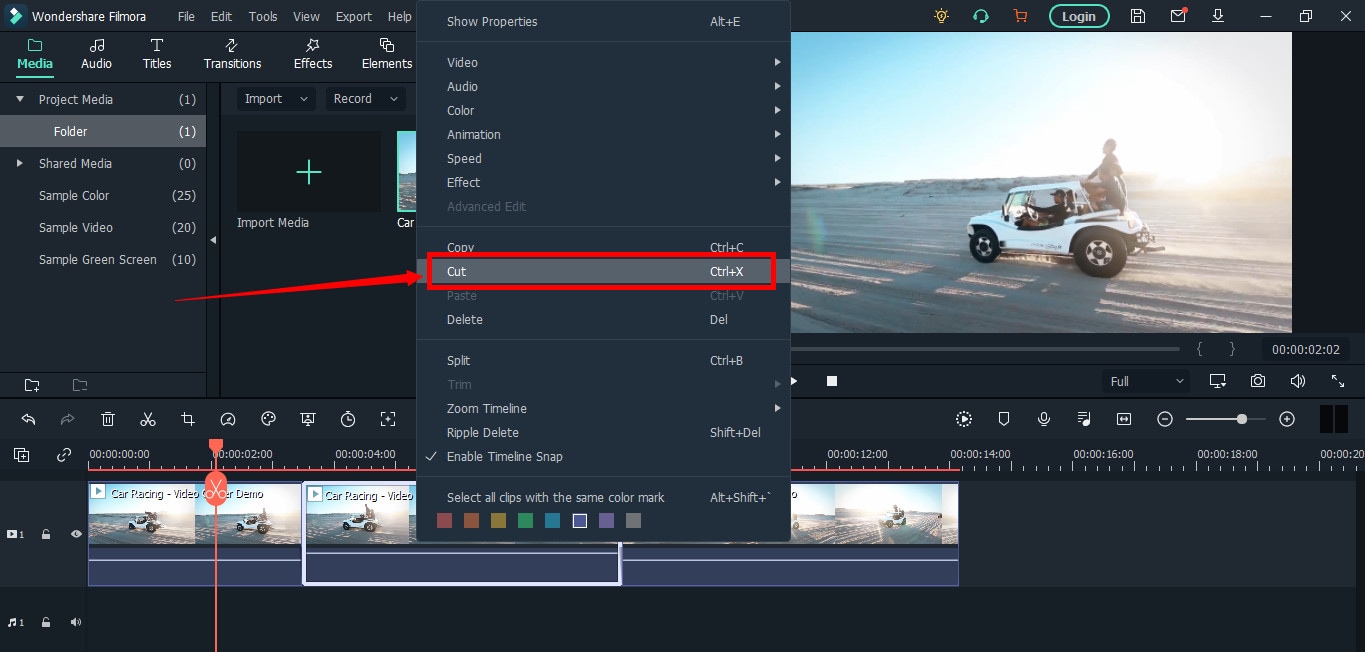
Keep in mind that there are three clips on the timeline. Now, if you want to remove the second clip from the video, you need to select that portion first by clicking on it.
Then, right-click on the mouse and choose “Cut” from the menu.
Within a semi-second, the selected portion will be removed from the timeline. And you will be able to see the remaining parts of the video. Now, pull the second clip using your mouse and place it at the end of the first clip without leaving a gap in between.
Then, click the “Play” button under the preview screen to see the results.
You can see in the above two screenshots that there’s a jump between the scenes due to cuts, confirming that video has been cut significantly.
Step 5: Trimming Your Video in Filmora
Remember that cutting and trimming in Filmora are two different things. Trimming allows you to remove a particular video part from visibility without deleting the portion.
So feel free to skip this step if you’re happy learning the cutting technique. But if you’re interested in trimming, here’s how you do it.
Take your mouse cursor at the beginning or end of the clip you want to trim. Keep holding the clip’s corner and slide the mouse back or front to trim the part
Note: Since the trim tool doesn’t delete the video, the final project based on trimming will be of a larger size. Therefore, it is advised to cut videos rather than trimming for fast rendering, better results, and small video size.
Step 6: Save Project and Export Your Cut/Trimmed AVI Video
Choose “Save Project” from the “File” menu.
Select the directory to save the project, rename the new video, and click the “Save” button.
Click on the “Export” button to save the video in AVI or any other video format of your choice on your computer.
Part 2: Top 3 Free AVI Video Cutter on Windows
As a Windows user, finding an excellent video cutter is relatively easy. However, not all software permits importing AVI videos. In the same way, some video trimmers come at a price. So if you really don’t want to pay and enjoy cutting your AVI files, try using these three video cutting tools.
Microsoft Photos (Windows 10)
Microsoft Photos or Photo App is a free photo viewer and editor with your Windows 10. It offers incredible photo editing and enhancement along with different tools for organizing and editing videos in a very friendly way. Likewise, you can create drawings over the videos and add 3D effects and background music to your clips.
You can also trim AVI videos with Microsoft Photos quickly. All you need to do is open your clip with the Photo App, choose the “Trim” option, select a portion of the video you want to trim, and go ahead.
That’s it!
Features
- Quick video trimming
- Cool text effects
- 3D library and effects
- It has a clear interface
- You can find and tag people’s faces
- The program has 15+ filters for editing
- Motion tracking option for drawing on videos
- Allows you to view and organize your files easily
Pros
- Microsoft Photos is free for Windows users
- It automatically creates albums
- The program has a touch-friendly interface
- You can integrate your OneDrive with the software
Cons
- Lacks before and after view
- Not included in older Windows versions
- It doesn’t support selective focus or panorama stitching
Handbrake
Handbrake is best-known for its video transcoding traits. Unlike typical video editors, this open-source tool includes limited options to rip Blu-rays and DVDs. Moreover, you can mix the 5.1 soundtracks and convert them to stereo to make the audio compatible with your TV speakers.
But the exciting thing about Handbrake is that you can use this software on your macOS 10.13 or later versions to cut AVI videos for free. However, it’s a bit technical process, as there’s no timeline to help you trim or make cuts on the clips directly with the help of your mouse.
You are required to mention a time range (seconds, minutes, or hours) to keep a specific part of the video while the software removes the non-ranged parts of the clip. For instance, you have a video of 10 seconds. You start the range from 5 seconds and end it at 10 seconds. So, the first four seconds of the video will be cut from the entire clip.
Features
- Video cutting, cropping, and resizing
- Low-quality and old video restoration
- Video conversion from any format to MKV or MP4
Pros
- Handbrake is free
- You can convert batch videos with ease
- It supports MAC, Windows, and Linux OS
- Allows you to import video files in all major formats
- The software comes with various video conversion presets
Cons
- Handbrake is not a user-friendly tool
- The video file output is limited to two formats (MKV and MP4) only
Gihosoft Video Cutter
Gihosoft is a clean, free, lossless video cutter on your Windows PC. It’s a simple tool that helps you cut video files into various output formats. So be it AVI, MPEG, or any other file, with Gihosoft, everything becomes handy.
Another fascinating fact about this software is that it allows you to cut videos in three simple steps without losing the quality. So right after installing the program, you simply need to import your file, choose the start and end time, and click the “Cut” button to remove the part of the video.
Features
- Fast video and audio cutting
- Easy drag and drop audio/video files
- It supports most audio and video formats
Pros
- Free for both Windows and MAC operating systems
- The cutter saves video in original quality
Cons
- It does not include basic video editing features
Part 3: Top 3 Free AVI Video Cutter on MAC
Are you looking for a great AVI video cutter for your MAC? Sadly, you have limited product choices as compared to Windows users. But to ensure you don’t waste time looking for a suitable tool, here’s a list of three AVI video cutting programs you can use on your Macintosh.
iMovie
The first and foremost recommended software for free video cutting on MAC is Apple’s own tool, iMovie . It is a built-in program that comes with your system, so there is no need to spend extra on a video editor. iMovie allows you to browse and import most video files, including AVI, right from your computer. Also, this tool is equipped with multiple functions, such as audio editing, video quality enhancement, and much more.
This MAC’s video editor is ideal for beginners. Many home users and small business owners find this tool extremely simple, as they don’t like to be confused with complex features. So, if you want to make cuts to your video clips, start working on iMovie. And within a few clicks, you can trim or cut your videos for free.
Features
- Video cutting and trimming
- Cropping and rotation
- Effects and transitions
- Built-in themes
- HD and 4K video support
- Movie sharing
- Audio adjustments
- Chroma screen controls
- Character tracking
Pros
- Free to use for MAC users
- Clean timeline
- One-click video cutting and trimming
- Easy-to-remember keyboard shortcuts
- Direct share projects to your social media, like YouTube
Cons
- It takes a lot of time to export videos
- iMovie needs high HDD storage space
VideoPad by NCH
VideoPad by NCH is a beginner-level video editor with all the basic features. The software is specifically designed for home movie makers. That is why VideoPad is easy to understand and use.
VideoPad is entirely free of cost for non-commercial purposes, but it has limited features. On the other hand, if you want to enjoy full traits, you can purchase the tool.
VideoPad supports video files, including AVI, WMV, MPEG, MOV, MP4, ASF, and XviD. Likewise, you can also burn movies to Blu-ray, DVD, HD-DVD, or CD. And most importantly, you can easily cut or trim AVI videos on your MAC, as the software is available on both MAC and Windows systems.
Features
- Audio tools
- Video rotation
- Video sharing
- Visual effects
- Video transitions
- 3D Video editing
- Color correction
- Overlays and texts
- Video optimization
- Great plugin support
- Direct video uploading
- Multiple video resolutions
- Video cutting and trimming
- Files exportation to various devices
- Stereoscopic conversion from 2D to 3D
Pros
- You can use the basic tools for free
- Allows 360-degree video production
- It supports a wide range of video formats
- Compatible with MAC and Windows computers
Cons
- The auto speech feature performs poorly
- The free version has annoying notifications
Xilisoft Video Cutter
Xilisoft Video Cutter is the simplest tool to cut videos on MAC. This software has a straightforward option to cut the clip after importing it to the timeline. The program is fast and has a user-friendly interface.
Moreover, you can polish your videos by merging multiple clips or increasing the video quality once you’re done with the cutting process. At the same time, this video cutter allows you to import all video formats, including XviD, DivX, MOV, FLV, MP4, MPEG-4/, MKV, MPEG, WMV, and AVI.
Features
- Video joining
- Support multiple output video formats, including HD
Pros
- Easy video cutting and merging
- It doesn’t require a large storage space
- Extremely uncomplicated interface
- Real-time preview to make better cuts
- Available on both MAC and Windows systems
Cons
- The trial version is free to use but limits you from enjoying extra features
Part 4: Top 3 Free AVI Video Cutter on Android
After capturing nice videos with your Android mobile phone, you may need to cut unnecessary scenes to make your clips look professional. While there are numerous Android cutters, not all support the AVI format. So below, you will find the 3 best AVI video cutters for Android, which are free to use.
Quick – Video Editor & Maker
Quick – Video Editor & Maker is a free video editor with PRO results. Many photographers and vloggers love using this app to cut clips immediately. Furthermore, the application offers a wide range of options to assure you don’t have to look to any other tool to rotate or compress video. Quick – Video Editor & Maker lets you import videos in all major formats, including AVI, MPEG, WMA, and more.
Features
- Video cutting, fading, and rotation
- Speed control tools
- Conversion from video to GIF
Pros
- Free app
- Simple interface
Cons
- Lack of updates
- Some users complain about app crash
Funimate Video Editor & Maker
If you want to make some professional-grade video edits quickly, you are welcome to download and use Funimate Video Editor & Maker on your Android device. It’s a free tool to cut videos. It has an easy procedure, and you can cut AVI videos in a few seconds.
Plus, you can use the app to add custom animations, effects, and many other exciting elements. You can share your makes on social media like TikTok, Instagram, and other platforms. Contrarily, the app itself is a community with millions of Funimate-users who share their creations daily. You can also join or watch videos from other creators to learn more about new techniques and trends in video editing.
Features
- Video trimming and splitting
- Animation and cropping
- Filters and AI effects
- Speed adjustment
- Keyframing and video merging
Pros
- Free Android application with several editing tools
- Easy trimming, splitting, and cropping
- Aspect ratio, border, and color customization
- Direct social media sharing
Cons
- Free users cannot use templates
- The free version stamps watermarks on each project
Part 5: Top 3 Free AVI Video Cutter on iPhone
No wonder iPhone’s camera captures high-quality videos. But the problem begins when there’s no free app to cut AVI videos. So if you’re recording great spots, but deep inside, you really want to remove some parts, then these 3 free AVI video cutters will work smoothly on your iPhone.
Cut, Trim, Split Video Editor
Download Cut, Trim, Split Video Editor on your iPhone to delete/cut unwanted portions of your video clips. The tool is also best for trimming iPhone-recorded clips without messing with the frames. Or, if you just want to split the video into multiple parts for your next WhatsApp status, this iPhone app can do that job for you.
The app supports multiple video file types, including MOV, MP4, AVI, MPEG, MPEG-2, and 3GPP
Features
- Easy trimming and cutting video clips
- Splitting big-sized videos into two smaller clips
- Import video from file-sharing platforms, like iCloud, using Wi-Fi
Pros
- Free app for fast video cutting and sharing
- Simple UI interface
Cons
- The free version shows advertisements
Splice - Video Editor & Maker
Splice is an extraordinary video editor that makes it easy to make fully customized and professional videos from your iPhone. The app is also best for video cutting. Besides, it has many interesting features, which you can use from your device.
Features
- Cutting, trimming, and cropping your videos
- Exposure, saturation, and exposure adjustment
- Slow and fast motion with speed ramping option
- Video masking and overlay
- Color correction and text overlays
Pros
- Free basic features, such as video cutting
- iTunes integration
- Supports AVI video input
- User-friendly application
- Access to the music library
- Quick and simple social sharing
Cons
- Output videos require high mobile storage space
Part 6: Top 3 Free AVI Video Cutter Online
Don’t want to install video cutters on your MAC, Windows, smartphone, or any other device? No problem! You can use online video cutters and trimmers to split, cut, or trim your clips for free.
However, the problem still exists in online tools, as not all web-based editors allow importing AVI files. So to save your time and energy, you can directly go to the following online AVI cutters to complete your tasks.
Kapwing
Kapwing is an online video editor best for casual creatives, such as Vloggers and YouTubers. You can use this web-based platform to cut your videos. Gladly, Kapwing supports all AVI incomings. You can upload your AVI video files to this platform and use its trim or split feature. To do that, you need to upload your AVI video and choose the “Trim” or “Split” tool to see the magic. Once done with the trimming process, you can explore Kapwing’s other incredible traits and apply them to your project.
Features
- Video splitting, trimming, and merging
- Audio capturing
- Speed adjustment
- Image and video library
- Text editing and overlay
- Auto-generated subtitles
- Several collaboration tools
- Video creation from scratch
- Templates, shapes, and emojis
- Simple drag-and-drop interface
- Video transitions, plugins, and elements
Pros
- Free online video trimmer
- User-friendly interface
- You can export 30-minutes long projects
- Allows you to export unlimited videos with a watermark
- One watermark-free video export is available each month
Cons
- Cannot export long videos with a free account
- Only 10 minutes transcription limit is available for free users
- You need to purchase a monthly or annual subscription to remove the watermark from multiple videos
Clideo
Clideo is not just a video cutter but an online solution to all your video editing problems. The tool is super popular, with 4 million+ users a month. And why not? This is one of those web-based platforms that allow AVI video files to be imported and exported without converting them into any other formats.
Nevertheless, if you’re only looking for video cutting options, this tool makes your life easy. Simply upload your video, and select the portion of it by setting start and end times. Choose whether you want to delete or extract the selected part from the clip, and hit the “Export” button.
And within a few moments, you can enjoy a trimmed video clip. And if you plan to be more creative, you can look for other Clideo features to make videos more fascinating.
Features
- Video combining and cutting
- Resize and crop clips
- Compress your videos
- Add text and subtitles
- Add music to your video files
- Filters and color correction tools
- Audio mute, cutting, and muting
- Video rotation, flipping, and speed adjustment
Pros
- Basic tools can be used for free
- Best for beginners and intermediate users
- Ideal for AVI videos and also supports other video formats
Cons
- You cannot use the free version regularly
Aspose
Aspose is a free web-based application to cut clips. You can use this tool on any operating system. It supports all major video file formats, including AVI, MKV, MOV, MP4, FLV, WMV, WEBM, and GIF. Additionally, you can use Aspose for various other reasons, such as audio extraction, video resizing, and more.
Features
- Video cutting and compressing
- Looping, rotation, and video merging
- Adding watermarks on videos
- Sound muting
- Speed change and audio addition
Pros
- Aspose is a free online tool
- It offers straightforward options to cut and edit videos
Cons
- No color correction option
- Slow video cutting process
- Lacks timeline and other valuable features
Part 7: Bottom Line
Tired of finding AVI cutters? Relax and try these top 16 AVI video cutters for Windows, MAC, iPhone, Android, and online. Almost all these tools are free to use and are extremely handy. On the other hand, if you want to cut and trim videos professionally, download Filmora and follow the step-by-step guide in this article for making clean cuts.
Part 8: FAQs
Q1. How do I trim an AVI video?
To trim an AVI video file, ensure that the software or tool you use supports AVI input. Generally, you need to upload or import a clip on the program, select the portion of the video, and apply the cut/trim feature to make it happen.
Q2. Which is the best online video cutter?
Kapwing and Clideo are the two best online video cutters you can use for free. Both web-based tools also allow you to cut your AVI videos.
Q3. Which is the best video cutter and joiner software?
Filmora, iMovie, and Kapwing are some of the best video cutters and joiner tools. These video editors are also free to use and come with different features.
Q4. How do I trim an AVI file in Windows 10?
Trimming an AVI video file in Windows 10 is very simple. Launch the Microsoft Photos (Photo App) application on your computer, add clip, and select the “Trim” tool to trim a specific video part.
Q5. How can I cut a video on my computer for free?
MAC and Windows users can download Filmora to cut videos for free. Filmora also offers a wide range of other features to make your clips exciting. Contrarily, Windows users can use the built-in Photo App in Windows 10 or download Gihosoft or Handbrake software to cut clips. Likewise, MAC users can download VideoPad, Xilisoft Video Cutter, or iMovie for free.
With the growing fame of video-sharing and social media applications like Twitter, Instagram, and TikTok, the demand for simple and fast video cutting and trimming tools has dramatically increased. Nowadays, you don’t have to play with complex video editing tools to produce high-quality videos.
Thanks to several user-friendly editing software to make things easy for everybody. However, finding the right programs to trim/cut videos is still challenging, especially in AVI format.
But, guess what? These top 16 AVI video cutters for Windows, MAC, Android, iPhone, and online will make video cutting and trimming fun, especially when you learn to do it using Filmora.
In this Article
Part 1: Best AVI Video Cutter to Trim/Cut AVI Video on Windows and MAC – Filmora Video Cutter [with steps}
Part 2: Top 3 Free AVI Video Cutter on Windows
Part 3: Top 3 Free AVI Video Cutter on MAC
Part 4: Top 3 Free AVI Video Cutter on Android
Part 5: Top 3 Free AVI Video Cutter on iPhone
Part 6: Top 3 Free AVI Video Cutter Online
Part 7: Bottom Line
Part 8: FAQs
Part 1: Best AVI Video Cutter to Trim/Cut AVI Video on Windows and MAC – Filmora Video Cutter [with steps]
Filmora by Wondershare is a star video editor with outstanding outcomes. Whether you have a MAC or Windows PC, you can download Filmora regardless of your operating system. The program best serves those who intend to make high-quality videos. The software provides editing support for all video formats, including AVI.
Although Filmora is an affordable editor with tons of audio and video editing options, you can still download the software for free and create projects if watermarks don’t bother you. Moreover, you can count this tool’s capabilities in cropping, resizing, and Chroma screen support. But that’s not the only sweet fruit.
In fact, Filmora is equipped with many jaw-dropping features, including preset templates, auto beat sync, split-screen, speed ramping, motion tracking, keyframing, creative transitions, titles, filters, and much more. And the best part is, you can learn and understand Filmora in no time. That’s why the program is loved and supported by all types of users.
So does Filmora helps cut and trim AVI videos? Yes! It does if you follow these steps correctly.
Step 1: Download Filmora Video Editor
First, download Filmora Video Editor by choosing your operating system, as seen in the screenshot below.
Run the setup and let it finish without any pause or break.
Step 2: Import Your Video to Filmora Video Editor
Importing your AVI video is a very simple process. Just click on the “Film Clip” icon.
It will open a new window screen on your computer to select the video from the directory. Find the clip you want to import and cut. Use your mouse to select it and click the “Open” button.
The video will be loaded in the “Media” folder of Filmora. The clip’s thumbnail should be visible to assure you have done everything correctly.
If you can see that, let’s go to the next step.
Step 3: Drag and Drop Video to Filmora’s Timeline
Select the video in the media folder by clicking over it once. Now, without leaving the hold of the left button of your mouse, slide the video down to the track in the timeline.
After that, a message will pop up, asking about your preference for the project settings. It is recommended to choose the “Match to Media” option unless you’re an experienced video editor who knows how to play with the resolution and frame rates.
You will see the video on the timeline with its preview on the “Preview Screen” on the right side of the interface.
Step 4: Cutting Your Video in Filmora
Here comes the core step you have been waiting for. But before you go any further, you need to know about the “Playhead.”
Playhead is an orange-reddish marker you can find on the timeline.
It has an important role in cutting your videos.
So, move the playhead to your desired frame and click on the “scissor” icon to make the “starting” cut.
As soon as you do it, you will see that the single clip is now divided into two parts similar to this image.
The “Red” marked area in the above screenshot ensures a gap between the clips on the timeline. The “Yellow” arrows confirm two separate clips of the same video.
Place the two clips together as seen in this “Green” area.
And place the playhead anywhere on the clip. And click on the “scissor” icon once again to make the “ending” cut (second cut).
If done correctly, there should be three clips now of the same video, as you can observe in this screenshot.
Again, the “Red” area in the above photo indicates the gap, and the “Yellow” area ensures a third segment of the video.
Note: The gaps you can see in the divided clips are made intentionally for understanding. Practically, Filmora doesn’t move the clip or make gaps in between after you have made the cuts.
Keep in mind that there are three clips on the timeline. Now, if you want to remove the second clip from the video, you need to select that portion first by clicking on it.
Then, right-click on the mouse and choose “Cut” from the menu.
Within a semi-second, the selected portion will be removed from the timeline. And you will be able to see the remaining parts of the video. Now, pull the second clip using your mouse and place it at the end of the first clip without leaving a gap in between.
Then, click the “Play” button under the preview screen to see the results.
You can see in the above two screenshots that there’s a jump between the scenes due to cuts, confirming that video has been cut significantly.
Step 5: Trimming Your Video in Filmora
Remember that cutting and trimming in Filmora are two different things. Trimming allows you to remove a particular video part from visibility without deleting the portion.
So feel free to skip this step if you’re happy learning the cutting technique. But if you’re interested in trimming, here’s how you do it.
Take your mouse cursor at the beginning or end of the clip you want to trim. Keep holding the clip’s corner and slide the mouse back or front to trim the part
Note: Since the trim tool doesn’t delete the video, the final project based on trimming will be of a larger size. Therefore, it is advised to cut videos rather than trimming for fast rendering, better results, and small video size.
Step 6: Save Project and Export Your Cut/Trimmed AVI Video
Choose “Save Project” from the “File” menu.
Select the directory to save the project, rename the new video, and click the “Save” button.
Click on the “Export” button to save the video in AVI or any other video format of your choice on your computer.
Part 2: Top 3 Free AVI Video Cutter on Windows
As a Windows user, finding an excellent video cutter is relatively easy. However, not all software permits importing AVI videos. In the same way, some video trimmers come at a price. So if you really don’t want to pay and enjoy cutting your AVI files, try using these three video cutting tools.
Microsoft Photos (Windows 10)
Microsoft Photos or Photo App is a free photo viewer and editor with your Windows 10. It offers incredible photo editing and enhancement along with different tools for organizing and editing videos in a very friendly way. Likewise, you can create drawings over the videos and add 3D effects and background music to your clips.
You can also trim AVI videos with Microsoft Photos quickly. All you need to do is open your clip with the Photo App, choose the “Trim” option, select a portion of the video you want to trim, and go ahead.
That’s it!
Features
- Quick video trimming
- Cool text effects
- 3D library and effects
- It has a clear interface
- You can find and tag people’s faces
- The program has 15+ filters for editing
- Motion tracking option for drawing on videos
- Allows you to view and organize your files easily
Pros
- Microsoft Photos is free for Windows users
- It automatically creates albums
- The program has a touch-friendly interface
- You can integrate your OneDrive with the software
Cons
- Lacks before and after view
- Not included in older Windows versions
- It doesn’t support selective focus or panorama stitching
Handbrake
Handbrake is best-known for its video transcoding traits. Unlike typical video editors, this open-source tool includes limited options to rip Blu-rays and DVDs. Moreover, you can mix the 5.1 soundtracks and convert them to stereo to make the audio compatible with your TV speakers.
But the exciting thing about Handbrake is that you can use this software on your macOS 10.13 or later versions to cut AVI videos for free. However, it’s a bit technical process, as there’s no timeline to help you trim or make cuts on the clips directly with the help of your mouse.
You are required to mention a time range (seconds, minutes, or hours) to keep a specific part of the video while the software removes the non-ranged parts of the clip. For instance, you have a video of 10 seconds. You start the range from 5 seconds and end it at 10 seconds. So, the first four seconds of the video will be cut from the entire clip.
Features
- Video cutting, cropping, and resizing
- Low-quality and old video restoration
- Video conversion from any format to MKV or MP4
Pros
- Handbrake is free
- You can convert batch videos with ease
- It supports MAC, Windows, and Linux OS
- Allows you to import video files in all major formats
- The software comes with various video conversion presets
Cons
- Handbrake is not a user-friendly tool
- The video file output is limited to two formats (MKV and MP4) only
Gihosoft Video Cutter
Gihosoft is a clean, free, lossless video cutter on your Windows PC. It’s a simple tool that helps you cut video files into various output formats. So be it AVI, MPEG, or any other file, with Gihosoft, everything becomes handy.
Another fascinating fact about this software is that it allows you to cut videos in three simple steps without losing the quality. So right after installing the program, you simply need to import your file, choose the start and end time, and click the “Cut” button to remove the part of the video.
Features
- Fast video and audio cutting
- Easy drag and drop audio/video files
- It supports most audio and video formats
Pros
- Free for both Windows and MAC operating systems
- The cutter saves video in original quality
Cons
- It does not include basic video editing features
Part 3: Top 3 Free AVI Video Cutter on MAC
Are you looking for a great AVI video cutter for your MAC? Sadly, you have limited product choices as compared to Windows users. But to ensure you don’t waste time looking for a suitable tool, here’s a list of three AVI video cutting programs you can use on your Macintosh.
iMovie
The first and foremost recommended software for free video cutting on MAC is Apple’s own tool, iMovie . It is a built-in program that comes with your system, so there is no need to spend extra on a video editor. iMovie allows you to browse and import most video files, including AVI, right from your computer. Also, this tool is equipped with multiple functions, such as audio editing, video quality enhancement, and much more.
This MAC’s video editor is ideal for beginners. Many home users and small business owners find this tool extremely simple, as they don’t like to be confused with complex features. So, if you want to make cuts to your video clips, start working on iMovie. And within a few clicks, you can trim or cut your videos for free.
Features
- Video cutting and trimming
- Cropping and rotation
- Effects and transitions
- Built-in themes
- HD and 4K video support
- Movie sharing
- Audio adjustments
- Chroma screen controls
- Character tracking
Pros
- Free to use for MAC users
- Clean timeline
- One-click video cutting and trimming
- Easy-to-remember keyboard shortcuts
- Direct share projects to your social media, like YouTube
Cons
- It takes a lot of time to export videos
- iMovie needs high HDD storage space
VideoPad by NCH
VideoPad by NCH is a beginner-level video editor with all the basic features. The software is specifically designed for home movie makers. That is why VideoPad is easy to understand and use.
VideoPad is entirely free of cost for non-commercial purposes, but it has limited features. On the other hand, if you want to enjoy full traits, you can purchase the tool.
VideoPad supports video files, including AVI, WMV, MPEG, MOV, MP4, ASF, and XviD. Likewise, you can also burn movies to Blu-ray, DVD, HD-DVD, or CD. And most importantly, you can easily cut or trim AVI videos on your MAC, as the software is available on both MAC and Windows systems.
Features
- Audio tools
- Video rotation
- Video sharing
- Visual effects
- Video transitions
- 3D Video editing
- Color correction
- Overlays and texts
- Video optimization
- Great plugin support
- Direct video uploading
- Multiple video resolutions
- Video cutting and trimming
- Files exportation to various devices
- Stereoscopic conversion from 2D to 3D
Pros
- You can use the basic tools for free
- Allows 360-degree video production
- It supports a wide range of video formats
- Compatible with MAC and Windows computers
Cons
- The auto speech feature performs poorly
- The free version has annoying notifications
Xilisoft Video Cutter
Xilisoft Video Cutter is the simplest tool to cut videos on MAC. This software has a straightforward option to cut the clip after importing it to the timeline. The program is fast and has a user-friendly interface.
Moreover, you can polish your videos by merging multiple clips or increasing the video quality once you’re done with the cutting process. At the same time, this video cutter allows you to import all video formats, including XviD, DivX, MOV, FLV, MP4, MPEG-4/, MKV, MPEG, WMV, and AVI.
Features
- Video joining
- Support multiple output video formats, including HD
Pros
- Easy video cutting and merging
- It doesn’t require a large storage space
- Extremely uncomplicated interface
- Real-time preview to make better cuts
- Available on both MAC and Windows systems
Cons
- The trial version is free to use but limits you from enjoying extra features
Part 4: Top 3 Free AVI Video Cutter on Android
After capturing nice videos with your Android mobile phone, you may need to cut unnecessary scenes to make your clips look professional. While there are numerous Android cutters, not all support the AVI format. So below, you will find the 3 best AVI video cutters for Android, which are free to use.
Quick – Video Editor & Maker
Quick – Video Editor & Maker is a free video editor with PRO results. Many photographers and vloggers love using this app to cut clips immediately. Furthermore, the application offers a wide range of options to assure you don’t have to look to any other tool to rotate or compress video. Quick – Video Editor & Maker lets you import videos in all major formats, including AVI, MPEG, WMA, and more.
Features
- Video cutting, fading, and rotation
- Speed control tools
- Conversion from video to GIF
Pros
- Free app
- Simple interface
Cons
- Lack of updates
- Some users complain about app crash
Funimate Video Editor & Maker
If you want to make some professional-grade video edits quickly, you are welcome to download and use Funimate Video Editor & Maker on your Android device. It’s a free tool to cut videos. It has an easy procedure, and you can cut AVI videos in a few seconds.
Plus, you can use the app to add custom animations, effects, and many other exciting elements. You can share your makes on social media like TikTok, Instagram, and other platforms. Contrarily, the app itself is a community with millions of Funimate-users who share their creations daily. You can also join or watch videos from other creators to learn more about new techniques and trends in video editing.
Features
- Video trimming and splitting
- Animation and cropping
- Filters and AI effects
- Speed adjustment
- Keyframing and video merging
Pros
- Free Android application with several editing tools
- Easy trimming, splitting, and cropping
- Aspect ratio, border, and color customization
- Direct social media sharing
Cons
- Free users cannot use templates
- The free version stamps watermarks on each project
Part 5: Top 3 Free AVI Video Cutter on iPhone
No wonder iPhone’s camera captures high-quality videos. But the problem begins when there’s no free app to cut AVI videos. So if you’re recording great spots, but deep inside, you really want to remove some parts, then these 3 free AVI video cutters will work smoothly on your iPhone.
Cut, Trim, Split Video Editor
Download Cut, Trim, Split Video Editor on your iPhone to delete/cut unwanted portions of your video clips. The tool is also best for trimming iPhone-recorded clips without messing with the frames. Or, if you just want to split the video into multiple parts for your next WhatsApp status, this iPhone app can do that job for you.
The app supports multiple video file types, including MOV, MP4, AVI, MPEG, MPEG-2, and 3GPP
Features
- Easy trimming and cutting video clips
- Splitting big-sized videos into two smaller clips
- Import video from file-sharing platforms, like iCloud, using Wi-Fi
Pros
- Free app for fast video cutting and sharing
- Simple UI interface
Cons
- The free version shows advertisements
Splice - Video Editor & Maker
Splice is an extraordinary video editor that makes it easy to make fully customized and professional videos from your iPhone. The app is also best for video cutting. Besides, it has many interesting features, which you can use from your device.
Features
- Cutting, trimming, and cropping your videos
- Exposure, saturation, and exposure adjustment
- Slow and fast motion with speed ramping option
- Video masking and overlay
- Color correction and text overlays
Pros
- Free basic features, such as video cutting
- iTunes integration
- Supports AVI video input
- User-friendly application
- Access to the music library
- Quick and simple social sharing
Cons
- Output videos require high mobile storage space
Part 6: Top 3 Free AVI Video Cutter Online
Don’t want to install video cutters on your MAC, Windows, smartphone, or any other device? No problem! You can use online video cutters and trimmers to split, cut, or trim your clips for free.
However, the problem still exists in online tools, as not all web-based editors allow importing AVI files. So to save your time and energy, you can directly go to the following online AVI cutters to complete your tasks.
Kapwing
Kapwing is an online video editor best for casual creatives, such as Vloggers and YouTubers. You can use this web-based platform to cut your videos. Gladly, Kapwing supports all AVI incomings. You can upload your AVI video files to this platform and use its trim or split feature. To do that, you need to upload your AVI video and choose the “Trim” or “Split” tool to see the magic. Once done with the trimming process, you can explore Kapwing’s other incredible traits and apply them to your project.
Features
- Video splitting, trimming, and merging
- Audio capturing
- Speed adjustment
- Image and video library
- Text editing and overlay
- Auto-generated subtitles
- Several collaboration tools
- Video creation from scratch
- Templates, shapes, and emojis
- Simple drag-and-drop interface
- Video transitions, plugins, and elements
Pros
- Free online video trimmer
- User-friendly interface
- You can export 30-minutes long projects
- Allows you to export unlimited videos with a watermark
- One watermark-free video export is available each month
Cons
- Cannot export long videos with a free account
- Only 10 minutes transcription limit is available for free users
- You need to purchase a monthly or annual subscription to remove the watermark from multiple videos
Clideo
Clideo is not just a video cutter but an online solution to all your video editing problems. The tool is super popular, with 4 million+ users a month. And why not? This is one of those web-based platforms that allow AVI video files to be imported and exported without converting them into any other formats.
Nevertheless, if you’re only looking for video cutting options, this tool makes your life easy. Simply upload your video, and select the portion of it by setting start and end times. Choose whether you want to delete or extract the selected part from the clip, and hit the “Export” button.
And within a few moments, you can enjoy a trimmed video clip. And if you plan to be more creative, you can look for other Clideo features to make videos more fascinating.
Features
- Video combining and cutting
- Resize and crop clips
- Compress your videos
- Add text and subtitles
- Add music to your video files
- Filters and color correction tools
- Audio mute, cutting, and muting
- Video rotation, flipping, and speed adjustment
Pros
- Basic tools can be used for free
- Best for beginners and intermediate users
- Ideal for AVI videos and also supports other video formats
Cons
- You cannot use the free version regularly
Aspose
Aspose is a free web-based application to cut clips. You can use this tool on any operating system. It supports all major video file formats, including AVI, MKV, MOV, MP4, FLV, WMV, WEBM, and GIF. Additionally, you can use Aspose for various other reasons, such as audio extraction, video resizing, and more.
Features
- Video cutting and compressing
- Looping, rotation, and video merging
- Adding watermarks on videos
- Sound muting
- Speed change and audio addition
Pros
- Aspose is a free online tool
- It offers straightforward options to cut and edit videos
Cons
- No color correction option
- Slow video cutting process
- Lacks timeline and other valuable features
Part 7: Bottom Line
Tired of finding AVI cutters? Relax and try these top 16 AVI video cutters for Windows, MAC, iPhone, Android, and online. Almost all these tools are free to use and are extremely handy. On the other hand, if you want to cut and trim videos professionally, download Filmora and follow the step-by-step guide in this article for making clean cuts.
Part 8: FAQs
Q1. How do I trim an AVI video?
To trim an AVI video file, ensure that the software or tool you use supports AVI input. Generally, you need to upload or import a clip on the program, select the portion of the video, and apply the cut/trim feature to make it happen.
Q2. Which is the best online video cutter?
Kapwing and Clideo are the two best online video cutters you can use for free. Both web-based tools also allow you to cut your AVI videos.
Q3. Which is the best video cutter and joiner software?
Filmora, iMovie, and Kapwing are some of the best video cutters and joiner tools. These video editors are also free to use and come with different features.
Q4. How do I trim an AVI file in Windows 10?
Trimming an AVI video file in Windows 10 is very simple. Launch the Microsoft Photos (Photo App) application on your computer, add clip, and select the “Trim” tool to trim a specific video part.
Q5. How can I cut a video on my computer for free?
MAC and Windows users can download Filmora to cut videos for free. Filmora also offers a wide range of other features to make your clips exciting. Contrarily, Windows users can use the built-in Photo App in Windows 10 or download Gihosoft or Handbrake software to cut clips. Likewise, MAC users can download VideoPad, Xilisoft Video Cutter, or iMovie for free.
Get Your Audio Fix: 10 WebM to MP3 Converters You Can Trust
Top Ten WebM to MP3 Converters

Liza Brown
Mar 27, 2024• Proven solutions
The days of silent cinema are long gone, and today sound is an inseparable part of a video, no matter how long or short it may be. The videos you discover on the Internet sometimes have great soundtracks, but they are not saved in file formats that are suitable for playback in audio media players .
Converting a WebM video to MP3 is probably one of the easiest ways to turn videos you find online into audio files you can listen to whenever you want. In this article, we are going to take a look at the top ten WebM to MP3 converters you can either install on your PC or Mac computer or use online.
You may also like: Convert MP4 to MP3
The Top Ten WebM to MP3 Converters
The file conversion process is simple, regardless of the tool you are using to change the format of a file. However, converting low-resolution WebM files to MP3 can result in low quality of the output files, which is why it is better to create audio files from high-resolution WebM videos. Here are the top ten WebM to MP3 converters.
1. Any Video Converter Ultimate
Price: Free
Compatibility: macOS, Windows

Converting a WebM video to MP3 with Any Video Converter Ultimate is a simple three-step process. After you’ve installed this cross-platform app on your Mac or PC computer, you just have to import the video file you would like to convert, select MP3 as the output file format and click on the Convert button.
Head over to the Output Folder after the conversion to get your newly generated MP3 file and play it in order to make sure that you like the results. Besides MP3 files, you can also use Any Video Converter Ultimate to convert WebM videos to MP4 , MOV, AVI and other common video file formats.
2. Pazera Free Audio Extractor
Price: Free
Compatibility: Windows, Linux
All video files contain an audio track regardless of the format in which they are saved. Pazera Free Audio Extractor is a tool that enables you to save a video’s audio track as a separate file without any quality loss. In addition to MP3, you can also save audio files in FLAC, WMA and a number of other audio file formats.

You can download it from here: http://www.pazera-software.com/products/webm-to-mp3/
The software supports more than seventy video and audio formats, so you can just drag and drop a WebM video into Pazera Free Audio Extractor’s main window, choose a preset profile and hit the Convert button. What’s more, you can adjust the encoding settings manually and fine-tune audio volume, sampling frequency or bitrate values.
Want to learn more about extracting audio from video? Check the best online tools to extract audio from video files .
3. Online UniConverter
Price: Free, pricing plans start at $2.95
Compatibility: Web-based

In case you are looking for a powerful video conversion tool you can use from a web browser, then Wondershare’s Online UniConverter is probably one of the best options you have. In order to convert a WebM video to MP3, you have to go through a simple four-step process. First, you need to upload a file you would like to convert, then set the output format to MP3, click on the Convert button and finally download the audio file you created to your computer. The size of a WebM video cannot exceed 100MB, but if you want to convert larger video files you can install the desktop version of this video converter on your Mac or PC computer.
4. CloudConvert
Price: Free
Compatibility: Web-based

This platform offers a number of file conversion tools you can use to change the file format of archives, images, vectors or videos. CloudConvert lets you import WebM videos via URLs, from cloud storage services like OneDrive, Dropbox or Google Drive and from a local hard drive. Optionally you can set the start and end times for the MP3 file you’re creating, adjust its volume or change the audio bitrate. Clicking on the Convert button will start the file conversion process, and once the WebM file is processed, you should download the MP3 file to your computer.
5. Convertio
Price: Free, pricing plans start at $9.99
Compatibility: Web-based

The fact that over five terabytes of files were converted through the Convertio platform shows you how popular and efficient this online file conversion platform actually is. Besides video files, you can also convert fonts, images or eBooks with Convertio. In order to turn a WebM video into an MP3 file you just have to upload it either from cloud storage or a local hard drive. Optionally, you can click on the Settings icon if you want to customize the bitrate, frequency or volume values. In addition, Convertio enables you to convert only a segment of a WebM video, as you can choose how much of that video you want to cut, by inserting the time in the video where the conversion should start and end.
6. Zamzar
Price: Free, pricing options start at $9.00 per month
Compatibility: Web-based

This is yet another popular destination for all Internet users who convert images, videos, audio files or different types of documents on a daily basis. After you add a WebM video to Zamzar, you just have to set the output format to MP3 and click on the Convert button. Uploading a video file larger than 150MB to the free version of Zamzar is not possible and you must purchase one of the subscription models if you would like to convert WebM videos that have up to 2GB. Moreover, uploading files from the cloud isn’t an option, since Zamzar only allows its users to add files via URL or from their computers.
7. FreeFileConvert
Price: Free
Compatibility: Web-based

This online file conversion platform enables you to turn a WebM video into an MP3 file in just a few minutes. You can upload up to five WebM files not larger than 300 MB to FreeFileConvert either from the cloud, a URL or your computer’s hard drive. When done, you should choose MP3 as the output format and initiate the conversion process by hitting the Convert button. The file you converted cannot be saved on the cloud or downloaded more than five times. All files you convert with FreeFileConvert are going to be deleted from the platform’s servers within one day after the conversion.
8. File-Converter-Online
Price: Free
Compatibility: Web-based

Anyone can convert a WebM video to MP3 with File-Converter-Online because the file conversion process is remarkably easy. All you need to do is choose a file from your hard drive you would like to convert, select MP3 as the output file type and click on the Start Converting button. The download process will start automatically, once the WebM file is converted to MP3, although you won’t be able to store your freshly generated audio file on the cloud directly from this platform. There are no video size limits, which enables you to convert all WebM files regardless of how large or small they are.
9. OnlineConvertFree
Price: Free, pricing plans start at $6.99 per month
Compatibility: Web-based

This is a simple but efficient file conversion tool that enables you to convert multiple WebM videos at the same time. However, if you are using the free version of the platform you won’t be able to convert more than two WebM files to MP3 simultaneously. Furthermore, the maximum size of a video file you can convert with this platform is limited to just 500MB regardless of the subscription plan you have. Opting for any of the available subscription plans will grant you access to unlimited conversion hours so that you can convert as many WebM videos as you want each day.
10. VLC - The Best WebM to MP3 Converter for macOS and Windows 10

The simplest and by far the fastest way to convert a WebM video to an MP3 file on PC and Mac computers is to use the VLC media player. After you installed and launched VLC you should click on the Media menu and select the Convert/Save option.
The Open Media window will pop up on the screen, and you just have to click on the Add button located in the File Selection section of the screen in order to import a WebM video into VLC. Afterward, you should click on the Convert/Save button to gain access to the Convert window. Change the Profile setting to Audio – MP3 and click on the Browse button in the Destination section of the window if you want to choose the location on your hard drive where the converted file is going to be saved. After you click on the Start button, VLC will convert you WebM video to MP3 and place the converted file to the folder you specified.
Conclusion
Each video saved in WebM file format can be easily converted into an MP3 audio file you can add to your music library. Online WebM to MP3 converters often have size limits, even if you purchase a subscription. That is why it is much easier and less expensive to install VLC media player on your Mac or PC computer if you want to convert WebM videos to MP3 files frequently. What is your favorite WebM to MP3 converter? Let us know in the comments.
Liza Brown
Liza Brown is a writer and a lover of all things video.
Follow @Liza Brown
Liza Brown
Mar 27, 2024• Proven solutions
The days of silent cinema are long gone, and today sound is an inseparable part of a video, no matter how long or short it may be. The videos you discover on the Internet sometimes have great soundtracks, but they are not saved in file formats that are suitable for playback in audio media players .
Converting a WebM video to MP3 is probably one of the easiest ways to turn videos you find online into audio files you can listen to whenever you want. In this article, we are going to take a look at the top ten WebM to MP3 converters you can either install on your PC or Mac computer or use online.
You may also like: Convert MP4 to MP3
The Top Ten WebM to MP3 Converters
The file conversion process is simple, regardless of the tool you are using to change the format of a file. However, converting low-resolution WebM files to MP3 can result in low quality of the output files, which is why it is better to create audio files from high-resolution WebM videos. Here are the top ten WebM to MP3 converters.
1. Any Video Converter Ultimate
Price: Free
Compatibility: macOS, Windows
Converting a WebM video to MP3 with Any Video Converter Ultimate is a simple three-step process. After you’ve installed this cross-platform app on your Mac or PC computer, you just have to import the video file you would like to convert, select MP3 as the output file format and click on the Convert button.
Head over to the Output Folder after the conversion to get your newly generated MP3 file and play it in order to make sure that you like the results. Besides MP3 files, you can also use Any Video Converter Ultimate to convert WebM videos to MP4 , MOV, AVI and other common video file formats.
2. Pazera Free Audio Extractor
Price: Free
Compatibility: Windows, Linux
All video files contain an audio track regardless of the format in which they are saved. Pazera Free Audio Extractor is a tool that enables you to save a video’s audio track as a separate file without any quality loss. In addition to MP3, you can also save audio files in FLAC, WMA and a number of other audio file formats.
You can download it from here: http://www.pazera-software.com/products/webm-to-mp3/
The software supports more than seventy video and audio formats, so you can just drag and drop a WebM video into Pazera Free Audio Extractor’s main window, choose a preset profile and hit the Convert button. What’s more, you can adjust the encoding settings manually and fine-tune audio volume, sampling frequency or bitrate values.
Want to learn more about extracting audio from video? Check the best online tools to extract audio from video files .
3. Online UniConverter
Price: Free, pricing plans start at $2.95
Compatibility: Web-based
In case you are looking for a powerful video conversion tool you can use from a web browser, then Wondershare’s Online UniConverter is probably one of the best options you have. In order to convert a WebM video to MP3, you have to go through a simple four-step process. First, you need to upload a file you would like to convert, then set the output format to MP3, click on the Convert button and finally download the audio file you created to your computer. The size of a WebM video cannot exceed 100MB, but if you want to convert larger video files you can install the desktop version of this video converter on your Mac or PC computer.
4. CloudConvert
Price: Free
Compatibility: Web-based
This platform offers a number of file conversion tools you can use to change the file format of archives, images, vectors or videos. CloudConvert lets you import WebM videos via URLs, from cloud storage services like OneDrive, Dropbox or Google Drive and from a local hard drive. Optionally you can set the start and end times for the MP3 file you’re creating, adjust its volume or change the audio bitrate. Clicking on the Convert button will start the file conversion process, and once the WebM file is processed, you should download the MP3 file to your computer.
5. Convertio
Price: Free, pricing plans start at $9.99
Compatibility: Web-based
The fact that over five terabytes of files were converted through the Convertio platform shows you how popular and efficient this online file conversion platform actually is. Besides video files, you can also convert fonts, images or eBooks with Convertio. In order to turn a WebM video into an MP3 file you just have to upload it either from cloud storage or a local hard drive. Optionally, you can click on the Settings icon if you want to customize the bitrate, frequency or volume values. In addition, Convertio enables you to convert only a segment of a WebM video, as you can choose how much of that video you want to cut, by inserting the time in the video where the conversion should start and end.
6. Zamzar
Price: Free, pricing options start at $9.00 per month
Compatibility: Web-based
This is yet another popular destination for all Internet users who convert images, videos, audio files or different types of documents on a daily basis. After you add a WebM video to Zamzar, you just have to set the output format to MP3 and click on the Convert button. Uploading a video file larger than 150MB to the free version of Zamzar is not possible and you must purchase one of the subscription models if you would like to convert WebM videos that have up to 2GB. Moreover, uploading files from the cloud isn’t an option, since Zamzar only allows its users to add files via URL or from their computers.
7. FreeFileConvert
Price: Free
Compatibility: Web-based
This online file conversion platform enables you to turn a WebM video into an MP3 file in just a few minutes. You can upload up to five WebM files not larger than 300 MB to FreeFileConvert either from the cloud, a URL or your computer’s hard drive. When done, you should choose MP3 as the output format and initiate the conversion process by hitting the Convert button. The file you converted cannot be saved on the cloud or downloaded more than five times. All files you convert with FreeFileConvert are going to be deleted from the platform’s servers within one day after the conversion.
8. File-Converter-Online
Price: Free
Compatibility: Web-based
Anyone can convert a WebM video to MP3 with File-Converter-Online because the file conversion process is remarkably easy. All you need to do is choose a file from your hard drive you would like to convert, select MP3 as the output file type and click on the Start Converting button. The download process will start automatically, once the WebM file is converted to MP3, although you won’t be able to store your freshly generated audio file on the cloud directly from this platform. There are no video size limits, which enables you to convert all WebM files regardless of how large or small they are.
9. OnlineConvertFree
Price: Free, pricing plans start at $6.99 per month
Compatibility: Web-based
This is a simple but efficient file conversion tool that enables you to convert multiple WebM videos at the same time. However, if you are using the free version of the platform you won’t be able to convert more than two WebM files to MP3 simultaneously. Furthermore, the maximum size of a video file you can convert with this platform is limited to just 500MB regardless of the subscription plan you have. Opting for any of the available subscription plans will grant you access to unlimited conversion hours so that you can convert as many WebM videos as you want each day.
10. VLC - The Best WebM to MP3 Converter for macOS and Windows 10
The simplest and by far the fastest way to convert a WebM video to an MP3 file on PC and Mac computers is to use the VLC media player. After you installed and launched VLC you should click on the Media menu and select the Convert/Save option.
The Open Media window will pop up on the screen, and you just have to click on the Add button located in the File Selection section of the screen in order to import a WebM video into VLC. Afterward, you should click on the Convert/Save button to gain access to the Convert window. Change the Profile setting to Audio – MP3 and click on the Browse button in the Destination section of the window if you want to choose the location on your hard drive where the converted file is going to be saved. After you click on the Start button, VLC will convert you WebM video to MP3 and place the converted file to the folder you specified.
Conclusion
Each video saved in WebM file format can be easily converted into an MP3 audio file you can add to your music library. Online WebM to MP3 converters often have size limits, even if you purchase a subscription. That is why it is much easier and less expensive to install VLC media player on your Mac or PC computer if you want to convert WebM videos to MP3 files frequently. What is your favorite WebM to MP3 converter? Let us know in the comments.
Liza Brown
Liza Brown is a writer and a lover of all things video.
Follow @Liza Brown
From Capture to Creation: Easy Video Editing with GoPro Quik on MacBook
How to Edit Your GoPro Videos with Quik on Mac
Liza Brown
Mar 27, 2024• Proven solutions
If you have a GoPro, then you might already know how easy it can be to record videos with this handy tool. While recording videos with GoPro is extremely simple, a lot of users find it hard to transfer or edit their videos on Mac. Though, you can always take the assistance of GoPro Quik on MacBook to manage and edit your videos – all in one place. Here, I will let you know how to make the most of the GoPro Quik desktop solution and will also list its best alternative.
- Part 1: What can you do with Go Pro Quik on Mac?
- Part 2: How to Make the Most of GoPro Quik on MacBook?
- Part 3: The Best GoPro Quik Alternatives for Mac

Part 1: What can you do with Go Pro Quik on Mac?
GoPro offers desktop and mobile solutions to help us import our recorded videos, edit them, and even share them on numerous platforms. The best part is that GoPro Quik for MacBook is available for free and can be download directly from its official website. Afterward, you can use GoPro Quik on your Mac in the following ways:
- Importing and Managing Videos
If you want, you can directly connect GoPro to your Mac and use the application to import your videos. You can also manage your videos and even upload them on your GoPro cloud directly.
- Video Editing
GoPro Quik for MacBook also offers tons of features to trim, crop, and edit your videos. You can apply effects to your videos, include audio tracks, and even sync your videos easily.
- Instant Sharing
Your GoPro Quik application can instantly be connected to popular social media platforms like YouTube and Facebook. In this way, you can instantly share your GoPro video on your social handles.
- What More?
Besides that, GoPro Quik on MacBook offers dedicated options to create timelapse videos. You can also create slow motion or fast forward videos and even trim highlights for any footage.
Runs on: macOS 10.9 or newer versions

Part 2: How to Make the Most of GoPro Quik on MacBook?
Now when you know the major features of the GoPro Quik application, let’s learn how to use it. Ideally, GoPro Quik for MacBook can help you not only to import your videos to your system, but also to edit them in different ways.
Import Videos to your Mac with GoPro Quik
If you want to manage GoPro videos on your Mac, then you can take the assistance of Quik’s desktop application.
Step 1: Connect your GoPro and Launch Quik
At first, you can just connect your GoPro camera to your Mac and look for GoPro Quik from the Spotlight. You can also find it in Applications and launch it on your Mac.

Step 2: Import your Videos from GoPro to Mac
Once the GoPro Quik app on your MacBook is launched, you can view the snapshot of the connected device (with its name). From here, you can just click on the “Import Files” button and wait as your videos would be saved on your Mac’s storage.

There is also a provision to manually select a location on your Mac where your GoPro videos would be saved.
Edit your Videos with GoPro Quik on MacBook
On GoPro Quik for MacBook, you can find several options to manage or edit your videos. Since it only provides basic editing solutions, it won’t meet your professional requirements. Nevertheless, let’s have a look at how we can clip a video on GoPro Quik.
Step 1: Select a video to edit
Once you have imported your videos, you can go to the “Media” tab on GoPro Quik to view all the stored videos. From here, you can right-click the thumbnail of any video to view it.

Step 2: Choose to Clip the Video
This will automatically load the video on the editing interface of GoPro Quik. Now, you can just click on the scissor icon at the bottom panel so that you can clip the important part of the video.

Step 3: Clip and Save your Video
Now, a blue marker will be displayed on the screen that you can move around to select the part of the video you want to clip. Afterward, you can preview the results and click on the “Save” button from the bottom.

Similarly, you can browse more options in GoPro Quik for MacBook to create timelapse videos and doing other edits.
Part 3: The Best GoPro Quik Alternatives for Mac
As you can see, GoPro Quik for MacBook can only be used to make minor edits and might not meet your overall requirements. In this case, you can consider using either of the following tools as a GoPro Quik alternative.
1. Wondershare Filmora for Mac [The Best Choice]
For all those who are looking for more advanced video editing options, Wondershare Filmora for Mac would be an ideal pick. It is the best GoPro Quik alternative for MacBook that has a user-friendly interface and features some of the most advanced editing options.


- Wondershare Filmora has integrated Artificial Intelligence features (in AI Portrait Mode ) that can instantly remove the background of a video.
- There are also tons of options to include AR stickers in your videos on Filmora and make them appealing.
- You can also use the Auto Reframe feature in Filmora to automatically adjust the aspect ratio of your videos for various social media platforms.
- Filmora also offers hundreds of transitions, audio effects, captions, filters, and more that you can instantly apply with drag and drop actions.
- Some other advanced features of Filmora are motion tracking , keyframing, audio ducking, pan-and-zoom, green screen edits, and more.
2. GoPro Studio [Discontinued]
While GoPro Studio has been discontinued, you can consider downloading this legacy desktop application from third-party sources. The only drawback is that you won’t get any updates or new features with GoPro Studio anymore.

- You can use GoPro Studio to import/export your videos or trim their vital parts.
- There are also options to add music and text to your videos to make them more appealing.
- You can alter the playback speed of videos to come up with slow motion or timelapse videos easily.
- GoPro Studio also offers a few other adjustment controls to customize the appearance and playback of your videos.
- Just like GoPro Quik, the Studio application can also be integrated with social media platforms like YouTube or Facebook.
You may also interested in: How to edit video with GoPro Studio
Conclusion
I’m sure that after reading this post, you would know more about GoPro Quik for MacBook. As you can see, it is quite easy to import your videos from GoPro to your Mac with the help of Quik. Furthermore, the desktop application can also be used to do minor edits with your GoPro videos. Though, if you are looking for a better macOS video editor , then Wondershare Filmora will be an ideal pick. Filmora offers a user-friendly interface, tons of high-end editing features, and a free trial version for Mac/Windows.
Liza Brown
Liza Brown is a writer and a lover of all things video.
Follow @Liza Brown
Liza Brown
Mar 27, 2024• Proven solutions
If you have a GoPro, then you might already know how easy it can be to record videos with this handy tool. While recording videos with GoPro is extremely simple, a lot of users find it hard to transfer or edit their videos on Mac. Though, you can always take the assistance of GoPro Quik on MacBook to manage and edit your videos – all in one place. Here, I will let you know how to make the most of the GoPro Quik desktop solution and will also list its best alternative.
- Part 1: What can you do with Go Pro Quik on Mac?
- Part 2: How to Make the Most of GoPro Quik on MacBook?
- Part 3: The Best GoPro Quik Alternatives for Mac
Part 1: What can you do with Go Pro Quik on Mac?
GoPro offers desktop and mobile solutions to help us import our recorded videos, edit them, and even share them on numerous platforms. The best part is that GoPro Quik for MacBook is available for free and can be download directly from its official website. Afterward, you can use GoPro Quik on your Mac in the following ways:
- Importing and Managing Videos
If you want, you can directly connect GoPro to your Mac and use the application to import your videos. You can also manage your videos and even upload them on your GoPro cloud directly.
- Video Editing
GoPro Quik for MacBook also offers tons of features to trim, crop, and edit your videos. You can apply effects to your videos, include audio tracks, and even sync your videos easily.
- Instant Sharing
Your GoPro Quik application can instantly be connected to popular social media platforms like YouTube and Facebook. In this way, you can instantly share your GoPro video on your social handles.
- What More?
Besides that, GoPro Quik on MacBook offers dedicated options to create timelapse videos. You can also create slow motion or fast forward videos and even trim highlights for any footage.
Runs on: macOS 10.9 or newer versions
Part 2: How to Make the Most of GoPro Quik on MacBook?
Now when you know the major features of the GoPro Quik application, let’s learn how to use it. Ideally, GoPro Quik for MacBook can help you not only to import your videos to your system, but also to edit them in different ways.
Import Videos to your Mac with GoPro Quik
If you want to manage GoPro videos on your Mac, then you can take the assistance of Quik’s desktop application.
Step 1: Connect your GoPro and Launch Quik
At first, you can just connect your GoPro camera to your Mac and look for GoPro Quik from the Spotlight. You can also find it in Applications and launch it on your Mac.
Step 2: Import your Videos from GoPro to Mac
Once the GoPro Quik app on your MacBook is launched, you can view the snapshot of the connected device (with its name). From here, you can just click on the “Import Files” button and wait as your videos would be saved on your Mac’s storage.
There is also a provision to manually select a location on your Mac where your GoPro videos would be saved.
Edit your Videos with GoPro Quik on MacBook
On GoPro Quik for MacBook, you can find several options to manage or edit your videos. Since it only provides basic editing solutions, it won’t meet your professional requirements. Nevertheless, let’s have a look at how we can clip a video on GoPro Quik.
Step 1: Select a video to edit
Once you have imported your videos, you can go to the “Media” tab on GoPro Quik to view all the stored videos. From here, you can right-click the thumbnail of any video to view it.
Step 2: Choose to Clip the Video
This will automatically load the video on the editing interface of GoPro Quik. Now, you can just click on the scissor icon at the bottom panel so that you can clip the important part of the video.
Step 3: Clip and Save your Video
Now, a blue marker will be displayed on the screen that you can move around to select the part of the video you want to clip. Afterward, you can preview the results and click on the “Save” button from the bottom.
Similarly, you can browse more options in GoPro Quik for MacBook to create timelapse videos and doing other edits.
Part 3: The Best GoPro Quik Alternatives for Mac
As you can see, GoPro Quik for MacBook can only be used to make minor edits and might not meet your overall requirements. In this case, you can consider using either of the following tools as a GoPro Quik alternative.
1. Wondershare Filmora for Mac [The Best Choice]
For all those who are looking for more advanced video editing options, Wondershare Filmora for Mac would be an ideal pick. It is the best GoPro Quik alternative for MacBook that has a user-friendly interface and features some of the most advanced editing options.
- Wondershare Filmora has integrated Artificial Intelligence features (in AI Portrait Mode ) that can instantly remove the background of a video.
- There are also tons of options to include AR stickers in your videos on Filmora and make them appealing.
- You can also use the Auto Reframe feature in Filmora to automatically adjust the aspect ratio of your videos for various social media platforms.
- Filmora also offers hundreds of transitions, audio effects, captions, filters, and more that you can instantly apply with drag and drop actions.
- Some other advanced features of Filmora are motion tracking , keyframing, audio ducking, pan-and-zoom, green screen edits, and more.
2. GoPro Studio [Discontinued]
While GoPro Studio has been discontinued, you can consider downloading this legacy desktop application from third-party sources. The only drawback is that you won’t get any updates or new features with GoPro Studio anymore.
- You can use GoPro Studio to import/export your videos or trim their vital parts.
- There are also options to add music and text to your videos to make them more appealing.
- You can alter the playback speed of videos to come up with slow motion or timelapse videos easily.
- GoPro Studio also offers a few other adjustment controls to customize the appearance and playback of your videos.
- Just like GoPro Quik, the Studio application can also be integrated with social media platforms like YouTube or Facebook.
You may also interested in: How to edit video with GoPro Studio
Conclusion
I’m sure that after reading this post, you would know more about GoPro Quik for MacBook. As you can see, it is quite easy to import your videos from GoPro to your Mac with the help of Quik. Furthermore, the desktop application can also be used to do minor edits with your GoPro videos. Though, if you are looking for a better macOS video editor , then Wondershare Filmora will be an ideal pick. Filmora offers a user-friendly interface, tons of high-end editing features, and a free trial version for Mac/Windows.
Liza Brown
Liza Brown is a writer and a lover of all things video.
Follow @Liza Brown
Free Animation Software Roundup: Windows and Mac Compatible
Best 12 Free Download Animation Software for Windows and Mac

Shanoon Cox
Mar 27, 2024• Proven solutions
In your search for quality animation software, you may have found that many of the programs cost a lot of money no matter it is 2D animation software or 3D animation editor. The good news is that you can choose free animation tools to make different animation types easily.
That is why we created a list of the best animation software on both Mac and Windows. Whether you are a professional editor or just a beginner to start making animation, you will find the tools listed below are easy to use without watermark and won’t cost money to improve your skills.
The best part is you will find these free animation programs are also very useful for content creation on Mac and Windows. Besides, we have listed the pros and cons of each software. Keep reading!
- Part 1: Best Free Animation Software for Mac
- Part 2: Best Free Animation Software for Windows
- Part 3: FAQ about Animation Software for Windows and Mac
Here we have made a table of 12 free animation software without watermark on Windows and macOS. Take a look.
6 Free Animation Software for macOS
5K-3DMiddleIt is a great tool for 3D artists6KritaDifficultPerfect software for 2D animation
| Number | Software | Difficulty Level | Highlight |
|---|---|---|---|
| 1 | Synfig Studio | Easy | Calculate vector shape to animation automatically |
| 2 | Pencil2D Animation | Easiest | Straightforward interface for beginners |
| 3 | Tupi | Middle | Its community is active to offer solutions |
| 4 | Blender | Difficult | It is a powerful animation tool to render and make modeling |
6 Free Animation Software for Windows
| Number | Software | Difficulty Level | Highlight |
|---|---|---|---|
| 1 | DAZ Studio | Difficult | For professional users with the fast animation process |
| 2 | Terragen | Middle | It can make realistic CG environments |
| 3 | Anim8or | Difficult | 3D animation is Anim8or’s main function |
| 4 | Seamless3d | Easy | It has many features for 3d modeling |
| 5 | OpenToonz | Middle | Make cartoon animation with plugins |
| 6 | Stykz | Easy | Quickly make animation if you have used Pivot StickFigure Animator |
Best Animation Software on Windows and Mac - Filmora
Looking for a simple while powerful Mac video editing tool ? We recommend using Wondershare Filmora. You can use it to create 2D/3D animated texts, shapes, or anything you like for YouTube videos.
The keyframing features will help you make animation effects smooth and precise. When exporting, you can also make it transparent.
Besides, various title templates and transitions are also available for you. Download it now to have a try! Or learn more from Wondershare Video Community .
Key features
- Create various shapes that you like
- Add keyframing to make it move
- Fine-tuning to make it smooth
- Add visual effects/text/color before export it

You can even create photo cut animation which has been very trendy on Tiktok and Instagram. Here is a video to present you how you can do it in Filmora.
Part 1 Best Free Animation Software for Mac
Listed below is free animation software on Mac. Take a look.
01 Synfig Studio - Mac Software to Animate Video
Difficulty Level: Easy
Pro: You can create many layers once a time and sync audio for your animation.
Con: This one needs much time to learn, especially for beginners.
An open-source 2D animation software that works on Macs, Synfig Studio delivers multiple players while you are creating content. Whether you want to add geometric, filters, distortions, or transformations, it is all possible! And thanks to the high-end bone system, you can create cut-out videos using bitmap images!
The thoughtful part is there are two download versions on the homepage: the stable version and the development version. If you want to enjoy a stable and smooth animation editing experience, choose the stable one. However, the development package gives you access to the use of the latest features.
For a novice, you can learn Synfig from step by step guide in Wikipedia and video tutorials. Four languages are available including English, Russian, Dutch, and French for a video course.
You can free download its latest version 1.3.11. The upcoming version is 1.4.
Features:
- It offers support for many layers within the animation.
- The program’s bone system means that you can easily create animations with bitmap images or vector artwork.
- It allows you to sync your creative work with any sound that you want. Has a full-featured audio editor.
02 Pencil2D Animation - Animation Program for 2D Pencil Lover
Difficulty Level: Easiest
Pro: Easy to start and make animation as the interface is user-friendly for many people.
Con: You need to set your preference every time to open it up, so it takes up some time
Pencil2D Animation is one of the simplest 2D hand-drawn tools available. It will work flawlessly on Mac computers. It is ideal for beginners, as the commands and interface are very easy to understand.
Whether you want to create a simple one, or you want something with many layers for videos on YouTube, you can use Pencil2D animation to get it done. Its timeline is easy to use at first glance. You can add and duplicate different frames on a different track.
The frequency of releasing the new version is very fast as Pencil2D is committed to bringing the lasted features to each user. The newest version is v0.6.4 (as of August 2019). Its user guide is informative with video tutorials, FAQs, and manual material.
Features:
- Lightweight and minimalistic design that makes it very easy for beginners.
- Features raster and vector workflows, with easy switching between them. You can paint and sketch as you want!
- Will run on all platforms - Mac, Windows, and Linux.
- Completely free and open source.
03 TupiTube - Free Animation Application for Mac Users
Difficulty Level: Middle
Pro: It supports vector illustrations. Besides, various formats are available.
Con: If you want to make 3D animation, it will fail. You can only make 2D effects.
A free software application for YouTube, Tupi will allow you to create 2D animations to your heart’s content. The tool was started by animators who wanted to create something that others could use.
It is an open-source tool, which means that users can make tweaks to the program if they have some interesting ideas. The program works on both Windows and Mac. You need to use Tupi and Papagayo to make lip-sync animation with different mouth shapes.
It also offers a solution for schools with related features including academic license, technical support, and ads-free, so many schools choose to use this one to teach kids how to make an animation video.
Features:
- Support for vector illustrations. You can add rectangles, lines, polygons, and other shapes as you please. To fill areas, just use the paint bucket.
- You can import raster images using this program.
- You can export all your finished images into different file formats.
- Support for tweeting positions, scale, shear, and rotations.

04 Blender - Need Some Time to Learn This Animation Tool
Difficulty Level: Difficult
Pro: Really powerful software that you can make for professional users.
Con: It is not easy to make image animation as it focuses on 3D.
Blender is an open-source 3D animation creation suite without a watermark. If you find that 2D is a little bit limiting, we think that you will be very happy with what this free program offers. You can take your projects to a whole new level when you can use this program on your Mac.
You can use Blender to make a video game, modeling, and high-quality animation. However, it involves a steep learning curve. Luckily, there are many tutorials to guide you through the journey. You can also ask for help in the Blender community that millions of talented people like you are there.
Features:
- Creating renders is no problem with this program.
- Modeling, such as sculpting, retopology, and creating curves is not an issue either.
- VFX and animation features are better than any option on the market.
- It offers powerful simulation tools.
- Integration with pipeline tools is easy.
05 K-3D - Best for Animation and Modeling in 3D
Difficulty Level: Middle
Pro: Ideal for designing simple 3D animations and models.
Con: It has an old-fashioned interface. Also, the built-render (RenderMan) feature is difficult to use by beginners.
K-3D is an animation and 3D modeling software. You can download this tool for free on your Mac. Besides, you can also install and run it on your Windows and Linux systems. If you look at the design, you will find that the software is quite old. But don’t judge a book by its cover. Why so? It is because K-3D is one of the strongest and most versatile tools for 3D artists with many options.
For example, K-3D offers extremely systematic and methodological workflows. You can easily adjust the properties of the features in real-time and get instant results. It has a node-oriented visualization pipeline to enjoy more freedom. That means you can create animation using a variety of combinations.
One of the best things about K-3D is that it has three subdivisions of animation. You can work on your model on one side while showing the other side in a mirrored form. Then, experience the final result combined together. And in case you need to make the changes to the end results, you can simply work on the first subdivision and savor automatic changes to the results.
K-3D has an advanced redo and undo mechanism to ensure you can go back or move forward to make corrections or amendments without limits. Additionally, the tool is developed keeping in mind all the industrial standards. For instance, it has complete support and integration of native RenderMan™ to its user interface. This is an excellent feature because most free animation software for Mac requires third-party render plugins.
Features:
- Parametric workflow.
- 2D and 3D animation tools.
- Allows Python and K3DScript scripting.
06 Krita - For Professional 2D Animators
Difficulty Level: Difficult
Pro: Advanced tools with numerous animation options and online training material.
Con: Not suitable for beginners.
If you love 2D animation, then you’ll surely love Krita. It is entirely free software available on Mac, Windows, and Linux. Also, it offers a full platform for drawing and frame-by-frame animation.
The number one reason for adoring Krita is its brush library. There are more than 100 professional brushes to give you a wide range of effects. Moreover, the strokes are pretty amazing and similar to Adobe Photoshop or Adobe Illustrator.
Another great thing about Krita is the brush stabilization feature designed for shaky hands. You can add a stabilizer to your chosen brush to smoothen its flow. Besides, there’s a special Dynamic Brush tool to make animation more fun. At the same time, you can also customize your brushes through different brush engines, including filter engines, color smudge engines, and many more.
Apart from the basic brush options, the preloaded vector tools are next to admire. These tools help you make great comic panels. All you need to do is choose and drag the word bubble template on your canvas. Then, make changes with the anchor point to make new shapes. At the same time, you can also add text to your animation by using the text tool.
Last but not least, there’s a wrap-around mode to create seamless patterns and textures. That means the image or drawing makes its own references along the x-axis and y-axis. This gives you the freedom to continue painting and enjoy updates to your animation instantly.
Features:
- HDR painting.
- PSD support.
- Python scripting.
- Selection and transformation tools.
- Proper group, filter, vector, and file layer management.
- Complete color management for extraordinary results.
- Drawing assistant to help you with straight lines and vanishing points.
Part 2 Best Free Animation Software for Windows
Below is free animation software on Windows. Keep reading.
01 Anireel - Easy to Use Animation Software
Difficulty Level: Easy
Anireel is a simple yet powerful Video Creativity tool used to make 2D animated explainer videos. Developed by Wondershare, one of the most popular Windows software and tool developers, Anireel uses rich, ready-to-use, and diverse assets to help one effortlessly make animated videos.
Features:
- There are tons of drag and drop characters, actions, props, text, and audio assets.
- Easy Text-to-Speech conversion via deep studying technology.
- Animate integrated and imported assets.
- Tons of templates that match many script types.

02 DAZ Studio - Free Software for 3D Lovers
Difficulty Level: Difficult
Pro: You can make game animation for fun. It also supports GPU accelerated real-time rendering.
Con: It has a high demand for the device, but owns a steep learning curve.
Daz 3d is a powerful and completely free 3D creation tool that will let you create the short videos that you want. Whether you are using this for business or pleasure, you will find the program is very easy to understand. Within a day, you will be completely used to its interface.
3D effects are the core focus of DAZ Studio. You can build a model, render, and pose animation within the skin texture level. It has a high requirement for the device. For Windows 64 bits, its recommended RAM is 3G.
Features:
- Options for 3D morphing, animation, and rendering.
- GPU accelerated real-time rendering, which delivers the best results.
- Interactive tutorials to help you become a better 3D artist.
- Everything you make is yours, royalty-free!
03 Terragen - Use It to Make CG Animation
Difficulty Level: Middle
Pro: The recently updated version is the best one. Ray-traced preview is a great function to help us make animation.
Con: The interface looks complicated, but it gets easy to know after you are familiar with it.
A completely free program that you can download and install on all Windows computers and tablets, Terragen is the ideal program for you to create the 3D animations and environments that you want. If you want a photo-realistic CG environment, using Terragen is the best way to do it!
Releasing imagination instantly, Terragen Creative is the one tool you’d like to consider. You can use it to make beautiful scenery.
For advanced tools, you can choose FBX to make animation quickly. The featured image gallery on its homepage will give you a deep understanding of the final outcome you can achieve with Terragen.
Features:
- Ray-traced preview. Without watermark after exporting
- Photo-realistic clouds and ozone simulation
- Rendering is twice as fast as the previous version of the program.
- Adding terrain, objects, and shader to your final product is very easy with the intuitive interface.
04 Anim8or - Free Tool to Make 3D Modeling
Difficulty Level: Difficult
Pro: Anim8or supports 3D modeler and TrueType fonts to meet advanced needs.
Con: Beginners will find it difficult to learn.
Anim8or is a free 3D modeling program that will let you create the unique work that you want. It is a personal project from an animator, but the program does get regular updates and troubleshooting.
It is not going to give you the same features as something like Studio Max or Maya, but you will get the basics. Beginners who are getting into animations will love this program.
Anim8or is a great tool to step into 3D animation ff you think other software is too different to start. In some way, it means you need to give up some advanced features. But all in all, it’s still recommended for you.
Features:
- A full 3D modeler that allows you to create spheres, cylinders, platonic solids, and any other objects that you want.
- Features support for TrueType fonts.
- Easy to create 3D scenes and output them as video files or images.
05 Seamless3d - Open-source Free Software
Difficulty Level: Easy
Pro: It is an open-source 3D modeling package. The good thing is the handy infinite Undo/Redo operation.
Con: Some advanced features are missing like drawing.
Seamless3d, an open-source 3D modeling software that you can download, is among the best animation worktables if you want to create specialized images, animated videos, or 3D characters.
It supports FFmpeg video format, so you can use AVI, MP4, and more. Besides, the forum is not active compared with before, but you still can find answers from many tutorials .
Features:
- It comes with infinite undo and redo options for complete flexibility to correct mistakes.
- It allows for partitioned and seamless texture mapping for YouTube videos.
- Has a specialized tree view interface.

06 OpenToonz - Support Plug in to Make Animation Freely
Difficulty Level: Middle
Pro: It is open-source software, so you can change the code freely.
Con: The plug-in effects are limited.
This animation program is made for beginners on Windows. It is among the best 2D animation software in the market. You can use plug-in effects to change image style, add lights, and distort details. It supports Windows 7/8/10 only for 64 bit.
Features:
- You can add provisional colors to make your animation more colorful.
- Smooth correction without frame losing.
- Compatible with black-and-white, colored, or without binarization scanning.
7 Stykz - Simple to Use Animation Program for Beginners
Difficulty Level: Easy
Pro: It is the best stick figure animation if you want to make this kind of video.
Con: The UI is not modern to use and needs time to adapt to using it.
Stykz is completely free to use and without a watermark. If you have used Pivot StickFigure Animator, then you will find Stykz is similar to it, but you can import the previous .stk files to animate it again. You can use it to make animation smooth frame by frame.
With its frame-based feature, Stykz is easy to customize each frame. You can change previous and current frames to get what you want. You can download it to have a try considering its easy-to-use features.
Features:
- There is some animes file on this website, so you can have a reference.
- Edit animation in the software without using another editing window.
- You can share the final work with others including information.
Part 3 FAQ about Animation Software for Windows and Mac
01 Are Macs good for animation?
To be frank, Mac is a better choice to make animation if you want to have a smooth animation experience. For example, screen resolution is a crucial factor to make excellent animation. The good is Mac’s screen will never let you disappointed.
02 What is the best animation software for Mac?
The best animation software on mac includes Synfig Studio, Pencil2D Animation, Tupi, Blender, and more. Mentioned are free-to-use. Maya is also worth considering animation software if you are a professional user. Maya offers a 1-month free trial. After it is ended, the paid plans are month, 1-year, and 3-year.
03 Can you animate in Photoshop?
Yes, you can make basic animation in Photoshop. However, it only supports frame-based animation making. In this case, you need to use other professional software to make animation. But, you still can use Photoshop to meet your needs if you are a beginner.
Conclusion
With any of these free animation maker programs on Mac and Windows, you will have an easy time creating your next 2D or 3D video. Ensure you choose the program that has the features and compatibility that you desire. Then it is up to your creative mind to come up with stunning animations! If you want to make animation easily, you can also find inspiration through classical animated cartoon types with examples .
Shanoon Cox
Shanoon Cox is a writer and a lover of all things video.
Follow @Shanoon Cox
Shanoon Cox
Mar 27, 2024• Proven solutions
In your search for quality animation software, you may have found that many of the programs cost a lot of money no matter it is 2D animation software or 3D animation editor. The good news is that you can choose free animation tools to make different animation types easily.
That is why we created a list of the best animation software on both Mac and Windows. Whether you are a professional editor or just a beginner to start making animation, you will find the tools listed below are easy to use without watermark and won’t cost money to improve your skills.
The best part is you will find these free animation programs are also very useful for content creation on Mac and Windows. Besides, we have listed the pros and cons of each software. Keep reading!
- Part 1: Best Free Animation Software for Mac
- Part 2: Best Free Animation Software for Windows
- Part 3: FAQ about Animation Software for Windows and Mac
Here we have made a table of 12 free animation software without watermark on Windows and macOS. Take a look.
6 Free Animation Software for macOS
5K-3DMiddleIt is a great tool for 3D artists6KritaDifficultPerfect software for 2D animation
| Number | Software | Difficulty Level | Highlight |
|---|---|---|---|
| 1 | Synfig Studio | Easy | Calculate vector shape to animation automatically |
| 2 | Pencil2D Animation | Easiest | Straightforward interface for beginners |
| 3 | Tupi | Middle | Its community is active to offer solutions |
| 4 | Blender | Difficult | It is a powerful animation tool to render and make modeling |
6 Free Animation Software for Windows
| Number | Software | Difficulty Level | Highlight |
|---|---|---|---|
| 1 | DAZ Studio | Difficult | For professional users with the fast animation process |
| 2 | Terragen | Middle | It can make realistic CG environments |
| 3 | Anim8or | Difficult | 3D animation is Anim8or’s main function |
| 4 | Seamless3d | Easy | It has many features for 3d modeling |
| 5 | OpenToonz | Middle | Make cartoon animation with plugins |
| 6 | Stykz | Easy | Quickly make animation if you have used Pivot StickFigure Animator |
Best Animation Software on Windows and Mac - Filmora
Looking for a simple while powerful Mac video editing tool ? We recommend using Wondershare Filmora. You can use it to create 2D/3D animated texts, shapes, or anything you like for YouTube videos.
The keyframing features will help you make animation effects smooth and precise. When exporting, you can also make it transparent.
Besides, various title templates and transitions are also available for you. Download it now to have a try! Or learn more from Wondershare Video Community .
Key features
- Create various shapes that you like
- Add keyframing to make it move
- Fine-tuning to make it smooth
- Add visual effects/text/color before export it
You can even create photo cut animation which has been very trendy on Tiktok and Instagram. Here is a video to present you how you can do it in Filmora.
Part 1 Best Free Animation Software for Mac
Listed below is free animation software on Mac. Take a look.
01 Synfig Studio - Mac Software to Animate Video
Difficulty Level: Easy
Pro: You can create many layers once a time and sync audio for your animation.
Con: This one needs much time to learn, especially for beginners.
An open-source 2D animation software that works on Macs, Synfig Studio delivers multiple players while you are creating content. Whether you want to add geometric, filters, distortions, or transformations, it is all possible! And thanks to the high-end bone system, you can create cut-out videos using bitmap images!
The thoughtful part is there are two download versions on the homepage: the stable version and the development version. If you want to enjoy a stable and smooth animation editing experience, choose the stable one. However, the development package gives you access to the use of the latest features.
For a novice, you can learn Synfig from step by step guide in Wikipedia and video tutorials. Four languages are available including English, Russian, Dutch, and French for a video course.
You can free download its latest version 1.3.11. The upcoming version is 1.4.
Features:
- It offers support for many layers within the animation.
- The program’s bone system means that you can easily create animations with bitmap images or vector artwork.
- It allows you to sync your creative work with any sound that you want. Has a full-featured audio editor.
02 Pencil2D Animation - Animation Program for 2D Pencil Lover
Difficulty Level: Easiest
Pro: Easy to start and make animation as the interface is user-friendly for many people.
Con: You need to set your preference every time to open it up, so it takes up some time
Pencil2D Animation is one of the simplest 2D hand-drawn tools available. It will work flawlessly on Mac computers. It is ideal for beginners, as the commands and interface are very easy to understand.
Whether you want to create a simple one, or you want something with many layers for videos on YouTube, you can use Pencil2D animation to get it done. Its timeline is easy to use at first glance. You can add and duplicate different frames on a different track.
The frequency of releasing the new version is very fast as Pencil2D is committed to bringing the lasted features to each user. The newest version is v0.6.4 (as of August 2019). Its user guide is informative with video tutorials, FAQs, and manual material.
Features:
- Lightweight and minimalistic design that makes it very easy for beginners.
- Features raster and vector workflows, with easy switching between them. You can paint and sketch as you want!
- Will run on all platforms - Mac, Windows, and Linux.
- Completely free and open source.
03 TupiTube - Free Animation Application for Mac Users
Difficulty Level: Middle
Pro: It supports vector illustrations. Besides, various formats are available.
Con: If you want to make 3D animation, it will fail. You can only make 2D effects.
A free software application for YouTube, Tupi will allow you to create 2D animations to your heart’s content. The tool was started by animators who wanted to create something that others could use.
It is an open-source tool, which means that users can make tweaks to the program if they have some interesting ideas. The program works on both Windows and Mac. You need to use Tupi and Papagayo to make lip-sync animation with different mouth shapes.
It also offers a solution for schools with related features including academic license, technical support, and ads-free, so many schools choose to use this one to teach kids how to make an animation video.
Features:
- Support for vector illustrations. You can add rectangles, lines, polygons, and other shapes as you please. To fill areas, just use the paint bucket.
- You can import raster images using this program.
- You can export all your finished images into different file formats.
- Support for tweeting positions, scale, shear, and rotations.
04 Blender - Need Some Time to Learn This Animation Tool
Difficulty Level: Difficult
Pro: Really powerful software that you can make for professional users.
Con: It is not easy to make image animation as it focuses on 3D.
Blender is an open-source 3D animation creation suite without a watermark. If you find that 2D is a little bit limiting, we think that you will be very happy with what this free program offers. You can take your projects to a whole new level when you can use this program on your Mac.
You can use Blender to make a video game, modeling, and high-quality animation. However, it involves a steep learning curve. Luckily, there are many tutorials to guide you through the journey. You can also ask for help in the Blender community that millions of talented people like you are there.
Features:
- Creating renders is no problem with this program.
- Modeling, such as sculpting, retopology, and creating curves is not an issue either.
- VFX and animation features are better than any option on the market.
- It offers powerful simulation tools.
- Integration with pipeline tools is easy.
05 K-3D - Best for Animation and Modeling in 3D
Difficulty Level: Middle
Pro: Ideal for designing simple 3D animations and models.
Con: It has an old-fashioned interface. Also, the built-render (RenderMan) feature is difficult to use by beginners.
K-3D is an animation and 3D modeling software. You can download this tool for free on your Mac. Besides, you can also install and run it on your Windows and Linux systems. If you look at the design, you will find that the software is quite old. But don’t judge a book by its cover. Why so? It is because K-3D is one of the strongest and most versatile tools for 3D artists with many options.
For example, K-3D offers extremely systematic and methodological workflows. You can easily adjust the properties of the features in real-time and get instant results. It has a node-oriented visualization pipeline to enjoy more freedom. That means you can create animation using a variety of combinations.
One of the best things about K-3D is that it has three subdivisions of animation. You can work on your model on one side while showing the other side in a mirrored form. Then, experience the final result combined together. And in case you need to make the changes to the end results, you can simply work on the first subdivision and savor automatic changes to the results.
K-3D has an advanced redo and undo mechanism to ensure you can go back or move forward to make corrections or amendments without limits. Additionally, the tool is developed keeping in mind all the industrial standards. For instance, it has complete support and integration of native RenderMan™ to its user interface. This is an excellent feature because most free animation software for Mac requires third-party render plugins.
Features:
- Parametric workflow.
- 2D and 3D animation tools.
- Allows Python and K3DScript scripting.
06 Krita - For Professional 2D Animators
Difficulty Level: Difficult
Pro: Advanced tools with numerous animation options and online training material.
Con: Not suitable for beginners.
If you love 2D animation, then you’ll surely love Krita. It is entirely free software available on Mac, Windows, and Linux. Also, it offers a full platform for drawing and frame-by-frame animation.
The number one reason for adoring Krita is its brush library. There are more than 100 professional brushes to give you a wide range of effects. Moreover, the strokes are pretty amazing and similar to Adobe Photoshop or Adobe Illustrator.
Another great thing about Krita is the brush stabilization feature designed for shaky hands. You can add a stabilizer to your chosen brush to smoothen its flow. Besides, there’s a special Dynamic Brush tool to make animation more fun. At the same time, you can also customize your brushes through different brush engines, including filter engines, color smudge engines, and many more.
Apart from the basic brush options, the preloaded vector tools are next to admire. These tools help you make great comic panels. All you need to do is choose and drag the word bubble template on your canvas. Then, make changes with the anchor point to make new shapes. At the same time, you can also add text to your animation by using the text tool.
Last but not least, there’s a wrap-around mode to create seamless patterns and textures. That means the image or drawing makes its own references along the x-axis and y-axis. This gives you the freedom to continue painting and enjoy updates to your animation instantly.
Features:
- HDR painting.
- PSD support.
- Python scripting.
- Selection and transformation tools.
- Proper group, filter, vector, and file layer management.
- Complete color management for extraordinary results.
- Drawing assistant to help you with straight lines and vanishing points.
Part 2 Best Free Animation Software for Windows
Below is free animation software on Windows. Keep reading.
01 Anireel - Easy to Use Animation Software
Difficulty Level: Easy
Anireel is a simple yet powerful Video Creativity tool used to make 2D animated explainer videos. Developed by Wondershare, one of the most popular Windows software and tool developers, Anireel uses rich, ready-to-use, and diverse assets to help one effortlessly make animated videos.
Features:
- There are tons of drag and drop characters, actions, props, text, and audio assets.
- Easy Text-to-Speech conversion via deep studying technology.
- Animate integrated and imported assets.
- Tons of templates that match many script types.
02 DAZ Studio - Free Software for 3D Lovers
Difficulty Level: Difficult
Pro: You can make game animation for fun. It also supports GPU accelerated real-time rendering.
Con: It has a high demand for the device, but owns a steep learning curve.
Daz 3d is a powerful and completely free 3D creation tool that will let you create the short videos that you want. Whether you are using this for business or pleasure, you will find the program is very easy to understand. Within a day, you will be completely used to its interface.
3D effects are the core focus of DAZ Studio. You can build a model, render, and pose animation within the skin texture level. It has a high requirement for the device. For Windows 64 bits, its recommended RAM is 3G.
Features:
- Options for 3D morphing, animation, and rendering.
- GPU accelerated real-time rendering, which delivers the best results.
- Interactive tutorials to help you become a better 3D artist.
- Everything you make is yours, royalty-free!
03 Terragen - Use It to Make CG Animation
Difficulty Level: Middle
Pro: The recently updated version is the best one. Ray-traced preview is a great function to help us make animation.
Con: The interface looks complicated, but it gets easy to know after you are familiar with it.
A completely free program that you can download and install on all Windows computers and tablets, Terragen is the ideal program for you to create the 3D animations and environments that you want. If you want a photo-realistic CG environment, using Terragen is the best way to do it!
Releasing imagination instantly, Terragen Creative is the one tool you’d like to consider. You can use it to make beautiful scenery.
For advanced tools, you can choose FBX to make animation quickly. The featured image gallery on its homepage will give you a deep understanding of the final outcome you can achieve with Terragen.
Features:
- Ray-traced preview. Without watermark after exporting
- Photo-realistic clouds and ozone simulation
- Rendering is twice as fast as the previous version of the program.
- Adding terrain, objects, and shader to your final product is very easy with the intuitive interface.
04 Anim8or - Free Tool to Make 3D Modeling
Difficulty Level: Difficult
Pro: Anim8or supports 3D modeler and TrueType fonts to meet advanced needs.
Con: Beginners will find it difficult to learn.
Anim8or is a free 3D modeling program that will let you create the unique work that you want. It is a personal project from an animator, but the program does get regular updates and troubleshooting.
It is not going to give you the same features as something like Studio Max or Maya, but you will get the basics. Beginners who are getting into animations will love this program.
Anim8or is a great tool to step into 3D animation ff you think other software is too different to start. In some way, it means you need to give up some advanced features. But all in all, it’s still recommended for you.
Features:
- A full 3D modeler that allows you to create spheres, cylinders, platonic solids, and any other objects that you want.
- Features support for TrueType fonts.
- Easy to create 3D scenes and output them as video files or images.
05 Seamless3d - Open-source Free Software
Difficulty Level: Easy
Pro: It is an open-source 3D modeling package. The good thing is the handy infinite Undo/Redo operation.
Con: Some advanced features are missing like drawing.
Seamless3d, an open-source 3D modeling software that you can download, is among the best animation worktables if you want to create specialized images, animated videos, or 3D characters.
It supports FFmpeg video format, so you can use AVI, MP4, and more. Besides, the forum is not active compared with before, but you still can find answers from many tutorials .
Features:
- It comes with infinite undo and redo options for complete flexibility to correct mistakes.
- It allows for partitioned and seamless texture mapping for YouTube videos.
- Has a specialized tree view interface.
06 OpenToonz - Support Plug in to Make Animation Freely
Difficulty Level: Middle
Pro: It is open-source software, so you can change the code freely.
Con: The plug-in effects are limited.
This animation program is made for beginners on Windows. It is among the best 2D animation software in the market. You can use plug-in effects to change image style, add lights, and distort details. It supports Windows 7/8/10 only for 64 bit.
Features:
- You can add provisional colors to make your animation more colorful.
- Smooth correction without frame losing.
- Compatible with black-and-white, colored, or without binarization scanning.
7 Stykz - Simple to Use Animation Program for Beginners
Difficulty Level: Easy
Pro: It is the best stick figure animation if you want to make this kind of video.
Con: The UI is not modern to use and needs time to adapt to using it.
Stykz is completely free to use and without a watermark. If you have used Pivot StickFigure Animator, then you will find Stykz is similar to it, but you can import the previous .stk files to animate it again. You can use it to make animation smooth frame by frame.
With its frame-based feature, Stykz is easy to customize each frame. You can change previous and current frames to get what you want. You can download it to have a try considering its easy-to-use features.
Features:
- There is some animes file on this website, so you can have a reference.
- Edit animation in the software without using another editing window.
- You can share the final work with others including information.
Part 3 FAQ about Animation Software for Windows and Mac
01 Are Macs good for animation?
To be frank, Mac is a better choice to make animation if you want to have a smooth animation experience. For example, screen resolution is a crucial factor to make excellent animation. The good is Mac’s screen will never let you disappointed.
02 What is the best animation software for Mac?
The best animation software on mac includes Synfig Studio, Pencil2D Animation, Tupi, Blender, and more. Mentioned are free-to-use. Maya is also worth considering animation software if you are a professional user. Maya offers a 1-month free trial. After it is ended, the paid plans are month, 1-year, and 3-year.
03 Can you animate in Photoshop?
Yes, you can make basic animation in Photoshop. However, it only supports frame-based animation making. In this case, you need to use other professional software to make animation. But, you still can use Photoshop to meet your needs if you are a beginner.
Conclusion
With any of these free animation maker programs on Mac and Windows, you will have an easy time creating your next 2D or 3D video. Ensure you choose the program that has the features and compatibility that you desire. Then it is up to your creative mind to come up with stunning animations! If you want to make animation easily, you can also find inspiration through classical animated cartoon types with examples .
Shanoon Cox
Shanoon Cox is a writer and a lover of all things video.
Follow @Shanoon Cox
Also read:
- New Silence Is Golden A Step-by-Step Guide to Noise Reduction in FCPX
- Updated 2024 Approved Video Stabilization Made Easy A Premiere Pro Tutorial
- Updated In 2024, Insights From the Best OGG Conversion Tools
- Updated Top 6 Free MOV Video Cutters
- Leading Online Video Promo Builders
- New The Ultimate Mac Video Editing Experience AVS
- Updated In 2024, Create Stunning Animations On-the-Go Top Free 3D Apps for Mobile
- 2024 Approved Lights, Camera, Action! A Kids Guide to Making Movies
- New Unleash Your Creativity Top-Rated 3D Animation Software for All Levels for 2024
- In 2024, Retro Video Revival Top VHS Apps for Smartphones
- New In 2024, The Best of the Best Top Stop Motion Animation Software for Mac and PC
- 2024 Approved Canon Camcorder Video Editing Made Easy Tips, Tricks, and Software
- New 2024 Approved Stop Motion 101 A Step-by-Step Guide and Alternative Options
- New In 2024, Unleash Pro-Level Video Editing with 64-Bit Software
- Updated Create Fake Identities Best Free Face Generator Websites
- Updated Edit Freely 10 Best Android Video Editing Apps with No Watermark
- 2024 Approved Unleash Your Creativity A Comprehensive Guide to Using Wax for Free Video Editing
- New In 2024, Condense Your Clips A Beginners Guide to Creating Time Lapse Videos
- New 2024 Approved Expert Review Videopad Video Editor - The Good, the Bad, and the Ugly
- Updated 2024 Approved The Ultimate List of Free MKV Cutting Software
- Updated 2024 Approved Unrestricted Video Editing Top 10 Free Online Tools with No Watermark
- Discover the Top 12 Audio Converters A Comprehensive Review
- Mastering Video Editing on Mac Fast and Easy Ways to Cut Large Videos
- In 2024, What to Look for in a YouTube to MP3 Conversion Tool
- Updated Fade In, Fade Out Two Essential Audio Techniques in FCP for 2024
- Updated 2024 Approved The Best Mac Video Editors Inspired by Windows Movie Maker
- Updated The Art of Stability Mastering Video Stabilization in After Effects for 2024
- New In 2024, Say Goodbye to Shaky Videos Top Free Android Stabilizers
- Updated 2024 Approved Video Joining Made Simple Top Alternatives to Software
- In 2024, Free Video Looper Programs for PC and Mac
- New Break Free From Windows 10 Photos Discover the Best Image Editing Software
- New Finding the Perfect YouTube to MP3 Converter Tips and Tricks
- Updated Best Android Apps For Creating Slow Motion Videos for 2024
- In 2024, What Is the Best MP4 Cutter for YouTuber on Mac?
- How To Do Oppo Reno 11F 5G Screen Sharing | Dr.fone
- In 2024, How to Screen Mirroring Honor X50i? | Dr.fone
- In 2024, How to Bypass iCloud Lock from iPhone 14 Pro
- In 2024, A Step-by-Step Guide on Using ADB and Fastboot to Remove FRP Lock on your Nokia G42 5G
- In 2024, Unlock Your Poco F5 Pro 5G Phone with Ease The 3 Best Lock Screen Removal Tools
- 7 Solutions to Fix Chrome Crashes or Wont Open on Realme V30T | Dr.fone
- Learn How to Use 3D Camera Tracking in Adobe After Effects and Take Your Skills to the Next Level
- In 2024, How to Unlock SIM Card on Vivo X100 Pro online without jailbreak
- In 2024, Android Unlock Code Sim Unlock Your Sony Xperia 10 V Phone and Remove Locked Screen
- 8 Best Apps for Screen Mirroring Samsung Galaxy A15 4G PC | Dr.fone
- In 2024, How To Unlock a Vivo V29 Pro Easily?
- How to use Pokemon Go Joystick on Xiaomi Redmi A2? | Dr.fone
- How to Change Netflix Location to Get More Country Version On Motorola Moto G 5G (2023) | Dr.fone
- New 2024 Approved Chrome Video Translators Top 5 Video Translation Chrome Extensions
- Top 10 Fixes for Phone Keep Disconnecting from Wi-Fi On Nubia Z50 Ultra | Dr.fone
- How to Find iSpoofer Pro Activation Key On Honor Magic5 Ultimate? | Dr.fone
- Easy Ways to Manage Your Samsung Galaxy S23 Ultra Location Settings | Dr.fone
- Best Photo Slideshow Maker How to Make a Photo Slideshow
- In 2024, How Do You Get Sun Stone Evolutions in Pokémon For Vivo Y78+ (T1) Edition? | Dr.fone
- 2024 Approved Animate Your Photo Online with These Awesome Tools
- How To Fix Unresponsive Touch Screen on Tecno Camon 20 Premier 5G | Dr.fone
- Title: 2024 Approved AVI Video Editing Essentials Top T
- Author: Amelia
- Created at : 2024-05-19 11:47:09
- Updated at : 2024-05-20 11:47:09
- Link: https://ai-driven-video-production.techidaily.com/2024-approved-avi-video-editing-essentials-top-t/
- License: This work is licensed under CC BY-NC-SA 4.0.
