
:max_bytes(150000):strip_icc():format(webp)/dns-wordcloud-lifewire-2-0c92c02113cb4832870891ac0e13ccbc.png)
In 2024, The Ultimate Guide to Free Video Looping Software for Windows and Mac
The Ultimate Guide to Free Video Looping Software for Windows and Mac
Video loops are common online. Most of them may be found on Twitter, YouTube, Facebook, Instagram, and other social media platforms. This may be an excellent way to emphasize a point or make the information more enjoyable.
In addition, it’s a great idea to play the video in repeat mode when you find a certain piece of a video or an entire clip very intriguing and want to watch it again and again for yourself, your friends, or your intended audience on your social media account.
The loopers come in here because they help make the movie loop several times. In this article, we will share a list of free Video Looper online solutions that, according to their regulations, enable you to repeat a piece of video.
In this article
01 Best Video Loopers to Loop Videos for Free on Windows and Mac
02 Create Boomerang Loop withWondershare Filmora Video Editor
Part 1: Best Video Loopers to Loop Videos for Free on Windows and Mac
Whatever you are motivated to create a video loop, you should know that it’s a straightforward process. If you wish to create a looping video, you’ll need to download a video editing tool. Here we will cover the best free video looper for you and how you can create a loop video.
1. Window Media Player
Windows Media Player offers a clean and intuitive interface, outstanding performance, particularly with big media libraries, and solid integration with Urge, the company’s de facto music streaming service. Whenever Windows Media Player approaches the finish of a video, it gives you the option to repeat it manually, but it does not do it routinely.
Enabling the Repeat function, on the other hand, directs Media Player to play the video in a constant loop until you actively stop it or shut the software. Looping a video impacts the rest of the video from start to finish; Media Player does not only allow you to loop a portion of it but more.
How to Loop Video in Windows Media Player?
Step 1: Drag your mouse pointer over the Media Player window in Now Playing status to reveal the playback settings.
Step 2: To continually repeat the movie, click the Turn Repeat On button, denoted by a circular arrow, and glows blue when toggled on.
(Note: If you don’t see this button in a tiny playing window, select the square Maximize symbol or drag the video corners to expand the window bigger).
Step 3: Until you exit the application or click the Turn Repeat Off icon, the Repeat option will repeat the whole video.

Note: When you close the window, your prior feature selection is retained; thus, the next video you watch will play in a loop until you turn off the Repeat feature.
2. QuickTime Player
QuickTime Player is a basic application that allows you to watch videos and record screencasts on your Mac. You may also produce your videos and audio recordings and do rapid changes. Basic activities such as video flipping and clip splitting are included in edits.
You can record a screencast of a lecture, or capture a portion of the screen with QuickTime, which is ideal for creating a video lesson for an application. Using QuickTime, you may cut the length of video clips or merge many pieces into a single film. Drag the clips to a film window - QuickTime dynamically scales or trims them to fit the size of the movie.
It can also play your video on loop. Here’s how:
How to Loop Video with QuickTime Player?
If you’re using a Mac and wish to generate a video loop in QuickTime Player, follow these steps:
Step 1: Launch the QuickTime player to watch any video.
Step 2: In the taskbar at the top right of the screen, select View.
Step 3: From the drop-down option, select Loop. And that’s it. You have put a video on loop.

These two video programs simplify setting up videos to run on repeat; they don’t allow you to loop individual video parts. To do so, you’ll need more powerful software, such as the well-known VLC Media Player.
3. VLC Media Player
The VLC media player is a program that allows you to play video and music files on your computer. The VLC player can operate on several operating systems, including Windows 2021, XP, and Mac OS X, because of the device’s powerful CPUs.
This makes the VLC Media Player an excellent alternative for anybody searching for a media player that can simultaneously run many programs. This free video editing program also includes special capabilities that allow it to execute numerous jobs simultaneously, including video editing, data transmission, graphic display, sound editing, and much more.
How to Loop a part of the Video in VLC Media Player Continuously?
Create a beginning point A and an ending point B, which are in the center of VLC’s timeline. There is a control button for the A to B looping function in the Advanced Controls. The starting and ending positions inside a media file can be specified by bringing up the advanced controls first. Now follow these steps to put a video on loop in the VLC media player:
Step 1: Open the video with VLC media player. Go to View. Select the Advanced Controls option.

Step 2: Go to the bottom of the VLC media player, and you will find 4 controls above the play button. Click the third button Loop from Piont A to Point B continuously to mark the starting point of the loop; and then click the third button again to mark the end of the loop.

Step 3: Click the Play button and you will find the video is playing loop. Until you press the Loop from point A to point B option for the third time to discontinue the looped playback, the segment of the clip you’ve put up will keep on playing on loop.
4. iMovie
iMovie is a fantastic tool for making beautiful short films, music videos, picture slideshows, and other creative projects. You may also loop videos straight in the iMovie software; however, you’ll need to utilize QuickTime to loop movies continually if you want to export them. Here are the quick and easy ways to loop a movie into iMovie.
How to Loop Video in iMovie?
Step 1: Open iMovie and then the video clip you want to loop in.
Step 2: Select the Loop Playback option from the View menu. Once the video begins to play, it will loop indefinitely until you stop it.
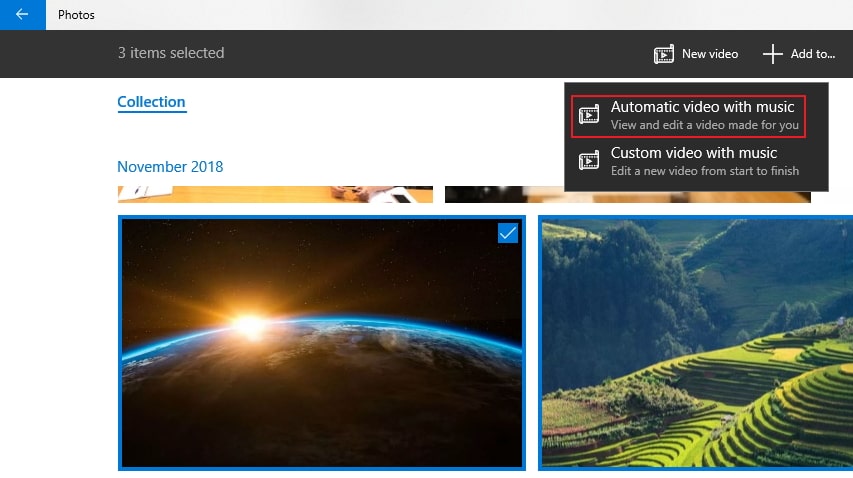
5. Windows Photos App
Microsoft Photos, a free photo viewer and editor bundled with Windows 10, provides capable image editing and photo improvements and capabilities for organizing and editing movies, all in a touch-friendly interface.
You may doodle on photographs, apply background music and 3D effects to videos , and use automated object tagging to make searching easier. Microsoft Photos is a wonderful tool for dealing with digital photographs, and for certain users, it may even replace third-party photo applications.
How to Loop Video in Windows 10 Photos app?
Windows 10 comes with the Photos app preinstalled. It can also assist you in making your movie loop. Here’s how to do it.
Step 1: Import your video to the Photos app, and use the trim tool to get the part you want to loop.

Step 2: Copy and paste the trimmed video to the storyboard as many times as you like. And then click the Finish Video button to export the video.

Part 2: Create Boomerang Loop with Wondershare Filmora Video Editor
Looping a movie is not a difficult chore for anyone, even a novice. As we all know, most video players cease playing when a video approaches its climax. You can manually reverse the portion if you wish to see it with Boomerang effects.
You may loop and enjoy the video you like continuously when you do a new project in Wondershare Filmora Video Editor , a video editor for all video content creators.
For Win 7 or later (64-bit)
For macOS 10.12 or later
Furthermore, this multi-functional program may trim, clip, divide or combine films to your liking. To loop any video in Filmora, follow these steps:
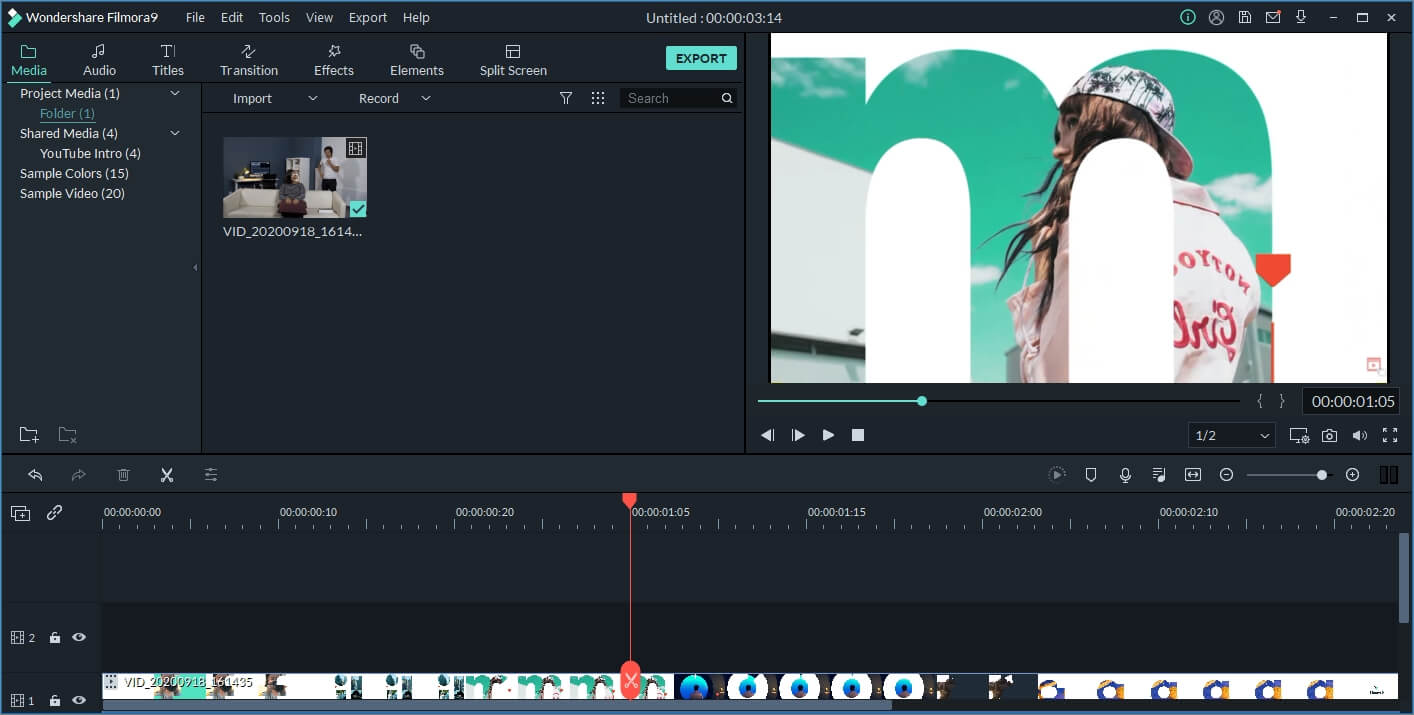
Step 1: Launch the Filmora video editor and import the video file. Click on File>Import Media>Import Media Files. And then drag the video file to the timeline. Do some basic editing such as trimming and cutting to get the segments that you want to loop with the Boomerang effect, if necessary.

Step 2: Copy and paste the video file on the timeline, and then change the speed of the pasted video to apply the Reverse effect. Repeat the process to loop the video as many times as you want.

Step 3: Export the video files when you’re done. Click on Export and save the looping video as a video or gif, and then select the location where you want to save the file.
Summary
Depending on your taste, the number of video loops required, and the amount of information you need when creating a full-fledged film with repeats, you can use any software described above. If you need a more advanced option, Wondershare Filmora video editor is your best alternative in terms of Video Loopers. It is not only a free video looper, but it also has several additional capabilities that allow you to create a full output with granular changes.
02 Create Boomerang Loop withWondershare Filmora Video Editor
Part 1: Best Video Loopers to Loop Videos for Free on Windows and Mac
Whatever you are motivated to create a video loop, you should know that it’s a straightforward process. If you wish to create a looping video, you’ll need to download a video editing tool. Here we will cover the best free video looper for you and how you can create a loop video.
1. Window Media Player
Windows Media Player offers a clean and intuitive interface, outstanding performance, particularly with big media libraries, and solid integration with Urge, the company’s de facto music streaming service. Whenever Windows Media Player approaches the finish of a video, it gives you the option to repeat it manually, but it does not do it routinely.
Enabling the Repeat function, on the other hand, directs Media Player to play the video in a constant loop until you actively stop it or shut the software. Looping a video impacts the rest of the video from start to finish; Media Player does not only allow you to loop a portion of it but more.
How to Loop Video in Windows Media Player?
Step 1: Drag your mouse pointer over the Media Player window in Now Playing status to reveal the playback settings.
Step 2: To continually repeat the movie, click the Turn Repeat On button, denoted by a circular arrow, and glows blue when toggled on.
(Note: If you don’t see this button in a tiny playing window, select the square Maximize symbol or drag the video corners to expand the window bigger).
Step 3: Until you exit the application or click the Turn Repeat Off icon, the Repeat option will repeat the whole video.
Note: When you close the window, your prior feature selection is retained; thus, the next video you watch will play in a loop until you turn off the Repeat feature.
2. QuickTime Player
QuickTime Player is a basic application that allows you to watch videos and record screencasts on your Mac. You may also produce your videos and audio recordings and do rapid changes. Basic activities such as video flipping and clip splitting are included in edits.
You can record a screencast of a lecture, or capture a portion of the screen with QuickTime, which is ideal for creating a video lesson for an application. Using QuickTime, you may cut the length of video clips or merge many pieces into a single film. Drag the clips to a film window - QuickTime dynamically scales or trims them to fit the size of the movie.
It can also play your video on loop. Here’s how:
How to Loop Video with QuickTime Player?
If you’re using a Mac and wish to generate a video loop in QuickTime Player, follow these steps:
Step 1: Launch the QuickTime player to watch any video.
Step 2: In the taskbar at the top right of the screen, select View.
Step 3: From the drop-down option, select Loop. And that’s it. You have put a video on loop.
These two video programs simplify setting up videos to run on repeat; they don’t allow you to loop individual video parts. To do so, you’ll need more powerful software, such as the well-known VLC Media Player.
3. VLC Media Player
The VLC media player is a program that allows you to play video and music files on your computer. The VLC player can operate on several operating systems, including Windows 2021, XP, and Mac OS X, because of the device’s powerful CPUs.
This makes the VLC Media Player an excellent alternative for anybody searching for a media player that can simultaneously run many programs. This free video editing program also includes special capabilities that allow it to execute numerous jobs simultaneously, including video editing, data transmission, graphic display, sound editing, and much more.
How to Loop a part of the Video in VLC Media Player Continuously?
Create a beginning point A and an ending point B, which are in the center of VLC’s timeline. There is a control button for the A to B looping function in the Advanced Controls. The starting and ending positions inside a media file can be specified by bringing up the advanced controls first. Now follow these steps to put a video on loop in the VLC media player:
Step 1: Open the video with VLC media player. Go to View. Select the Advanced Controls option.
Step 2: Go to the bottom of the VLC media player, and you will find 4 controls above the play button. Click the third button Loop from Piont A to Point B continuously to mark the starting point of the loop; and then click the third button again to mark the end of the loop.
Step 3: Click the Play button and you will find the video is playing loop. Until you press the Loop from point A to point B option for the third time to discontinue the looped playback, the segment of the clip you’ve put up will keep on playing on loop.
4. iMovie
iMovie is a fantastic tool for making beautiful short films, music videos, picture slideshows, and other creative projects. You may also loop videos straight in the iMovie software; however, you’ll need to utilize QuickTime to loop movies continually if you want to export them. Here are the quick and easy ways to loop a movie into iMovie.
How to Loop Video in iMovie?
Step 1: Open iMovie and then the video clip you want to loop in.
Step 2: Select the Loop Playback option from the View menu. Once the video begins to play, it will loop indefinitely until you stop it.
5. Windows Photos App
Microsoft Photos, a free photo viewer and editor bundled with Windows 10, provides capable image editing and photo improvements and capabilities for organizing and editing movies, all in a touch-friendly interface.
You may doodle on photographs, apply background music and 3D effects to videos , and use automated object tagging to make searching easier. Microsoft Photos is a wonderful tool for dealing with digital photographs, and for certain users, it may even replace third-party photo applications.
How to Loop Video in Windows 10 Photos app?
Windows 10 comes with the Photos app preinstalled. It can also assist you in making your movie loop. Here’s how to do it.
Step 1: Import your video to the Photos app, and use the trim tool to get the part you want to loop.
Step 2: Copy and paste the trimmed video to the storyboard as many times as you like. And then click the Finish Video button to export the video.
Part 2: Create Boomerang Loop with Wondershare Filmora Video Editor
Looping a movie is not a difficult chore for anyone, even a novice. As we all know, most video players cease playing when a video approaches its climax. You can manually reverse the portion if you wish to see it with Boomerang effects.
You may loop and enjoy the video you like continuously when you do a new project in Wondershare Filmora Video Editor , a video editor for all video content creators.
For Win 7 or later (64-bit)
For macOS 10.12 or later
Furthermore, this multi-functional program may trim, clip, divide or combine films to your liking. To loop any video in Filmora, follow these steps:
Step 1: Launch the Filmora video editor and import the video file. Click on File>Import Media>Import Media Files. And then drag the video file to the timeline. Do some basic editing such as trimming and cutting to get the segments that you want to loop with the Boomerang effect, if necessary.
Step 2: Copy and paste the video file on the timeline, and then change the speed of the pasted video to apply the Reverse effect. Repeat the process to loop the video as many times as you want.
Step 3: Export the video files when you’re done. Click on Export and save the looping video as a video or gif, and then select the location where you want to save the file.
Summary
Depending on your taste, the number of video loops required, and the amount of information you need when creating a full-fledged film with repeats, you can use any software described above. If you need a more advanced option, Wondershare Filmora video editor is your best alternative in terms of Video Loopers. It is not only a free video looper, but it also has several additional capabilities that allow you to create a full output with granular changes.
Vlogger’s Paradise: 14 Best Video Editing Software for Hot Platforms
Best 10 Vlog Video Editing Software [Free & Paid]

Ollie Mattison
Mar 27, 2024• Proven solutions
Nowadays, more and more people are tending to share their life with short videos on social media platforms such as YouTube, Facebook, Instagram TV and Vimeo. Consequently, aspiring and accomplished vloggers must have at least basic video editing tools at their disposal that enable them to produce captivating visual content which grabs the audience’s attention.
If you’re curious about what software vloggers use, what is the best video editing software for vlogging, or which video editor to choose for YouTube vlog videos, you will get some clues based on the information below.
We’ve researched the internet and picked up the top 10 best video editing software for vlogging, which allows to record as well as edit videos easily for vlogs.
- Part 1: Best Free Vlog Video Editing Software for Beginners
- Part 2: Advanced Vlog Video Editing Software Products on Mac & PC Computers for semi-pros and pros
- Part 3: How to Edit Vlog Videos [Video Tutorial: take travel vlog video as an example]
Best Free & Paid Vlog Editing Software for Vloggers on YT/FB/Ins/Vimeo in 2024
Besides shooting with a goodvlogging camera , the post-production process is very important to your vlogging as well. The complexity of the videos you intend to produce should be one of the first things you consider when choosing vlog video editing software. For instance, if you don’t have a lot of experience in the field and you’d just like to piece a few clips together, then there is no reason to spend extensive amounts of money on professional video editing software.
For Win 7 or later (64-bit)
 Secure Download
For macOS 10.12 or later
Secure Download
Here we’ve sorted out some of the best video editing software for vloggers available on the market depending on your skills and experience level. Some of them are totally free to use, while some still provide unlimited free trial version such as Filmora. You can identify with one which is right for your needs after trying. But at first, let’s have a look at some of the free vlog editing options novice and advanced video editors have at their disposal.
Part 1: Best Free Vlog Video Editing Software for Beginners
1. Windows Built-in Movie Maker for Windows 7 and Photos app for Windows 10
Price: Free
Compatibility: Windows OS
Windows Movie Maker used to be bundled with the Windows operating system and has been assisting amateurs for a very long time. It features the drag-n-drop functions and offers almost all the classic video editing functions including trim, rotate, split, combine as well as adding music track, filters, and themes. The windows movie maker is simple yet the function is limited. After you editing one or two vlog videos with it, you will find that.
However, Windows Movie Maker has been discontinued, and it is no longer available for download, but if you are using an older version of the Windows 7 operating system, you can still edit your videos with this iconic PC-based software. The newcomers to the world of vlogging can use this software to put several video clips together or to perform basic video editing actions like cutting or trimming. Windows Movie Maker never had much to offer to skilled video editors, so if you take vlogging seriously, you won’t spend too much time editing your videos with it. Check our Picks of theBest Free Video Editing Software for Windows in 2020 >>

The latest news, Microsoft will stop supporting Windows 7 in January 2020. If you’re looking for some video editing software designed for Windows10, check some of the best movie makers for Windows 10 . If you’ve already updated and run to Windows10, you can also use the in-built Windows10 Photos app. The Photos app in Windows 10 allows you to pick up a theme, soundtrack to make a video easily. One of the interesting features of Photos is that you can choose a star and then it will create a video which focused on that person with videos and pics of your media collection. Learn more details about how to edit videos in the Photos app with Story Remix
What we like:
Totally free for windows users and the automatic video creation feature is interesting
What we don’t like:
Video Editing Features are limited
Only for Windows users
2. iMovie
Price: Free
Compatibility: MacOS and iOS
iMovie is a free video editing software for vloggers who using Mac to edit vidoes. It is equipped with an array of fantastic and practical video editing features, iMovie is an idea video editing tool for anyone. Comes with every new iMac, it’s free of charge and provides a wide range of effects and tools sets, thus it’s always considered as an essential tool for any Mac user to enhance their vologs.
Despite a somewhat limited scope of video editing features iMovie provides, the software is still powerful enough to enable you to edit footage captured in resolutions up to 4K . Additionally, you can create titles , apply visual effects and filters to video clips, or even record your own voiceovers. iMovie’s file sharing capabilities are perfectly suited for vlogging as you can upload a video to your YouTube channel or Facebook account directly from the software.
What we like:
Totally free for Mac users and you can also use it on iPhone or iPad to edit vlog videos
What we don’t like:
Limited features and effects
Only for Mac or iOS users
3. VSDC Free Video Editor
Price: Free
Compatibility: Windows
This non-linear editor seems to be a perfect solution for both established and aspiring vloggers because it offers a lot of video editing tools that are incredibly easy to use. Moreover, the software supports nearly all common image andvideo file formats , which means that you can record your vlog entries with any digital camera. The best part is that VSDC enables its users to export videos in HD and 4K resolutions directly to YouTube. The only downside is that you can only install this vlog editor on a PC computer.
What we like:
Anyone without previous knowledge can use this tool
What we don’t like:
Sometimes errors appear when opening the software
4. GoPro Quik Desktop app
Price: Free
Compatibility: Windows and MacOS
If you’re traveling around the world and spend a lot of time on the road shooting videos with a GoPro action camera, then you can try using the Quik desktop app to edit your vlog videos. The Quik video editor is perfectly optimized for editing footage captured with different models of GoPro cameras, but the amount of video editing options the app provides can be a bit underwhelming for professionals. This is a great option if the laptop you carry with you on your journeys doesn’t have enough processing power to run a more powerful video editing software. However, if you rarely use GoPro cameras to record your footage, then this video editing app won’t have a lot to offer you.
What we like:
It offers cloud storage
What we don’t like:
Some good features are paid and expensive
5. DaVinci Resolve
Price: Free and premium version
Compatibility: Windows and MacOS
Tools like Filmora and Adobe Premiere are full of great features, but these blessings come with a price. That’s why people love working on DaVinci, as most of its features are free. The good thing is that you can do all sorts of video editing using this software. While this editor is awesome for vlogs, it is already under significant usage in the Hollywood industry.
Although this software has a premium version with additional features, I have found everything I looked for in the free version. That includes color grading, animations, text, and effects. Moreover, it has a customizable and easy interface. But to be honest, you will find it a bit tricky at first. Also, you might need to watch some YouTube tutorials to get started with DaVinci Resolve.
What we like:
Complete video production tool with audio post-production options
What we don’t like:
4K video editing requires a premium version
6. VN Video Editor
Price: Free
Compatibility: iOS, Android, Mac, and Windows OS
Not many people have heard this name, but VN Video Editor is the best tool for cross-platform operating systems, including iOS and Android. You can also download this tool on your Mac and Windows.
Another fantastic thing about this software is that it’s free and doesn’t even leave a visible watermark on the edited stuff. Furthermore, it doesn’t demand any heavy system requirements whether you’re using it on a smartphone or computer.
You can use this tool on an Apple laptop or computer by downloading this tool from the Apps Store. However, the problem is that you can’t directly download VN Video Editor on your Windows PC. You have to go through a bit of struggle to use it on your system. First, you need to download BluesSacks and then search and install VN Video Editor through Google Play. Here’s a video for your reference.
So, is this struggle worth doing it? Let’s be realistic! I won’t tell you that you can edit an entire Christopher Nolan movie with it, but as a vlogging tool, this has almost everything you will need to make cool videos.
What we like:
No watermark and easy to use
What we don’t like
No direct download link
Not meant for professional editors
7. VideoPad
Price: Free and premium version
Compatibility: Mac and Windows OS
Despite being an old tool, VideoPad is still known to be an excellent pick if you’re looking for free editing software for vlogging. It has a simple interface and is extremely easy to use. Anyone with a bit of interest and knowledge can start editing videos without learning from tutorials.
In my experience, this software is almost similar to Filmora regarding easiness. However, compared to Filmora, it lacks some essential presets. Besides, the interface looks old. But it doesn’t mean that this tool lacks some modern traits.
Furthermore, the editor allows you to export videos in multiple formats, making it great for YouTube videos.
What we like:
The free version includes lots of exciting features
Affordable upgrade
What we don’t like:
Unable to export mp4 and limited audio tracks in free version
8. VideoProc Vlogger
Price: Free
Compatibility: Mac and Windows OS
VideoProc Vlogger is specially designed for vlogging. It is great for both beginners and professionals. It has an easy interface and options with lots of unique features, including 28 motion presets, pan & zoom, and motion cropping.
Likewise, you can also do color grading and color correction along with HSL color adjustment. In the same way, you can fix low light and overexposure and reduce noise.
A few more features of VideoProc Vlogger include fisheye removal, time-lapse, split screen, green screen, text addition, voice recording, audio extractor, and more.
What we like:
100% secure
Free tech – support
Video tutorials available
What we don’t like:
Minor issues with clips splitting
Part 2: Best Vlog Video Editing Software Products for Semi-pros & pros
1. Wondershare Filmora
Price: $79.99 for a perpetual license
Compatibility: Windows and MacOS
This vlog software is easy to edit videos for all creators. Both skilled video editing professionals and vlogging enthusiasts can use Filmora equally effectively to produce captivating videos. With its ability to record both Webcam and desktop screen, and voiceover directly and upload to YouTube and Vimeo social media platform, it has become one of the best solutions for Vloggers to edit their videos. Filmora is an easily mastered tool that enables users to join, cut, split, rotate, crop clips within clicks.


Besides a rich filter gallery and an impressive collection of royalty-free music , the Filmora’s latest update brings improved color correction and audio features. You can add up to a hundred video and audio tracks to the timeline and take full advantage of the software’s compositing capabilities.
It also stocks a list of filters and options to add extra touches to your video. Vloggers can easily add annotations to their videos , create a PIP effect, or even stabilize shaky footage . The software’s file-sharing capabilities, as well as the fast rendering speeds, make it one of the best vlog video editors in 2020. What’s more, it offers you a lot of fashion and beautiful effects for Game, Beauty, Education, Travel, etc. It is now PC & Mac Cross-compatible, which means you can edit the Projects on either Operating system.
What we like:
Remove background noise easily
Record Voiceover, desktop, webcam simultaneously and change speed easily
Plenty Filters, Overlays, Effects (really important for vloggers)
Intuitive Interface & Easy to Use
What we don’t like:
Need to pay to remove the watermark
2. Lightworks
Price: Free version available $24.99 per month
Compatibility: Windows, Linus, and MacOS
Even the free version of this professional video editor offers the option to export 720p HD videos to Vimeo or YouTube. Furthermore, advanced Multicam editing features, as well as a rich effects library, make Lightwork an excellent choice for vlog editing even if you don’t want to purchase one of the available subscription plans. Vloggers who choose to purchase a monthly or an annual subscription have a much wider range of options at their disposal, so it is best to try the free version of Lightworks before you decide if you want to use it to edit your vlog entries on a constant basis.
What we like:
Proper support forum to get guidance
What we don’t like:
Some users find the interface extremely difficult
3. Adobe Premiere Pro
Price: $20.99 per month, as a single app
Compatibility: Windows and MacOS
Adobe Premiere is one of the best video editing apps ever created, if not the best, so if you’re looking for a reliable video editor with plenty of advanced video editing features, this is probably your best choice. The seemingly endless collection of tools, visual effects, and animation features will ensure that each video you edit in Adobe Premiere Pro meets the highest professional standards.

Vloggers in need of a powerful video editing app that is capable of performing even the most demanding video editing tasks will benefit from purchasing Adobe Premiere Pro as a single app or as a part of some other Creative Cloud plan.
It also supports manythird-party plug-ins for additional features. Please note that there is a 30-day limited trial period, so if you edit vlog videos with it, please remember to check before the trial expired, otherwise you can’t access the software anymore. And there will be a watermark in the free trial version as well.
What we like:
Gives you more controls over vlog footage
What we don’t like:
Expensive
Need some editing experience to handle it
4. Final Cut Pro:
Price: $299.99
Compatibility: MacOS
Over the course of the last couple of decades, Final Cut Pro has become one of the most frequently used video editing software packages in the film industry. That’s why it is hardly surprising that the Final Cut’s latest update is among the best vlog video editors you can use in 2020. A broad spectrum of video editing options grants you the creative freedom to visualize any idea, regardless of how complex that idea may be. However, if you are new to Final Cut Pro, you will need a lot of practice in order to be able to utilize its capabilities entirely.

Final Cut Pro is a sophisticated video editing program for professionals . It offers different almost all the video editing features and options you can imagine, such as multi-cam synchronization support, batch sequence capture as well as third-party plug-in support. However, it’s one of the most expensive video editing software available on the market. So think twice before you make the final decision. But professional video editing software costs much ($299) and need more time to learn how to edit with it. Check the video editing tips with Final Cut Pro >>
What we like:
Plugins available which makes it powerful
What we don’t like:
Available on Mac computer only
Professional and not easy to start
5. MAGIX Movie Studio 2024
Price: $69.99 – $99.99 for a lifetime
Compatibility: Windows and MacOS
MAGIX Movie Studio has two versions – advanced editing and simple editing.
You can work on projects in advance editing by creating multiple effects and layers. This version also allows you to edit your 4K videos, color correct them, and make them more stunning. Similarly, it also permits you to apply the green screen effect. However, this is suitable for professionals and takes a lot of time to do job.
On the contrary, the simple editing version comes with essential features, which are also best for quick vlog editing. So if you’re in a hurry and need to upload videos to your channel daily, you can use the simple mode.
And let me add a few more great things which make MAGIX Movie Studio wonderful. For example, there are lots of add-ons available. It has big effects and tools library best for pro vloggers.
What we like:
Affordable pricing for the features it has
What we don’t like:
The software crashes sometimes
6. Camtasia
Price: $299.99 per year
Compatibility: Mac and Windows OS
Camtasia is another kid on the block that is suitable for vloggers. The tool serves best on projects, including how-to-videos, tutorials, and instructional videos.
Camtasia has all the basic features you may need to edit YouTube videos, including animations, motion graphics, and more. Additionally, it comes with a screen recorder and green-screen effects.
What we like:
Simple interface
What we don’t like:
Expensive
Slow video rendering
Part 3: How to Edit Vlog Videos in Filmora Vlog Editing Software [Video Tutorial & Detailed Steps]
The video tutorial below will show you how to edit a travel vlog with this vlog editing software. If you don’t have time to watch the video tutorial right now, you can check our brief guide [3 steps] of how to edit vlog videos in Filmora below.
Bonus: More and more people are making money with videos, want to know how? Check our YouTube monetarization guide about How to make money on YouTube .
1. Importing Vlog Videos
Click the Import option or select Import Media Files Here to navigate to import your vlog video materials. It allows you to import folders from disks or from your iPhone or camera even from your social media account.

Then drag and drop the vlog media to the timeline to edit.
2. Editing Vlog Footage
It provides all the basic editing features such as trimming, cutting, deleting, rotating and flipping, as well as advanced features such as video stabilization, color grading, background noise removing and green screen compositing and blending. We know that most vloggers need filters and transition, all these effects are available on Filmora Effects library and Transition library, and you can also click Filmstock

3. Export vlog footage and share to YouTube/Vimeo or Save
Click the Export button to enter the Export window, here you can choose to save the video to popular formats on your computer, or save to mobile devices such as iPhone, iPad, and Android phone, or to TVs as well. You can also upload the vlog video to YouTube and Vimeo directly.

You can also check the step-by-step tutorial aboutHow to edit videos to know more details .
Related: How to create amazing food vlog or family vlog ?
Conclusion
Above are our picks of the best video editing software for vloggers, some are designed for free for video editing novices, while after editing several vlog videos, you may need professional ones, so I also introduced some video editing software for professionals. Having the right equipment is much more important than having the most expensive equipment. So instead of simply buying the priciest video editing software, you can find on the market, you should choose a video editor that provides all the tools you’ll need to create a vlog. Which video editing software are you going to be using to edit your vlogs in 2020?
FAQs About Vlog Video Editing
1. What Video Editing Software Do Vloggers Use?
Vloggers use a wide range of video editors based on their needs. Beginners who need a free & straightforward editor for light editing typically go for editors such as iMovie, Windows 10 Photos, etc. But consumer and pro-level Vloggers opt for more capable alternatives like Filmora. Drag-n-drop actions handle most of the editing in Filmora. Thanks to this, applying transitions, effects & filters is a breeze. There is an extensive library of stock content which is crucial for vloggers. Trendy filters & effects, Action Cam tool combined with 4K support makes it a must-have for vloggers.
2. What Is the Best Vlog Editing Software for Windows Free?
Microsoft Photos is the best free video editor for Windows. It delivers a solid video editing package in a simple interface. Since it comes built-in with Windows, no additional hassle is necessary. Microsoft Photos can create automatic videos from your media library. The videos don’t always turn out great, but they save a lot of time which you can dedicate to vlogging. You can choose from six themes to automatically take care of your text, filters, and soundtrack. The filters also come in eleven flavors to spice up your video.
For Win 7 or later (64-bit)
Secure Download
For macOS 10.12 or later
Secure Download
If you prefer to record vlog and edit it on your phones, you can check our picks of the Best Vlog Editor Apps [iOS & Android] .
Ollie Mattison
Ollie Mattison is a writer and a lover of all things video.
Follow @Ollie Mattison
Ollie Mattison
Mar 27, 2024• Proven solutions
Nowadays, more and more people are tending to share their life with short videos on social media platforms such as YouTube, Facebook, Instagram TV and Vimeo. Consequently, aspiring and accomplished vloggers must have at least basic video editing tools at their disposal that enable them to produce captivating visual content which grabs the audience’s attention.
If you’re curious about what software vloggers use, what is the best video editing software for vlogging, or which video editor to choose for YouTube vlog videos, you will get some clues based on the information below.
We’ve researched the internet and picked up the top 10 best video editing software for vlogging, which allows to record as well as edit videos easily for vlogs.
- Part 1: Best Free Vlog Video Editing Software for Beginners
- Part 2: Advanced Vlog Video Editing Software Products on Mac & PC Computers for semi-pros and pros
- Part 3: How to Edit Vlog Videos [Video Tutorial: take travel vlog video as an example]
Best Free & Paid Vlog Editing Software for Vloggers on YT/FB/Ins/Vimeo in 2024
Besides shooting with a goodvlogging camera , the post-production process is very important to your vlogging as well. The complexity of the videos you intend to produce should be one of the first things you consider when choosing vlog video editing software. For instance, if you don’t have a lot of experience in the field and you’d just like to piece a few clips together, then there is no reason to spend extensive amounts of money on professional video editing software.
For Win 7 or later (64-bit)
Secure Download
For macOS 10.12 or later
Secure Download
Here we’ve sorted out some of the best video editing software for vloggers available on the market depending on your skills and experience level. Some of them are totally free to use, while some still provide unlimited free trial version such as Filmora. You can identify with one which is right for your needs after trying. But at first, let’s have a look at some of the free vlog editing options novice and advanced video editors have at their disposal.
Part 1: Best Free Vlog Video Editing Software for Beginners
1. Windows Built-in Movie Maker for Windows 7 and Photos app for Windows 10
Price: Free
Compatibility: Windows OS
Windows Movie Maker used to be bundled with the Windows operating system and has been assisting amateurs for a very long time. It features the drag-n-drop functions and offers almost all the classic video editing functions including trim, rotate, split, combine as well as adding music track, filters, and themes. The windows movie maker is simple yet the function is limited. After you editing one or two vlog videos with it, you will find that.
However, Windows Movie Maker has been discontinued, and it is no longer available for download, but if you are using an older version of the Windows 7 operating system, you can still edit your videos with this iconic PC-based software. The newcomers to the world of vlogging can use this software to put several video clips together or to perform basic video editing actions like cutting or trimming. Windows Movie Maker never had much to offer to skilled video editors, so if you take vlogging seriously, you won’t spend too much time editing your videos with it. Check our Picks of theBest Free Video Editing Software for Windows in 2020 >>
The latest news, Microsoft will stop supporting Windows 7 in January 2020. If you’re looking for some video editing software designed for Windows10, check some of the best movie makers for Windows 10 . If you’ve already updated and run to Windows10, you can also use the in-built Windows10 Photos app. The Photos app in Windows 10 allows you to pick up a theme, soundtrack to make a video easily. One of the interesting features of Photos is that you can choose a star and then it will create a video which focused on that person with videos and pics of your media collection. Learn more details about how to edit videos in the Photos app with Story Remix
What we like:
Totally free for windows users and the automatic video creation feature is interesting
What we don’t like:
Video Editing Features are limited
Only for Windows users
2. iMovie
Price: Free
Compatibility: MacOS and iOS
iMovie is a free video editing software for vloggers who using Mac to edit vidoes. It is equipped with an array of fantastic and practical video editing features, iMovie is an idea video editing tool for anyone. Comes with every new iMac, it’s free of charge and provides a wide range of effects and tools sets, thus it’s always considered as an essential tool for any Mac user to enhance their vologs.
Despite a somewhat limited scope of video editing features iMovie provides, the software is still powerful enough to enable you to edit footage captured in resolutions up to 4K . Additionally, you can create titles , apply visual effects and filters to video clips, or even record your own voiceovers. iMovie’s file sharing capabilities are perfectly suited for vlogging as you can upload a video to your YouTube channel or Facebook account directly from the software.
What we like:
Totally free for Mac users and you can also use it on iPhone or iPad to edit vlog videos
What we don’t like:
Limited features and effects
Only for Mac or iOS users
3. VSDC Free Video Editor
Price: Free
Compatibility: Windows
This non-linear editor seems to be a perfect solution for both established and aspiring vloggers because it offers a lot of video editing tools that are incredibly easy to use. Moreover, the software supports nearly all common image andvideo file formats , which means that you can record your vlog entries with any digital camera. The best part is that VSDC enables its users to export videos in HD and 4K resolutions directly to YouTube. The only downside is that you can only install this vlog editor on a PC computer.
What we like:
Anyone without previous knowledge can use this tool
What we don’t like:
Sometimes errors appear when opening the software
4. GoPro Quik Desktop app
Price: Free
Compatibility: Windows and MacOS
If you’re traveling around the world and spend a lot of time on the road shooting videos with a GoPro action camera, then you can try using the Quik desktop app to edit your vlog videos. The Quik video editor is perfectly optimized for editing footage captured with different models of GoPro cameras, but the amount of video editing options the app provides can be a bit underwhelming for professionals. This is a great option if the laptop you carry with you on your journeys doesn’t have enough processing power to run a more powerful video editing software. However, if you rarely use GoPro cameras to record your footage, then this video editing app won’t have a lot to offer you.
What we like:
It offers cloud storage
What we don’t like:
Some good features are paid and expensive
5. DaVinci Resolve
Price: Free and premium version
Compatibility: Windows and MacOS
Tools like Filmora and Adobe Premiere are full of great features, but these blessings come with a price. That’s why people love working on DaVinci, as most of its features are free. The good thing is that you can do all sorts of video editing using this software. While this editor is awesome for vlogs, it is already under significant usage in the Hollywood industry.
Although this software has a premium version with additional features, I have found everything I looked for in the free version. That includes color grading, animations, text, and effects. Moreover, it has a customizable and easy interface. But to be honest, you will find it a bit tricky at first. Also, you might need to watch some YouTube tutorials to get started with DaVinci Resolve.
What we like:
Complete video production tool with audio post-production options
What we don’t like:
4K video editing requires a premium version
6. VN Video Editor
Price: Free
Compatibility: iOS, Android, Mac, and Windows OS
Not many people have heard this name, but VN Video Editor is the best tool for cross-platform operating systems, including iOS and Android. You can also download this tool on your Mac and Windows.
Another fantastic thing about this software is that it’s free and doesn’t even leave a visible watermark on the edited stuff. Furthermore, it doesn’t demand any heavy system requirements whether you’re using it on a smartphone or computer.
You can use this tool on an Apple laptop or computer by downloading this tool from the Apps Store. However, the problem is that you can’t directly download VN Video Editor on your Windows PC. You have to go through a bit of struggle to use it on your system. First, you need to download BluesSacks and then search and install VN Video Editor through Google Play. Here’s a video for your reference.
So, is this struggle worth doing it? Let’s be realistic! I won’t tell you that you can edit an entire Christopher Nolan movie with it, but as a vlogging tool, this has almost everything you will need to make cool videos.
What we like:
No watermark and easy to use
What we don’t like
No direct download link
Not meant for professional editors
7. VideoPad
Price: Free and premium version
Compatibility: Mac and Windows OS
Despite being an old tool, VideoPad is still known to be an excellent pick if you’re looking for free editing software for vlogging. It has a simple interface and is extremely easy to use. Anyone with a bit of interest and knowledge can start editing videos without learning from tutorials.
In my experience, this software is almost similar to Filmora regarding easiness. However, compared to Filmora, it lacks some essential presets. Besides, the interface looks old. But it doesn’t mean that this tool lacks some modern traits.
Furthermore, the editor allows you to export videos in multiple formats, making it great for YouTube videos.
What we like:
The free version includes lots of exciting features
Affordable upgrade
What we don’t like:
Unable to export mp4 and limited audio tracks in free version
8. VideoProc Vlogger
Price: Free
Compatibility: Mac and Windows OS
VideoProc Vlogger is specially designed for vlogging. It is great for both beginners and professionals. It has an easy interface and options with lots of unique features, including 28 motion presets, pan & zoom, and motion cropping.
Likewise, you can also do color grading and color correction along with HSL color adjustment. In the same way, you can fix low light and overexposure and reduce noise.
A few more features of VideoProc Vlogger include fisheye removal, time-lapse, split screen, green screen, text addition, voice recording, audio extractor, and more.
What we like:
100% secure
Free tech – support
Video tutorials available
What we don’t like:
Minor issues with clips splitting
Part 2: Best Vlog Video Editing Software Products for Semi-pros & pros
1. Wondershare Filmora
Price: $79.99 for a perpetual license
Compatibility: Windows and MacOS
This vlog software is easy to edit videos for all creators. Both skilled video editing professionals and vlogging enthusiasts can use Filmora equally effectively to produce captivating videos. With its ability to record both Webcam and desktop screen, and voiceover directly and upload to YouTube and Vimeo social media platform, it has become one of the best solutions for Vloggers to edit their videos. Filmora is an easily mastered tool that enables users to join, cut, split, rotate, crop clips within clicks.
Besides a rich filter gallery and an impressive collection of royalty-free music , the Filmora’s latest update brings improved color correction and audio features. You can add up to a hundred video and audio tracks to the timeline and take full advantage of the software’s compositing capabilities.
It also stocks a list of filters and options to add extra touches to your video. Vloggers can easily add annotations to their videos , create a PIP effect, or even stabilize shaky footage . The software’s file-sharing capabilities, as well as the fast rendering speeds, make it one of the best vlog video editors in 2020. What’s more, it offers you a lot of fashion and beautiful effects for Game, Beauty, Education, Travel, etc. It is now PC & Mac Cross-compatible, which means you can edit the Projects on either Operating system.
What we like:
Remove background noise easily
Record Voiceover, desktop, webcam simultaneously and change speed easily
Plenty Filters, Overlays, Effects (really important for vloggers)
Intuitive Interface & Easy to Use
What we don’t like:
Need to pay to remove the watermark
2. Lightworks
Price: Free version available $24.99 per month
Compatibility: Windows, Linus, and MacOS
Even the free version of this professional video editor offers the option to export 720p HD videos to Vimeo or YouTube. Furthermore, advanced Multicam editing features, as well as a rich effects library, make Lightwork an excellent choice for vlog editing even if you don’t want to purchase one of the available subscription plans. Vloggers who choose to purchase a monthly or an annual subscription have a much wider range of options at their disposal, so it is best to try the free version of Lightworks before you decide if you want to use it to edit your vlog entries on a constant basis.
What we like:
Proper support forum to get guidance
What we don’t like:
Some users find the interface extremely difficult
3. Adobe Premiere Pro
Price: $20.99 per month, as a single app
Compatibility: Windows and MacOS
Adobe Premiere is one of the best video editing apps ever created, if not the best, so if you’re looking for a reliable video editor with plenty of advanced video editing features, this is probably your best choice. The seemingly endless collection of tools, visual effects, and animation features will ensure that each video you edit in Adobe Premiere Pro meets the highest professional standards.
Vloggers in need of a powerful video editing app that is capable of performing even the most demanding video editing tasks will benefit from purchasing Adobe Premiere Pro as a single app or as a part of some other Creative Cloud plan.
It also supports manythird-party plug-ins for additional features. Please note that there is a 30-day limited trial period, so if you edit vlog videos with it, please remember to check before the trial expired, otherwise you can’t access the software anymore. And there will be a watermark in the free trial version as well.
What we like:
Gives you more controls over vlog footage
What we don’t like:
Expensive
Need some editing experience to handle it
4. Final Cut Pro:
Price: $299.99
Compatibility: MacOS
Over the course of the last couple of decades, Final Cut Pro has become one of the most frequently used video editing software packages in the film industry. That’s why it is hardly surprising that the Final Cut’s latest update is among the best vlog video editors you can use in 2020. A broad spectrum of video editing options grants you the creative freedom to visualize any idea, regardless of how complex that idea may be. However, if you are new to Final Cut Pro, you will need a lot of practice in order to be able to utilize its capabilities entirely.
Final Cut Pro is a sophisticated video editing program for professionals . It offers different almost all the video editing features and options you can imagine, such as multi-cam synchronization support, batch sequence capture as well as third-party plug-in support. However, it’s one of the most expensive video editing software available on the market. So think twice before you make the final decision. But professional video editing software costs much ($299) and need more time to learn how to edit with it. Check the video editing tips with Final Cut Pro >>
What we like:
Plugins available which makes it powerful
What we don’t like:
Available on Mac computer only
Professional and not easy to start
5. MAGIX Movie Studio 2024
Price: $69.99 – $99.99 for a lifetime
Compatibility: Windows and MacOS
MAGIX Movie Studio has two versions – advanced editing and simple editing.
You can work on projects in advance editing by creating multiple effects and layers. This version also allows you to edit your 4K videos, color correct them, and make them more stunning. Similarly, it also permits you to apply the green screen effect. However, this is suitable for professionals and takes a lot of time to do job.
On the contrary, the simple editing version comes with essential features, which are also best for quick vlog editing. So if you’re in a hurry and need to upload videos to your channel daily, you can use the simple mode.
And let me add a few more great things which make MAGIX Movie Studio wonderful. For example, there are lots of add-ons available. It has big effects and tools library best for pro vloggers.
What we like:
Affordable pricing for the features it has
What we don’t like:
The software crashes sometimes
6. Camtasia
Price: $299.99 per year
Compatibility: Mac and Windows OS
Camtasia is another kid on the block that is suitable for vloggers. The tool serves best on projects, including how-to-videos, tutorials, and instructional videos.
Camtasia has all the basic features you may need to edit YouTube videos, including animations, motion graphics, and more. Additionally, it comes with a screen recorder and green-screen effects.
What we like:
Simple interface
What we don’t like:
Expensive
Slow video rendering
Part 3: How to Edit Vlog Videos in Filmora Vlog Editing Software [Video Tutorial & Detailed Steps]
The video tutorial below will show you how to edit a travel vlog with this vlog editing software. If you don’t have time to watch the video tutorial right now, you can check our brief guide [3 steps] of how to edit vlog videos in Filmora below.
Bonus: More and more people are making money with videos, want to know how? Check our YouTube monetarization guide about How to make money on YouTube .
1. Importing Vlog Videos
Click the Import option or select Import Media Files Here to navigate to import your vlog video materials. It allows you to import folders from disks or from your iPhone or camera even from your social media account.
Then drag and drop the vlog media to the timeline to edit.
2. Editing Vlog Footage
It provides all the basic editing features such as trimming, cutting, deleting, rotating and flipping, as well as advanced features such as video stabilization, color grading, background noise removing and green screen compositing and blending. We know that most vloggers need filters and transition, all these effects are available on Filmora Effects library and Transition library, and you can also click Filmstock
3. Export vlog footage and share to YouTube/Vimeo or Save
Click the Export button to enter the Export window, here you can choose to save the video to popular formats on your computer, or save to mobile devices such as iPhone, iPad, and Android phone, or to TVs as well. You can also upload the vlog video to YouTube and Vimeo directly.
You can also check the step-by-step tutorial aboutHow to edit videos to know more details .
Related: How to create amazing food vlog or family vlog ?
Conclusion
Above are our picks of the best video editing software for vloggers, some are designed for free for video editing novices, while after editing several vlog videos, you may need professional ones, so I also introduced some video editing software for professionals. Having the right equipment is much more important than having the most expensive equipment. So instead of simply buying the priciest video editing software, you can find on the market, you should choose a video editor that provides all the tools you’ll need to create a vlog. Which video editing software are you going to be using to edit your vlogs in 2020?
FAQs About Vlog Video Editing
1. What Video Editing Software Do Vloggers Use?
Vloggers use a wide range of video editors based on their needs. Beginners who need a free & straightforward editor for light editing typically go for editors such as iMovie, Windows 10 Photos, etc. But consumer and pro-level Vloggers opt for more capable alternatives like Filmora. Drag-n-drop actions handle most of the editing in Filmora. Thanks to this, applying transitions, effects & filters is a breeze. There is an extensive library of stock content which is crucial for vloggers. Trendy filters & effects, Action Cam tool combined with 4K support makes it a must-have for vloggers.
2. What Is the Best Vlog Editing Software for Windows Free?
Microsoft Photos is the best free video editor for Windows. It delivers a solid video editing package in a simple interface. Since it comes built-in with Windows, no additional hassle is necessary. Microsoft Photos can create automatic videos from your media library. The videos don’t always turn out great, but they save a lot of time which you can dedicate to vlogging. You can choose from six themes to automatically take care of your text, filters, and soundtrack. The filters also come in eleven flavors to spice up your video.
For Win 7 or later (64-bit)
Secure Download
For macOS 10.12 or later
Secure Download
If you prefer to record vlog and edit it on your phones, you can check our picks of the Best Vlog Editor Apps [iOS & Android] .
Ollie Mattison
Ollie Mattison is a writer and a lover of all things video.
Follow @Ollie Mattison
Steady Shots: The Best Free Video Stabilization Software
Are you having issues regarding your video quality and looking for a video stabilizer to improve it? Guess what? You can create high-quality videos through free video stabilization software, either for your professional or personal use.
It helps to remove the shakiness you get on videos recorded on handheld devices such as mobile phones. It makes your clips and home movies look more stable and standard. Why upload the same boring and shady videos all the time when you can stabilize them and look more professional? This article takes you through some of the best video stabilization software to stabilize your videos and stand out.
Top 10 Best Free Video Stabilization Software for Windows and Mac
1. iMovie
iMovie is a video editing software available exclusively for iOS and macOS users. It is a complete video editing software that enables users to make professional cinematic movies. Additionally, it allows you to smooth out the shaky footage and create high-quality videos. You also get access to a handful of themes and templates that you can use to customize your videos.
iMovie’s user-friendly interface does not require you to be tech-savvy to operate it. It allows any ordinary user to stabilize videos and yield elegant videos.
Key features:
- It enables easy sharing of movies across mobile devices.
- You can freely adjust the levels of your audio clip.
- Easy green-screen control
- It essentializes professional movie creation
Steps to stabilize shaky clips on iMovie
Step 1: Import the video you want to stabilize into the iMovie application on Mac computer;
Step 2: In the adjustment tab, click on the Stabilization button and turn on Stabilize Shaky Video tool.

Step 3: To adjust the amount of stabilization, click and drag the stabilize shaky video slider.
2. Windows movie maker
Windows Movie Maker is another video stabilizer available exclusively for Windows users. It allows you to make personalized movies and incorporate video, still images, background music, and narration. It is also beneficial for stabilizing videos, adding titles and transactions.
Key features:
- It enables you to add special effects to your videos.
- Options for extensive audio track selection.
- Timeline narration options.
If you are using Windows 7, you are lucky to use Windows Movie Maker to stabilize the shaky videos easily. Watch the video tutorial to find out how.
Steps to stabilize shaky clips on Windows Movie Maker
Step 1: Open the app and click on the Add videos and photos icon, and select the video clip you want to stabilize.
Step 2: Select the portion of the clip that you want to stabilize. You can do this by selecting the shaky video selection option on the right side of the software’s windows.
Step 3: Click on the Edit tab to access the Video stabilization feature.
Step 4: Under the video stabilization feature, you will see three options, namely Anti-shake, Anti-shake and wobble correction- low, Anti-shake and wobble correction- high. Select the most suitable option.

3. HitFilm express
The HitFilm Express is one of the best video stabilization software. It is available for both macOS and Windows. It is an all-in-one video editing software that allows you to import clips and add visual effects and audio to the videos. You can also import your 3D model and create themes like star wars or other animation themes.
Key features:-
- Advance tracking
- Lighting effects
- Muzzle flash effects
- Masking and layering technique
- Screen simulation
Steps to stabilize shaky clips on HitFilm Express
Step 1: Import the clip you want to stabilize and navigate to the control panel.
Step 2: Under the control panel menu, select the track option, and locate your tracking points.
Step 3: It will provide you with two options under the type menu, Single-point position only and double-point position scale/rotation. Select the most appropriate option.
Step 4: Under the purpose-tab, select stabilize options and hit apply.
4. FilmForth
FilmForth is a new name in the video editing industry but it allows you to create videos easily with powerful features. If you are looking for free video stabilization software, FilmForth might be one of them for you. It is compact with powerful and easy-to-apply features.
You can edit video, add filters and transitions, titles, record voiceover, or add background music to video. What’s more, it allows you to save the video without watermark.
Key features:-
- Slideshow maker with photos, videos, music, and effects;
- Change the video background or make the logo transparent;
Steps to stabilize videos using FilmForth
Step 1: Select the stabilize video option under the quick tool menu.
Step 2: Select the video file that you want to stabilize.
Step 3: Manually fill the video resolution, video quality, and frame rate settings.
Step 4: Give the file an output name, and choose the video to save the video file.
5. Video DeShake
Video DeShake is solely developed for video stabilization. You can easily download it from av2video.com. It is an effective solution for video stabilization. However, it does not provide you with fancy video editing features, but if you are looking for an instant solution for video stabilization, it is one of the best options.
Steps to stabilize videos using video Deshake:
Step 1: Download and install video Deshake software from av2video.com.
Step 2: Select the plus icon from the left-aligned menu bar.
Step 3: Select the video file that you want to stabilize.
Step 4: Select your preferred format for the output video, and click on the stabilize option present at the bottom of the interface.
6. Shotcut
Shotcut is a free video stabilizer. You don’t need to sign up or log in to begin. There is no sales funnel waiting for you once you get addicted to using it. Another reason for its popularity is beginner-focused design. It is easy to learn and use. However, it lacks advanced editing features like iMovie or HitFilm Express.
Key features:-
- It can load videos recorded in high resolution or above 60 fps.
- Single frame image extraction options.
- Video stabilization feature
- Blurring effect
Steps to stabilize videos using Shotcut:-
Step 1: Drag the video file you want to stabilize into the software interface. Select the timeline feature to select the portion of the video clip that you want to stabilize.
Step 2: Select the filter tab and follow by selecting the plus button. Under the plus icon, select the monitor option and find the stabilize option under the menu.
Step 3: Customize the stabilizations options according to your specific needs and click on analyze to monitor the stabilization. After stabilization is complete, select the file option and click on save to save the video.
7. Blender
The Blender is free and one of the best video editing software for professionals . Besides video editing, it provides you with 3D modeling, rigging animation, simulation, and motion tracking features . It allows you to perform basic actions like video cuts and splicing and complex tasks like video masking or color grading.
Key features:-
- Live preview, chroma vectorscope, and histogram displays.
- Scrubbing and waveform visualization.
- Audion mixing and syncing.
- Speed control, adjustment layers, transitions, and keyframe options.
Steps to stabilize videos using Blender
Step 1: Begin by going to the motion tracking workspace.
Step 2: Click on open and select the video file you want to stabilize.
Step 3: Select the tracking option from the toolbar and click on the movie to set tracking points.
Step 4: Set the tracking point size and press the right arrow to start tracking.
Step 5: Select the file menu and navigate the save option to save the stabilized video.
8. AVS video stabilizer
AVS video editor is suitable for both beginners and professionals. It enables you to create videos of any resolution and length. It allows you to cut, trim, join, and rotate videos. It also amazes you with the freedom of using over 300 effects. With AVS video editor, you can edit VHS videos and convert them into digital format.
Key features:-
- Audio capture
- Brand overlay
- Customizable templates
- Easy to use interface with drag and drop features
- Multimedia format support
Steps to stabilize videos using AVS video editor:
Step 1: Click on the import option under the media library tab and import the video you want to stabilize.
Step 2: Press the video stabilization button present over the timeline.
Step 3: Under the stabilization video, drag the compensation bar to adjust the degree of stabilization.
Step 4: Click on the ok button at the bottom of the stabilization menu to save the changes.
9. VSDC
VSDC is a free video stabilizer that allows you to stabilize and edit videos of any complexity. It is compact with advanced features to cut and merge video files and apply visual and audio effects to make a slideshow and add appropriate soundtracks. It also facilitates easy video conversion for playback on specific media devices.
Key features:-
- Side by side and split-screen videos
- Videos in the text effects
- Green screen removal
- Double exposure
Steps to stabilize videos using VSDC
Step 1: Open the VSDC video editor, and navigate to the video stabilization feature from the Tools tab.
Step2: Select the open file option and export the video file you want to stabilize.
Step 3: In the stabilization, tab adjust the settings that best suit your specific requirements.
Step 4: Complete the process by clicking on the export project to view the outcome.
10. Openshot
OpenShot video editor is an easy-to-use video stabilization and edition software. It is helping professionals around the world with its excellent video editing features. Another factor that makes it different from other software is its compatibility with multiple operating software. It goes with Mac, Linux and Windows and is easily downloadable from its website.
Key features:-
- Compatible with multiple operating systems (Linux, Mac, and Windows)
- It supports a handful of video audio and image formats.
- Video transition along with the real-time preview.
- Options for creating title and sub-title creation
- Titles formation with 3D animation
Steps to stabilize videos using Openshot
Step 1: Open the video you want to stabilize using the project file tab.
Step 2: Drag the video timeline tab and locate the shaky part of the video you want to stabilize.
Step 3: Select the effects tab and navigate the stabilizer feature from the menu.
Step 4: Drag the stabilizer feature to your video clip in the timeline.
Step 5: You will see the stabilizer: initialize effect window. Select the degree of percentage as per your specific requirements.
Step 6: Select the process effects option.
Bonus: Stabilize shaky videos using Filmora video editor
Filmora video editor is a powerful video stabilizing software filled with powerful editing features. Unlike other editing software, Filmora is compatible with both Windows and Mac.
Some of the above video stabilizers are complex and require expertise. On the other hand, Wondershare Filmora video editor provides you with an easy-to-use interface and easy navigation options.
Key features:
- Modern and intuitive interface.
- Video stabilization in one click.
- Powerful edition features.
- Rich effects and templates.
Steps to stabilize videos using Wondershare Filmora video editor
For Win 7 or later (64-bit)
For macOS 10.12 or later
Step 1: Drag shaky videos into the Filmora video editor timeline.
Step 2: Click on the edit option in the toolbar to access the editing panel.
Step 3: Select the stabilization option from the editing panel.
Step 4: Click the play button to preview the stabilized video clip. It also allows you to stabilize the smooth level to obtain better results.
Conclusion
Videos are the most popular types of content. They instantly convey the message and engage the consumers. However, the quality of your video is crucial from your business perspective. Video stabilizing software provides stability to videos and makes them look professional and smooth.
Even if you don’t use video stabilizers for stabilizing videos for your business purposes, they can still come in handy while stabilizing your private videos.
Steps to stabilize shaky clips on iMovie
Step 1: Import the video you want to stabilize into the iMovie application on Mac computer;
Step 2: In the adjustment tab, click on the Stabilization button and turn on Stabilize Shaky Video tool.
Step 3: To adjust the amount of stabilization, click and drag the stabilize shaky video slider.
2. Windows movie maker
Windows Movie Maker is another video stabilizer available exclusively for Windows users. It allows you to make personalized movies and incorporate video, still images, background music, and narration. It is also beneficial for stabilizing videos, adding titles and transactions.
Key features:
- It enables you to add special effects to your videos.
- Options for extensive audio track selection.
- Timeline narration options.
If you are using Windows 7, you are lucky to use Windows Movie Maker to stabilize the shaky videos easily. Watch the video tutorial to find out how.
Steps to stabilize shaky clips on Windows Movie Maker
Step 1: Open the app and click on the Add videos and photos icon, and select the video clip you want to stabilize.
Step 2: Select the portion of the clip that you want to stabilize. You can do this by selecting the shaky video selection option on the right side of the software’s windows.
Step 3: Click on the Edit tab to access the Video stabilization feature.
Step 4: Under the video stabilization feature, you will see three options, namely Anti-shake, Anti-shake and wobble correction- low, Anti-shake and wobble correction- high. Select the most suitable option.
3. HitFilm express
The HitFilm Express is one of the best video stabilization software. It is available for both macOS and Windows. It is an all-in-one video editing software that allows you to import clips and add visual effects and audio to the videos. You can also import your 3D model and create themes like star wars or other animation themes.
Key features:-
- Advance tracking
- Lighting effects
- Muzzle flash effects
- Masking and layering technique
- Screen simulation
Steps to stabilize shaky clips on HitFilm Express
Step 1: Import the clip you want to stabilize and navigate to the control panel.
Step 2: Under the control panel menu, select the track option, and locate your tracking points.
Step 3: It will provide you with two options under the type menu, Single-point position only and double-point position scale/rotation. Select the most appropriate option.
Step 4: Under the purpose-tab, select stabilize options and hit apply.
4. FilmForth
FilmForth is a new name in the video editing industry but it allows you to create videos easily with powerful features. If you are looking for free video stabilization software, FilmForth might be one of them for you. It is compact with powerful and easy-to-apply features.
You can edit video, add filters and transitions, titles, record voiceover, or add background music to video. What’s more, it allows you to save the video without watermark.
Key features:-
- Slideshow maker with photos, videos, music, and effects;
- Change the video background or make the logo transparent;
Steps to stabilize videos using FilmForth
Step 1: Select the stabilize video option under the quick tool menu.
Step 2: Select the video file that you want to stabilize.
Step 3: Manually fill the video resolution, video quality, and frame rate settings.
Step 4: Give the file an output name, and choose the video to save the video file.
5. Video DeShake
Video DeShake is solely developed for video stabilization. You can easily download it from av2video.com. It is an effective solution for video stabilization. However, it does not provide you with fancy video editing features, but if you are looking for an instant solution for video stabilization, it is one of the best options.
Steps to stabilize videos using video Deshake:
Step 1: Download and install video Deshake software from av2video.com.
Step 2: Select the plus icon from the left-aligned menu bar.
Step 3: Select the video file that you want to stabilize.
Step 4: Select your preferred format for the output video, and click on the stabilize option present at the bottom of the interface.
6. Shotcut
Shotcut is a free video stabilizer. You don’t need to sign up or log in to begin. There is no sales funnel waiting for you once you get addicted to using it. Another reason for its popularity is beginner-focused design. It is easy to learn and use. However, it lacks advanced editing features like iMovie or HitFilm Express.
Key features:-
- It can load videos recorded in high resolution or above 60 fps.
- Single frame image extraction options.
- Video stabilization feature
- Blurring effect
Steps to stabilize videos using Shotcut:-
Step 1: Drag the video file you want to stabilize into the software interface. Select the timeline feature to select the portion of the video clip that you want to stabilize.
Step 2: Select the filter tab and follow by selecting the plus button. Under the plus icon, select the monitor option and find the stabilize option under the menu.
Step 3: Customize the stabilizations options according to your specific needs and click on analyze to monitor the stabilization. After stabilization is complete, select the file option and click on save to save the video.
7. Blender
The Blender is free and one of the best video editing software for professionals . Besides video editing, it provides you with 3D modeling, rigging animation, simulation, and motion tracking features . It allows you to perform basic actions like video cuts and splicing and complex tasks like video masking or color grading.
Key features:-
- Live preview, chroma vectorscope, and histogram displays.
- Scrubbing and waveform visualization.
- Audion mixing and syncing.
- Speed control, adjustment layers, transitions, and keyframe options.
Steps to stabilize videos using Blender
Step 1: Begin by going to the motion tracking workspace.
Step 2: Click on open and select the video file you want to stabilize.
Step 3: Select the tracking option from the toolbar and click on the movie to set tracking points.
Step 4: Set the tracking point size and press the right arrow to start tracking.
Step 5: Select the file menu and navigate the save option to save the stabilized video.
8. AVS video stabilizer
AVS video editor is suitable for both beginners and professionals. It enables you to create videos of any resolution and length. It allows you to cut, trim, join, and rotate videos. It also amazes you with the freedom of using over 300 effects. With AVS video editor, you can edit VHS videos and convert them into digital format.
Key features:-
- Audio capture
- Brand overlay
- Customizable templates
- Easy to use interface with drag and drop features
- Multimedia format support
Steps to stabilize videos using AVS video editor:
Step 1: Click on the import option under the media library tab and import the video you want to stabilize.
Step 2: Press the video stabilization button present over the timeline.
Step 3: Under the stabilization video, drag the compensation bar to adjust the degree of stabilization.
Step 4: Click on the ok button at the bottom of the stabilization menu to save the changes.
9. VSDC
VSDC is a free video stabilizer that allows you to stabilize and edit videos of any complexity. It is compact with advanced features to cut and merge video files and apply visual and audio effects to make a slideshow and add appropriate soundtracks. It also facilitates easy video conversion for playback on specific media devices.
Key features:-
- Side by side and split-screen videos
- Videos in the text effects
- Green screen removal
- Double exposure
Steps to stabilize videos using VSDC
Step 1: Open the VSDC video editor, and navigate to the video stabilization feature from the Tools tab.
Step2: Select the open file option and export the video file you want to stabilize.
Step 3: In the stabilization, tab adjust the settings that best suit your specific requirements.
Step 4: Complete the process by clicking on the export project to view the outcome.
10. Openshot
OpenShot video editor is an easy-to-use video stabilization and edition software. It is helping professionals around the world with its excellent video editing features. Another factor that makes it different from other software is its compatibility with multiple operating software. It goes with Mac, Linux and Windows and is easily downloadable from its website.
Key features:-
- Compatible with multiple operating systems (Linux, Mac, and Windows)
- It supports a handful of video audio and image formats.
- Video transition along with the real-time preview.
- Options for creating title and sub-title creation
- Titles formation with 3D animation
Steps to stabilize videos using Openshot
Step 1: Open the video you want to stabilize using the project file tab.
Step 2: Drag the video timeline tab and locate the shaky part of the video you want to stabilize.
Step 3: Select the effects tab and navigate the stabilizer feature from the menu.
Step 4: Drag the stabilizer feature to your video clip in the timeline.
Step 5: You will see the stabilizer: initialize effect window. Select the degree of percentage as per your specific requirements.
Step 6: Select the process effects option.
Bonus: Stabilize shaky videos using Filmora video editor
Filmora video editor is a powerful video stabilizing software filled with powerful editing features. Unlike other editing software, Filmora is compatible with both Windows and Mac.
Some of the above video stabilizers are complex and require expertise. On the other hand, Wondershare Filmora video editor provides you with an easy-to-use interface and easy navigation options.
Key features:
- Modern and intuitive interface.
- Video stabilization in one click.
- Powerful edition features.
- Rich effects and templates.
Steps to stabilize videos using Wondershare Filmora video editor
For Win 7 or later (64-bit)
For macOS 10.12 or later
Step 1: Drag shaky videos into the Filmora video editor timeline.
Step 2: Click on the edit option in the toolbar to access the editing panel.
Step 3: Select the stabilization option from the editing panel.
Step 4: Click the play button to preview the stabilized video clip. It also allows you to stabilize the smooth level to obtain better results.
Conclusion
Videos are the most popular types of content. They instantly convey the message and engage the consumers. However, the quality of your video is crucial from your business perspective. Video stabilizing software provides stability to videos and makes them look professional and smooth.
Even if you don’t use video stabilizers for stabilizing videos for your business purposes, they can still come in handy while stabilizing your private videos.
Skip the Hunt: Exclusive Filmora Coupon Codes Inside
Stop Looking for Filmora Coupon Code on Reddit - We’ve Got it Here

Liza Brown
Mar 27, 2024• Proven solutions
If you are looking for Filmora coupon codes on Reddit, they might not be available on this site. Reddit does aggregate social news and has several discussion threads and content that viewers find useful. This is a site where people sign up to share content such as links, videos, images, text posts, and others. As a result, many people share coupon code links on this forum as well. However, there is no guarantee as to how valid these links are. Often people who look for Filmora or other coupon code links here find them to be outdated or not functional.

It is not surprising that there aren’t so many results of the Filmora coupon code on Reddit. To find valid and working coupon codes for Filmora, here are some websites to try.
5 Best Sites to Get Filmora Promo Code Instead of Reddit
1. Filmora Official Website
Filmora is a useful tool for many, whether they are beginners or professionals. This video editing tool offers an efficient platform with many editing features. It has a user-friendly design that makes it easy for most people to find their way around the editing platform.
If you are looking to make high-quality videos or edit such software, this is a popular and useful tool to use. It even supports the editing of 4K videos. The product is affordable and comes with tools for audio and video edits. It also comes with several options for adding effects, styling as well as customizing videos.
Of course, to use all features of this software you need to subscribe. To get a discounted price when you make a purchase it is best to hunt for the best deals available.
You can log onto the official website and make the purchase instead of looking for the Filmora coupon code Reddit. They also have attractive discounts and offers for customers on the site.
2. Groupon

Groupon is an eCommerce site that acts as an online marketplace with great deal offers. As per the country site, you log into, there are local merchants who offer travel, activities, services, and goods. The site has its presence across 15 countries. Groupon has been operational since 2008 and it features local restaurants, spa deals as well as discount coupons on services, online purchases, and others.
Pros
- Easy to sign up.
- Deals of the day every day.
- Wide variety of local products and services.
Cons
- Time-limited deals.
- Online deals are limited.
3. CouponzGuru
CouponzGuru is a leading eCommerce marketplace, especially for online goods and services. If you wish to order food, groceries, or do shopping online, this is a site to visit first. That is because it ties up with popular online merchants for each country where it has a domain. As a result, you will find discounts and deals across several categories and of your local brands and online stores. You can search by brand or use the search panel to look for a product. Instead of looking for the Filmora coupon code Reddit, you can look up the same on CouponzGuru. Once you find the offer you wish to take up, you can click on the same and get the coupon code. It also redirects you to the site where you wish to make the purchase, making the transactions smooth and swift.
Pros
- Clean, well-designed layout.
- The website is easy to browse.
- No need to subscribe.
Cons
- Cash-back offers are limited.
4. JoinHoney
This website is run by Honey Science Corp which is headquartered in Los Angeles. It operates the site as a browser extension. This then aggregates different coupon deals from different eCommerce sites. A site is a subsidiary unit of PayPal. This retailer gains commission by redirecting customers to partner retailer sites.
Unlike most coupon websites this site adds an extension to your web browser. It is a free application that you can simply add as an extension to Chrome or any other browser application. You can then look up codes of a variety of services and products on select websites through this extension bar. It also helps you find codes across 3000 and more websites.
- Easy to install.
- No need to pay the subscription fee.
- Supports multiple products and stores.
- Not marketed well.
5. CouponFollow
This is an online platform that features coupon codes for online merchants. It is part of a venture formed in 2009 by Marc Mezzacca. Also, the website is headquartered in New Jersey. This site, formed in 2009, earns commission when customers click and follow links to complete transactions on partner sites. If you are looking for the latest Filmora coupon code Reddit it is best to use the search function here.
- CouponFollow provides an easy-to-use web interface.
- Reliable customer service.
- Dependable website.
Conclusion
There are different discount deals to use to get off on Filmora subscription plans. If you wish to make the most of the latest offers, log onto sites such as the coupon websites mentioned above instead of the Filmora coupon code Reddit. They will redirect you to the official website where you can avail of the discount when purchasing a subscription plan as per your requirement.
Liza Brown
Liza Brown is a writer and a lover of all things video.
Follow @Liza Brown
Liza Brown
Mar 27, 2024• Proven solutions
If you are looking for Filmora coupon codes on Reddit, they might not be available on this site. Reddit does aggregate social news and has several discussion threads and content that viewers find useful. This is a site where people sign up to share content such as links, videos, images, text posts, and others. As a result, many people share coupon code links on this forum as well. However, there is no guarantee as to how valid these links are. Often people who look for Filmora or other coupon code links here find them to be outdated or not functional.
It is not surprising that there aren’t so many results of the Filmora coupon code on Reddit. To find valid and working coupon codes for Filmora, here are some websites to try.
5 Best Sites to Get Filmora Promo Code Instead of Reddit
1. Filmora Official Website
Filmora is a useful tool for many, whether they are beginners or professionals. This video editing tool offers an efficient platform with many editing features. It has a user-friendly design that makes it easy for most people to find their way around the editing platform.
If you are looking to make high-quality videos or edit such software, this is a popular and useful tool to use. It even supports the editing of 4K videos. The product is affordable and comes with tools for audio and video edits. It also comes with several options for adding effects, styling as well as customizing videos.
Of course, to use all features of this software you need to subscribe. To get a discounted price when you make a purchase it is best to hunt for the best deals available.
You can log onto the official website and make the purchase instead of looking for the Filmora coupon code Reddit. They also have attractive discounts and offers for customers on the site.
2. Groupon
Groupon is an eCommerce site that acts as an online marketplace with great deal offers. As per the country site, you log into, there are local merchants who offer travel, activities, services, and goods. The site has its presence across 15 countries. Groupon has been operational since 2008 and it features local restaurants, spa deals as well as discount coupons on services, online purchases, and others.
Pros
- Easy to sign up.
- Deals of the day every day.
- Wide variety of local products and services.
Cons
- Time-limited deals.
- Online deals are limited.
3. CouponzGuru
CouponzGuru is a leading eCommerce marketplace, especially for online goods and services. If you wish to order food, groceries, or do shopping online, this is a site to visit first. That is because it ties up with popular online merchants for each country where it has a domain. As a result, you will find discounts and deals across several categories and of your local brands and online stores. You can search by brand or use the search panel to look for a product. Instead of looking for the Filmora coupon code Reddit, you can look up the same on CouponzGuru. Once you find the offer you wish to take up, you can click on the same and get the coupon code. It also redirects you to the site where you wish to make the purchase, making the transactions smooth and swift.
Pros
- Clean, well-designed layout.
- The website is easy to browse.
- No need to subscribe.
Cons
- Cash-back offers are limited.
4. JoinHoney
This website is run by Honey Science Corp which is headquartered in Los Angeles. It operates the site as a browser extension. This then aggregates different coupon deals from different eCommerce sites. A site is a subsidiary unit of PayPal. This retailer gains commission by redirecting customers to partner retailer sites.
Unlike most coupon websites this site adds an extension to your web browser. It is a free application that you can simply add as an extension to Chrome or any other browser application. You can then look up codes of a variety of services and products on select websites through this extension bar. It also helps you find codes across 3000 and more websites.
- Easy to install.
- No need to pay the subscription fee.
- Supports multiple products and stores.
- Not marketed well.
5. CouponFollow
This is an online platform that features coupon codes for online merchants. It is part of a venture formed in 2009 by Marc Mezzacca. Also, the website is headquartered in New Jersey. This site, formed in 2009, earns commission when customers click and follow links to complete transactions on partner sites. If you are looking for the latest Filmora coupon code Reddit it is best to use the search function here.
- CouponFollow provides an easy-to-use web interface.
- Reliable customer service.
- Dependable website.
Conclusion
There are different discount deals to use to get off on Filmora subscription plans. If you wish to make the most of the latest offers, log onto sites such as the coupon websites mentioned above instead of the Filmora coupon code Reddit. They will redirect you to the official website where you can avail of the discount when purchasing a subscription plan as per your requirement.
Liza Brown
Liza Brown is a writer and a lover of all things video.
Follow @Liza Brown
Also read:
- Updated Free MOV Video Rotator Top Picks and Reviews
- New Are You Wondering YouTube Audio Download Procedure? Heres Your Quick yet Stunning Guide on YouTube 2 MP3 Conversion for 2024
- Updated 2024 Approved Video to MP3 Conversion Best Practices for Retaining Quality
- New In 2024, Combine Videos Without Restrictions 7 Best Watermark-Free Tools
- In 2024, Free and Easy Video Editing Software for Beginners
- New 5 Fantastic Free Online Video Editors Like iMovie (Updated 2023)
- Updated Top 5 Free Video Compression Apps for iPhone and iPad
- In 2024, Take Your Videos to the Next Level 3D Effects Tutorial for Windows Users
- Updated In 2024, Best Timecode Conversion Tools for Filmmaker
- Updated 2024 Approved Lights, Camera, Action! A Kids Guide to Making Movies
- In 2024, From Screens to Success Mastering Vertical Aspect Ratios for Mobile Devices
- New FCPX Pr for 2024
- 2024 Approved Quick Fix Resizing Your Video to Perfect Proportions
- Updated Say Goodbye to Software Top Easy Video Joiner Alternatives
- New In 2024, Unleash Your Creativity Top 10 Free Video Editing Software for Chrome OS
- In 2024, The Ultimate List 10 Free Online Video Compression Tools
- New In 2024, AVS Video Editor An In-Depth Analysis
- New In 2024, Color Grading 101 Unifying Your Video Clips in PowerDirector
- 2024 Approved Unlock Slow Motion Playback on VLC Media Player
- New 2024 Approved FCPX Visual Storytelling Using Freeze Frames and Slow Motion for Impact
- In 2024, Top-Rated Video Editing Programs for Windows 10/11
- Updated 2024 Approved AVS Video Editor A Comprehensive Analysis
- New 2024 Approved From Snap to Story Mastering the Art of Vertical Mobile Video
- Bringing Your Drawings to Life The Best Animation Software for Artists for 2024
- FCP Audio Editing Tutorial From Basics to Advanced Techniques
- Get Started with Video Editing Top Free Software for Rookies
- In 2024, Lyric Video Maker Showdown Free vs Paid Services Reviewed
- New 2024 Approved How to Play Video in Reverse Using Final Cut Pro 2023 Update
- 2024 Approved Edit AVI Files with Ease Best Windows 8 Video Editor - 2023
- New 2024 Approved MOD Video Editing on a Shoestring Top Free Editors
- Video Editing Made Simple Microsoft Video Editor for Windows 10, 8, and 7 Users for 2024
- New Top-Rated Free Video Editing Apps with Special Effects for Mobile
- New Extracting Crystal-Clear Audio From Videos A Step-by-Step Guide for 2024
- New 2024 Approved S Top-Rated Free Music Recording Programs A Comprehensive Guide
- The Ultimate Video Editing Decision Final Cut Pro or LumaFusion for 2024
- In 2024, MacVideoEditor
- New Private and Business Video Hosting 10 Free Options to Consider
- Updated Top Android Movie Makers A Comprehensive Selection Guide for 2024
- New In 2024, Best VLC Trimming Software for Mac No Quality Loss Guaranteed
- In 2024, Ranking the Best iPad Video Editors for A Buyers Guide
- New Get Splice Video Editing Software for Mac
- New Download VLLO for Mac and Uncover Its Competitors
- Updated The Ultimate Guide to Video Editing on Mac OS X Yosemite
- Unleash Your Creativity 6 Innovative Adobe Premiere Pro Techniques for 2024
- New Ranking the Best Top 5 Video Editing Apps for iPhone Users for 2024
- How to Downgrade iPhone 6s to an Older Version? | Dr.fone
- How To Update or Downgrade iPhone 12 Pro? | Dr.fone
- How to Move Custom Ringtones from Apple iPhone 15 Pro to Android? | Dr.fone
- Dose Life360 Notify Me When Someone Checks My Location On Infinix Hot 40 Pro? | Dr.fone
- In 2024, Full Guide to Unlock Your Oppo Reno 11F 5G
- How to Transfer Data from Samsung Galaxy A14 5G to Other Android Devices? | Dr.fone
- 2024 Approved Save Money, Get Great Images Free Commercial Image Alternatives
- Life360 Learn How Everything Works On Apple iPhone 11 Pro Max | Dr.fone
- Updated Read and Learn How to Convert a Slow-Motion Video to Normal in This Guide. Besides, Find the Best Desktop Solution to Adjust Video Speed Quickly and Easily
- Forgot Apple iPhone 14 Backup Password? Heres What to Do | Dr.fone
- 4 Ways to Transfer Music from Infinix Smart 7 to iPhone | Dr.fone
- Trouble with Apple iPhone 14 Pro Swipe-Up? Try These 11 Solutions
- Why Is My Honor 90 Offline? Troubleshooting Guide | Dr.fone
- New Are You Looking to Enhance Your Video or Photo Colors Using Premiere LUTs? Get to Know About the Best Free LUT Effects to Get Started for 2024
- iPogo will be the new iSpoofer On OnePlus Nord 3 5G? | Dr.fone
- How to restore wiped messages on Honor
- How To Transfer WhatsApp From Apple iPhone 13 to other iPhone devices? | Dr.fone
- VN Video Editor Pro Does It Deliver on Its Promises?
- In 2024, How to Mirror PC Screen to Samsung Galaxy F54 5G Phones? | Dr.fone
- In 2024, 6 Ways To Transfer Contacts From Poco X5 Pro to iPhone | Dr.fone
- Ways to Learn Discord Game Bots – Even if Youre Just Starting Out
- How to Flash Dead Motorola Edge 40 Pro Safely | Dr.fone
- Ultimate Guide to Catch the Regional-Located Pokemon For Samsung Galaxy F14 5G | Dr.fone
- The Ultimate Guide to Realme Narzo N55 Pattern Lock Screen Everything You Need to Know
- In 2024, Overview of the Best Vivo S18 Screen Mirroring App | Dr.fone
- 11 Proven Solutions to Fix Google Play Store Not Working Issue on Realme 12 Pro 5G | Dr.fone
- In 2024, Top 10 AirPlay Apps in Infinix Hot 40 Pro for Streaming | Dr.fone
- In 2024, Pokémon Go Cooldown Chart On Oppo Find X7 | Dr.fone
- In 2024, How does the stardust trade cost In pokemon go On Lava Agni 2 5G? | Dr.fone
- In 2024, 5 Ways to Track Oppo A78 5G without App | Dr.fone
- In 2024, How to Spy on Text Messages from Computer & Nokia 130 Music | Dr.fone
- What Does Enter PUK Code Mean And Why Did The Sim Get PUK Blocked On OnePlus 12 Device
- In 2024, Best 3 Oppo A78 Emulator for Mac to Run Your Wanted Android Apps | Dr.fone
- Title: In 2024, The Ultimate Guide to Free Video Looping Software for Windows and Mac
- Author: Amelia
- Created at : 2024-05-19 11:47:55
- Updated at : 2024-05-20 11:47:55
- Link: https://ai-driven-video-production.techidaily.com/in-2024-the-ultimate-guide-to-free-video-looping-software-for-windows-and-mac/
- License: This work is licensed under CC BY-NC-SA 4.0.
