
:max_bytes(150000):strip_icc():format(webp)/youtube-s-free-streaming-movies-and-tv-shows-1357439-ddbc3cf482e24a539c67009c07310ae1.png)
New 2024 Approved Split Your Screen for Free Top Online and Offline Video Editors
Split Your Screen for Free: Top Online and Offline Video Editors
Best Split Screen Video Editor [Online & Offline]

Ollie Mattison
Mar 27, 2024• Proven solutions
The effect that comes up after adding two or more screens in a single frame is called split screen, and the tool that enables the users to do this is a split screen video editor. These split screens have significant importance in post-production tasks. That said, the following sections discuss about the tools that enable you to create split screen videos, and explain the process of doing so.
As mentioned above, the split screen effect lets you add two or more screens in a single frame. When multiple activities occur at the same time but at different locations, they all can be shown on one screen by placing their corresponding footages side-by-side or in any other arrangement that the split screen video maker allows.
Best Split Screen Video Editing Software for Windows and Mac [Free & Paid]
After understanding what split screen is, it becomes both obvious and mandatory to know about some of the most used split screen video editor applications, and how they help you in adding the effect to your movies. Following is a list of a couple of such programs:
1. iMovie
A proprietary of Apple, iMovie is available for both iOS and macOS, and is absolutely free of cost. Even though the tool lacks some advanced options for fine editing, it still offers a good platform to those planning their career in post-production industry. With simple UI, it is easy to learn iMovie.
The step-by-step instructions given below explain how to use iMovie to add split screen effect to your videos:
Step 1: Add Footages to iMovie
After importing the footages to the Media Bin in iMovie, drag the first one to the Timeline, and then drag the second one above the first layer.
Step 2: Select the Split Screen Effect
Select the top video layer in the Timeline, and choose Split Screen from the screen type drop-down list at the top.
Step 3: Select Split Screen Preset
Choose a position for the selected layer from the Position drop-down list at the top, and use the Slide slider to adjust the speed of the appearance of the footage.
Pros
- iMovie is free to download and use
- The program is available for both macOS and iOS
Cons
- Allows only up to two videos to be used in split screen
You can get iMovie from here: https://www.apple.com/in/imovie/
2. Wondershare Filmora Editor


One of the most robust apps that is compared with post-production applications like Adobe Premiere Pro and Final Cut Pro X, Wondershare Filmora is also a video editor that helps split screen easily. The software is available for Windows and Mac computers, and provides prompt technical support to its consumers. Although Filmora that packed with more advanced tools is also available, most of the times Filmora serves the purpose pretty well.
You can learn how to add split screen effect in Wondershare Filmora by following the steps given below:
Step 1: Import Footages to Filmora
Launch Wondershare Filmora, click anywhere inside the Media window in the upper-left section, and import all the videos you want to use to create the split screen effect.
Step 2: Choose a Split Screen Preset
Click Split Screen from the standard toolbar at the top, click and drag your preferred preset to the Timeline, and then extend the duration of the effect in the Timeline by dragging its handle.
Step 3: Add Videos to Split Screen

Click ADVANCED from the bottom-right area of the Media pane, on the Advanced Split Screen Edit box, drag the first video from the left pane, and drop it on your preferred section in the right. Repeat the process to add all the other videos to their corresponding sections. Adjust their time of appearance by dragging their thumbnail in the Timeline of the box, and click OK.
Pros
- Wondershare Filmora is lightweight and is less resource intensive
- Allows as many as 6 videos to be added to create split screen effect
- Has 30+ split screen presets
Cons
- A couple of windows are required to be opened while working with split screen
3 . VSDC
VSDC is a free and efficient split screen video maker. In fact, the program is a full-fledged post-production application that can be used to edit the videos to prepare industry-standard clips for presentations, broadcasting, and commercial and private distribution. The best thing about VSDC is, it is absolutely free of cost, and doesn’t add any watermarks to the output files.
The instructions given below explain how to use the split screen feature in VSDC:
Step 1: Add Video Footages
Click Add object from the standard toolbar at the top, click Video, and select and add the first footage to the preview window. Repeat the process to add more video(s) as needed.
Step 2: Add Split Screen Effect
Grab any of the side handles of the video you added last, and drag it inward to reduce its size proportionally. Repeat the process to reduce the size of the other video(s) that is/are now revealed from beneath the one you just adjusted in order to create the split screen effect.
Pros
- Absolutely free to use
- Allows practically unlimited number of footages to be added to create the split screen videos
Cons
- No presets for automatic video positioning are available for split screen effect
You can get VSDC free video editor from here: http://www.videosoftdev.com/
4. Shotcut
A free and opensource editing tool, Shotcut can also be used as a split screen video maker to produce industry-standard movies and documentaries. Shotcut is available for FreeBSD, Windows, Linux, and macOS, and comes in both x64 and x86 variants. Being a free program, Shotcut doesn’t require any activation or registration.
The procedure that follows explains how to use Shortcut as a free split screen video editor:
Step 1: Add Clips to the Timeline
Import the footages to the Shotcut’s media bin, drag one of the clips from the bin to the Timeline at the bottom, and then press Ctrl + I on your keyboard to add more video tracks. You can press this shortcut key for another couple of times depending on the number films you want to use for the split screen effect. Next, drag each film from the bin to their corresponding tracks. Note: Make sure NOT to place all the clips on the same track, and that each of them is on a different, its own, video layer.
Step 2: Adjust the First Video
Select the last video you added to the Timeline (it should be the topmost track), click Filters from above the Timeline, click the + button from the upper-left corner, click Size and Position from the list that appears next, and select the clip’s position from the Preset drop-down list.
Step 3: Adjust Other Videos
Select the second video in the Timeline and repeat the process to set its position, and do the same for all other footages that you added in order to create the split screen effect.
Pros
- Available for FreeBSD, Windows, Linux, and macOS platforms
- If using presets, as many as 4 videos can be added for split screen effect
Cons
- Working with split screen manually may require practice and some calculations to position the clips on the screen correctly
You can get Shotcut from here: https://shotcut.org/
5. Lightworks
Used by the professionals to edit and prepare movies like Pulp Fiction, The Cure, L.A. Confidential, Bruce Almighty, The Wolf of Wall Street, etc., Lightworks is, in true means, a complete and full-fledged post-production application to create industry-standard outputs. The main reason for the app’s wide userbase is that it is a cross-platform software that is available for Linux, Mac, and Windows computers.
To use Lightworks as split screen video maker, you can follow the instructions given below:
Step 1: Add Tracks in Timeline
After importing the clips to Lightworks, leave them in the Media Bin for now, right-click anywhere in the Timeline at the bottom, go to Tracks, click Add multiple, and from the Number to add drop-down list, choose the number of tracks you want to add to the Timeline. Click Add to confirm the changes.
Step 2: Disable Auto Sync
Right-click anywhere in the Timeline, and click to deselect Auto track sync.
Step 3: Add Clips to Timeline
Drag the clips from the Media Bin to the Timeline. Make sure to place each footage on a different track, and that all the tracks are on top of each other. Optionally, right-click the audio that was added along with the clips, and click Remove from the context menu. Use this method to remove all the audios or leave the one you want to have. Note: Removing the audio tracks ensures that they do not overlap during the playback.
Step 4: Enable Split Screen
Click VFX from above the preview window, click the + (Add new effects) icon from the top of the left pane, select the DVE category from the upper-right corner of the left pane, scroll down the left pane to the Split-screen Presets section, and double-click your preferred split screen preset to add the effect to the participating clips.
Pros
- Even the free variant has split screen feature
- A complete post-production tool that doesn’t require any other program for finalizing the things
Cons
- Not many split screen presets are available
Download Lightworks free version from here: https://www.lwks.com/
6. Adobe Premiere Pro
One of the most appreciated and widely used post-production applications for Windows and Mac computers, Adobe Premiere Pro has been professionals’ first choice when it comes to video editing, irrespective of the fact that it has a steep learning curve, and is also a resource intensive software to work with.
The steps below explain how to use Adobe Premiere Pro as a split screen video maker:
Step 1: Add Videos to Timeline
After importing the clips to the Project window, drag each of them to the Timeline, and place them in their separate tracks one above the other.
Step 2: Position and Crop
Select the topmost video track in the Timeline, go to Effect Controls panel from the top of the upper-left pane, and use the Position slider to position the video to your preferred area of the screen. Repeat this process for all the clips in the Timeline you want to add to split screen.
Step 3: Crop the Clips
Search for the Crop effect in the Effects pane present at the lower-left corner, drag and drop the effect on each of the clips in the timeline, and use the Crop slider in the Effect Controls pane to crop the videos as needed. Optionally use the keyframes to add sliding animations to give more professional look to the split screen effect.
Pros
- Most robust and efficient video editing tool
- Allows practically unlimited number of videos to be used for split screen
Cons
- Requires subscription that needs to be renewed regularly
For more details about making split screen with Pr, check How to create a split screen in Premiere Pro
7. Final Cut Pro X
Available only for Mac computers at the time of this writing, Final Cut Pro X or FCPX gives tough competition to Adobe Premiere Pro. Since Apple devices are famous for their speedy processing, professionals any day prefer FCPX over Adobe Premiere Pro if they own a Mac PC running macOS.
You can use FCPX as split screen video maker by following the steps given below:
Step 1: Place Footages in the Timeline
As mentioned earlier, add the clips on top of each other on separate tracks in the Timeline of FCPX.
Step 2: Position and Crop
Select the first clip in the Timeline, from the Transform section of the Video Inspector pane in the right, use the Position slider to move the clip to your preferred side of the screen, and use the sliders from the Crop section to crop the footage to adjust the portion of interest. Repeat the process for the other video tracks as well to get your desired split screen effect in Final Cut Pro X.
Pros
- Offers quick and easy way to add split screen effect
- Allows practically unlimited number of videos to be used for split screen
Cons
- Doesn’t have any particular preset for split screen effect
You may also like: How to create a PIP video with Final Cut Pro X
Best Free Online Split Screen Video Editors
Apart from the desktop programs discussed above, there are a couple of web tools that can be used as split screen video maker online free. Two of the most used ones are introduced below:
1. Kapwing Collage Maker
Although Kapwing offers several other online tools like video resizer, meme generator, slideshow maker, etc., the solution that can be considered split screen video editor is Kapwing Collage Maker. This web app allows you to select a template to get started, and the rest of the process is simple.
The following steps explain how to create a split screen video with Kapwing:
Step 1: Add Clips to Preset
Go to the https://www.kapwing.com/collage link, click to select your preferred split screen preset, click REPLACE on one of the segments of the split screen on the next page, and select and upload the first video. Next, click REPLACE on the other segment(s), and select and upload the other videos as well.
Step 2: Reposition and Publish
Click and drag each of the added clips to reposition them on the screen, use the other tools to crop and adjust the videos as needed, and click Publish from the top-right corner. Note: Optionally you can click Timeline from the top of the preview window, adjust the timings and other settings as needed on the next page, and click Done. After this, you can go ahead and hit Publish to create the split screen effect out of the uploaded videos.
Pros
- Free to use
- Allows as many as 4 videos to create split screen effect
Cons
- Requires you to register and sign in to remove the watermark from the output file
2. WeVideo
Yet another split screen video maker online free solution, WeVideo offers almost desktop program-like experience while creating split screen effects. Even though all the subscription plans that the vendor offers are chargeable, the Education plan can be tried for 30 days for free, post which the teachers are required to pay to continue using the web tool.
The following steps explain how to get split screen effect with WeVideo:
Step 1: Import Videos
Visit https://www.wevideo.com and on the main window, click Video from under the Create a new section at the top, select a layout on the Let’s get started box, and click START EDITING from the bottom right corner. Next, click ADD in the My media window in the upper-left section, click BROWSE TO SELECT on the Import media box, and add the videos you want to use in the split screen effect.
Step 2: Add Clips to Timeline
As explained earlier, drag the videos from the My media pane and drop them in the Timeline. Make sure to place every video in its separate layer, and that all the layers are on top of each other.
Step 3: Create Split Screen Effect
Select any clip in the Timeline, and click the Open clip editor icon from the upper-left area of the track. On the next page, use the Scale slider to reduce the size of the selected clip, and from the preview window in the right, drag to reposition the video to your preferred location on the screen. Click SAVE CHANGES from the bottom of the left pane to confirm the settings. Repeat the process for the second clip in the Timeline to resize and reposition it on the screen. Click FINISH from the upper-right corner, on the next box, enter a name for the video in the available field, click SET, choose your preferred settings on the next page, and click EXPORT from the bottom-right corner to produce the split screen video.
Pros
- Free to use
- Allows multiple videos to be used for split screen
Cons
- Paid subscription is needed to remove watermark from the outputs
FAQs About Split Screen Video Editors
Why you should use split screen effect in video?
There are a couple of reasons you may want to use split screen effect in your video. Some of the most common uses include:
- Showing multiple actions by the same or different characters at the same time, without changing the screen
- Comparing multiple objects or picture quality. This can be done only when the entities in question are placed side-by-side
- Making your video look more professional
- Showing different effects on the same screen
Can I create a split screen video with Windows Movie Maker or Windows 10 Photos app?
No, you cannot. Although these tools enable you to resize the videos, since they don’t allow multi-tracked Timelines, no video clips can be placed one above the other which is an essential part for any split screen video maker to create the effect. However, as discussed above, there are several post-production tools, offline and online, that allow you to make split screen videos easily and without any cost.
Conclusion
Split screen video editor tools are both paid and free. Regardless of the program you use to create the effect, the output files always look more professional and informative. Furthermore, things become way simpler if the split screen video maker has simple UI, is less resource intensive, and is easy to use as it is the case with Wondershare Filmora.
Ollie Mattison
Ollie Mattison is a writer and a lover of all things video.
Follow @Ollie Mattison
Ollie Mattison
Mar 27, 2024• Proven solutions
The effect that comes up after adding two or more screens in a single frame is called split screen, and the tool that enables the users to do this is a split screen video editor. These split screens have significant importance in post-production tasks. That said, the following sections discuss about the tools that enable you to create split screen videos, and explain the process of doing so.
As mentioned above, the split screen effect lets you add two or more screens in a single frame. When multiple activities occur at the same time but at different locations, they all can be shown on one screen by placing their corresponding footages side-by-side or in any other arrangement that the split screen video maker allows.
Best Split Screen Video Editing Software for Windows and Mac [Free & Paid]
After understanding what split screen is, it becomes both obvious and mandatory to know about some of the most used split screen video editor applications, and how they help you in adding the effect to your movies. Following is a list of a couple of such programs:
1. iMovie
A proprietary of Apple, iMovie is available for both iOS and macOS, and is absolutely free of cost. Even though the tool lacks some advanced options for fine editing, it still offers a good platform to those planning their career in post-production industry. With simple UI, it is easy to learn iMovie.
The step-by-step instructions given below explain how to use iMovie to add split screen effect to your videos:
Step 1: Add Footages to iMovie
After importing the footages to the Media Bin in iMovie, drag the first one to the Timeline, and then drag the second one above the first layer.
Step 2: Select the Split Screen Effect
Select the top video layer in the Timeline, and choose Split Screen from the screen type drop-down list at the top.
Step 3: Select Split Screen Preset
Choose a position for the selected layer from the Position drop-down list at the top, and use the Slide slider to adjust the speed of the appearance of the footage.
Pros
- iMovie is free to download and use
- The program is available for both macOS and iOS
Cons
- Allows only up to two videos to be used in split screen
You can get iMovie from here: https://www.apple.com/in/imovie/
2. Wondershare Filmora Editor
One of the most robust apps that is compared with post-production applications like Adobe Premiere Pro and Final Cut Pro X, Wondershare Filmora is also a video editor that helps split screen easily. The software is available for Windows and Mac computers, and provides prompt technical support to its consumers. Although Filmora that packed with more advanced tools is also available, most of the times Filmora serves the purpose pretty well.
You can learn how to add split screen effect in Wondershare Filmora by following the steps given below:
Step 1: Import Footages to Filmora
Launch Wondershare Filmora, click anywhere inside the Media window in the upper-left section, and import all the videos you want to use to create the split screen effect.
Step 2: Choose a Split Screen Preset
Click Split Screen from the standard toolbar at the top, click and drag your preferred preset to the Timeline, and then extend the duration of the effect in the Timeline by dragging its handle.
Step 3: Add Videos to Split Screen
Click ADVANCED from the bottom-right area of the Media pane, on the Advanced Split Screen Edit box, drag the first video from the left pane, and drop it on your preferred section in the right. Repeat the process to add all the other videos to their corresponding sections. Adjust their time of appearance by dragging their thumbnail in the Timeline of the box, and click OK.
Pros
- Wondershare Filmora is lightweight and is less resource intensive
- Allows as many as 6 videos to be added to create split screen effect
- Has 30+ split screen presets
Cons
- A couple of windows are required to be opened while working with split screen
3 . VSDC
VSDC is a free and efficient split screen video maker. In fact, the program is a full-fledged post-production application that can be used to edit the videos to prepare industry-standard clips for presentations, broadcasting, and commercial and private distribution. The best thing about VSDC is, it is absolutely free of cost, and doesn’t add any watermarks to the output files.
The instructions given below explain how to use the split screen feature in VSDC:
Step 1: Add Video Footages
Click Add object from the standard toolbar at the top, click Video, and select and add the first footage to the preview window. Repeat the process to add more video(s) as needed.
Step 2: Add Split Screen Effect
Grab any of the side handles of the video you added last, and drag it inward to reduce its size proportionally. Repeat the process to reduce the size of the other video(s) that is/are now revealed from beneath the one you just adjusted in order to create the split screen effect.
Pros
- Absolutely free to use
- Allows practically unlimited number of footages to be added to create the split screen videos
Cons
- No presets for automatic video positioning are available for split screen effect
You can get VSDC free video editor from here: http://www.videosoftdev.com/
4. Shotcut
A free and opensource editing tool, Shotcut can also be used as a split screen video maker to produce industry-standard movies and documentaries. Shotcut is available for FreeBSD, Windows, Linux, and macOS, and comes in both x64 and x86 variants. Being a free program, Shotcut doesn’t require any activation or registration.
The procedure that follows explains how to use Shortcut as a free split screen video editor:
Step 1: Add Clips to the Timeline
Import the footages to the Shotcut’s media bin, drag one of the clips from the bin to the Timeline at the bottom, and then press Ctrl + I on your keyboard to add more video tracks. You can press this shortcut key for another couple of times depending on the number films you want to use for the split screen effect. Next, drag each film from the bin to their corresponding tracks. Note: Make sure NOT to place all the clips on the same track, and that each of them is on a different, its own, video layer.
Step 2: Adjust the First Video
Select the last video you added to the Timeline (it should be the topmost track), click Filters from above the Timeline, click the + button from the upper-left corner, click Size and Position from the list that appears next, and select the clip’s position from the Preset drop-down list.
Step 3: Adjust Other Videos
Select the second video in the Timeline and repeat the process to set its position, and do the same for all other footages that you added in order to create the split screen effect.
Pros
- Available for FreeBSD, Windows, Linux, and macOS platforms
- If using presets, as many as 4 videos can be added for split screen effect
Cons
- Working with split screen manually may require practice and some calculations to position the clips on the screen correctly
You can get Shotcut from here: https://shotcut.org/
5. Lightworks
Used by the professionals to edit and prepare movies like Pulp Fiction, The Cure, L.A. Confidential, Bruce Almighty, The Wolf of Wall Street, etc., Lightworks is, in true means, a complete and full-fledged post-production application to create industry-standard outputs. The main reason for the app’s wide userbase is that it is a cross-platform software that is available for Linux, Mac, and Windows computers.
To use Lightworks as split screen video maker, you can follow the instructions given below:
Step 1: Add Tracks in Timeline
After importing the clips to Lightworks, leave them in the Media Bin for now, right-click anywhere in the Timeline at the bottom, go to Tracks, click Add multiple, and from the Number to add drop-down list, choose the number of tracks you want to add to the Timeline. Click Add to confirm the changes.
Step 2: Disable Auto Sync
Right-click anywhere in the Timeline, and click to deselect Auto track sync.
Step 3: Add Clips to Timeline
Drag the clips from the Media Bin to the Timeline. Make sure to place each footage on a different track, and that all the tracks are on top of each other. Optionally, right-click the audio that was added along with the clips, and click Remove from the context menu. Use this method to remove all the audios or leave the one you want to have. Note: Removing the audio tracks ensures that they do not overlap during the playback.
Step 4: Enable Split Screen
Click VFX from above the preview window, click the + (Add new effects) icon from the top of the left pane, select the DVE category from the upper-right corner of the left pane, scroll down the left pane to the Split-screen Presets section, and double-click your preferred split screen preset to add the effect to the participating clips.
Pros
- Even the free variant has split screen feature
- A complete post-production tool that doesn’t require any other program for finalizing the things
Cons
- Not many split screen presets are available
Download Lightworks free version from here: https://www.lwks.com/
6. Adobe Premiere Pro
One of the most appreciated and widely used post-production applications for Windows and Mac computers, Adobe Premiere Pro has been professionals’ first choice when it comes to video editing, irrespective of the fact that it has a steep learning curve, and is also a resource intensive software to work with.
The steps below explain how to use Adobe Premiere Pro as a split screen video maker:
Step 1: Add Videos to Timeline
After importing the clips to the Project window, drag each of them to the Timeline, and place them in their separate tracks one above the other.
Step 2: Position and Crop
Select the topmost video track in the Timeline, go to Effect Controls panel from the top of the upper-left pane, and use the Position slider to position the video to your preferred area of the screen. Repeat this process for all the clips in the Timeline you want to add to split screen.
Step 3: Crop the Clips
Search for the Crop effect in the Effects pane present at the lower-left corner, drag and drop the effect on each of the clips in the timeline, and use the Crop slider in the Effect Controls pane to crop the videos as needed. Optionally use the keyframes to add sliding animations to give more professional look to the split screen effect.
Pros
- Most robust and efficient video editing tool
- Allows practically unlimited number of videos to be used for split screen
Cons
- Requires subscription that needs to be renewed regularly
For more details about making split screen with Pr, check How to create a split screen in Premiere Pro
7. Final Cut Pro X
Available only for Mac computers at the time of this writing, Final Cut Pro X or FCPX gives tough competition to Adobe Premiere Pro. Since Apple devices are famous for their speedy processing, professionals any day prefer FCPX over Adobe Premiere Pro if they own a Mac PC running macOS.
You can use FCPX as split screen video maker by following the steps given below:
Step 1: Place Footages in the Timeline
As mentioned earlier, add the clips on top of each other on separate tracks in the Timeline of FCPX.
Step 2: Position and Crop
Select the first clip in the Timeline, from the Transform section of the Video Inspector pane in the right, use the Position slider to move the clip to your preferred side of the screen, and use the sliders from the Crop section to crop the footage to adjust the portion of interest. Repeat the process for the other video tracks as well to get your desired split screen effect in Final Cut Pro X.
Pros
- Offers quick and easy way to add split screen effect
- Allows practically unlimited number of videos to be used for split screen
Cons
- Doesn’t have any particular preset for split screen effect
You may also like: How to create a PIP video with Final Cut Pro X
Best Free Online Split Screen Video Editors
Apart from the desktop programs discussed above, there are a couple of web tools that can be used as split screen video maker online free. Two of the most used ones are introduced below:
1. Kapwing Collage Maker
Although Kapwing offers several other online tools like video resizer, meme generator, slideshow maker, etc., the solution that can be considered split screen video editor is Kapwing Collage Maker. This web app allows you to select a template to get started, and the rest of the process is simple.
The following steps explain how to create a split screen video with Kapwing:
Step 1: Add Clips to Preset
Go to the https://www.kapwing.com/collage link, click to select your preferred split screen preset, click REPLACE on one of the segments of the split screen on the next page, and select and upload the first video. Next, click REPLACE on the other segment(s), and select and upload the other videos as well.
Step 2: Reposition and Publish
Click and drag each of the added clips to reposition them on the screen, use the other tools to crop and adjust the videos as needed, and click Publish from the top-right corner. Note: Optionally you can click Timeline from the top of the preview window, adjust the timings and other settings as needed on the next page, and click Done. After this, you can go ahead and hit Publish to create the split screen effect out of the uploaded videos.
Pros
- Free to use
- Allows as many as 4 videos to create split screen effect
Cons
- Requires you to register and sign in to remove the watermark from the output file
2. WeVideo
Yet another split screen video maker online free solution, WeVideo offers almost desktop program-like experience while creating split screen effects. Even though all the subscription plans that the vendor offers are chargeable, the Education plan can be tried for 30 days for free, post which the teachers are required to pay to continue using the web tool.
The following steps explain how to get split screen effect with WeVideo:
Step 1: Import Videos
Visit https://www.wevideo.com and on the main window, click Video from under the Create a new section at the top, select a layout on the Let’s get started box, and click START EDITING from the bottom right corner. Next, click ADD in the My media window in the upper-left section, click BROWSE TO SELECT on the Import media box, and add the videos you want to use in the split screen effect.
Step 2: Add Clips to Timeline
As explained earlier, drag the videos from the My media pane and drop them in the Timeline. Make sure to place every video in its separate layer, and that all the layers are on top of each other.
Step 3: Create Split Screen Effect
Select any clip in the Timeline, and click the Open clip editor icon from the upper-left area of the track. On the next page, use the Scale slider to reduce the size of the selected clip, and from the preview window in the right, drag to reposition the video to your preferred location on the screen. Click SAVE CHANGES from the bottom of the left pane to confirm the settings. Repeat the process for the second clip in the Timeline to resize and reposition it on the screen. Click FINISH from the upper-right corner, on the next box, enter a name for the video in the available field, click SET, choose your preferred settings on the next page, and click EXPORT from the bottom-right corner to produce the split screen video.
Pros
- Free to use
- Allows multiple videos to be used for split screen
Cons
- Paid subscription is needed to remove watermark from the outputs
FAQs About Split Screen Video Editors
Why you should use split screen effect in video?
There are a couple of reasons you may want to use split screen effect in your video. Some of the most common uses include:
- Showing multiple actions by the same or different characters at the same time, without changing the screen
- Comparing multiple objects or picture quality. This can be done only when the entities in question are placed side-by-side
- Making your video look more professional
- Showing different effects on the same screen
Can I create a split screen video with Windows Movie Maker or Windows 10 Photos app?
No, you cannot. Although these tools enable you to resize the videos, since they don’t allow multi-tracked Timelines, no video clips can be placed one above the other which is an essential part for any split screen video maker to create the effect. However, as discussed above, there are several post-production tools, offline and online, that allow you to make split screen videos easily and without any cost.
Conclusion
Split screen video editor tools are both paid and free. Regardless of the program you use to create the effect, the output files always look more professional and informative. Furthermore, things become way simpler if the split screen video maker has simple UI, is less resource intensive, and is easy to use as it is the case with Wondershare Filmora.
Ollie Mattison
Ollie Mattison is a writer and a lover of all things video.
Follow @Ollie Mattison
Move Over WMM: Discover the Best Video Editors
Windows Movie Maker has been a cornerstone tool for video editors for quite a while. There are a lot of amateurs who’ve made use of the free program and have done wonders with it. As it is discontinued, many Windows Movie Maker alternatives claim to offer ‘just the right video editing tool for you,’ few can live up to their promises—and most are very expensive.
We have ten other programs that can be used to create videos that include everything from Apple iMovie to other basic alternatives.
So whether you’re a beginner who wants to learn how to make a movie, a pro looking for an excellent alternative to Windows Movie Maker, or someone who wants to make a simple slide presentation or online video, you’re bound to find a video creation program here.
- Wondershare Filmora
- Avidemux Video Editor
- VirtualDub
- Sony Vegas Movie Studio
- WeVideo
- Lightworks
- ShotCut
- OpenShot
- Movavi Video Editor Plus
- VSDC Free Video Editor
- VideoPad Video Editor
- HitFilm
- Magix Movie Studio
- How To Edit a Video With a Windows Movie Maker Alternative
- Hot FAQs on Windows Movie Maker Alternatives
Part 1: Top 3 Picks for Windows Movie Maker Alternatives
The world’s best video editing software is about to change. We look at three of the most popular and valuable alternatives to Windows Movie Maker.
You will need to consider these alternatives to ensure they meet your expectations and needs.
1. Wondershare Filmora - Best Overall

Filmora is the best Windows Movie Maker Alternative designed according to your convenience.
Ratings: 4.4 Stars out 5
Starting from $49.99
2. Magix Movie Studio - Best for Collages
This alternative offers a variety of tools and plugins for anyone who wants to create professional-level videos in under a minute.
Download on Windows
Ratings: 4 stars out of 5
30-day free trials, then starts from $69.99 all the way to $129
3. Avidemux Video Editor - Best Open-Source Editor

An open-source editor that supports a wide range of formats is free! Avidemux has an interface similar to Windows Movie Maker, which makes it a perfect alternative.
Download on Windows
Ratings: 4.0 stars out of 5
Free Trial
Part 2: Ultimate Overview on 13 Best Alternatives to Windows Movie Maker
We live in visual culture, and we constantly see, capture, upload, and share videos on our smartphones, tablets, and laptops. So, it is only natural that more people seek ways to edit their videos. Windows Movie Maker was one of the most popular video editing apps. So it’s time to dig into the best Windows Movie Maker alternatives, which are arguably better and feature-rich.
| Software | OS | Media Resources | AI editing | Easy to Use | Free Trial |
|---|---|---|---|---|---|
| Wondershare Filmora | WindowsMacMobile | Yes | Yes | Yes | Yes |
| Avidemux | WindowsOS XLinuxBSD | Yes | No | Yes | Yes |
| Virtual Dub | Windows | No | No | Yes | Yes |
| Vegas Movie Studio | Windows | Yes | Yes | No | No |
| WeVideo | Online | Yes | No | Yes | Yes |
| Lightworks | LinuxOS X Windows | Yes | Yes | No | No |
| ShotCut | WindowsMacLinuxBSD | Yes | No | No | Yes |
| OpenShot | WindowsMacLinuxChrome OS | Yes | No | Yes | Yes |
| Movavi Plus | WindowsMac | Yes | No | Yes | Yes |
| VSDC | Windows | Yes | No | Yes | Yes |
| VideoPad | WindowsMaciPad/iPhone | Yes | No | Yes | Yes |
| HitFilm | WindowsMac | Yes | Yes | Yes | Yes |
| Magix Movie Studio | Windows | Yes | Yes | No | Yes |
Part 3: 13 Best Windows Movie Maker Alternatives for Windows
As we all know, Windows Movie Maker is the most used and trusted tool for creating videos in Windows. With its unique features and user-friendly interface, people often use this software to develop short and entertaining videos.
However, the fact is that Windows Movie Maker is not the current best video editing software for creating complex video projects. For this reason, we compiled a list of the 12 best alternatives to offer you a better option for Windows Movie Maker.
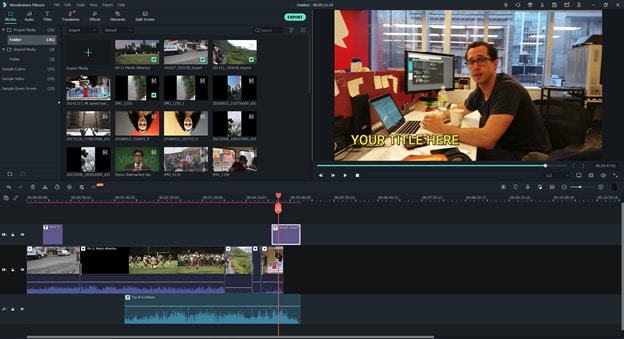
1. Wondershare Filmora
Filmora 11 is a powerful, easy-to-use video editor specially designed to streamline your workflow and save you hours weekly. It supports everything from Windows, Mac, and IOS to Android. The latest update to the flagship app includes several key enhancements that result in a much more efficient video creation workflow and one that’s easier to use than its rivals.
Key features
- Preset Templates
- Instant Mode
- Motion Tracking
- AI Editing Effects
- Auto Synchronization
- Plug-ins
Price
- Annual Plan: $49.99
- Perpetual Plan: $79.99
Pros
- Seamless interface for beginners
- Great customer support
- Plenty of effects and preset templates
- 4K video output options
Cons
- Rendering requires too much time
- The mobile app requires separate subscription
Supported OS: Windows , Mac , iOS , Android , iPad
G2 Ratings: 4.4 stars out of 5
Summary
Filmora’s intuitive interface allows experienced and brand-new users to create incredible videos with flawless special effects. Its high ratings and multiple supported formats make it quite popular among users.
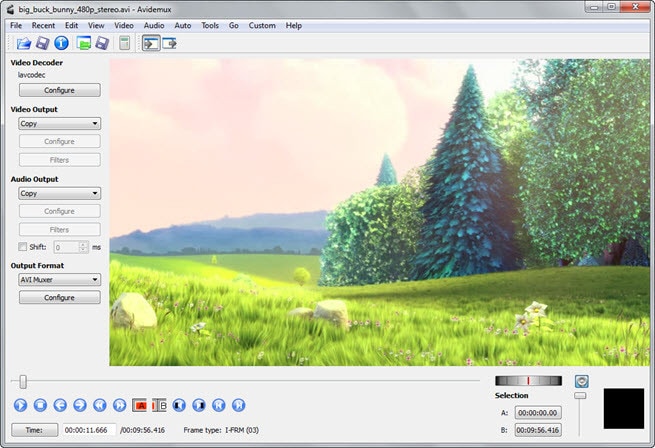
2. Avidemux Video Editor
If you are a beginner and want to use a free, open-source software program for basic video editing, then Avidemux is a good choice. The interface is not as fancy as it could be, but there are some presets that’ll save you a lot of time. Avidemux is a cross-platform video editor that allows you to create custom videos, but it doesn’t feature the ability to share the edited footage to social media directly,
Key features
- Video and Audio Filters
- Support Popular Formats
- Convert Video For Archiving or Publishing
Price: Free
Pros
- It can convert Video To A Smaller Size
- Easy cut, trim, split video
Cons
- Out-dated UI
- Lacks sharing option
Supported OS: Windows , OS X , Linux , BSD
Uptodown Ratings: 4.0 stars out of 5
Summary
An open-source video editor that supports most formats. Due to its obsolete UI and lack of sharing features, Avidemux has average ratings.
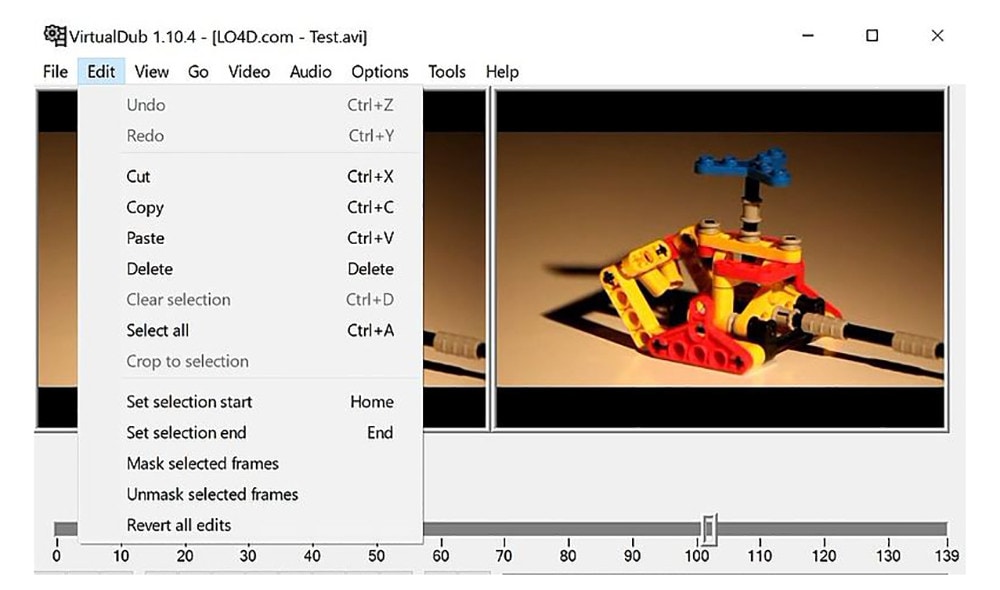
3. VirtualDub
This open-source software is user-friendly and allows users with little experience to navigate the software without much trouble. It supports 3rd party apps and also offers batch-processing, which means working on multiple videos simultaneously makes it possible.
Key features
- Integrated volume and histogram meter
- Optimized disk
- Noise reduction
- Fractional frame rates
Price: Free
Pros
- Clean interface, easy to use
- Keyboard and mouse shortcuts for faster operation
- Free to use
Cons
- Not suitable for 4K editing
- Lack learning material
- Obsolete Interface
Supported OS: Windows
Compare Camp Ratings: 4.0 stars out of 5
Summary
Virtual Dub supports multitasking, and its features are pretty helpful. However, it lacks 4k editing and a friendly interface. Overall Virtual Dub is a good choice.
4. Sony Vegas Movie Studio
This video editing software makes it easy to create professional-looking videos in minimum time and effort. Vegas Movie Studio software is best for video editing professionals who have been doing it for some time and are looking for something a little more sophisticated than free alternatives. Not only does it has a high retail price, but its internal elements can be too complex for those just beginning.
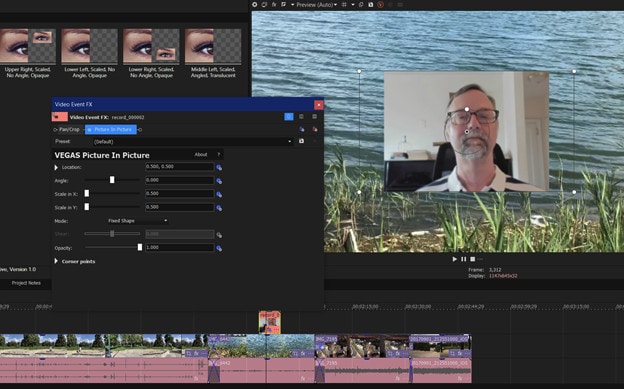
Key features
- Color correction
- HDV and AVCHD-editing
- DV batch capture
- Wide variety of file formats and codecs
Price: Starting from $7.99 USD per month
Pros
- Customizable interface
- Multicam editing
- Lots of effects and transitions, with plug-in capability
- Good slow motion and warp flow transition tools
Cons
- Less intuitive interface than competitors
- Import from camcorder not ideal
- Some tools are complex
Supported OS: Windows
G2 Ratings: 4.4 out of 5
Summary
Vegas Movie Studio is the choice of professionals. It does all the work without taking up a lot of resources, and like most programs, there is a learning curve. It’s not always intuitive for beginners, but its professional and powerful features score decent in most reviews.
5. WeVideo
This cloud-based application is a simple-to-use video editing and sharing suite. WeVideo is a full-featured video editing application that uses JumpStart technology to create amazing videos. It’s an innovative app that offers a seamless editing experience as it supports multiple formats of video, images, audio, and graphics.
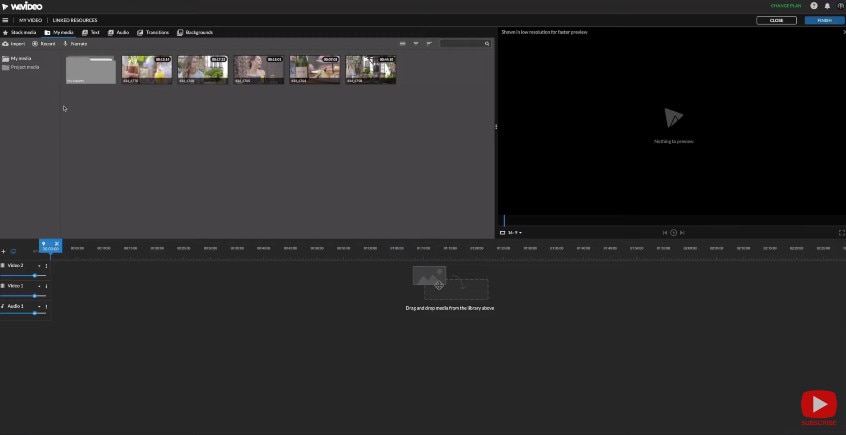
Key features
- WeVideo JumpStart
- Cloud storage
- Built-in graphics
- Customizable environment
- Advanced text editing
- Multi-track editing and storyboard
Price
- Free trial
- Power Plan: $9.99/month
- Unlimited Plan: $15.99/month
- Professional Plan: $39.99/month
- Business Plan: $73.99/month
Pros
- Constantly improving features
- Ease of use
- Storage is cloud-based
Cons
- Old fashion transition
- Leaves a watermark on free trial
Supported OS: Online
Trustpilot Ratings: 4 stars out of 5
Summary
WeVideo is a straightforward yet robust video editor. It offers a variety of features and supports multiple formats, plus its comprehensive pricing plan makes it useful for everyone.
6. Lightworks
Lightworks is the most powerful video editor in its class and an excellent tool for professionals who want to make amazing videos quickly. Lightworks is very fast and straightforward to use, and it has some great features you won’t find in any other video editor. It is available on all popular OS.

Key features
- Audio and Video Effect Plugin Support
- Cloud Connected
- Motion Graphics
- Advanced Metadata
- Proxy Workflows
- Apple ProRes decoding
Price
- Monthly Plan: $9.99/user
- Yearly Plan: $9.99/user
- Perpetual: $154.99
Pros
- High-resolution timeline rendering
- It has social media export templates
- Interfaces for multiple OS are consistent
- Instant autosave
Cons
- Commands are not always intuitive
- A bit pricey as compared to its competitors
Supported OS: Windows , Mac , Linux
Techradar Pro Ratings: 4 stars out of 5
Summary
Lightworks is not any other video editing tool available on the market of video editing tools. This video editing tool provides amateurs with the most sophisticated features in an optimized platform. Its scores are the highest on almost every review site.
7. ShotCut
Shotcut is a multiplatform video editor that lets you work with various formats for audio, video, image files, etc. This video editor makes it easy to mix and match the resolution and frame rates in a video file. All the changes you make in the editor can be undone and redone often. Shotcut is the best choice for video editing, without question.

Key features
- Webcam capture
- Audio scopes and filters
- Deinterlacing
- Eyedropper tool
- Video wipe transitions
- Keyframes for filter parameters
Price: Free
Pros
- Support for 4K resolutions
- Free
Cons
- Less intuitive than commercial apps
- Lacks built-in sharing to popular sites
Supported OS: Windows , Mac , Linux
GetApp Ratings: 4.5 out of 5 stars
Summary
Shotcut is an open-source video editor for creative professionals and is available on mac, Windows, and Linux. The free version of Shotcut has many excellent features, but it doesn’t have the slick interface or advanced techniques of the top paid editors.
8. OpenShot
An award-winning open-source video editor that creates stunning videos. OpenShot is a fast, easy-to-use, and surprisingly powerful video editor. OpenShot Video Editor allows you to work with many different types of tracks so that your edits will seem natural. OpenShot Video Editor allows you to add your custom animations or titles. The options are endless, so it all depends on your time and interest. It is available in more than 70 languages, making it ideal for all types of users.
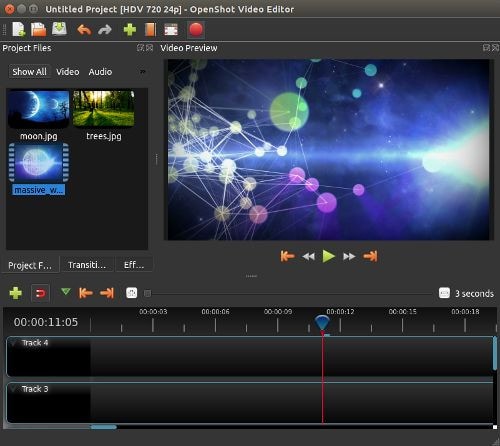
Key features
- 3D animations
- Animation and keyframes
- Multiple languages and formats
- Cross-platform
- Video-effects
Price: Free
Pros
- It is a non-linear editor with infinite tracks
- 100% free without watermark
- Frequent updates
Cons
- Obsolete interface
- Unstable performance
- Lacks some editing features
Supported OS: Window , Mac , Linux , Chrome OS
Getapp Ratings: 4.2 stars out of 5
Summary
Another open-source video-editor in the list is named OpenShot. It’s a multi-lingual and multi-supported app with unique features. Despite its unstable performance, OpenShot is still an ideal choice for many users.
9. Movavi Video Editor Plus
Movavi Video Editor Plus is the perfect tool to bring your creative ideas to life. It has special effects, ready-made intros, and keyframe animation. Using chroma keying, you can change the background of your video clips to any color or pattern that suits your need. Movavi has now redesigned its user interface to make it easy to use.
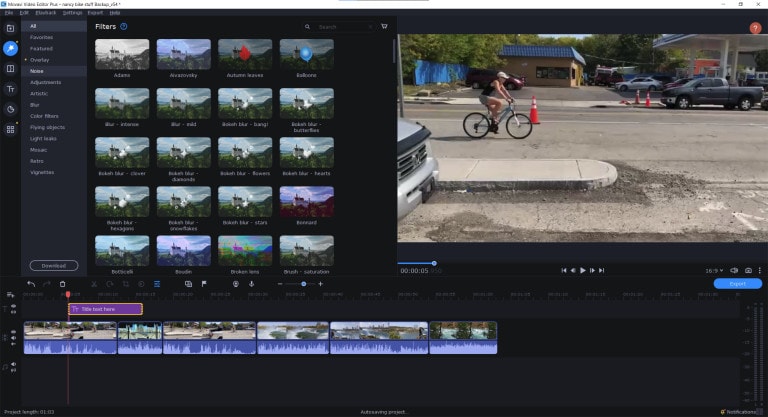
Key features
- Effects and transitions
- Built-in media pack
- Fast processing of 4K videos
- Keyframe animation
- Automatic video creation
- Cutting, trimming, joining
Price
- Free version: 7 days
- Video Editor Plus 1 year /1 PC: $49.95
- Video Editor Plus Lifetime /1 PC: $69.95
- Video Suite Lifetime /1 PC: $89.95
Pros
- Easy-to-understand user interface
- Transitions with sound
- Motion tracking and picture-in-picture tools
- Chroma-key capability
- Quick movie-creation tool
Cons
- Lacks advanced trim modes
- Slow rendering
PCMag Ratings: 4.0 stars out of 5
Summary
If you want to edit your videos with a minimal learning curve, try Movavi. You get PiP, chroma-keying, titling, basic keying, and motion tracking. The program is simple to use but doesn’t have all the features and stands four stars.
10. VSDC Free Video Editor
VSDC Free Video Editor is an online tool that lets you edit audio and video files to make your creations like movies, YouTube tutorial videos, and more. The audio and video files supported are extensive, and the software includes a codec manager. The Pro version isn’t necessary if you’re using the free edition of the software; it’s more than enough to get the job done.
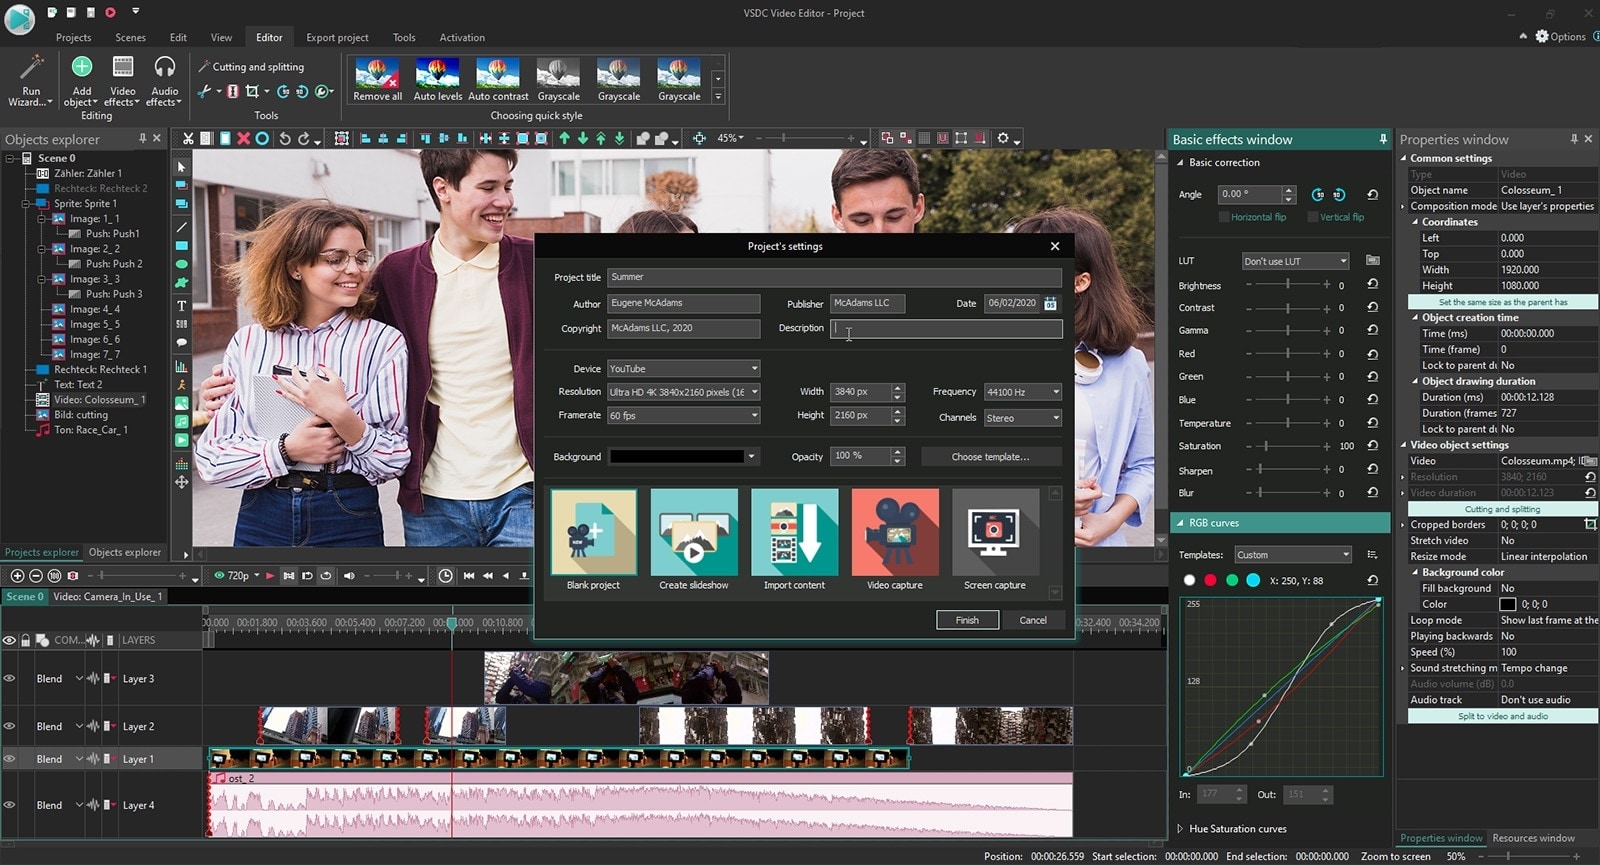
Key features
- Dark theme
- Subpixel Accuracy
- Powerful Chroma Key tool
- Trendy video effects, filters, and transitions
- Color Blending And Filters
- Built-In DVD Burning Tool
Price: Free
Pros
- Non-linear
- Video effects library
- Video stabilization
- Masking
Cons
- Outdated interface
- Lack keyboard shortcuts
- Only available on Windows
Supported OS: Windows
Capterra Ratings: 4.5 stars out 5
Summary
VSDC is a non-linear editor with extensive format support. It includes all the essential features an editor requires but with an obsolete UI. It is also ideal for many who need a powerful yet free video editor.
11. VideoPad Video Editor
VideoPad is a free video editor that can create stunning videos and perform basic editing tasks. A good video editor can help you to create videos for different social media platforms. You can make your videos look professional and polished with a few clicks and some simple editing skills. There’s nothing particularly exciting or advanced about this app; it’s simple enough for anyone new to video editing or even for seasoned editors. But the simple and easy-to-use interface makes the entire process very exciting.
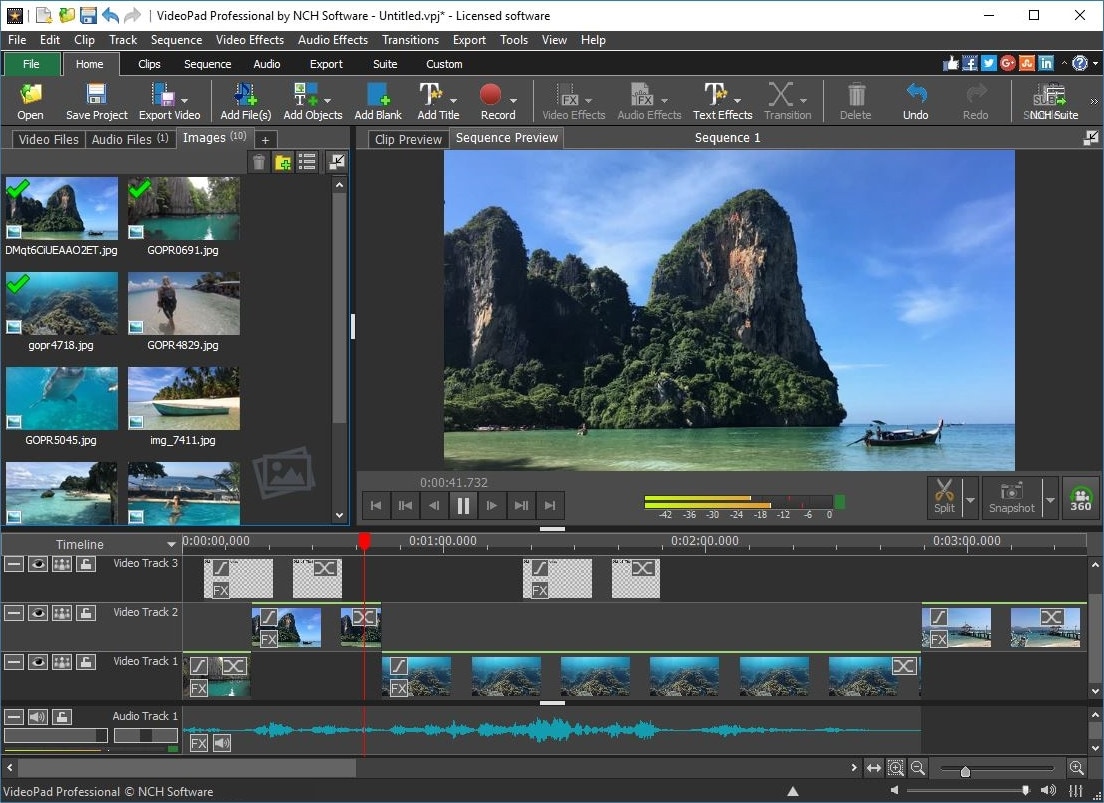
Key features
- Text snippets
- Range of transitional effects
- Plug-ins Library
- Burn finished videos to Blu-Ray, DVD, etc.
- Color correction and light balance.
Price: Free
Pros
- Simple and clean interface
- Supports multiple file formats
- Includes video effects
- Lightweight on system resources
Cons
- Lack of advanced features
Supported OS: Windows , Mac , iPad/iPhone
Tom’s guide Ratings: 3.5 stars out of 5
Summary
Video pad is a free video editor designed for beginners that is lightweight and simple. VideoPad is also great for creating quick videos for social media purposes like Youtube and Facebook. The software has a high rating, as shown above, and it’s available on Windows.
12. HitFilm
HitFilm is a helpful video editing software that makes editing easier for users. In addition to basic features, the program also provides advanced-level functions that make edited videos pop. Hitfilm Express Download has more than 400 features to help casual video editors save time. Features like: visual effects, cinematic elements, and compositing tools preset help unleash your creativity.
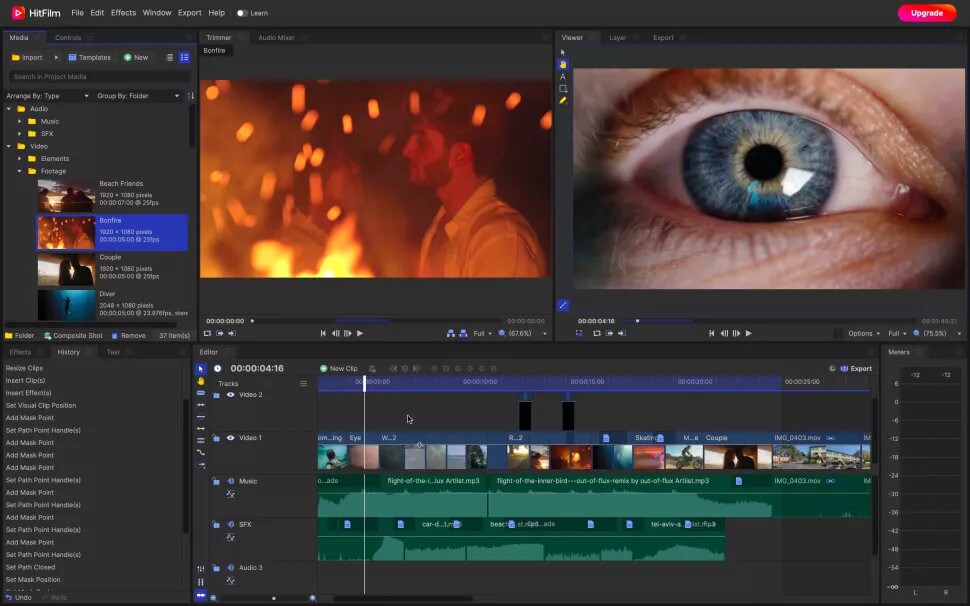
Key features
- Color Grading and correction
- Smart search
- Commentator recorder
- Lightning and lens flares
- 3D camera tracker
Price
- Free trial
- Creator: $7.50
- Pro: $12.50
- Enterprise: Custom pricing
Pros
- Intuitive interface
- It offers free tutorials and masterclasses
- Works on both Windows and Mac
Cons
- It requires heavy system requirements
TechRadar Ratings: 4.5 stars out of 5
Summary
HitFilm Express 15 is a powerful free video editing program that enables you to create high-quality videos in minutes with an intuitive interface. It offers advanced editing features such as advanced video trimming, 3D editing, and more.
13. Magix Movie Studio
Magix is the world’s leading professional audiovisual media software, with Sequoia being its industry-standard audio editing software. This movie editor is an enthusiast-level video editing software that competes with software from Adobe and CyberLink, and it even boasts support for 4K content and 360 degrees. There are many reasons to upgrade. This year’s update includes stabilization, 8K editing, motion tracking, and an in-app plug-in store.
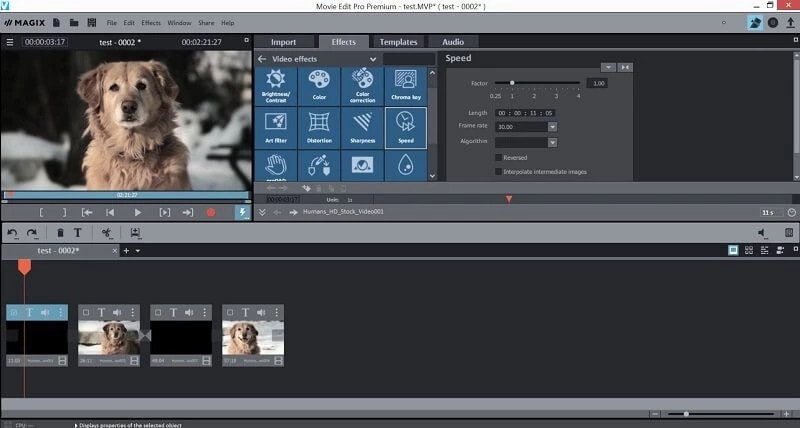
Key features
- NewBlue effects
- Fly-in animation
- New filter view
- Stabilization
- Motion tracking
- 8k support
Price
- Movie Studio 2024: $69.99 (30-day free trial)
- Movie Studio 2024 Platinum: $99.99 (30-day free trial)
- Movie Studio 2024 Suite: $129.00 (30-day free trial)
Pros
- Lots of video effects
- Responsive editing interface
- Multicam
- Trailer-like movie templates
- Solid audio editing
Cons
- Slower project rendering than others
- Lacks import and organization tools
Supported OS: Windows
PCMag Ratings: 3 stars out of 5
Summary
Magix movie studio is a powerful all-around video editing tool with many features that professional users have come to expect. It’s also relatively simple to use. But usability and performance are poor compared to other software programs like Filmora .
Part 4: How To Edit a Video With a Windows Movie Maker Alternative
Windows Movie Maker was great for editing a video, but it’s no match for some of the best video editing software. We’re talking about software capable of creating a cinematic experience in seconds, all on your computer.
When you need to edit a video with simple, quick edits, like adding a special effect or changing the background, try Filmora . Filmora is an easy-to-use application that allows you to create a movie using simple tools that don’t require additional training. You can’t beat this option if you want to create a professional-quality video for your blog or website.
Let’s dive into a quick tutorial on editing videos in Filmora:
Free Download For Win 7 or later(64-bit)
Free Download For macOS 10.14 or later
Step1 Open Wondershare Filmora on your PC or Mac
You can start a new project by clicking on ‘New Project’. And you can also change the ‘Aspect Ratio’ according to your project demand.
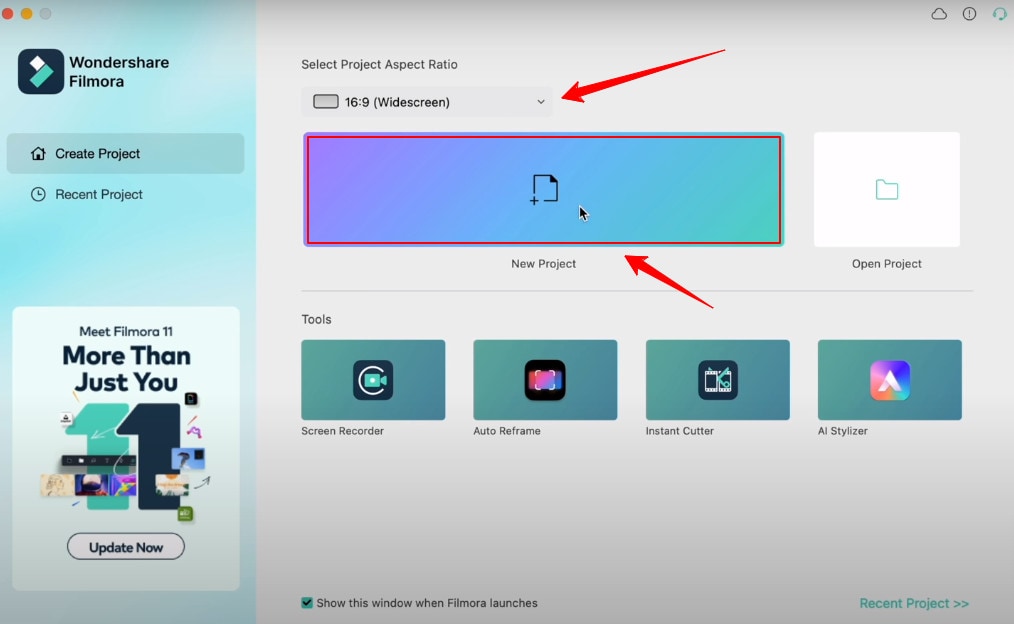
Step2 Import Videos
You can import your file by clicking the import tab on the upper-left side or clicking the import icon on the main window.
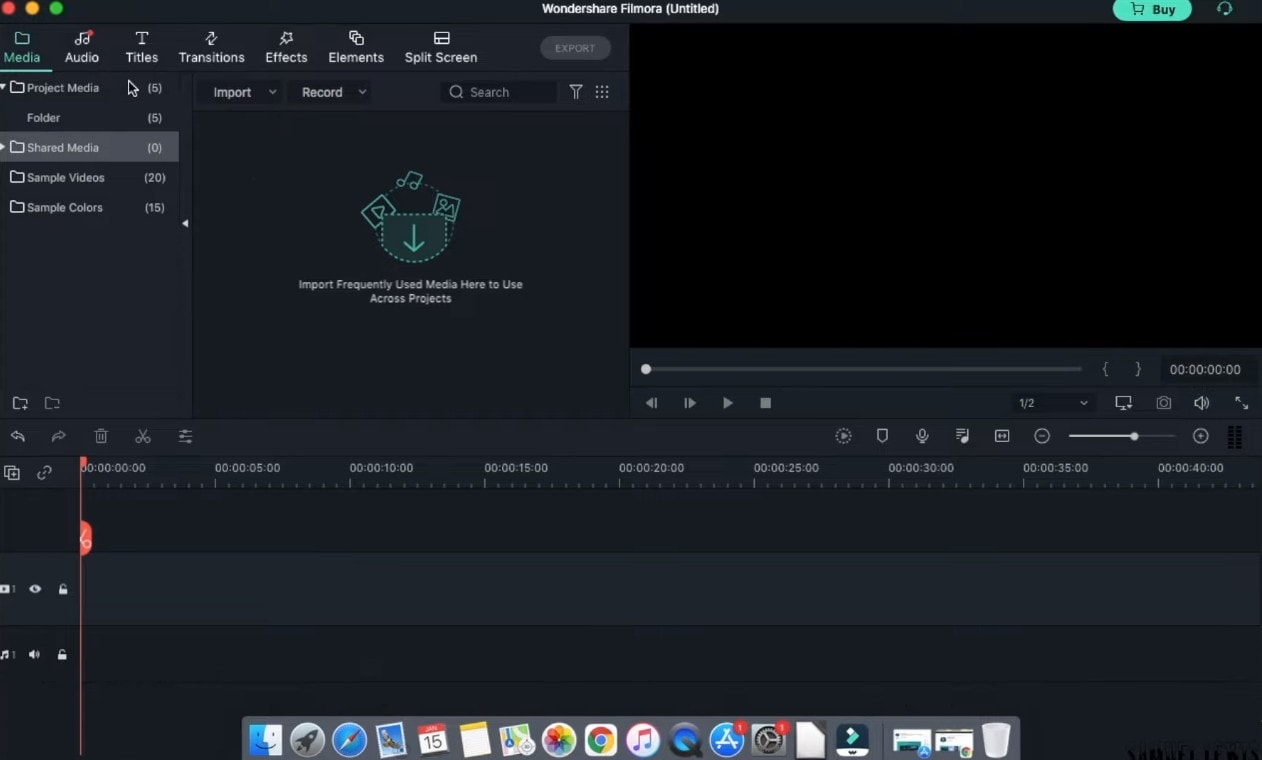
Step3 Drag and drop your footage to the timeline
After importing all the files, click and hold each individual video and drag and drop it to the timeline area according to your ideal sequence.
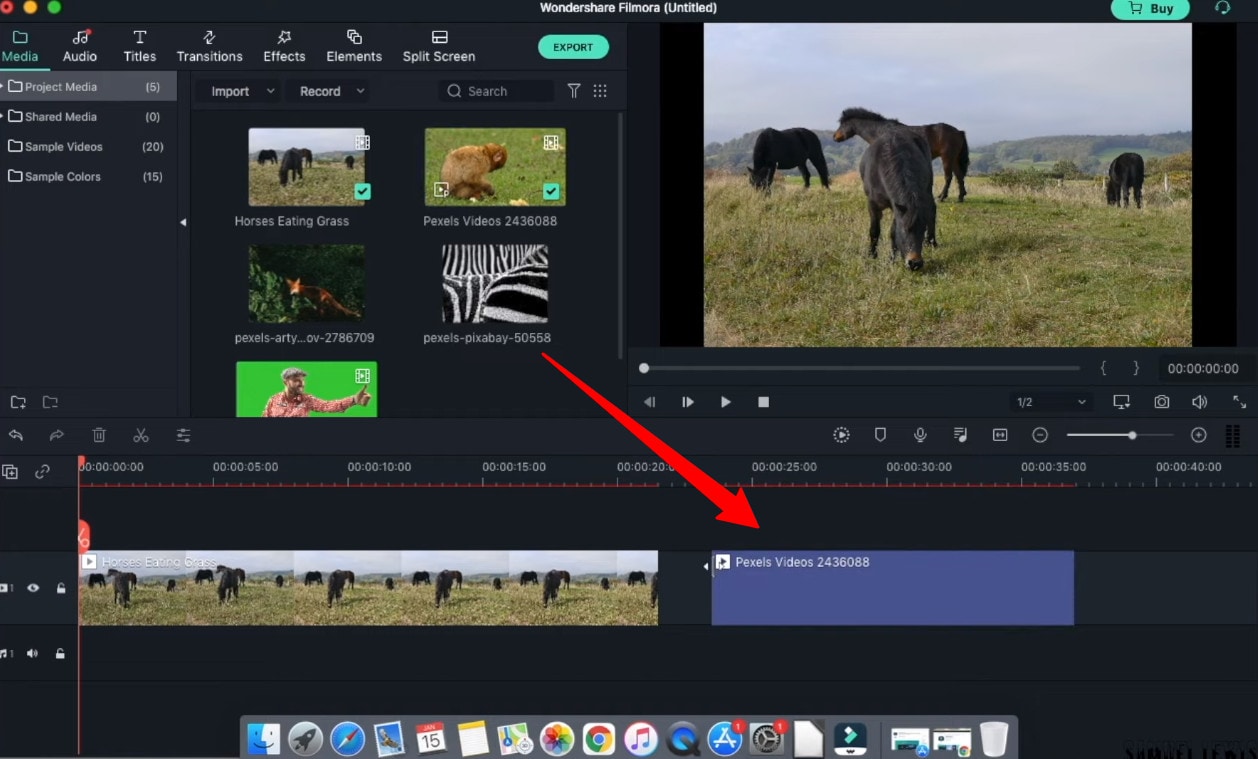
Step4 Add Audio
Go to the ‘Audio’ tab and select the audio file from the audio library. Once selected, drag and drop the audio file into the music timeline.
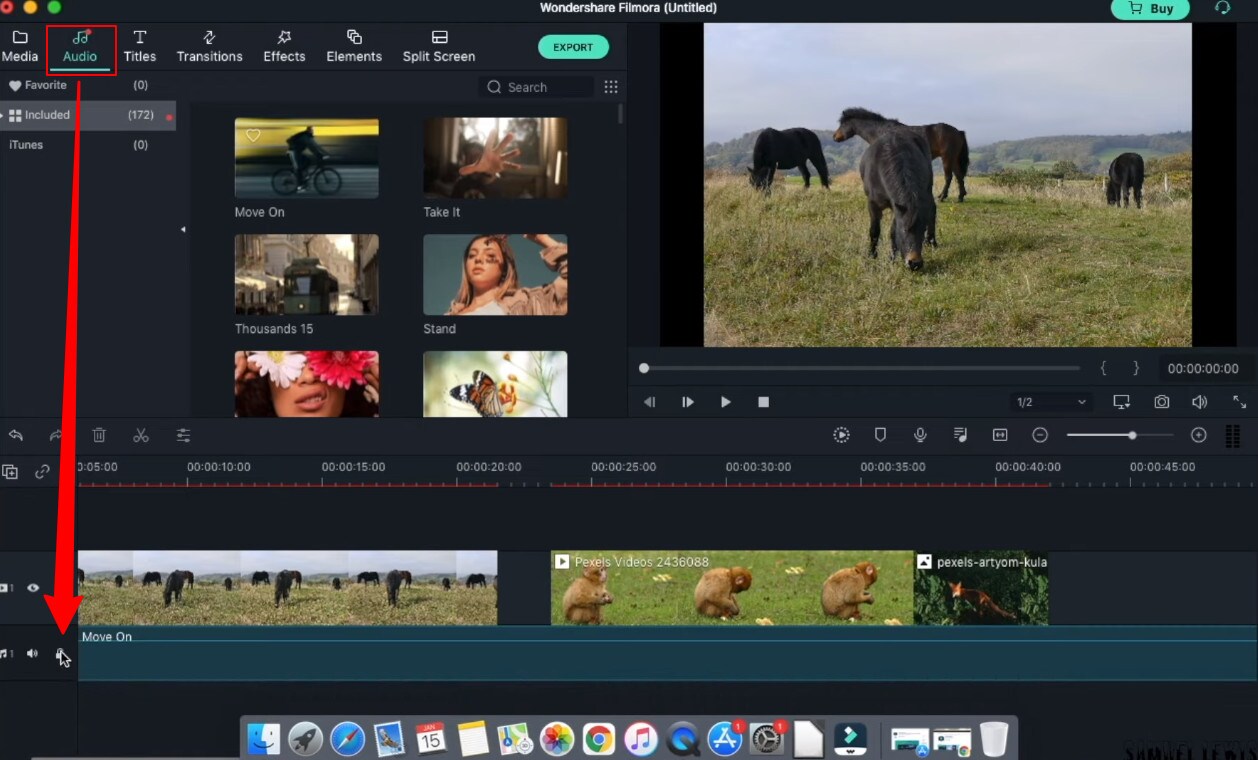
Step5 Add Titles
In your video intro, you can insert some title text. Go to the ‘Titles’ tab and select the one you like, and drag and drop it on top of the timeline. Double-click and edit the text and state your ideal statements. You can customize your text fonts and color too.
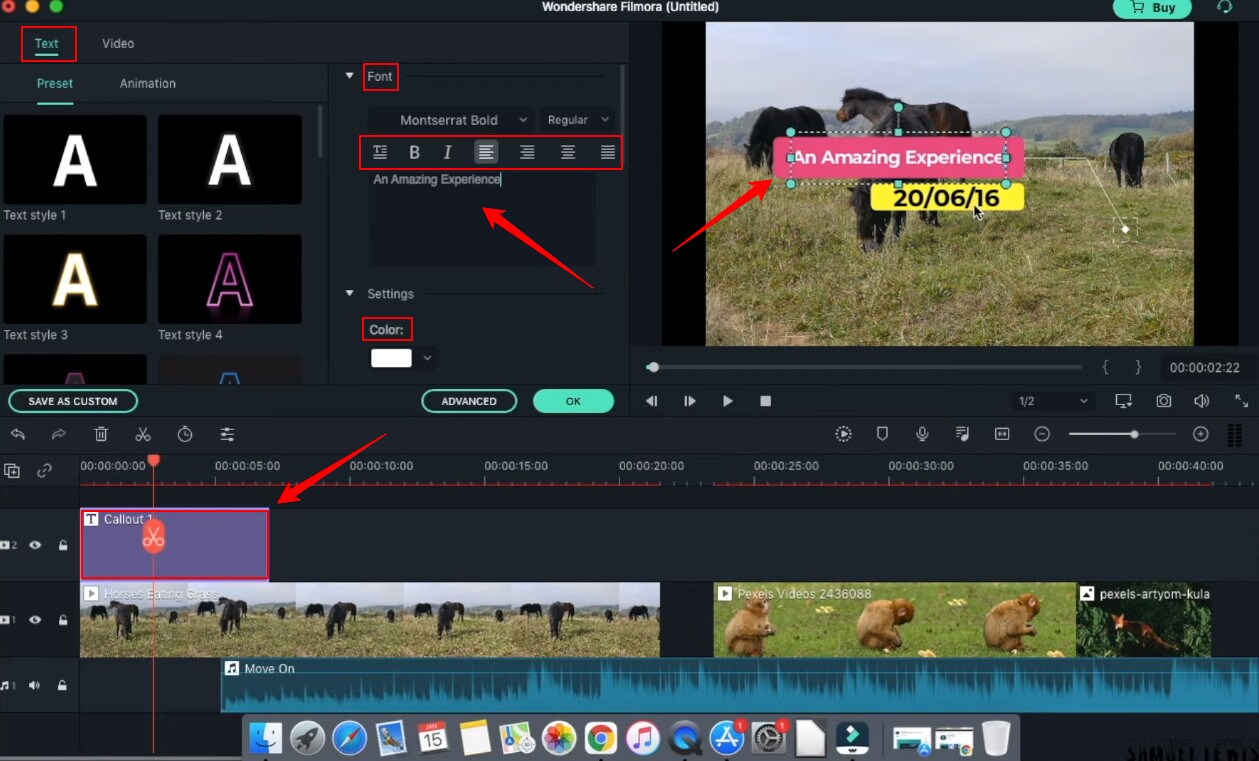
Step6 Add Transitions
You can add transition effects to ensure a smooth transition from one scene to another. The overall will get more professional look.
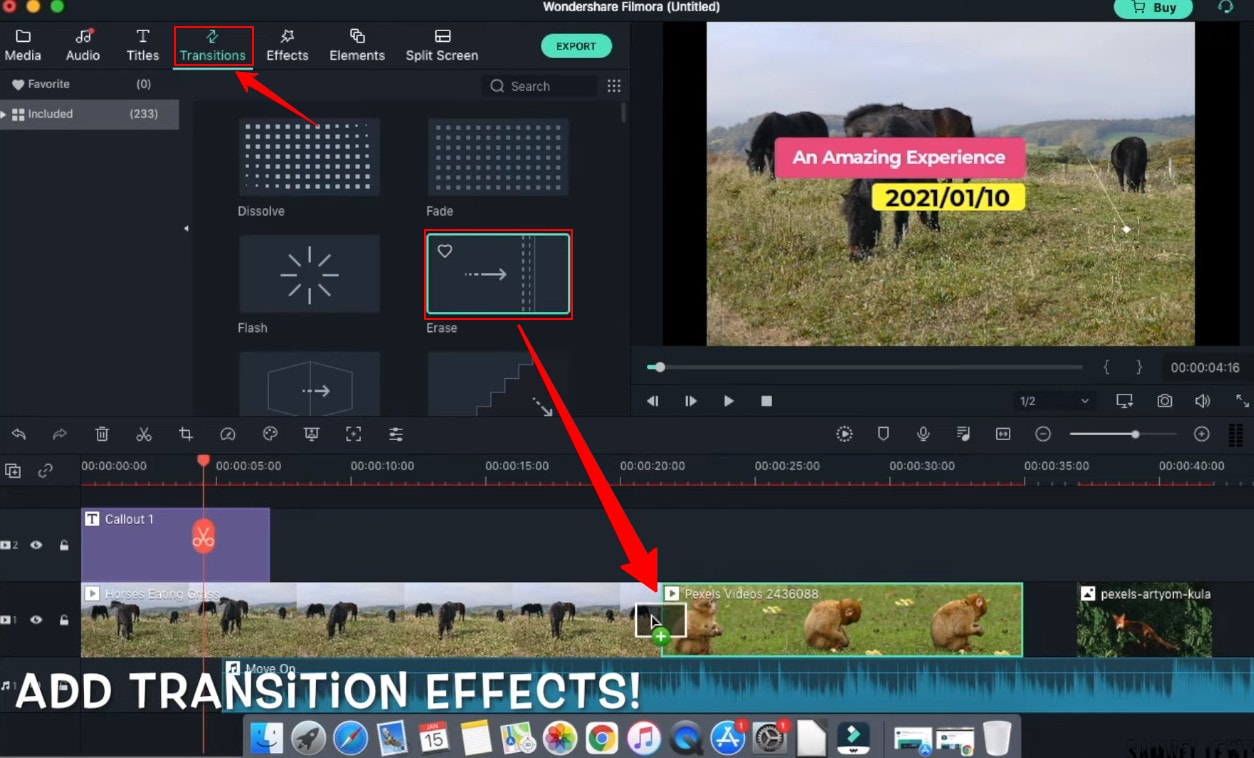
Step7 Add Effects
Next; you can get special effects to your video to make them more attractive and engaging to watch. Simple drag down the effect to your video and watch the effect take place in your selective scene.
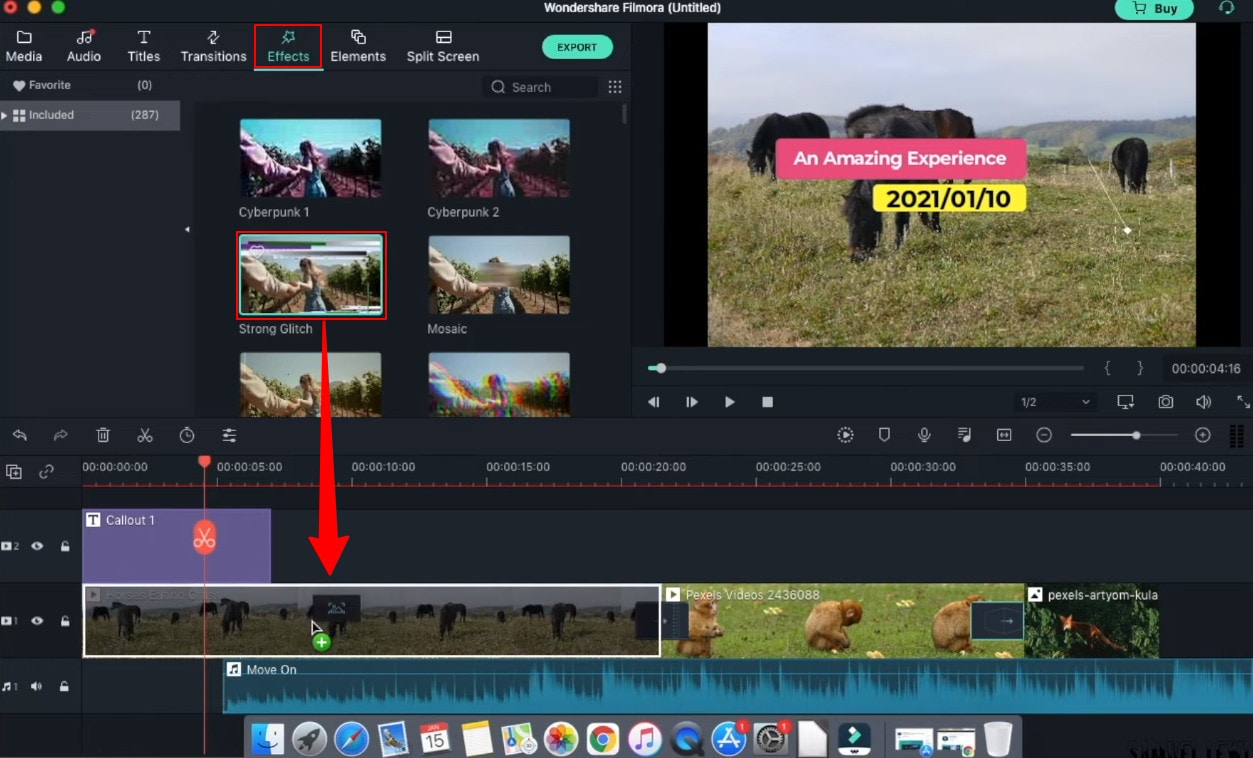
Step8 Export your work
Once all the changes have been made, hit ‘export’ from the top tab. A window will appear where you can change the settings, resolution, frame rate, bit rate, etc. Next, click the ‘export’ button down on that window, and then you can save the file in your drive.
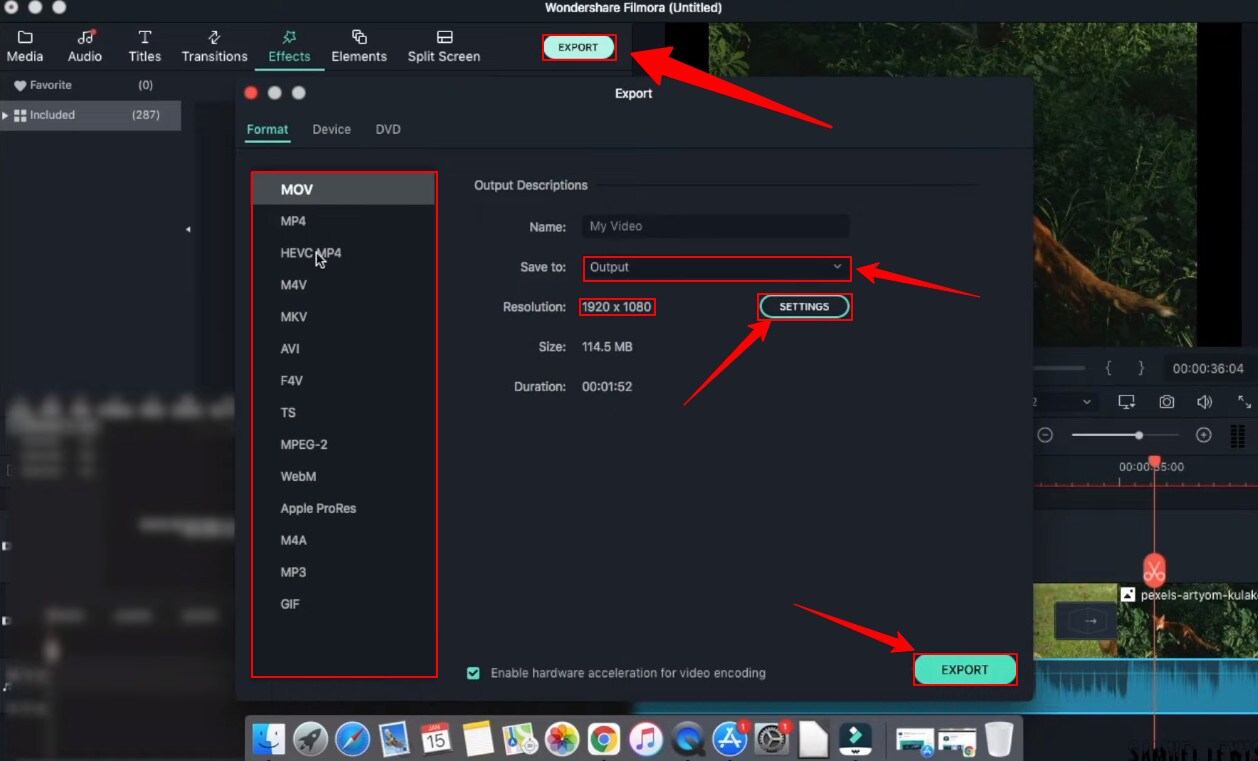
Part 5: Hot FAQs on Windows Movie Maker Alternatives
1. Why is Windows Movie Maker discontinued?
Microsoft’s video editing program, Windows Movie Maker, did not become a big hit with the public because it failed to do well on the market. Microsoft couldn’t get the support they were looking for from the program’s users. As a result, Microsoft had to cease its support of the program.
2. Is there a free version of Windows Movie Maker?
Microsoft Windows Movie maker was always accessible and pre-installed every windows product. Microsoft has discontinued support for Movie Maker and warns about free downloads of Movie Maker provided by third parties that might contain malware, viruses, or other issues.
3. What are the best free Windows Movie Maker Alternatives for Mac?
After switching to a Mac, you’ll find that the Windows Movie Maker alternatives offer much more than just a simple video editor. They provide advanced features, easy transitions, and less technical know-how to create pro-quality results. You should try using these platforms on your Mac if you have a video to edit.
- Wondershare Filmora
- Movavi
- OpenShot
Final Words
Windows Movie Maker is an excellent Windows video editor application for Windows users. But in recent years, it has become outdated due to the continuous development of new technologies. There are many alternatives for Windows Movie Maker, and here we listed some of the best ones. Most of them are free and featured packs. Each program has its unique set of features and capabilities, and each one excels in different areas. Check them out and see what you think.
Free Download For Win 7 or later(64-bit)
Free Download For macOS 10.14 or later
Part 1: Top 3 Picks for Windows Movie Maker Alternatives
The world’s best video editing software is about to change. We look at three of the most popular and valuable alternatives to Windows Movie Maker.
You will need to consider these alternatives to ensure they meet your expectations and needs.
1. Wondershare Filmora - Best Overall
Filmora is the best Windows Movie Maker Alternative designed according to your convenience.
Ratings: 4.4 Stars out 5
Starting from $49.99
2. Magix Movie Studio - Best for Collages
This alternative offers a variety of tools and plugins for anyone who wants to create professional-level videos in under a minute.
Download on Windows
Ratings: 4 stars out of 5
30-day free trials, then starts from $69.99 all the way to $129
3. Avidemux Video Editor - Best Open-Source Editor
An open-source editor that supports a wide range of formats is free! Avidemux has an interface similar to Windows Movie Maker, which makes it a perfect alternative.
Download on Windows
Ratings: 4.0 stars out of 5
Free Trial
Part 2: Ultimate Overview on 13 Best Alternatives to Windows Movie Maker
We live in visual culture, and we constantly see, capture, upload, and share videos on our smartphones, tablets, and laptops. So, it is only natural that more people seek ways to edit their videos. Windows Movie Maker was one of the most popular video editing apps. So it’s time to dig into the best Windows Movie Maker alternatives, which are arguably better and feature-rich.
| Software | OS | Media Resources | AI editing | Easy to Use | Free Trial |
|---|---|---|---|---|---|
| Wondershare Filmora | WindowsMacMobile | Yes | Yes | Yes | Yes |
| Avidemux | WindowsOS XLinuxBSD | Yes | No | Yes | Yes |
| Virtual Dub | Windows | No | No | Yes | Yes |
| Vegas Movie Studio | Windows | Yes | Yes | No | No |
| WeVideo | Online | Yes | No | Yes | Yes |
| Lightworks | LinuxOS X Windows | Yes | Yes | No | No |
| ShotCut | WindowsMacLinuxBSD | Yes | No | No | Yes |
| OpenShot | WindowsMacLinuxChrome OS | Yes | No | Yes | Yes |
| Movavi Plus | WindowsMac | Yes | No | Yes | Yes |
| VSDC | Windows | Yes | No | Yes | Yes |
| VideoPad | WindowsMaciPad/iPhone | Yes | No | Yes | Yes |
| HitFilm | WindowsMac | Yes | Yes | Yes | Yes |
| Magix Movie Studio | Windows | Yes | Yes | No | Yes |
Part 3: 13 Best Windows Movie Maker Alternatives for Windows
As we all know, Windows Movie Maker is the most used and trusted tool for creating videos in Windows. With its unique features and user-friendly interface, people often use this software to develop short and entertaining videos.
However, the fact is that Windows Movie Maker is not the current best video editing software for creating complex video projects. For this reason, we compiled a list of the 12 best alternatives to offer you a better option for Windows Movie Maker.
1. Wondershare Filmora
Filmora 11 is a powerful, easy-to-use video editor specially designed to streamline your workflow and save you hours weekly. It supports everything from Windows, Mac, and IOS to Android. The latest update to the flagship app includes several key enhancements that result in a much more efficient video creation workflow and one that’s easier to use than its rivals.
Key features
- Preset Templates
- Instant Mode
- Motion Tracking
- AI Editing Effects
- Auto Synchronization
- Plug-ins
Price
- Annual Plan: $49.99
- Perpetual Plan: $79.99
Pros
- Seamless interface for beginners
- Great customer support
- Plenty of effects and preset templates
- 4K video output options
Cons
- Rendering requires too much time
- The mobile app requires separate subscription
Supported OS: Windows , Mac , iOS , Android , iPad
G2 Ratings: 4.4 stars out of 5
Summary
Filmora’s intuitive interface allows experienced and brand-new users to create incredible videos with flawless special effects. Its high ratings and multiple supported formats make it quite popular among users.
2. Avidemux Video Editor
If you are a beginner and want to use a free, open-source software program for basic video editing, then Avidemux is a good choice. The interface is not as fancy as it could be, but there are some presets that’ll save you a lot of time. Avidemux is a cross-platform video editor that allows you to create custom videos, but it doesn’t feature the ability to share the edited footage to social media directly,
Key features
- Video and Audio Filters
- Support Popular Formats
- Convert Video For Archiving or Publishing
Price: Free
Pros
- It can convert Video To A Smaller Size
- Easy cut, trim, split video
Cons
- Out-dated UI
- Lacks sharing option
Supported OS: Windows , OS X , Linux , BSD
Uptodown Ratings: 4.0 stars out of 5
Summary
An open-source video editor that supports most formats. Due to its obsolete UI and lack of sharing features, Avidemux has average ratings.
3. VirtualDub
This open-source software is user-friendly and allows users with little experience to navigate the software without much trouble. It supports 3rd party apps and also offers batch-processing, which means working on multiple videos simultaneously makes it possible.
Key features
- Integrated volume and histogram meter
- Optimized disk
- Noise reduction
- Fractional frame rates
Price: Free
Pros
- Clean interface, easy to use
- Keyboard and mouse shortcuts for faster operation
- Free to use
Cons
- Not suitable for 4K editing
- Lack learning material
- Obsolete Interface
Supported OS: Windows
Compare Camp Ratings: 4.0 stars out of 5
Summary
Virtual Dub supports multitasking, and its features are pretty helpful. However, it lacks 4k editing and a friendly interface. Overall Virtual Dub is a good choice.
4. Sony Vegas Movie Studio
This video editing software makes it easy to create professional-looking videos in minimum time and effort. Vegas Movie Studio software is best for video editing professionals who have been doing it for some time and are looking for something a little more sophisticated than free alternatives. Not only does it has a high retail price, but its internal elements can be too complex for those just beginning.
Key features
- Color correction
- HDV and AVCHD-editing
- DV batch capture
- Wide variety of file formats and codecs
Price: Starting from $7.99 USD per month
Pros
- Customizable interface
- Multicam editing
- Lots of effects and transitions, with plug-in capability
- Good slow motion and warp flow transition tools
Cons
- Less intuitive interface than competitors
- Import from camcorder not ideal
- Some tools are complex
Supported OS: Windows
G2 Ratings: 4.4 out of 5
Summary
Vegas Movie Studio is the choice of professionals. It does all the work without taking up a lot of resources, and like most programs, there is a learning curve. It’s not always intuitive for beginners, but its professional and powerful features score decent in most reviews.
5. WeVideo
This cloud-based application is a simple-to-use video editing and sharing suite. WeVideo is a full-featured video editing application that uses JumpStart technology to create amazing videos. It’s an innovative app that offers a seamless editing experience as it supports multiple formats of video, images, audio, and graphics.
Key features
- WeVideo JumpStart
- Cloud storage
- Built-in graphics
- Customizable environment
- Advanced text editing
- Multi-track editing and storyboard
Price
- Free trial
- Power Plan: $9.99/month
- Unlimited Plan: $15.99/month
- Professional Plan: $39.99/month
- Business Plan: $73.99/month
Pros
- Constantly improving features
- Ease of use
- Storage is cloud-based
Cons
- Old fashion transition
- Leaves a watermark on free trial
Supported OS: Online
Trustpilot Ratings: 4 stars out of 5
Summary
WeVideo is a straightforward yet robust video editor. It offers a variety of features and supports multiple formats, plus its comprehensive pricing plan makes it useful for everyone.
6. Lightworks
Lightworks is the most powerful video editor in its class and an excellent tool for professionals who want to make amazing videos quickly. Lightworks is very fast and straightforward to use, and it has some great features you won’t find in any other video editor. It is available on all popular OS.
Key features
- Audio and Video Effect Plugin Support
- Cloud Connected
- Motion Graphics
- Advanced Metadata
- Proxy Workflows
- Apple ProRes decoding
Price
- Monthly Plan: $9.99/user
- Yearly Plan: $9.99/user
- Perpetual: $154.99
Pros
- High-resolution timeline rendering
- It has social media export templates
- Interfaces for multiple OS are consistent
- Instant autosave
Cons
- Commands are not always intuitive
- A bit pricey as compared to its competitors
Supported OS: Windows , Mac , Linux
Techradar Pro Ratings: 4 stars out of 5
Summary
Lightworks is not any other video editing tool available on the market of video editing tools. This video editing tool provides amateurs with the most sophisticated features in an optimized platform. Its scores are the highest on almost every review site.
7. ShotCut
Shotcut is a multiplatform video editor that lets you work with various formats for audio, video, image files, etc. This video editor makes it easy to mix and match the resolution and frame rates in a video file. All the changes you make in the editor can be undone and redone often. Shotcut is the best choice for video editing, without question.
Key features
- Webcam capture
- Audio scopes and filters
- Deinterlacing
- Eyedropper tool
- Video wipe transitions
- Keyframes for filter parameters
Price: Free
Pros
- Support for 4K resolutions
- Free
Cons
- Less intuitive than commercial apps
- Lacks built-in sharing to popular sites
Supported OS: Windows , Mac , Linux
GetApp Ratings: 4.5 out of 5 stars
Summary
Shotcut is an open-source video editor for creative professionals and is available on mac, Windows, and Linux. The free version of Shotcut has many excellent features, but it doesn’t have the slick interface or advanced techniques of the top paid editors.
8. OpenShot
An award-winning open-source video editor that creates stunning videos. OpenShot is a fast, easy-to-use, and surprisingly powerful video editor. OpenShot Video Editor allows you to work with many different types of tracks so that your edits will seem natural. OpenShot Video Editor allows you to add your custom animations or titles. The options are endless, so it all depends on your time and interest. It is available in more than 70 languages, making it ideal for all types of users.
Key features
- 3D animations
- Animation and keyframes
- Multiple languages and formats
- Cross-platform
- Video-effects
Price: Free
Pros
- It is a non-linear editor with infinite tracks
- 100% free without watermark
- Frequent updates
Cons
- Obsolete interface
- Unstable performance
- Lacks some editing features
Supported OS: Window , Mac , Linux , Chrome OS
Getapp Ratings: 4.2 stars out of 5
Summary
Another open-source video-editor in the list is named OpenShot. It’s a multi-lingual and multi-supported app with unique features. Despite its unstable performance, OpenShot is still an ideal choice for many users.
9. Movavi Video Editor Plus
Movavi Video Editor Plus is the perfect tool to bring your creative ideas to life. It has special effects, ready-made intros, and keyframe animation. Using chroma keying, you can change the background of your video clips to any color or pattern that suits your need. Movavi has now redesigned its user interface to make it easy to use.
Key features
- Effects and transitions
- Built-in media pack
- Fast processing of 4K videos
- Keyframe animation
- Automatic video creation
- Cutting, trimming, joining
Price
- Free version: 7 days
- Video Editor Plus 1 year /1 PC: $49.95
- Video Editor Plus Lifetime /1 PC: $69.95
- Video Suite Lifetime /1 PC: $89.95
Pros
- Easy-to-understand user interface
- Transitions with sound
- Motion tracking and picture-in-picture tools
- Chroma-key capability
- Quick movie-creation tool
Cons
- Lacks advanced trim modes
- Slow rendering
PCMag Ratings: 4.0 stars out of 5
Summary
If you want to edit your videos with a minimal learning curve, try Movavi. You get PiP, chroma-keying, titling, basic keying, and motion tracking. The program is simple to use but doesn’t have all the features and stands four stars.
10. VSDC Free Video Editor
VSDC Free Video Editor is an online tool that lets you edit audio and video files to make your creations like movies, YouTube tutorial videos, and more. The audio and video files supported are extensive, and the software includes a codec manager. The Pro version isn’t necessary if you’re using the free edition of the software; it’s more than enough to get the job done.
Key features
- Dark theme
- Subpixel Accuracy
- Powerful Chroma Key tool
- Trendy video effects, filters, and transitions
- Color Blending And Filters
- Built-In DVD Burning Tool
Price: Free
Pros
- Non-linear
- Video effects library
- Video stabilization
- Masking
Cons
- Outdated interface
- Lack keyboard shortcuts
- Only available on Windows
Supported OS: Windows
Capterra Ratings: 4.5 stars out 5
Summary
VSDC is a non-linear editor with extensive format support. It includes all the essential features an editor requires but with an obsolete UI. It is also ideal for many who need a powerful yet free video editor.
11. VideoPad Video Editor
VideoPad is a free video editor that can create stunning videos and perform basic editing tasks. A good video editor can help you to create videos for different social media platforms. You can make your videos look professional and polished with a few clicks and some simple editing skills. There’s nothing particularly exciting or advanced about this app; it’s simple enough for anyone new to video editing or even for seasoned editors. But the simple and easy-to-use interface makes the entire process very exciting.
Key features
- Text snippets
- Range of transitional effects
- Plug-ins Library
- Burn finished videos to Blu-Ray, DVD, etc.
- Color correction and light balance.
Price: Free
Pros
- Simple and clean interface
- Supports multiple file formats
- Includes video effects
- Lightweight on system resources
Cons
- Lack of advanced features
Supported OS: Windows , Mac , iPad/iPhone
Tom’s guide Ratings: 3.5 stars out of 5
Summary
Video pad is a free video editor designed for beginners that is lightweight and simple. VideoPad is also great for creating quick videos for social media purposes like Youtube and Facebook. The software has a high rating, as shown above, and it’s available on Windows.
12. HitFilm
HitFilm is a helpful video editing software that makes editing easier for users. In addition to basic features, the program also provides advanced-level functions that make edited videos pop. Hitfilm Express Download has more than 400 features to help casual video editors save time. Features like: visual effects, cinematic elements, and compositing tools preset help unleash your creativity.
Key features
- Color Grading and correction
- Smart search
- Commentator recorder
- Lightning and lens flares
- 3D camera tracker
Price
- Free trial
- Creator: $7.50
- Pro: $12.50
- Enterprise: Custom pricing
Pros
- Intuitive interface
- It offers free tutorials and masterclasses
- Works on both Windows and Mac
Cons
- It requires heavy system requirements
TechRadar Ratings: 4.5 stars out of 5
Summary
HitFilm Express 15 is a powerful free video editing program that enables you to create high-quality videos in minutes with an intuitive interface. It offers advanced editing features such as advanced video trimming, 3D editing, and more.
13. Magix Movie Studio
Magix is the world’s leading professional audiovisual media software, with Sequoia being its industry-standard audio editing software. This movie editor is an enthusiast-level video editing software that competes with software from Adobe and CyberLink, and it even boasts support for 4K content and 360 degrees. There are many reasons to upgrade. This year’s update includes stabilization, 8K editing, motion tracking, and an in-app plug-in store.
Key features
- NewBlue effects
- Fly-in animation
- New filter view
- Stabilization
- Motion tracking
- 8k support
Price
- Movie Studio 2024: $69.99 (30-day free trial)
- Movie Studio 2024 Platinum: $99.99 (30-day free trial)
- Movie Studio 2024 Suite: $129.00 (30-day free trial)
Pros
- Lots of video effects
- Responsive editing interface
- Multicam
- Trailer-like movie templates
- Solid audio editing
Cons
- Slower project rendering than others
- Lacks import and organization tools
Supported OS: Windows
PCMag Ratings: 3 stars out of 5
Summary
Magix movie studio is a powerful all-around video editing tool with many features that professional users have come to expect. It’s also relatively simple to use. But usability and performance are poor compared to other software programs like Filmora .
Part 4: How To Edit a Video With a Windows Movie Maker Alternative
Windows Movie Maker was great for editing a video, but it’s no match for some of the best video editing software. We’re talking about software capable of creating a cinematic experience in seconds, all on your computer.
When you need to edit a video with simple, quick edits, like adding a special effect or changing the background, try Filmora . Filmora is an easy-to-use application that allows you to create a movie using simple tools that don’t require additional training. You can’t beat this option if you want to create a professional-quality video for your blog or website.
Let’s dive into a quick tutorial on editing videos in Filmora:
Free Download For Win 7 or later(64-bit)
Free Download For macOS 10.14 or later
Step1 Open Wondershare Filmora on your PC or Mac
You can start a new project by clicking on ‘New Project’. And you can also change the ‘Aspect Ratio’ according to your project demand.
Step2 Import Videos
You can import your file by clicking the import tab on the upper-left side or clicking the import icon on the main window.
Step3 Drag and drop your footage to the timeline
After importing all the files, click and hold each individual video and drag and drop it to the timeline area according to your ideal sequence.
Step4 Add Audio
Go to the ‘Audio’ tab and select the audio file from the audio library. Once selected, drag and drop the audio file into the music timeline.
Step5 Add Titles
In your video intro, you can insert some title text. Go to the ‘Titles’ tab and select the one you like, and drag and drop it on top of the timeline. Double-click and edit the text and state your ideal statements. You can customize your text fonts and color too.
Step6 Add Transitions
You can add transition effects to ensure a smooth transition from one scene to another. The overall will get more professional look.
Step7 Add Effects
Next; you can get special effects to your video to make them more attractive and engaging to watch. Simple drag down the effect to your video and watch the effect take place in your selective scene.
Step8 Export your work
Once all the changes have been made, hit ‘export’ from the top tab. A window will appear where you can change the settings, resolution, frame rate, bit rate, etc. Next, click the ‘export’ button down on that window, and then you can save the file in your drive.
Part 5: Hot FAQs on Windows Movie Maker Alternatives
1. Why is Windows Movie Maker discontinued?
Microsoft’s video editing program, Windows Movie Maker, did not become a big hit with the public because it failed to do well on the market. Microsoft couldn’t get the support they were looking for from the program’s users. As a result, Microsoft had to cease its support of the program.
2. Is there a free version of Windows Movie Maker?
Microsoft Windows Movie maker was always accessible and pre-installed every windows product. Microsoft has discontinued support for Movie Maker and warns about free downloads of Movie Maker provided by third parties that might contain malware, viruses, or other issues.
3. What are the best free Windows Movie Maker Alternatives for Mac?
After switching to a Mac, you’ll find that the Windows Movie Maker alternatives offer much more than just a simple video editor. They provide advanced features, easy transitions, and less technical know-how to create pro-quality results. You should try using these platforms on your Mac if you have a video to edit.
- Wondershare Filmora
- Movavi
- OpenShot
Final Words
Windows Movie Maker is an excellent Windows video editor application for Windows users. But in recent years, it has become outdated due to the continuous development of new technologies. There are many alternatives for Windows Movie Maker, and here we listed some of the best ones. Most of them are free and featured packs. Each program has its unique set of features and capabilities, and each one excels in different areas. Check them out and see what you think.
Free Download For Win 7 or later(64-bit)
Free Download For macOS 10.14 or later
WhatsApp Status Video Creation Tools
Staying connected is one thing that many of us believe in at present. And, we suppose WhatsApp has certainly played a very important role in maintaining connectivity amongst people due to its easy-to-use features and functionalities.
Ever since WhatsApp launched its 24-hour status update feature, there have been people who are constantly keeping their dear ones updated with their various WhatsApp statuses. They are using the best status video maker for creating amazing videos to keep their viewers entertained.
However, amidst this huge pool of status video editing apps, it is very common for people to keep wondering about which one the best of all is. This is why; we are here to ease your task.
Well, we have come up with a list of the top most WhatsApp video status makers that might help you in the long run.
In this article
01 Part 1: What is WhatsApp Status?
02 Part 2: How to Make WhatsAppStatus VideosinWondershare Filmora Video Editor?
03 Part3:Best WhatsApp Photo and Video Status Makers Online
04 Part 4: How to Share and Download Your WhatsApp Status Video?
05 Part 5: FAQs about WhatsApp Status
Part 1: What is WhatsApp Status?
WhatsApp is a messaging application that allows you to interact with friends and family members all around the world in real-time. Contacts can see your current location and if you are online at any given time.
Sending free messages to contacts all over the world is made possible through the usage of WiFi or a network connection using WhatsApp. In WhatsApp, you may set a status, which informs your relatives and friends about your whereabouts and whether or not you are online so that they can view the messages.
WhatsApp Status is a status update that is only visible for 24 hours after it is uploaded. You can send pictures, videos, text, links, and animated GIFs to other people. Knowing how to use Instagram Stories will make you feel right at home in no time at all. WhatsApp Status is activated only between two people, who have each other’s contact information saved in their address books; this happens by default. Your Status message will not be seen by anyone if you do not have their phone number saved in your contacts.
Part 2: How to Make WhatsAppStatus VideosinWondershare Filmora Video Editor?
Being the one-in-all video editor, Filmora video editor from Wondershare is one of the best applications you’ll ever need to complete all of your video editing and modification tasks. It is possible to create amazing WhatsApp status videos without restrictions with Filmora, infusing it with life and creating videos that are inspired by many different people and places. It is one of the best video editing software and has been recognized by major publications. If you’re wondering why we think it’s the greatest recommendation, perhaps going over the feature list below will shed some light on the situation.
Features of Filmora:
- Filmora removes annoying background noise from WhatsApp status videos and other videos.
- Import, modify, and export GIF files for easy sharing on social media.
- Change the speed of the clips, add time-lapses and slow-motion effects to your video to make it more interesting.
- Play many slips at the same time and modify the video text with text and pictures.
- Various video aspect ratios available: 1:1, 9:16, 16:9, 4:3, 21:9
Part3:Best WhatsApp Photo and Video Status Makers Online
Whether it’s a funny video or some life clips, the online WhatsApp video status maker app helps you stand out. These apps not only enable you to acquire the latest trending status but also allow you to modify and customize movies.
That is why; we are going to be talking about the best status video maker app that can be of help to you for creating interesting video content. Make sure that you check these out so that you can end up choosing the one that suits your requirements.
1. FlexiClip

Beginning with one of the best status video makers, FlexiClip is what we have for you. To put it more simply, it is an online video editor that is designed for people who are new to content creation. Whether you’re looking to create a quirky WhatsApp video status or upload your own video to create a sort of compilation, they have plenty of templates and stock content available. It’s entirely up to you what you want to do.
FlexiClip Features:
- Simple and convenient online platform to create videos
- Get rich animated elements including dynamic overlays, text, overlays, widgets, logos, and much more
- Equipped with an in-built screen or webcam recorder
- Video output resolution options include 480P, 720P, and 1080P
- Can create instructional videos, as it provides voice-overs also
- Make a single video by combining and merging several videos and photographs
- Video aspect ratio options are 1:1, 9:16, and 16:9
2. Animaker
Animaker has emerged as a breakthrough in the field of “drag-and-drop” computer animation, radically overturning the status quo by delivering professional and studio-grade creative solutions in a super-simple package that is extremely easy to use. You no longer have to be a pro editor to create WhatsApp status videos since this app itself is enough.
Being the second-best on our list, this app allows you to create short videos, animated presentations, and much more with just a few clicks. The best part is that you get access to one of the greatest animation resource libraries (which is completely free and does not require you to pay any rights) in the business.
Animaker Features:
- Hundreds of professionally designed templates are available to help you
- Equipped with HTML5 engine for seamless operation and smooth performance
- You can find the most extensive assortment of animated characters and properties
- Can add voice overs to the characters and also use auto lip-sync
- Need to register at the portal for video creation
3. Animoto
Founded in 2006, Animoto is one of the earliest examples of an online video editing service. It’s an online slideshow maker that blends video clips, photos, and music to create visually stunning videos. The purpose of Animoto, which is frequently used by individuals, is to make the process of generating videos as simple as drag-and-drop. What distinguishes this application from others is that it is a web-based application that does not require a download!
Animoto makes certain that their website gets off to a flying start thanks to the several extra features that can be found at the top of the website. By selecting the Create or Templates options, you may get started on creating the video you require straight away.
Animoto Features:
- Direct sharing on other platforms
- Provides you with tons of templates
- Easy-to-use interface for the beginners
- 720p HD video quality
- Large Music Library
4. Folip
No matter if you want to create motivational videos or add in a picture of your ‘Outfit of the Day; there is so much that you can do with the help of features that Folip provides. You can consider using this status video maker since it is very easy to use.

For creating a status video on Folip, all that you need to do is sign up and log in to your account. After logging in, you can browse through hundreds of templates to choose from. The next best part of using Folip is that you can customize the templates by inserting creative texts and graphics into them.
Folip features:
- Need to log in to your account for creating videos
- Get access to tons of video templates in the library
- Insert texts and graphics to the video during its creation
- One platform for all purposes
5. PosterMyWall
Modifying ready-made templates in design software allows you to quickly and easily create spectacular social media posts and promotional videos in just minutes. There is no requirement for design abilities!
PosterMyWall enables you to work with your team in real-time by allowing you to share designs, files, and digital materials while maintaining strict control over who has access to what. Get your hands on the designs that are just stunning on PosterMyWall.

And the last that you will love about PosterMyWall is that - you can use this online video status maker from any device, be it your computer, tablet, or phone.
PosterMyWall Features:
- Create professional-looking videos with a customizable video template
- Get access to a large collection of free customized picture and video templates
- Able to resize design options for free
- UI is very user-friendly
- Very easy to use for beginners
- It helps you publish your creations directly on social media platforms
- Need to Log In for creating a video
6. PhotoADKing
This WhatsApp status maker tool, which is very much popular among social media users these days, allows you to create music videos using your own photos and graphics, which you can then share with others. The best videos have never looked better, and you can display them in your social media space thanks to this tool. There’s plenty for everyone in this application, from creative templates to wonderful text fonts and color variations.

With PhotoADKing’s drag-and-drop editor and professionally designed layouts, you can quickly and easily create visually beautiful images. There is no requirement for design skills. In addition to thousands of ready-made templates, a stock collection, stickers, and shapes, you also get to access custom design services.
PhotoADKing Features:
- Ideal for creating posters, graphics, presentations, and videos
- Many free video templates are available for video creation
- Sign up needed for video creation and download
- Make amazing WhatsApp status in just a few clicks
- Can add stickers, icons, images, and different shapes to the status video
- Easy to use WhatsApp video creator
7. Canva
Canva is one of the most sought-after online graphics applications that are really easy to use and has a plethora of themes that can be of assistance to you. Designed to be a quick and simple way to produce images, it is intended to assist folks who are not familiar with the magic of graphic design.
Depending on the style of design you’re attempting to make, Canva will ask you to select a template from which to draw inspiration. Canva is extremely simple to use, perhaps even more so than Microsoft Paint. You can begin personalizing your video content after you’ve selected a layout and template that you like. Everything is drag and drop, and text can be modified in the same way that text boxes can be edited in any other video-making app.
Canva Features:
- Sign up and then create video status for WhatsApp
- Simple ‘Drag-to-Drop’ method used for video creation
- Pick from the variety of templates that are available here
- The interface is clear and easy to navigate
- Offers both template-based content creation and a library of stock photographs and images
8. DooGraphics
This is an App that you would absolutely enjoy during creating WhatsApp video status. DooGraphics makes it very much possible to create videos from your images and also to incorporate music into them with this application. It is simple to make a status with only a single click. You may add a personal touch to your videos and share them with the rest of the world, all thanks to the range of customizing options available.
In this WhatsApp status maker App, you can add beautiful stickers, amusing emojis, interesting texts, and much more.
DooGraphics Features:
- Easy to use for video creation
- Wide varieties of templates are available for free
- Royalty-free visual content accessible
- Choose custom dimensions for your video, crop images, remove background from images, and add text to the layout
- Need to sign up for further use

Part 4: How to Share and Download Your WhatsApp Status Video ?
WhatsApp debuted the ‘Status’ feature a few years ago. Many people use both Instagram and WhatsApp to update their status. It happens that, at times, you might want to save your friends’ statuses as a remembrance or for some other reason. While photos can be screenshotted, videos require the help of the File Manager or any third-party app.
Below are the steps you need to follow for saving WhatsApp status and then sharing it further.
Method 1: Save It with File Manager
Step 1: View the status that you wish to save. This creates a temporary copy on the phone’s storage.
Step 2: Open your File Manager app. Click on the hamburger icon (three dots) present on the right corner of the screen.

Step 3: On the next screen of Settings, you can enable the option of show hidden files. Go to the internal storage of the device.

Step 4: Look for the WhatsApp folder, go to ‘Media’ and then click on the folder ‘.Statuses’

Step 5: From here you can copy any file and then save it to another folder to watch or share later on.
Method 2: Save It with Third-Party App
Step 1: First, download the app ‘Status Saver – Downloader for WhatsApp .’ And open the app and grant it storage access.
Step 2: In order to save someone’s WhatsApp status, you must first view it in WhatsApp. After watching the status, open the Status Saver app.
Step 3: When you open it, you will see all the statuses you have seen on WhatsApp. Tap on the movie or image you wish to save, then click the download icon at the bottom. The share icon on the right allows you to share the status with WhatsApp contacts, Instagram, Facebook, and other networks.
Part 5: FAQs about WhatsApp Status
Who can see my WhatsApp status?
It’s only possible for someone to see your status updates if both of you have each other’s phone numbers in your phone’s address book. You have the option of sharing your status updates with everyone in your contact list or just those you specify. Unless you change this setting, your status updates are visible to everyone on your contact list.
What is the benefit of using WhatsApp status?
The WhatsApp status feature allows the user to share pictures, text, videos, and GIFs on their account. The best part is that these disappear after 24 hours and are end-to-end encrypted. This feature makes it possible for you to stay in touch with people by sharing motivation posts, fun videos, or any memorable moment.
How to Know Who Viewed My WhatsApp Status?
It is very easy to check who has viewed your WhatsApp status. The steps you need to follow are:
- Open WhatsApp and tap the Status tab;
- Then click on ‘My Status,’ and a list of statuses will appear.
- Tap on the status that you want to check viewers for, and then look for the ‘eye’ icon.Click the ‘eye’ icon, and a list of viewers will appear.
02 Part 2: How to Make WhatsAppStatus VideosinWondershare Filmora Video Editor?
03 Part3:Best WhatsApp Photo and Video Status Makers Online
04 Part 4: How to Share and Download Your WhatsApp Status Video?
05 Part 5: FAQs about WhatsApp Status
Part 1: What is WhatsApp Status?
WhatsApp is a messaging application that allows you to interact with friends and family members all around the world in real-time. Contacts can see your current location and if you are online at any given time.
Sending free messages to contacts all over the world is made possible through the usage of WiFi or a network connection using WhatsApp. In WhatsApp, you may set a status, which informs your relatives and friends about your whereabouts and whether or not you are online so that they can view the messages.
WhatsApp Status is a status update that is only visible for 24 hours after it is uploaded. You can send pictures, videos, text, links, and animated GIFs to other people. Knowing how to use Instagram Stories will make you feel right at home in no time at all. WhatsApp Status is activated only between two people, who have each other’s contact information saved in their address books; this happens by default. Your Status message will not be seen by anyone if you do not have their phone number saved in your contacts.
Part 2: How to Make WhatsAppStatus VideosinWondershare Filmora Video Editor?
Being the one-in-all video editor, Filmora video editor from Wondershare is one of the best applications you’ll ever need to complete all of your video editing and modification tasks. It is possible to create amazing WhatsApp status videos without restrictions with Filmora, infusing it with life and creating videos that are inspired by many different people and places. It is one of the best video editing software and has been recognized by major publications. If you’re wondering why we think it’s the greatest recommendation, perhaps going over the feature list below will shed some light on the situation.
Features of Filmora:
- Filmora removes annoying background noise from WhatsApp status videos and other videos.
- Import, modify, and export GIF files for easy sharing on social media.
- Change the speed of the clips, add time-lapses and slow-motion effects to your video to make it more interesting.
- Play many slips at the same time and modify the video text with text and pictures.
- Various video aspect ratios available: 1:1, 9:16, 16:9, 4:3, 21:9
Part3:Best WhatsApp Photo and Video Status Makers Online
Whether it’s a funny video or some life clips, the online WhatsApp video status maker app helps you stand out. These apps not only enable you to acquire the latest trending status but also allow you to modify and customize movies.
That is why; we are going to be talking about the best status video maker app that can be of help to you for creating interesting video content. Make sure that you check these out so that you can end up choosing the one that suits your requirements.
1. FlexiClip
Beginning with one of the best status video makers, FlexiClip is what we have for you. To put it more simply, it is an online video editor that is designed for people who are new to content creation. Whether you’re looking to create a quirky WhatsApp video status or upload your own video to create a sort of compilation, they have plenty of templates and stock content available. It’s entirely up to you what you want to do.
FlexiClip Features:
- Simple and convenient online platform to create videos
- Get rich animated elements including dynamic overlays, text, overlays, widgets, logos, and much more
- Equipped with an in-built screen or webcam recorder
- Video output resolution options include 480P, 720P, and 1080P
- Can create instructional videos, as it provides voice-overs also
- Make a single video by combining and merging several videos and photographs
- Video aspect ratio options are 1:1, 9:16, and 16:9
2. Animaker
Animaker has emerged as a breakthrough in the field of “drag-and-drop” computer animation, radically overturning the status quo by delivering professional and studio-grade creative solutions in a super-simple package that is extremely easy to use. You no longer have to be a pro editor to create WhatsApp status videos since this app itself is enough.
Being the second-best on our list, this app allows you to create short videos, animated presentations, and much more with just a few clicks. The best part is that you get access to one of the greatest animation resource libraries (which is completely free and does not require you to pay any rights) in the business.
Animaker Features:
- Hundreds of professionally designed templates are available to help you
- Equipped with HTML5 engine for seamless operation and smooth performance
- You can find the most extensive assortment of animated characters and properties
- Can add voice overs to the characters and also use auto lip-sync
- Need to register at the portal for video creation
3. Animoto
Founded in 2006, Animoto is one of the earliest examples of an online video editing service. It’s an online slideshow maker that blends video clips, photos, and music to create visually stunning videos. The purpose of Animoto, which is frequently used by individuals, is to make the process of generating videos as simple as drag-and-drop. What distinguishes this application from others is that it is a web-based application that does not require a download!
Animoto makes certain that their website gets off to a flying start thanks to the several extra features that can be found at the top of the website. By selecting the Create or Templates options, you may get started on creating the video you require straight away.
Animoto Features:
- Direct sharing on other platforms
- Provides you with tons of templates
- Easy-to-use interface for the beginners
- 720p HD video quality
- Large Music Library
4. Folip
No matter if you want to create motivational videos or add in a picture of your ‘Outfit of the Day; there is so much that you can do with the help of features that Folip provides. You can consider using this status video maker since it is very easy to use.
For creating a status video on Folip, all that you need to do is sign up and log in to your account. After logging in, you can browse through hundreds of templates to choose from. The next best part of using Folip is that you can customize the templates by inserting creative texts and graphics into them.
Folip features:
- Need to log in to your account for creating videos
- Get access to tons of video templates in the library
- Insert texts and graphics to the video during its creation
- One platform for all purposes
5. PosterMyWall
Modifying ready-made templates in design software allows you to quickly and easily create spectacular social media posts and promotional videos in just minutes. There is no requirement for design abilities!
PosterMyWall enables you to work with your team in real-time by allowing you to share designs, files, and digital materials while maintaining strict control over who has access to what. Get your hands on the designs that are just stunning on PosterMyWall.
And the last that you will love about PosterMyWall is that - you can use this online video status maker from any device, be it your computer, tablet, or phone.
PosterMyWall Features:
- Create professional-looking videos with a customizable video template
- Get access to a large collection of free customized picture and video templates
- Able to resize design options for free
- UI is very user-friendly
- Very easy to use for beginners
- It helps you publish your creations directly on social media platforms
- Need to Log In for creating a video
6. PhotoADKing
This WhatsApp status maker tool, which is very much popular among social media users these days, allows you to create music videos using your own photos and graphics, which you can then share with others. The best videos have never looked better, and you can display them in your social media space thanks to this tool. There’s plenty for everyone in this application, from creative templates to wonderful text fonts and color variations.
With PhotoADKing’s drag-and-drop editor and professionally designed layouts, you can quickly and easily create visually beautiful images. There is no requirement for design skills. In addition to thousands of ready-made templates, a stock collection, stickers, and shapes, you also get to access custom design services.
PhotoADKing Features:
- Ideal for creating posters, graphics, presentations, and videos
- Many free video templates are available for video creation
- Sign up needed for video creation and download
- Make amazing WhatsApp status in just a few clicks
- Can add stickers, icons, images, and different shapes to the status video
- Easy to use WhatsApp video creator
7. Canva
Canva is one of the most sought-after online graphics applications that are really easy to use and has a plethora of themes that can be of assistance to you. Designed to be a quick and simple way to produce images, it is intended to assist folks who are not familiar with the magic of graphic design.
Depending on the style of design you’re attempting to make, Canva will ask you to select a template from which to draw inspiration. Canva is extremely simple to use, perhaps even more so than Microsoft Paint. You can begin personalizing your video content after you’ve selected a layout and template that you like. Everything is drag and drop, and text can be modified in the same way that text boxes can be edited in any other video-making app.
Canva Features:
- Sign up and then create video status for WhatsApp
- Simple ‘Drag-to-Drop’ method used for video creation
- Pick from the variety of templates that are available here
- The interface is clear and easy to navigate
- Offers both template-based content creation and a library of stock photographs and images
8. DooGraphics
This is an App that you would absolutely enjoy during creating WhatsApp video status. DooGraphics makes it very much possible to create videos from your images and also to incorporate music into them with this application. It is simple to make a status with only a single click. You may add a personal touch to your videos and share them with the rest of the world, all thanks to the range of customizing options available.
In this WhatsApp status maker App, you can add beautiful stickers, amusing emojis, interesting texts, and much more.
DooGraphics Features:
- Easy to use for video creation
- Wide varieties of templates are available for free
- Royalty-free visual content accessible
- Choose custom dimensions for your video, crop images, remove background from images, and add text to the layout
- Need to sign up for further use
Part 4: How to Share and Download Your WhatsApp Status Video ?
WhatsApp debuted the ‘Status’ feature a few years ago. Many people use both Instagram and WhatsApp to update their status. It happens that, at times, you might want to save your friends’ statuses as a remembrance or for some other reason. While photos can be screenshotted, videos require the help of the File Manager or any third-party app.
Below are the steps you need to follow for saving WhatsApp status and then sharing it further.
Method 1: Save It with File Manager
Step 1: View the status that you wish to save. This creates a temporary copy on the phone’s storage.
Step 2: Open your File Manager app. Click on the hamburger icon (three dots) present on the right corner of the screen.
Step 3: On the next screen of Settings, you can enable the option of show hidden files. Go to the internal storage of the device.
Step 4: Look for the WhatsApp folder, go to ‘Media’ and then click on the folder ‘.Statuses’
Step 5: From here you can copy any file and then save it to another folder to watch or share later on.
Method 2: Save It with Third-Party App
Step 1: First, download the app ‘Status Saver – Downloader for WhatsApp .’ And open the app and grant it storage access.
Step 2: In order to save someone’s WhatsApp status, you must first view it in WhatsApp. After watching the status, open the Status Saver app.
Step 3: When you open it, you will see all the statuses you have seen on WhatsApp. Tap on the movie or image you wish to save, then click the download icon at the bottom. The share icon on the right allows you to share the status with WhatsApp contacts, Instagram, Facebook, and other networks.
Part 5: FAQs about WhatsApp Status
Who can see my WhatsApp status?
It’s only possible for someone to see your status updates if both of you have each other’s phone numbers in your phone’s address book. You have the option of sharing your status updates with everyone in your contact list or just those you specify. Unless you change this setting, your status updates are visible to everyone on your contact list.
What is the benefit of using WhatsApp status?
The WhatsApp status feature allows the user to share pictures, text, videos, and GIFs on their account. The best part is that these disappear after 24 hours and are end-to-end encrypted. This feature makes it possible for you to stay in touch with people by sharing motivation posts, fun videos, or any memorable moment.
How to Know Who Viewed My WhatsApp Status?
It is very easy to check who has viewed your WhatsApp status. The steps you need to follow are:
- Open WhatsApp and tap the Status tab;
- Then click on ‘My Status,’ and a list of statuses will appear.
- Tap on the status that you want to check viewers for, and then look for the ‘eye’ icon.Click the ‘eye’ icon, and a list of viewers will appear.
Take Your Videos to the Next Level: Adding 3D Effects in Windows 10 and 11
You may want to add 3D effects to a video to make something in it appear realistic. For example, you can have balloons moving in a circle around a person’s head, make a building hit by a thunderstorm, etc. However, adding such properties to a footage requires a lot of focus and precision that comes with in-depth learning and a lot of practice.
That said, here you will learn how to add 3D effects to a video using Windows’s free built-in Photos app. In addition, you will also see how easy the process becomes if you use a dedicated third-party software that has been specifically designed for the purpose.
In this article
01 How to Add 3D Effects in Windows 11 Photos App for Free
02 How to Add 3D Effects to Video with Filmora
Part 1: How to Add 3D Effects in Windows 11 Photos App for Free
To add 3D effects to a video with the Photos app, you must right-click the media file, go to ‘Open with’, and click to select ‘Photos’ from the submenu. Once this is done, you can follow the steps that are given below to complete the remaining procedure:
Step 1: Open the 3D Effects Panel
In the Photos app, pause the video to avoid any distractions. Click the See more icon (with three horizontal dots) from the top-center, hover mouse to Edit more, and click Add 3D effects.

Step 2: Add a 3D Effect and Customize
Make sure that the Effects tab is selected from the top of the right pane, scroll through the available effects, and click the one that you want to add to the video. Once added, in the preview window, use the scaling handles and rotation tools to resize the effect and change its orientation respectively.

Optionally use the Volume slider from the right pane to increase or decrease the sound volume of the effect to blend it in with the audio of the footage. If required, drag the side handles of the effect in the progress bar at the bottom to increase or decrease the duration of the effect in the video.

Step 3: Use Anchor Point
Drag and place the 3D effect to the location you want it to appear at, turn on the Attach to a point button from the right pane, and drag the anchor point to the object where you want it to stick even if the camera moves.

Step 4: Export the Video
Click the Play button from the bottom to preview the video with the 3D effect, and if everything looks fine, click Save a copy from the bottom-right area.

When the Finish your video box appears, choose your preferred resolution from the Video quality drop-down list, and click Export.

Next, choose your preferred destination folder in the Save As box that opens up next, specify the name of the output file in the File name field, and click Export to export the modified clip in MP4 format.
Note: Videos that you export from the Photos app are by default saved in MP4 format.
As one of the best basic video editing software for beginners , the Microsoft Photos app allows you trim video, add text to video and much more. For details, check how to edit videos with the Microsoft Photos app on Windows 10 and Windows 11.
Part 2: How to Add 3D Effects to Video with Filmora
Although Photos is a free app in Windows 11, it has certain limitations. This is where Filmora video editor , a product by Wondershare, comes into play. Wondershare Filmora is a post-production application for both Windows and Mac computers, and is considered a good competitor of some of the industry-standard video editing applications like Adobe Premiere Pro, Final Cut Pro X, DaVinci Resolve, etc.
While the Photos app can add 3D effects to the videos quickly, Filmora gives more control by offering a plethora of editing tools, options, and presets. In addition, Filmora is a timeline-oriented tool that allows you to add effects, filters, and/or elements in their corresponding layers without making any changes to the original footage.
For Win 7 or later (64-bit)
For macOS 10.12 or later
You can follow the step-by-step instructions that are given below to learn how to add 3D effects to a video with Wondershare Filmora:
Step 1: Import Source Video and Add It to the Timeline
After installing Wondershare Filmora on Windows 10 or Windows 11, launch the program, click anywhere inside the Media box present at the upper-left section of the interface, and locate and import the source video to the program. Next, hover the mouse over the thumbnail of the video, click the + icon from the bottom-right corner.
When the confirmation box appears, either click Match to Media or Keep Project Settings to adjust the project settings according to the media clip or modify the media clip according to the project preferences while adding the footage to the Timeline respectively.
Step 2: Add 3D Titles and Transitions
Click Titles from the toolbox at the top, type 3D Titles in the Search titles field present at the upper section of the upper-left box, and click 3D titles from the suggestions list.

From all the available 3D title presets that appear next, drag the one you like to the Timeline, and place it above the video track.

After this, double-click the placeholder text in the Preview window, and replace it with your caption. You can customize the font, color, and alignment of the text from the options that appear on left. Click OK from the lower-left area of the left pane to exit the editing mode. Repeat the process for all the texts that the preset has. Optionally, drag the sides of the 3D title in the Timeline to specify its duration of visibility on the screen.

To add the transitions, click Media from the toolbox at the top, click Import Media from the Media box, and repeat the process explained earlier to add a new video clip to the Timeline. Make sure that both the clips are on the same track, and are placed next to each other. Now, go to Transitions from the toolbox, and drag and place your preferred transition effect between the two media clips in the Timeline. Optionally you can drag the sides of the transition inwards or outwards to increase or decrease the speed of the effect respectively.

After this, move the Playhead (Skimmer) to the beginning of the Timeline, and press the Spacebar on your keyboard to preview the video.
Note: It is a good practice to preview your video several times during the entire editing process. This will help you identify the error sooner, and you will be able to address the issue with fewer hassles.
Step 3: Add Elements and Effects
Go to Elements from the toolbox, drag your preferred element from the upper-left box to the Timeline, and place it on a new track. You can drag the sides of the element in the Timeline to increase or decrease its visibility during video playback.

To add effects, go to Effects from the toolbox, drag your preferred effect from the upper-left box, and place it on a new layer in the Timeline. As it is with other entities, you can drag the sides of the effect to increase or decrease the duration of its impact on the video. Next, double-click the Effects layer in the Timeline, and use the available options in the box to make further adjustments.
Note: The options that you get by double-clicking the effect in the Timeline may vary according to the adjustments it allows you to make.

Once this is done, preview the video, click Export from the top-center, and use the tabs and options on the Export box to export the modified video in your preferred format.
Conclusion
If you are new to the VFX and video editing industry, trying hands with the Photos app would give you a fair idea about how things work. Once you are well-versed or if you are already a post-production professional, you can and you must go for a dedicated program like Wondershare Filmora that not only has an intuitive interface, it is also equipped with a plethora of presets to add 3D titles, elements, transitions, and effects to the videos without much hassle.
02 How to Add 3D Effects to Video with Filmora
Part 1: How to Add 3D Effects in Windows 11 Photos App for Free
To add 3D effects to a video with the Photos app, you must right-click the media file, go to ‘Open with’, and click to select ‘Photos’ from the submenu. Once this is done, you can follow the steps that are given below to complete the remaining procedure:
Step 1: Open the 3D Effects Panel
In the Photos app, pause the video to avoid any distractions. Click the See more icon (with three horizontal dots) from the top-center, hover mouse to Edit more, and click Add 3D effects.
Step 2: Add a 3D Effect and Customize
Make sure that the Effects tab is selected from the top of the right pane, scroll through the available effects, and click the one that you want to add to the video. Once added, in the preview window, use the scaling handles and rotation tools to resize the effect and change its orientation respectively.
Optionally use the Volume slider from the right pane to increase or decrease the sound volume of the effect to blend it in with the audio of the footage. If required, drag the side handles of the effect in the progress bar at the bottom to increase or decrease the duration of the effect in the video.
Step 3: Use Anchor Point
Drag and place the 3D effect to the location you want it to appear at, turn on the Attach to a point button from the right pane, and drag the anchor point to the object where you want it to stick even if the camera moves.
Step 4: Export the Video
Click the Play button from the bottom to preview the video with the 3D effect, and if everything looks fine, click Save a copy from the bottom-right area.
When the Finish your video box appears, choose your preferred resolution from the Video quality drop-down list, and click Export.
Next, choose your preferred destination folder in the Save As box that opens up next, specify the name of the output file in the File name field, and click Export to export the modified clip in MP4 format.
Note: Videos that you export from the Photos app are by default saved in MP4 format.
As one of the best basic video editing software for beginners , the Microsoft Photos app allows you trim video, add text to video and much more. For details, check how to edit videos with the Microsoft Photos app on Windows 10 and Windows 11.
Part 2: How to Add 3D Effects to Video with Filmora
Although Photos is a free app in Windows 11, it has certain limitations. This is where Filmora video editor , a product by Wondershare, comes into play. Wondershare Filmora is a post-production application for both Windows and Mac computers, and is considered a good competitor of some of the industry-standard video editing applications like Adobe Premiere Pro, Final Cut Pro X, DaVinci Resolve, etc.
While the Photos app can add 3D effects to the videos quickly, Filmora gives more control by offering a plethora of editing tools, options, and presets. In addition, Filmora is a timeline-oriented tool that allows you to add effects, filters, and/or elements in their corresponding layers without making any changes to the original footage.
For Win 7 or later (64-bit)
For macOS 10.12 or later
You can follow the step-by-step instructions that are given below to learn how to add 3D effects to a video with Wondershare Filmora:
Step 1: Import Source Video and Add It to the Timeline
After installing Wondershare Filmora on Windows 10 or Windows 11, launch the program, click anywhere inside the Media box present at the upper-left section of the interface, and locate and import the source video to the program. Next, hover the mouse over the thumbnail of the video, click the + icon from the bottom-right corner.
When the confirmation box appears, either click Match to Media or Keep Project Settings to adjust the project settings according to the media clip or modify the media clip according to the project preferences while adding the footage to the Timeline respectively.
Step 2: Add 3D Titles and Transitions
Click Titles from the toolbox at the top, type 3D Titles in the Search titles field present at the upper section of the upper-left box, and click 3D titles from the suggestions list.
From all the available 3D title presets that appear next, drag the one you like to the Timeline, and place it above the video track.
After this, double-click the placeholder text in the Preview window, and replace it with your caption. You can customize the font, color, and alignment of the text from the options that appear on left. Click OK from the lower-left area of the left pane to exit the editing mode. Repeat the process for all the texts that the preset has. Optionally, drag the sides of the 3D title in the Timeline to specify its duration of visibility on the screen.
To add the transitions, click Media from the toolbox at the top, click Import Media from the Media box, and repeat the process explained earlier to add a new video clip to the Timeline. Make sure that both the clips are on the same track, and are placed next to each other. Now, go to Transitions from the toolbox, and drag and place your preferred transition effect between the two media clips in the Timeline. Optionally you can drag the sides of the transition inwards or outwards to increase or decrease the speed of the effect respectively.
After this, move the Playhead (Skimmer) to the beginning of the Timeline, and press the Spacebar on your keyboard to preview the video.
Note: It is a good practice to preview your video several times during the entire editing process. This will help you identify the error sooner, and you will be able to address the issue with fewer hassles.
Step 3: Add Elements and Effects
Go to Elements from the toolbox, drag your preferred element from the upper-left box to the Timeline, and place it on a new track. You can drag the sides of the element in the Timeline to increase or decrease its visibility during video playback.
To add effects, go to Effects from the toolbox, drag your preferred effect from the upper-left box, and place it on a new layer in the Timeline. As it is with other entities, you can drag the sides of the effect to increase or decrease the duration of its impact on the video. Next, double-click the Effects layer in the Timeline, and use the available options in the box to make further adjustments.
Note: The options that you get by double-clicking the effect in the Timeline may vary according to the adjustments it allows you to make.
Once this is done, preview the video, click Export from the top-center, and use the tabs and options on the Export box to export the modified video in your preferred format.
Conclusion
If you are new to the VFX and video editing industry, trying hands with the Photos app would give you a fair idea about how things work. Once you are well-versed or if you are already a post-production professional, you can and you must go for a dedicated program like Wondershare Filmora that not only has an intuitive interface, it is also equipped with a plethora of presets to add 3D titles, elements, transitions, and effects to the videos without much hassle.
Also read:
- 2024 Approved The Most Popular 3D Video Production Tools You Cant Miss
- Reverse Video Online The Ultimate 2023 Guide
- Updated In 2024, Split Screen Video Editing Made Easy Free Online and Offline Solutions
- 2024 Approved From Written to Spoken Effective Text-to-MP3 Conversion Methods
- New Elevate Your Videos Top Free Special Effects Apps for Mobile Video Editing for 2024
- Updated S Best Stop Motion Animation Programs for Mac and PC Computers for 2024
- Updated 10 Essential Android Apps for Aspiring Filmmakers
- New Full Guide on Making a Big-Budget Cinematic Look Video with Final Cut Pro X
- Updated In 2024, Steady as a Rock 3 Methods for Smoothing Out Shaky Videos
- 2024 Approved Meet the Minimums Premiere Pro System Requirements Explained
- 2024 Approved FCP X Pro Tutorials Creating Realistic Green Screen Effects
- The Ultimate Guide to Finding a Reliable YouTube MP3 Converter
- New Reversing Video Clips in Final Cut Pro Tips and Tricks for 2024
- Updated The Ultimate Guide to Online Video Editing with Music
- New 2024 Approved Mac Green Screen Software Finding the Perfect Fit for You
- Sizing Up Success How YouTube Aspect Ratios Influence Video Style and Engagement
- Updated 2024 Approved From Click to View The Art of Creating Effective YouTube Thumbnails (Size, Design, and More)
- Unleash Your Creativity Easy GoPro Video Editing for Beginners
- Updated The Best Free Divx Video Cutting Software
- In 2024, The Chromebook Video Editors Secret Running Windows and Mac Apps with Ease
- Updated 2024 Approved Unlocking Video Editing Potential on Mac Yosemite
- 2024 Approved Trim, Cut, and Edit AVI Videos Top Software for Windows, MAC, and Mobile
- New In 2024, 16 Free AVI Video Rotation Tools for Seamless Editing Multi-Platform
- New Facebook to MP3 Best Online Conversion Tools Ranked
- In 2024, The Search Is Over Best Sony Vegas Alternatives for Windows Video Editors
- Updated The Art of the Ken Burns Effect Tips and Tricks for Stunning Results for 2024
- Easily Resize Images Online Top Tools and Resources
- Updated In 2024, Top Video Lighting Enhancement Tools
- Master FLV Video Editing on Windows 8 Tips and Tricks for 2024
- Updated Adobe Premiere vs Sony Vegas Which Video Editor Reigns Supreme , In 2024
- Edit 3GP Videos Like a Pro Cutting, Trimming, and More
- Updated 2024 Approved Video Pace Control A Beginners Guide to Camtasia Speed Adjustment
- New 2024 Approved Video Editing on a Budget Free Options for New Users Desktop/Online/Mobile
- Updated 2024 Approved Virtualdub Is It Still the Best? Exploring Top Alternatives
- Updated 2024 Approved PC Video Editors Similar to GoPro Quik Top Picks
- Updated Videopad Video Editor Review The Best Choice for Your Video Editing Needs for 2024
- New In 2024, S Hottest Free and Paid Android Video Editors A Comprehensive Review
- Updated In 2024, Free M4A Editing Solutions Top 5 Software
- New Web-Based Movie Trailer Creation Platforms for 2024
- Updated 2024 Approved Wav Converter Mastery A Step-by-Step Tutorial
- Updated In 2024, FCPX Storage Solutions Masterclass on Freeing Up Space on Your Mac
- Updated Editing on the Go Top 8 Lightweight Video Software for Portability for 2024
- Updated The Ultimate List Top 10 Free Video Editing Software for Ubuntu
- Updated Create Unforgettable Invites 10 Free Online Video Makers for 2024
- New Top Picks for Simple Video Editing Tools
- Updated Top-Rated Windows Movie Maker Alternatives for Mac Users
- New Must-Have iPhone Apps Expertly Curated List with Reviews for 2024
- New Free Green Screen Fun Top 10 Mobile Apps for Creative Video Editing
- Get Started with Green Screen Top 10 Free Mobile Apps for Beginners for 2024
- In 2024, How To Remove the Two Factor Authentication On Apple iPhone 6s Plus
- New 2024 Approved Best Canva 10 Animated Templates
- In 2024, How to Stream Apple iPhone 6 to Computer? | Dr.fone
- Learn How to Add Dynamic Shake Effects to Your Videos Using Alight Motion. Our Step-by-Step Guide Makes It Easy to Create Cinematic Footage for 2024
- Fake the Location to Get Around the MLB Blackouts on Oppo Find X6 Pro | Dr.fone
- Recover iPhone 13 Data From iOS iTunes Backup | Dr.fone
- In 2024, 3 Effective Methods to Fake GPS location on Android For your Infinix Smart 8 HD | Dr.fone
- Updated Let Us Talk About the Famous Photoshop and Most Commonly Used Glitch Effect. The Article Understudy Will Discuss in Detail About Photo Glitch Effect
- In 2024, How to Use Pokémon Emerald Master Ball Cheat On Xiaomi Redmi Note 12 Pro 5G | Dr.fone
- New This Article Shares Valuable Insight Into the Best Brand Story Videos. Also, It Highlights the Importance of a Video Maker in Your Brand Story Video Ad-Making Process and Why Filmora Should Be Your Go-To Choice
- Hard Reset Honor X50i+ in 3 Efficient Ways | Dr.fone
- How to Perform Hard Reset on Realme 12 Pro 5G? | Dr.fone
- In 2024, 8 Ways to Transfer Photos from Vivo Y28 5G to iPhone Easily | Dr.fone
- The Magnificent Art of Pokemon Go Streaming On Realme 10T 5G? | Dr.fone
- Solved Warning Camera Failed on Tecno Spark 10 4G | Dr.fone
- In 2024, How Can We Bypass Asus ROG Phone 7 Ultimate FRP?
- Title: New 2024 Approved Split Your Screen for Free Top Online and Offline Video Editors
- Author: Amelia
- Created at : 2024-04-29 19:52:29
- Updated at : 2024-04-30 19:52:29
- Link: https://ai-driven-video-production.techidaily.com/new-2024-approved-split-your-screen-for-free-top-online-and-offline-video-editors/
- License: This work is licensed under CC BY-NC-SA 4.0.
