
:max_bytes(150000):strip_icc():format(webp)/Twitter-and-X-4c4103f6bc3c42e0b7197b60a50317ca.jpg)
New 2024 Approved Trimming Made Easy A Step-by-Step Guide to Cropping Videos in Avidemux
Trimming Made Easy: A Step-by-Step Guide to Cropping Videos in Avidemux
How to Crop a Video with Avidemux

Ollie Mattison
Mar 27, 2024• Proven solutions
Cropping a video, to bring focus onto the important aspects and remove the extraneous parts of the scene, is one of the most valuable tools available to a video editor. It can be used as mentioned to ensure the viewer focuses on what is important, but also to magnify objects on the screen, such as with footage of nature. It has many uses, and one of the best tools available for cropping video is the free program Avidemux. Here we are going to go through the process of getting Avidemux running on your system and cropping some video.
If Avidemux is too complicate for you, you can consider Wondershare Filmora , which is an easy-to-use video editing tool to crop videos within several click. Download the free trial version blow.
 Download Mac Version ](https://tools.techidaily.com/wondershare/filmora/download/ )
How to Crop a Video with Avidemux
1. Installation
You can find Avidemux for download here , it is available for a wide range of platforms, just download the version that fits your needs. Once downloaded, install in the standard way for your platform, this is the Wndows version (64bit).
One point of note during installation is that you can choose which parts of the program you wish to install. It is a very small footprint and for the best performance it is wise to simply install everything.

Once installed you will be presented with the program as seen here.

2. Importing Video
The next step is importing video. This can be done in two ways, by clicking the file folder icon at the top left you open a standard file browser to navigate to, and select your chosen video file, or alternatively you can simply drag you video into the main panel to import it.

Whichever route you take, you will end up with your video file loaded in like this.

Now you can edit the video as you need, Avidemux contains a wealth of features to enable the full spectrum of editing tasks to be completed. However, here we are going to look at the cropping tool, so on to the next step.
3. Editing Video
Avidemux has some idiosyncrasies in terms of operation, one of those is that to be able to edit any video, you have to choose your output format. Don’t worry though, this is easy, just use the dropdown at the side to choose the output format you want as can be seen here.

Once that is set you are free to start editing your footage.
4. Cropping
It is important to understand how the editing process works in Avidemux, everything is accessed via the filters menu Video>Filters and from here you are faced with a new interface that enables you to choose the component you wish to use.

Selecting ‘Crop’ from the menu and pressing the green plus symbol at the bottom activated the crop tool and presents you with yet another view that allows you to adjust the crop to your tastes.

5. Cropping controls
There are two options for cropping, you can use the Auto crop feature, which will detect any black lines and crop the footage between them, or if you are using the crop tool for something else, or just want to do it manually, you can set the crop via the left right top and bottom boxes. Values input here are the number of pixels from that edge the crop extends, as you are setting it, this is displayed with a green block signifying the area of the image that will be removed.

You can adjust this independently for all 4 edges as you wish.

Once you are happy with the crop, you click Ok and it takes you back to the familiar filter menu where you can use other components to perform more editing if you need.
6. Saving the crop
One of the most common points of confusion with Avidemux comes at this point, as your video will look no different to when you started, and many think they have done something wrong, but this is another part of Avidemux workflow. These filters can only be applied when the video is reencoded, and you do that through the file>save menu.

Selecting this presents the familiar export dialogue and allows you to choose the name and destination of the file. Once that is done you click OK and you will see Avidemux processing your file and re-rendering it in this dialogue box.

How long it takes will depend on a few factors, how many other effects have been added, how fast a processor your computer has, and how large and what resolution the video is. Format also plays a part in the process too, with some formats taking less time to encode than others. Once it has finished, you can view your video and see the crop in action.
As we can see, although there are a few aspects of the workflow that are a little unintuitive, cropping video in Avidemux is a straightforward process that anyone can accomplish with a bit of patience.
One of the key things to remember with Avidemux is that you apply all of your filters before re-encoding, this again is a question of patience and a bit of organization to ensure everything you wish to do is completed in order.
Avidemux is a great piece of software, it lacks the polish of some of its commercial rivals of course, but behind the sometimes clunky interface there is a very broad range of features that allow you to accomplish more or less any editing task you may want. In terms of free programs this is about as good as it gets, and the output is, without a doubt, great quality. For anyone looking for a free solution to video editing problems, and who do not mind a learning process Avidemux provides a useful tool.
An Easier Way to Crop a Video with Filmora
Filmora Video Editor is a powerful program that allows you to create stunning video clips in only a few clicks. This video editing software provides users with a variety of tools for editing videos. It also includes a user-friendly interface for editing home films on Windows PCs, Macs, and Linux devices. To crop a video, these are to follow:

Step 1: Open a video that you want to edit. Go to “Import” and choose the file that you want to upload and put it in the Media Library.

Step 2: Select the “Crop and Zoom” icon in the Filmora editing tool.

Step 3: To alter the size of the crop frame, drag the pointer from any corner of your video preview window.

Step 4: When you’ve changed it to your liking, click the green “OK” button. As a result, you may effortlessly add or remove any element of a video clip on Filmora.

Ollie Mattison
Ollie Mattison is a writer and a lover of all things video.
Follow @Ollie Mattison
Ollie Mattison
Mar 27, 2024• Proven solutions
Cropping a video, to bring focus onto the important aspects and remove the extraneous parts of the scene, is one of the most valuable tools available to a video editor. It can be used as mentioned to ensure the viewer focuses on what is important, but also to magnify objects on the screen, such as with footage of nature. It has many uses, and one of the best tools available for cropping video is the free program Avidemux. Here we are going to go through the process of getting Avidemux running on your system and cropping some video.
If Avidemux is too complicate for you, you can consider Wondershare Filmora , which is an easy-to-use video editing tool to crop videos within several click. Download the free trial version blow.
Download Mac Version ](https://tools.techidaily.com/wondershare/filmora/download/ )
How to Crop a Video with Avidemux
1. Installation
You can find Avidemux for download here , it is available for a wide range of platforms, just download the version that fits your needs. Once downloaded, install in the standard way for your platform, this is the Wndows version (64bit).
One point of note during installation is that you can choose which parts of the program you wish to install. It is a very small footprint and for the best performance it is wise to simply install everything.
Once installed you will be presented with the program as seen here.
2. Importing Video
The next step is importing video. This can be done in two ways, by clicking the file folder icon at the top left you open a standard file browser to navigate to, and select your chosen video file, or alternatively you can simply drag you video into the main panel to import it.
Whichever route you take, you will end up with your video file loaded in like this.
Now you can edit the video as you need, Avidemux contains a wealth of features to enable the full spectrum of editing tasks to be completed. However, here we are going to look at the cropping tool, so on to the next step.
3. Editing Video
Avidemux has some idiosyncrasies in terms of operation, one of those is that to be able to edit any video, you have to choose your output format. Don’t worry though, this is easy, just use the dropdown at the side to choose the output format you want as can be seen here.
Once that is set you are free to start editing your footage.
4. Cropping
It is important to understand how the editing process works in Avidemux, everything is accessed via the filters menu Video>Filters and from here you are faced with a new interface that enables you to choose the component you wish to use.
Selecting ‘Crop’ from the menu and pressing the green plus symbol at the bottom activated the crop tool and presents you with yet another view that allows you to adjust the crop to your tastes.
5. Cropping controls
There are two options for cropping, you can use the Auto crop feature, which will detect any black lines and crop the footage between them, or if you are using the crop tool for something else, or just want to do it manually, you can set the crop via the left right top and bottom boxes. Values input here are the number of pixels from that edge the crop extends, as you are setting it, this is displayed with a green block signifying the area of the image that will be removed.
You can adjust this independently for all 4 edges as you wish.
Once you are happy with the crop, you click Ok and it takes you back to the familiar filter menu where you can use other components to perform more editing if you need.
6. Saving the crop
One of the most common points of confusion with Avidemux comes at this point, as your video will look no different to when you started, and many think they have done something wrong, but this is another part of Avidemux workflow. These filters can only be applied when the video is reencoded, and you do that through the file>save menu.
Selecting this presents the familiar export dialogue and allows you to choose the name and destination of the file. Once that is done you click OK and you will see Avidemux processing your file and re-rendering it in this dialogue box.
How long it takes will depend on a few factors, how many other effects have been added, how fast a processor your computer has, and how large and what resolution the video is. Format also plays a part in the process too, with some formats taking less time to encode than others. Once it has finished, you can view your video and see the crop in action.
As we can see, although there are a few aspects of the workflow that are a little unintuitive, cropping video in Avidemux is a straightforward process that anyone can accomplish with a bit of patience.
One of the key things to remember with Avidemux is that you apply all of your filters before re-encoding, this again is a question of patience and a bit of organization to ensure everything you wish to do is completed in order.
Avidemux is a great piece of software, it lacks the polish of some of its commercial rivals of course, but behind the sometimes clunky interface there is a very broad range of features that allow you to accomplish more or less any editing task you may want. In terms of free programs this is about as good as it gets, and the output is, without a doubt, great quality. For anyone looking for a free solution to video editing problems, and who do not mind a learning process Avidemux provides a useful tool.
An Easier Way to Crop a Video with Filmora
Filmora Video Editor is a powerful program that allows you to create stunning video clips in only a few clicks. This video editing software provides users with a variety of tools for editing videos. It also includes a user-friendly interface for editing home films on Windows PCs, Macs, and Linux devices. To crop a video, these are to follow:
Step 1: Open a video that you want to edit. Go to “Import” and choose the file that you want to upload and put it in the Media Library.
Step 2: Select the “Crop and Zoom” icon in the Filmora editing tool.
Step 3: To alter the size of the crop frame, drag the pointer from any corner of your video preview window.
Step 4: When you’ve changed it to your liking, click the green “OK” button. As a result, you may effortlessly add or remove any element of a video clip on Filmora.
Ollie Mattison
Ollie Mattison is a writer and a lover of all things video.
Follow @Ollie Mattison
Mac Users, Rejoice! The Best Free Speech-to-Text Apps Without Downloads
Do you struggle to meet deadlines for your text assignments? If you do, then you are in luck. Speech recognition technology is the best way to beat this challenge. Whether you are a student or a corporate professional, several speech-to-text apps can be used to guarantee that you meet your deadlines. For example, Mac owners can use dragon for Mac to complete typing assignments in half the time.
Below are the best speech-to-text apps on Mac you might have missed since the beginning of 2022. Some of the apps in the list are in-built into your device, while others may require you to download additional software. Regardless, all of those listed below are free to use on your Mac device. Keep reading to find out more.
Part1: Top 1 Built-in Mac Dictation Feature

Did you know your Mac device comes with a built-in speech-to-text feature? So whether you use a laptop or desktop, you can generate text from your voice through your device’s microphone. Officially known as Dictation, the app allows you to transcribe text anywhere you can type it. So, for example, you can use Apple Dictation for your messaging and word processing apps.
The feature has been available since macOS Sierra as a free built-in feature. Earlier versions of Apple Dictation relied on its voice recognition software. However, it now relies on Siri for users of macOS Catalina onwards.
Typically, the app allows you to transcribe thirty seconds and below of audio. However, you can enable Enhanced dictation for longer transcription times. According to most users, the app is suitable for getting the first draft of your assignment, which you can manually edit later.
Follow these steps to enable Apple Dictation on your Mac:
- Tap the Apple logo on the top-left toolbar of your screen and select System Preferences from the resulting menu.
- Click on the Keyboard option from the system preferences screen.
- Once there, click on the Dictation option located at the top of the menu.
- Select On to activate the app in its default mode. In addition, you can check the Use Enhanced Dictation box to enable additional functions such as offline use and text commands like bold and italics.
- Finally, select your language from the dropdown menu and choose a shortcut key.
Please note that you need to speak your punctuation loudly when using Apple Dictation. Otherwise, the app will consider them as regular words.
Part2: Top 2 Microsoft Word [Free & No Download]

Another option to consider is speech-to-text Microsoft Word Mac. The app is free to use and relies on Microsoft Azure Speech Services to transcribe text. Below are the requirements to use speech-to-text word mac.
- An external microphone for your Mac desktop, or you can use your built-in microphone for your MacBook. This is because speech-to-text on Microsoft word mac only allows input with a microphone rather than an audio file upload.
- An active Office 365 subscription. Please note you need to log in to your account for the app to function.
- Insider builds 16.32 (19120802) and above.
- An active internet connection.
Once you have everything set up, follow these steps to use speech-to-text on Word.
- Launch Microsoft Word from your desktop.
- Click on the Dictate button from the top menu of your Word document, and wait for the red dot to appear. The button features a microphone for easy identification.
- Once the dot appears, start speaking to transcribe your text. Ensure you are in a quiet environment for the best results. In addition, speak louder when transcribing punctuations.
- Click on the Dictate button to finish the transcription.
Part3: Top 3 Google docs

Google Docs is arguably the market’s most accurate free speech-to-text service. In addition, it allows you to transcribe your voice to text and format documents with your voice. However, you can only use the service through the Chrome browser.
Follow these steps to activate Google Docs voice typing on your Mac device:
- Launch the Chrome browser on your macOS and select Docs from the app menu. Please note you will need an active Google account to use the service.
- Open a new document and click on the Tools tab from the top menu.
- Select Voice Typing from the menu to access speech-to-text on Google Docs.
- Tap the microphone to start transcribing, and tap it again to finish.
Google Docs speech-to-text is available in 71 languages. In addition, it supports simple commands such as ‘create a bulleted list,’ which are unavailable on other speech-to-text apps. As such, it is one of the market’s most popular voice typing apps.
Part4: Top 4 Filmora

Free Download For Win 7 or later(64-bit)
Free Download For macOS 10.14 or later
Adding subtitles to your videos can be incredibly time-consuming if you do not have the right tools. However, with Filmora’s speech-to-text function, you can add subtitles to your video with a single click. In addition, it automatically recognizes audio in your videos and transcribes it to text with incredible accuracy. The plugin uses state-of-the-art algorithms to ensure the video industry’s most accurate speech technology.
Furthermore, you can import external files to your video’s timeline and edit them as you please. For example, you can import a video from your thumb drive and use the Filmora speech-to-text plugin to transcribe to text. Currently, the plugin can transcribe the text in 26 languages. As such, it is a favorite for vloggers, teachers, and film editors, who all have to deliver their content with great efficiency.
Please note that you must have Filmora installed on your Mac device to access the Speech to Text plugin. In addition, check if your Filmora version is compatible with the plugin before downloading. Once you confirm that you meet all the requirements, here is how to use the service:
- Launch the Filmora app on your Mac and open a new video workspace.
- Click on the microphone symbol at the bottom right corner of the page to start recording. Tap it once again to finish the recording.
- Tap the Tools tab on your main menu and select Speech to Text. Then, confirm your preferences and wait for the transcription.
Part5: Top 5 Dragon for Mac

Dragon Dictate is arguably the best dictation software currently on the market. According to most users, its accuracy and feature sets are next to none. For example, the Smart Format Rules learn how you represent dates, numbers, and abbreviations, resulting in less editing work for you. The Dragon Dictate app is free to download from the Apple Store.
Dragon for Mac users reports a dictation accuracy of nearly 99%, which is excellent in the speech-to-text software category. All of Nuance’s Dragon products use deep learning technology to capture your accent and cadence. As such, the app gets better at transcribing your text as you continue using it. In addition, dragon for Mac professional allows you to transcribe audio clips from uploaded files. For example, you can import audio from your iPhone to your Dragon Dictate workspace and transcribe it hassle-free.
Unfortunately, you cannot get a stand-alone dragon app for Mac. This is because Nuance discontinued its development in 2018. In addition, Microsoft’s acquisition of the company in 2021 proves that the decision is permanent. However, you can still use the Windows version of Dragon through Parallels, which allows you to run macOS and Windows simultaneously. In addition, this method also works for M1 Macs.
Part6: FAQs
Is there a difference between voice recognition and speech-to-text?
Voice recognition software allows your device to capture your accent and tone and then stores that data for different functions, such as user logins and speech-to-text functionality. For example, Siri will ask you to repeat a sentence several times as one of the setup steps.
Which is the best external device for the speech-to-text service?
Most users report better speech-to-text accuracy when using headsets compared to using an external microphone. This is because the microphone is much closer to your mouth, so your voice is less affected by external noise.
Can speech-to-text apps automatically translate a transcribed text?
Yes, they can. Apps such as Google’s Speech to Text include a translation feature in their functionality. However, you will need the Google Chrome browser to access Speech to text. This is because the service is only available to active google account holders.
How much faster is speech to text faster than typing?
A 2017 Stanford study states that speech to text is aboutthree times faster than typing . In addition, it found that speech-to-text apps can transcribe over 150 words per minute, while professional transcriptionists range between 50 to 80 words per minute.
Free Download For Win 7 or later(64-bit)
Free Download For macOS 10.14 or later
Free Download For macOS 10.14 or later
Adding subtitles to your videos can be incredibly time-consuming if you do not have the right tools. However, with Filmora’s speech-to-text function, you can add subtitles to your video with a single click. In addition, it automatically recognizes audio in your videos and transcribes it to text with incredible accuracy. The plugin uses state-of-the-art algorithms to ensure the video industry’s most accurate speech technology.
Furthermore, you can import external files to your video’s timeline and edit them as you please. For example, you can import a video from your thumb drive and use the Filmora speech-to-text plugin to transcribe to text. Currently, the plugin can transcribe the text in 26 languages. As such, it is a favorite for vloggers, teachers, and film editors, who all have to deliver their content with great efficiency.
Please note that you must have Filmora installed on your Mac device to access the Speech to Text plugin. In addition, check if your Filmora version is compatible with the plugin before downloading. Once you confirm that you meet all the requirements, here is how to use the service:
- Launch the Filmora app on your Mac and open a new video workspace.
- Click on the microphone symbol at the bottom right corner of the page to start recording. Tap it once again to finish the recording.
- Tap the Tools tab on your main menu and select Speech to Text. Then, confirm your preferences and wait for the transcription.
Part5: Top 5 Dragon for Mac
Dragon Dictate is arguably the best dictation software currently on the market. According to most users, its accuracy and feature sets are next to none. For example, the Smart Format Rules learn how you represent dates, numbers, and abbreviations, resulting in less editing work for you. The Dragon Dictate app is free to download from the Apple Store.
Dragon for Mac users reports a dictation accuracy of nearly 99%, which is excellent in the speech-to-text software category. All of Nuance’s Dragon products use deep learning technology to capture your accent and cadence. As such, the app gets better at transcribing your text as you continue using it. In addition, dragon for Mac professional allows you to transcribe audio clips from uploaded files. For example, you can import audio from your iPhone to your Dragon Dictate workspace and transcribe it hassle-free.
Unfortunately, you cannot get a stand-alone dragon app for Mac. This is because Nuance discontinued its development in 2018. In addition, Microsoft’s acquisition of the company in 2021 proves that the decision is permanent. However, you can still use the Windows version of Dragon through Parallels, which allows you to run macOS and Windows simultaneously. In addition, this method also works for M1 Macs.
Part6: FAQs
Is there a difference between voice recognition and speech-to-text?
Voice recognition software allows your device to capture your accent and tone and then stores that data for different functions, such as user logins and speech-to-text functionality. For example, Siri will ask you to repeat a sentence several times as one of the setup steps.
Which is the best external device for the speech-to-text service?
Most users report better speech-to-text accuracy when using headsets compared to using an external microphone. This is because the microphone is much closer to your mouth, so your voice is less affected by external noise.
Can speech-to-text apps automatically translate a transcribed text?
Yes, they can. Apps such as Google’s Speech to Text include a translation feature in their functionality. However, you will need the Google Chrome browser to access Speech to text. This is because the service is only available to active google account holders.
How much faster is speech to text faster than typing?
A 2017 Stanford study states that speech to text is aboutthree times faster than typing . In addition, it found that speech-to-text apps can transcribe over 150 words per minute, while professional transcriptionists range between 50 to 80 words per minute.
Free Download For Win 7 or later(64-bit)
Free Download For macOS 10.14 or later
Take Your Videos to the Next Level: Using Slow Motion in Windows Live Movie Maker 2023
How to Use Windows Live Movie Maker Slow Motion Effect
Ollie Mattison
Mar 27, 2024• Proven solutions
Slow motion effect is one of the most popular video effects. Fortunately, Windows Live Movie Maker provides this useful function for you to slow down your videos either for better presentation or better video effect. It is very easy to use Windows Live Movie Maker slow motion function. Just get Windows Live Movie Maker installed and follow the below guide to use slow motion effect in Windows Live Movie Maker.
How to slow down videos in Windows Live Movie Maker
Step 1. Add photos and videos to Windows Live Movie Maker
Click “Add videos and photos” to browse and select videos and photos from you computer to add. You can also drag and drop videos and photos to the storyboard.
Step 2. Slow down videos in Windows Live Movie Maker
To slow down videos, select the video clip and on the Edit tab under “Video Tools” choose a speed (depending on how much you want to speed the video up or slow it down).

For more Windows Live Movie Maker tips, please go to how to edit videos in Windows Live Movie Maker .
By the way, Windows Live Movie Maker is really a good free video editing software. However, compared with other video editing software, it lacks some features. Have your thought about any video editing software better than Windows Live Movie Maker, which can slow down the motion effects and with powerful edting tools at the same time?
More Powerful Video Movie Making Can Slow Down Videos
For video movie making, you can use Wondershare Filmora to make a stunning movie from your home videos. All popular video formats are supported and lots of free video transition effects are provided for your to make your videos more smooth. With an intuitive interface, even beginners can make stunning movies with this video editor software.
Besides, you can directly upload your video to YouTube for sharing with family and friends. What’s the best? There are more special editing features like Scene Detection, Close-up, Jump Cut, Mosaic, Tilt Shift, Picture-in-Picture, Face off, Audio Separation, Playback Speed. Hurry to free download Wondershare Filmora to edit your stunning videos now!


Ollie Mattison
Ollie Mattison is a writer and a lover of all things video.
Follow @Ollie Mattison
Ollie Mattison
Mar 27, 2024• Proven solutions
Slow motion effect is one of the most popular video effects. Fortunately, Windows Live Movie Maker provides this useful function for you to slow down your videos either for better presentation or better video effect. It is very easy to use Windows Live Movie Maker slow motion function. Just get Windows Live Movie Maker installed and follow the below guide to use slow motion effect in Windows Live Movie Maker.
How to slow down videos in Windows Live Movie Maker
Step 1. Add photos and videos to Windows Live Movie Maker
Click “Add videos and photos” to browse and select videos and photos from you computer to add. You can also drag and drop videos and photos to the storyboard.
Step 2. Slow down videos in Windows Live Movie Maker
To slow down videos, select the video clip and on the Edit tab under “Video Tools” choose a speed (depending on how much you want to speed the video up or slow it down).
For more Windows Live Movie Maker tips, please go to how to edit videos in Windows Live Movie Maker .
By the way, Windows Live Movie Maker is really a good free video editing software. However, compared with other video editing software, it lacks some features. Have your thought about any video editing software better than Windows Live Movie Maker, which can slow down the motion effects and with powerful edting tools at the same time?
More Powerful Video Movie Making Can Slow Down Videos
For video movie making, you can use Wondershare Filmora to make a stunning movie from your home videos. All popular video formats are supported and lots of free video transition effects are provided for your to make your videos more smooth. With an intuitive interface, even beginners can make stunning movies with this video editor software.
Besides, you can directly upload your video to YouTube for sharing with family and friends. What’s the best? There are more special editing features like Scene Detection, Close-up, Jump Cut, Mosaic, Tilt Shift, Picture-in-Picture, Face off, Audio Separation, Playback Speed. Hurry to free download Wondershare Filmora to edit your stunning videos now!
Ollie Mattison
Ollie Mattison is a writer and a lover of all things video.
Follow @Ollie Mattison
The Ultimate List of Free AVI Video Rotation Tools [Windows, MAC, Mobile, Online]
Did you rush to record a video in a mistaken direction? Or were you just excited to film the moments without noticing the position of your camera? Whatever the case, if you regret recording the clip at the incorrect angle, here’s your chance to do the alteration. The article includes the top 16 best free AVI video rotators you can use on MAC, Windows, iPhone, Android, and online. Plus, if you’re looking for a single platform to rotate or flip videos, you can learn the complete process by following the step-by-step Filmora Video Editor tutorial that works on MAC and Windows.
In this Article
Part 1: Best AVI Video Rotators to Rotate AVI Video on Windows and MAC – Filmora Video Editor [with steps]
Part 2: Top 3 Free Video Rotators on Windows
Part 3: Top 3 Free Video Rotators on MAC
Part 4: Top 3 Free Video Rotators on Android
Part 5: Top 3 Free Video Rotators on iPhone
Part 6: Top 3 Free Video Rotators Online
Part 7: Bottom Line
Part 8: FAQs
Part 1: Best AVI Video Rotators to Rotate AVI Video on Windows and MAC – Filmora Video Editor [with steps]
Heard about Filmora but never used it? Surely, you’re missing great fun if you’re a video professional or a beginner video editor.
Filmora is an award-winning video editing software that works for both PC and MAC users. While the tool comes at an affordable price, you can still download the free setup to start showing your creativity.
This video editor has dozens of new effects, transitions, and many more features, which can help you create engaging videos. You can also enjoy some more key features, including audio ducking, color matching, motion tracking, split screen, video filters and transitions, speed control, and multiple exporting formats.
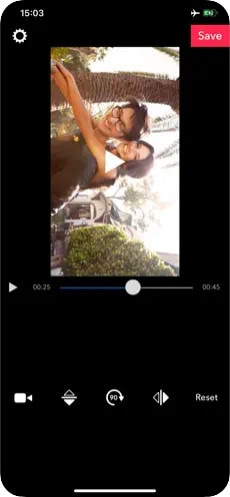
And, of course, video rotation is as easy as ABC! You can follow this step-by-step tutorial to rotate or flip your videos using Filmora 10. You can apply the same procedure if you have a different version.
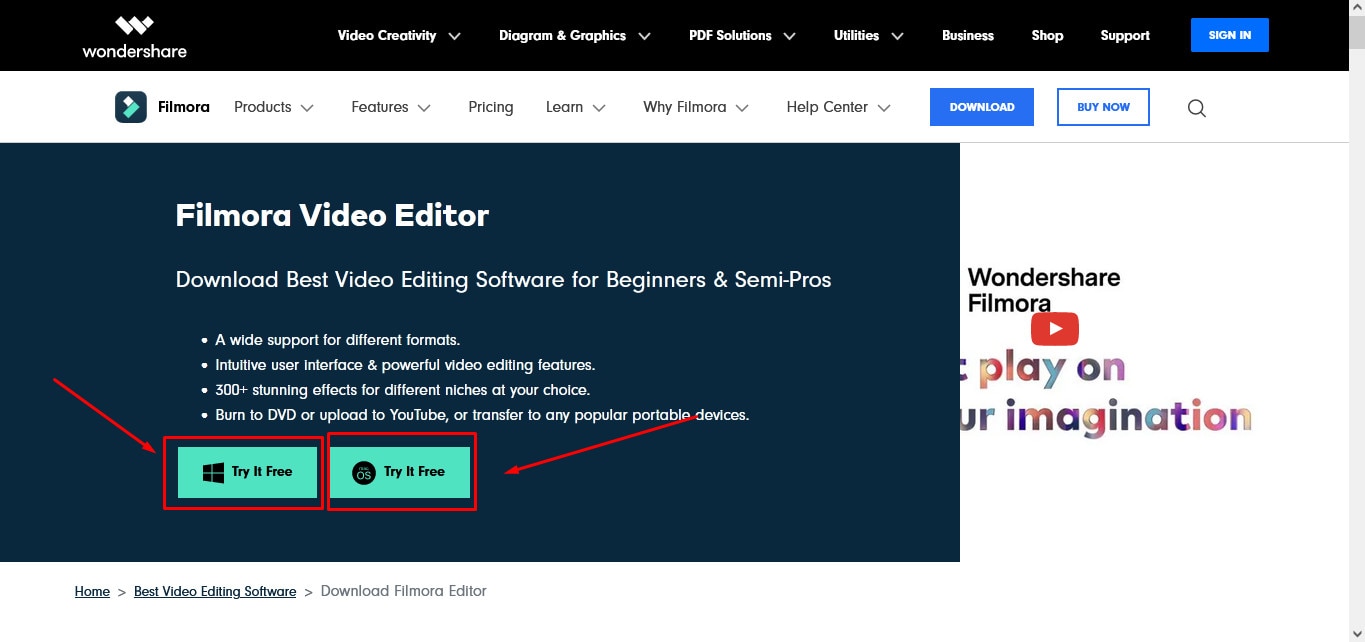
Step 1: Download and Install Filmora
Visit Filmora Video Editor’s official website to download the newest version. Click on the “Try it Free” button according to your operating system (look at the icons on the button to identify the OS).
After downloading the setup, double-click the file to install the video editor. Then, open the program.
Feel free to judge the interface (see the image below), as it is pretty simple to understand. So, even if you’re a beginner, you can learn this tool within a few minutes of practice.
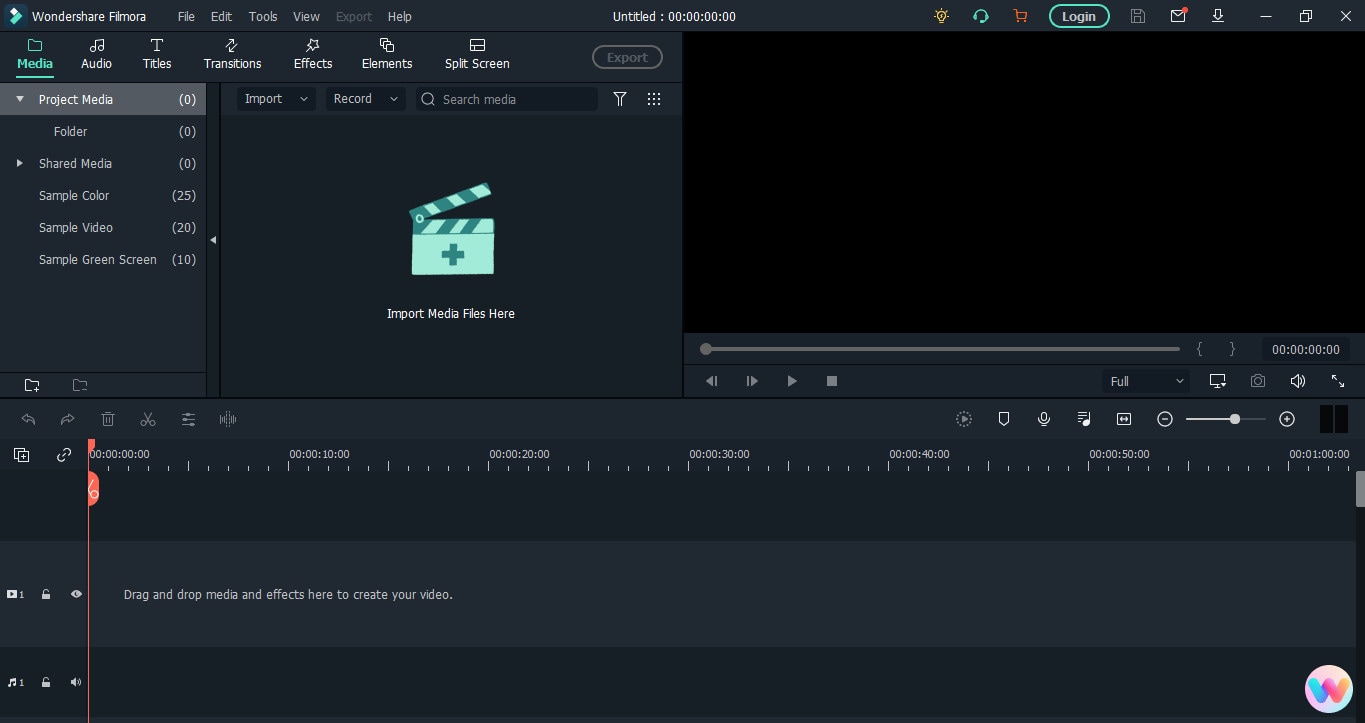
Step 2: Import the Video You Want to Rotate
The next is to bring the video file to Filmora’s library before proceeding. To do that, click on the “Movie Clip” icon in the center of the interface to select the clip from your computer’s hard drive.

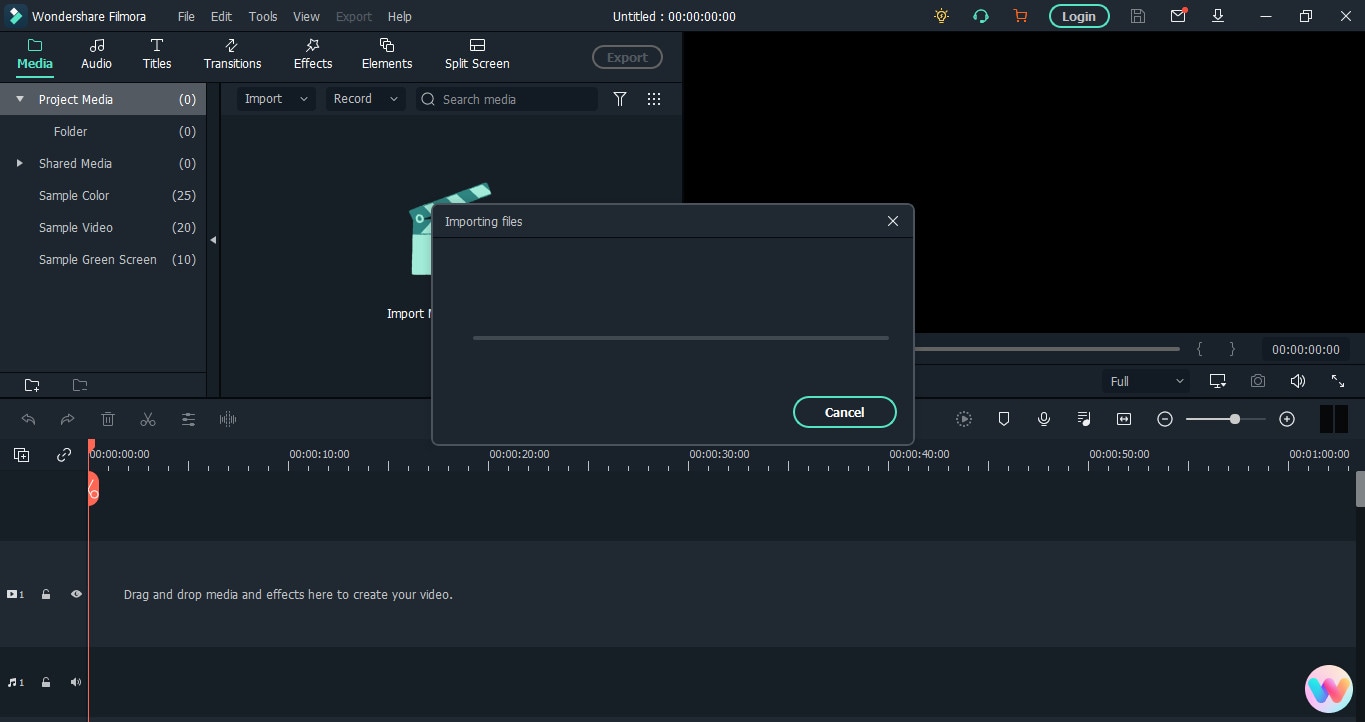
Double-click or select the video and click the “Open” button to import files. The importing process may take several seconds or a few minutes, depending on the video size.
If you’re using Filmora for the first time, you might see the “Create Proxy File” message popping up right after the video import. So, simply click on the “Yes” button to go ahead.
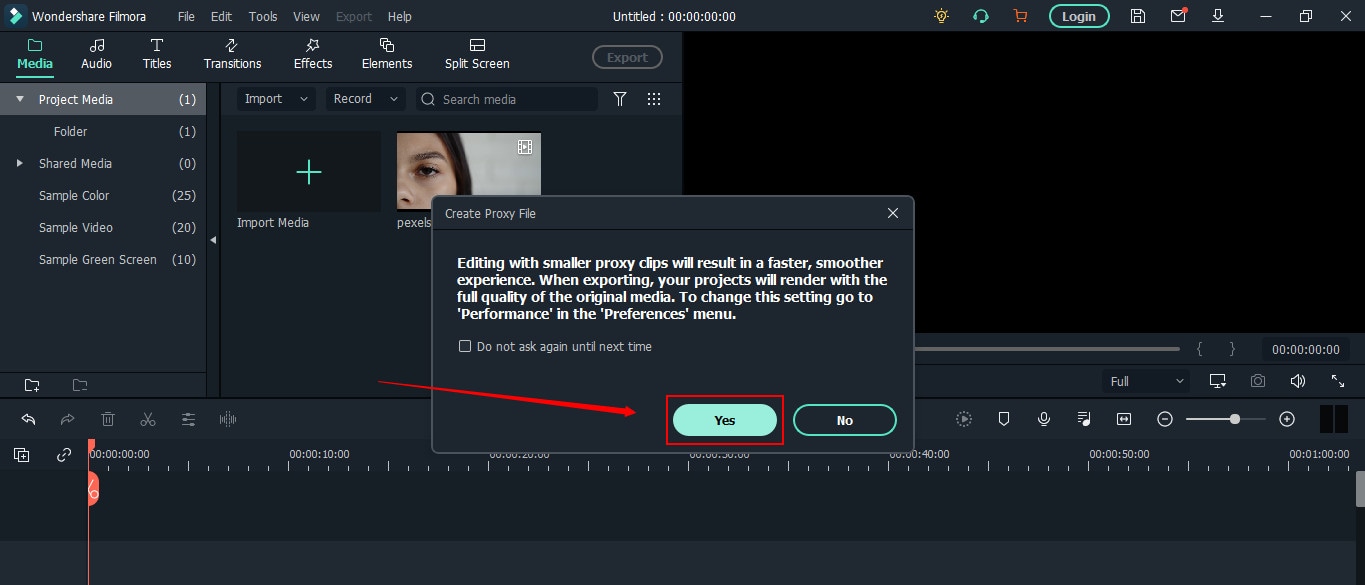
Your video will be stored in the “Project Media” tab and will be visible next to the preview window.
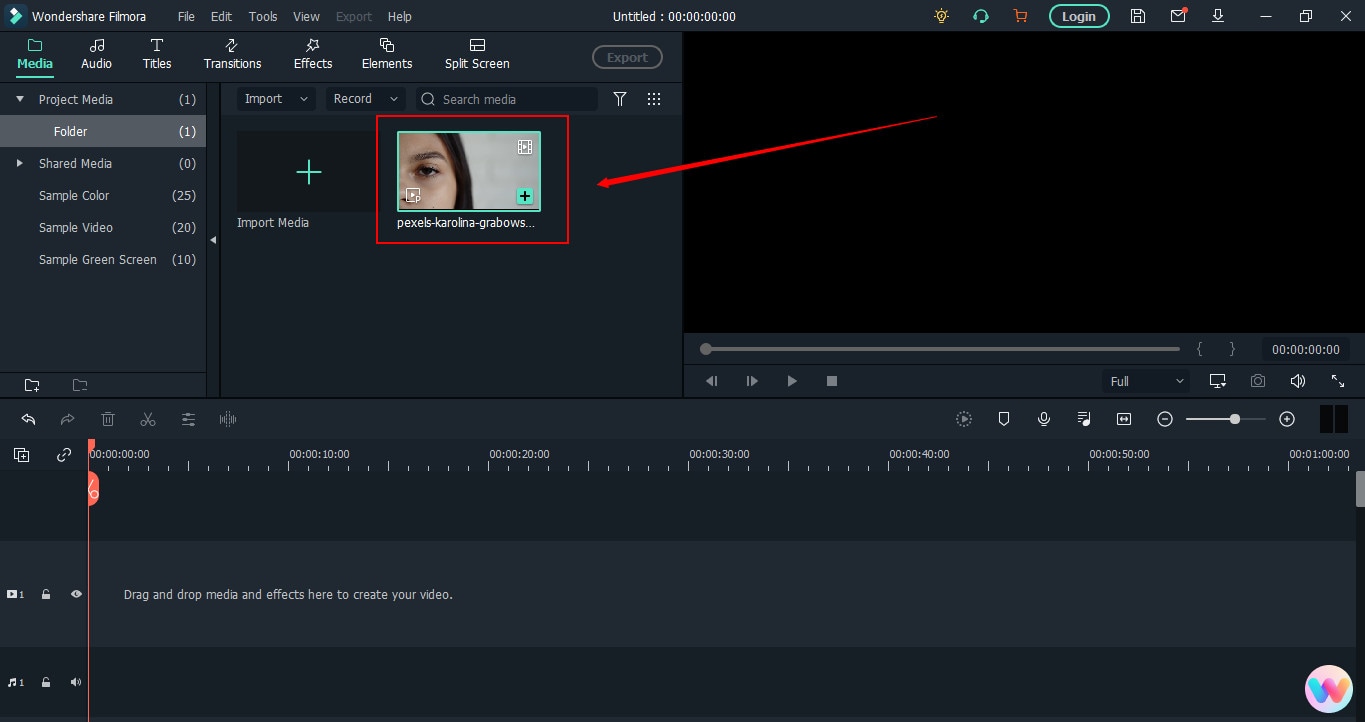
Step 3: Drag and Drop the Video on Filmora’s Timeline
To rotate the video, first, you need to add it to the track. For that, take your mouse on the video, and select it by clicking the right button on your mouse. Keep holding the button to drag the video on the timeline. Remove your finger from the button after placing the clip on the track.

Right after the above step, you will get another message to help you decide whether you want to keep the resolution of the video to its original settings or match the media. Choose “Match to Media” for fast rendering.
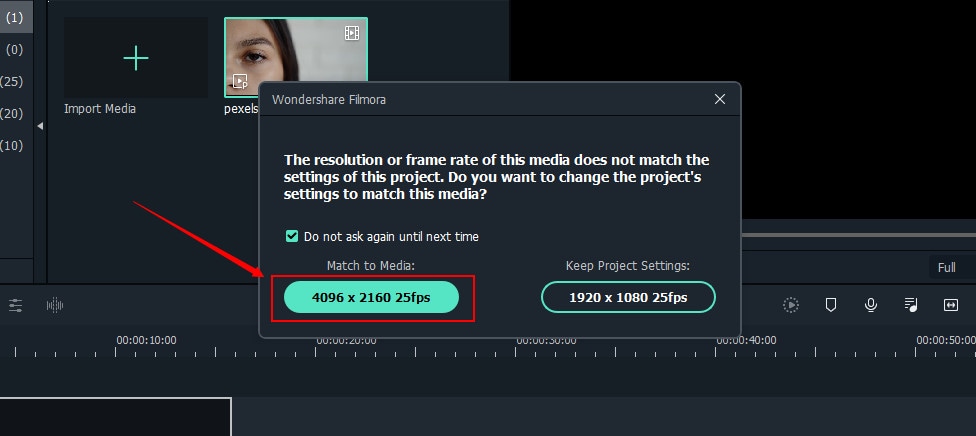
However, if you’re a professional video editor, feel free to select the option that suits you the most.
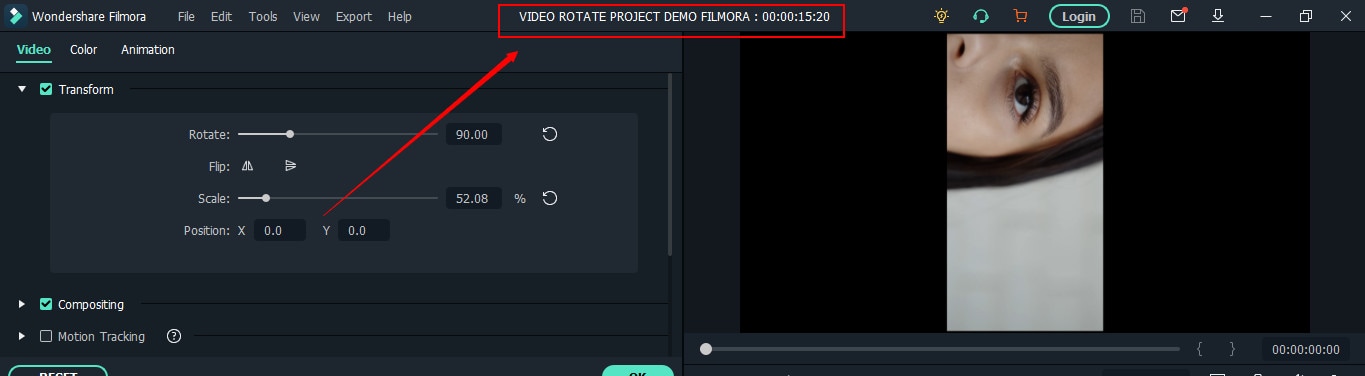
Step 4: Rotate Your Video with Filmora
Double-click anywhere on the video that is already on the timeline.

You will see three tabs – “Video,” “Color,” and “Animation.” So choose the “Video” tab and click on the “Transform” option.
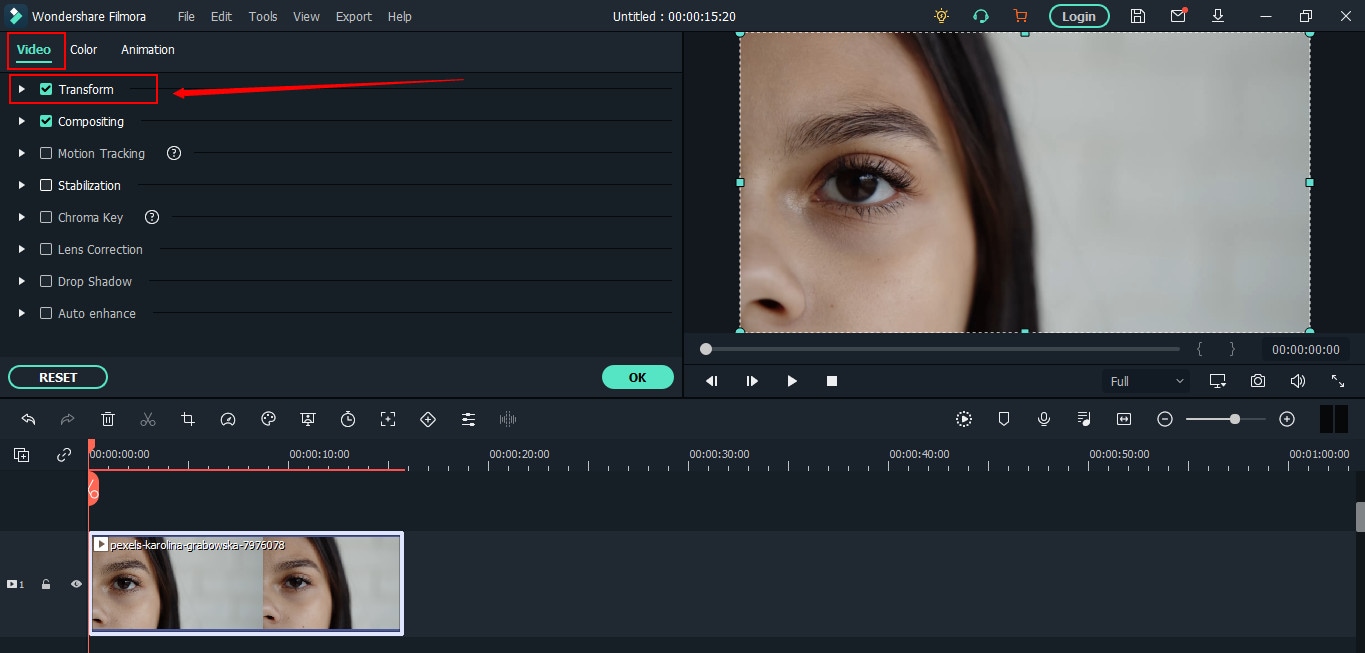
Once done, you will see three important options, which will help you rotate the video.
First, you will notice the “Rotate” option with an adjustment bar. This option will turn your video to different angles of your choice.
All you need to do is play with the adjustments by grabbing the “Round” knob-like button while keeping an eye on the preview window to see the results.
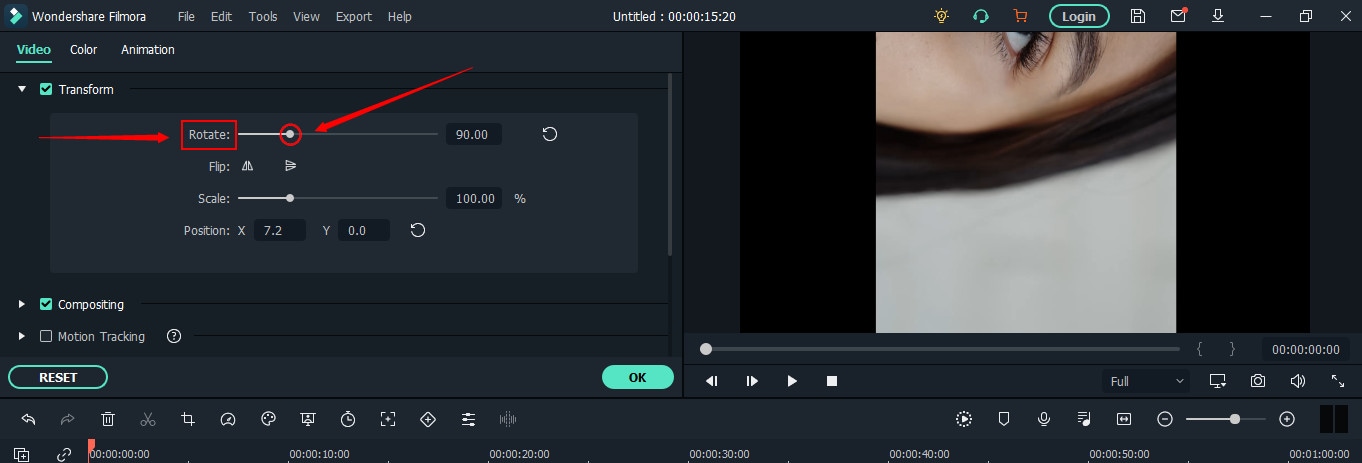
Just below “Rotate,” you will see the “Flip” option with “Horizontal” and “Vertical” mirror icons. Choosing any one of the icons will make your video mirror flip in horizontal or vertical directions.
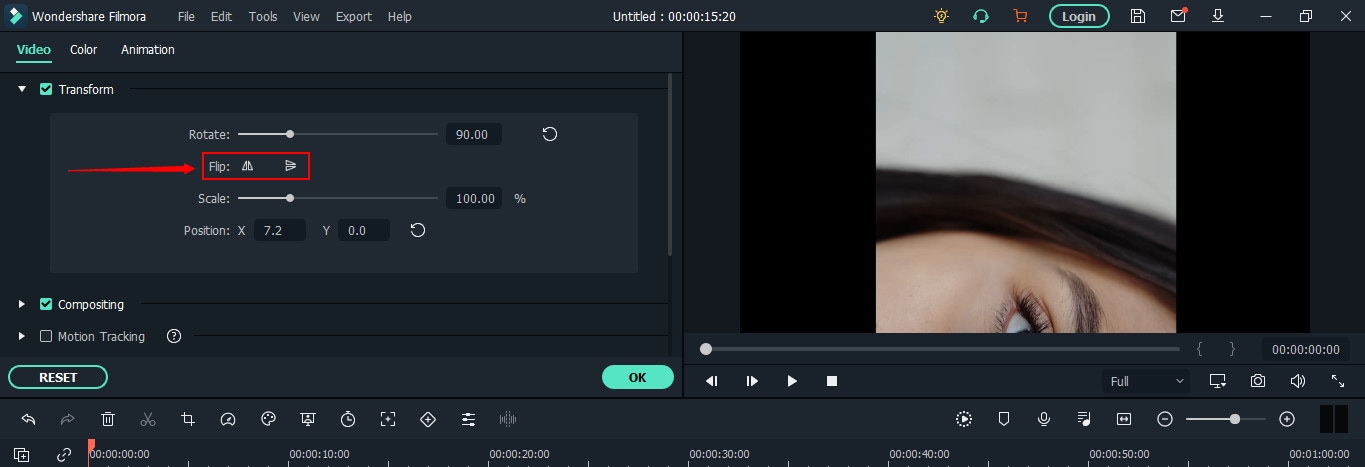
The third option is “Scale” beneath the “Flip” option. Similar to the rotate option, this tool also has an adjustment bar. You can make adjustments to magnify or de-magnify the clip to fit the screen. Although this option isn’t mandatory, you can still use it if you find the need.

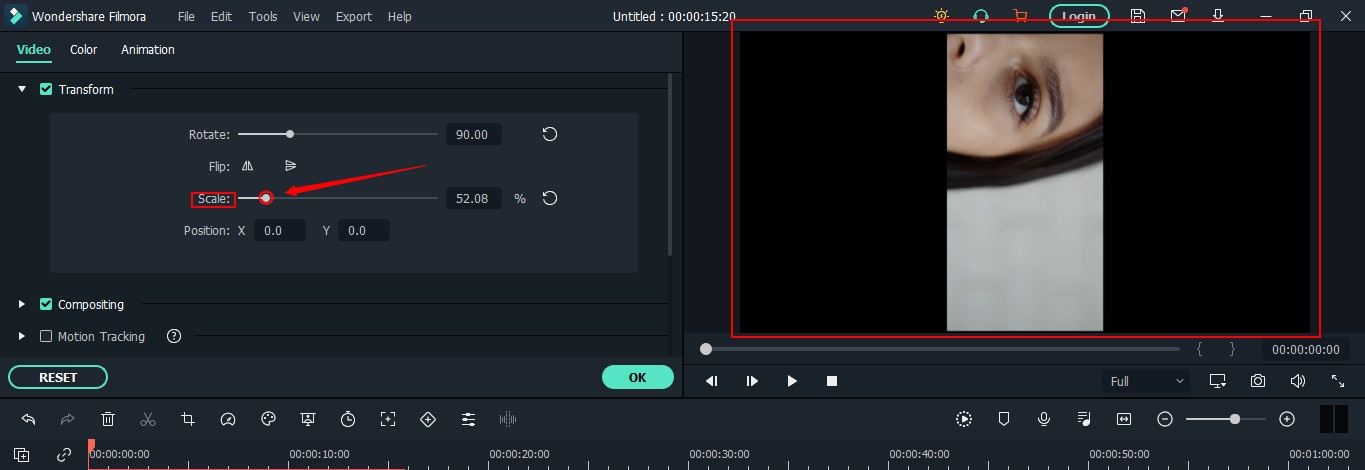
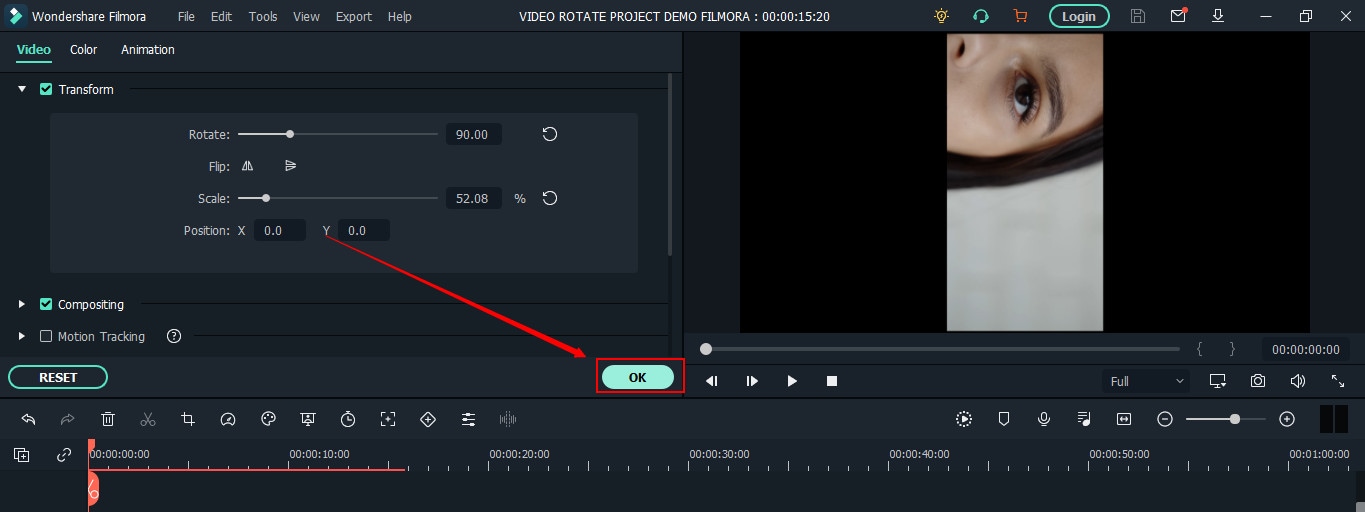
Now, click the “OK” button to apply rotation and return to the timeline.
Step 5: Save and Export Rotated Video to Your Widows or MAC
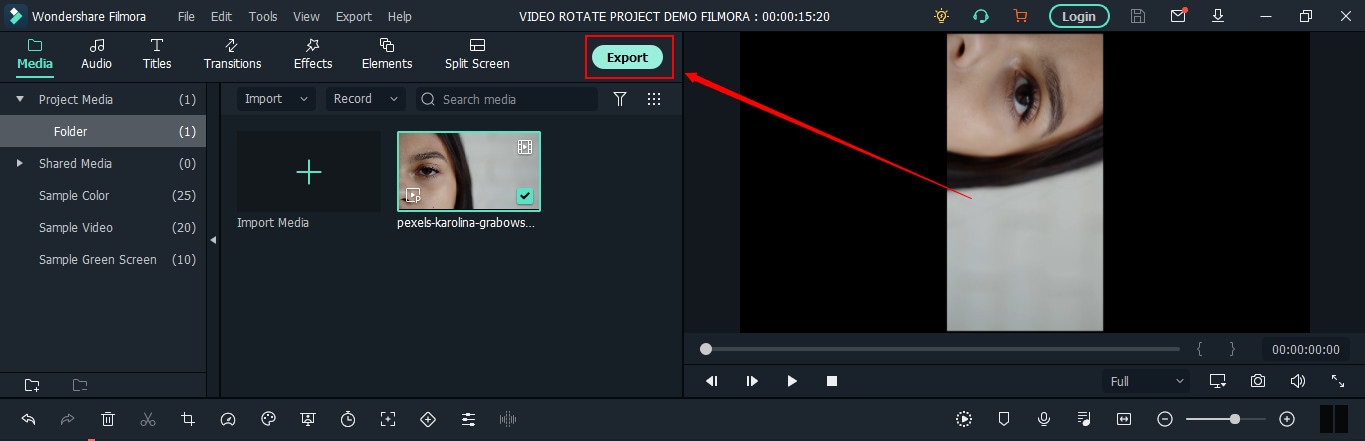
Here you will learn how to save the project and then export it. If you have already saved the project in the beginning, skip reading this part and directly hit the “Export” button.
Contrarily, you can also directly export your files without saving the project. But you won’t be able to make changes to the same project in the future as all source files will be lost. Therefore, saving the project and then exporting files is recommended.
So, if you’re done with step 4, save your project before going further.
You can go to the “File” tab, choose “Save Project,” and rename the video.
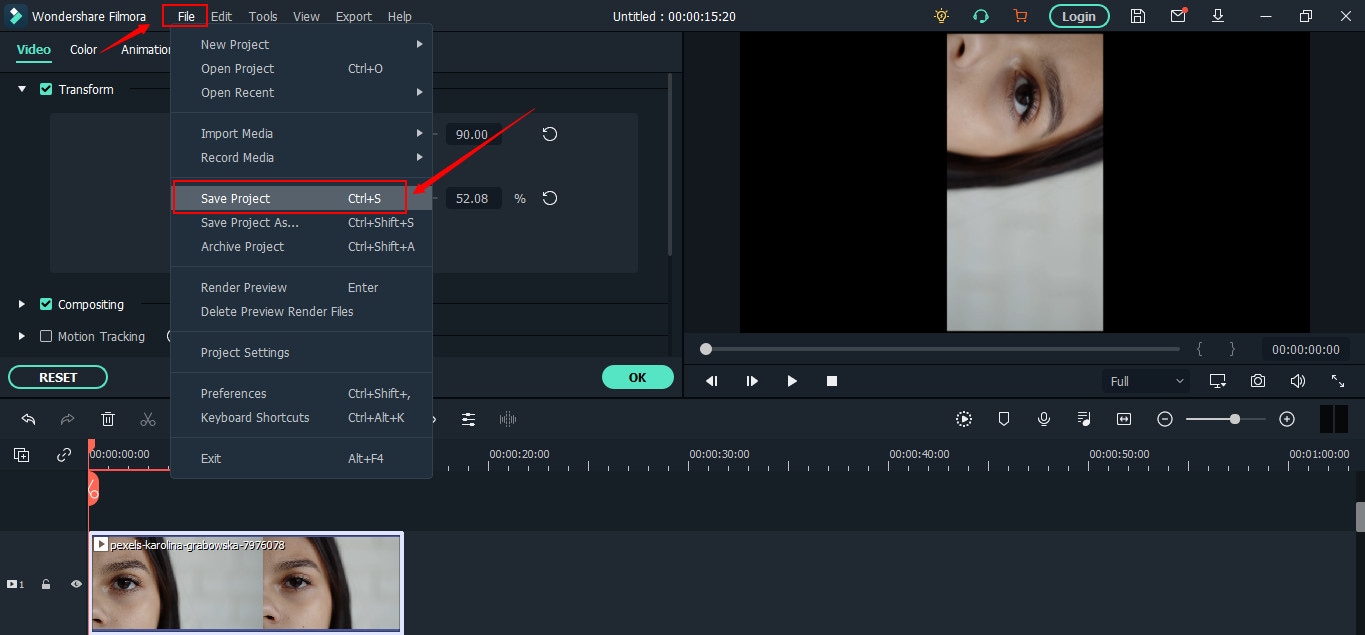
Rename your file and click on the “Save” button.
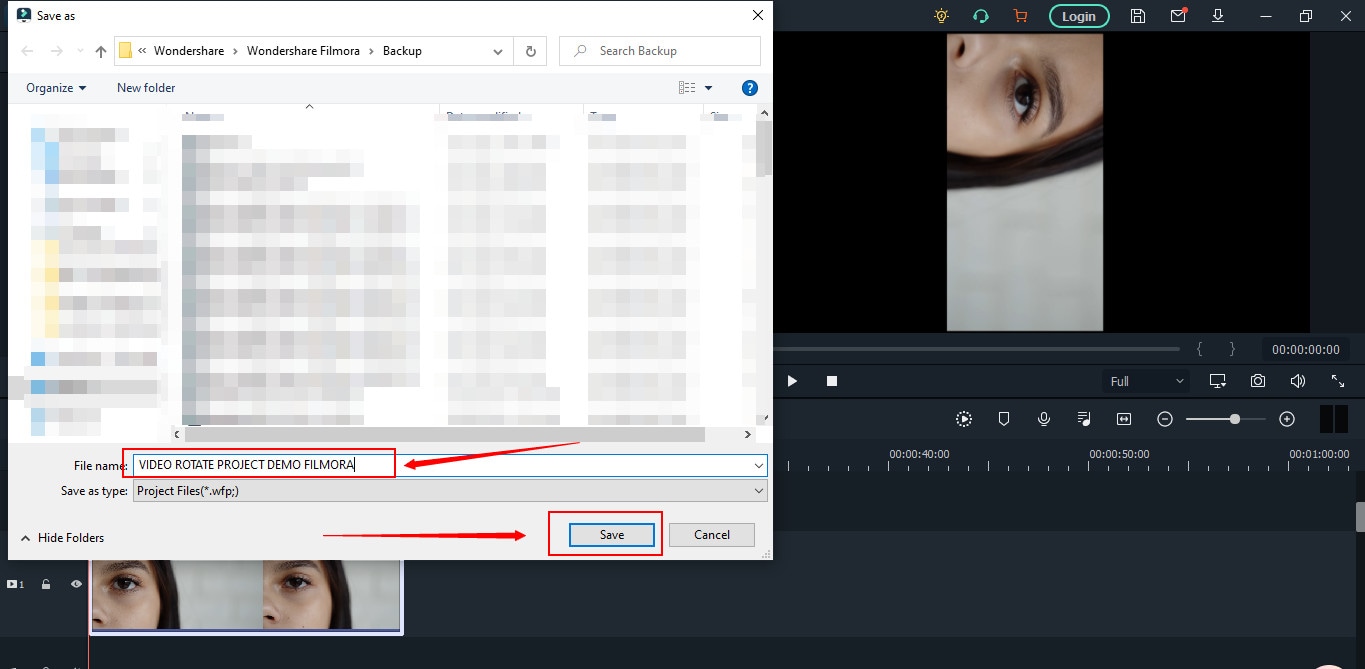
The new name will appear at the top of Filmora’s interface.
Lastly, click the “Export” button to save the file on your computer.
F 17
Part 2: Top 3 Free Video Rotators on Windows
No luck with finding free movie rotators for your Windows operating system? Don’t stress! These three AVI video rotators will solve your problem.
Free Video Flip and Rotate
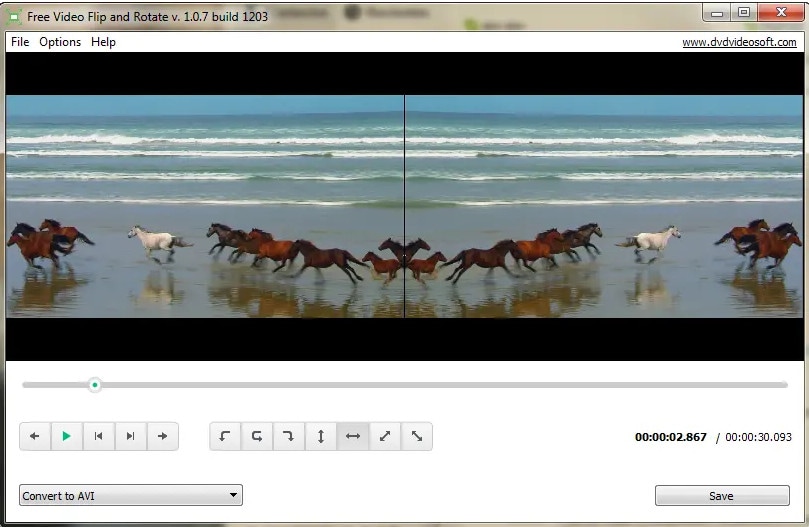
This tool could satisfy your requirements if you’re looking for a core video rotator. As the name sounds, the Free Video Flip and Rotate is software by DVD Video Soft that allows you to modify the orientation of your videos easily. In other words, this is one of the easiest video rotators for Windows users, which is also free to download and use.
It has a simple interface with user-friendly options, which permits you to rotate your videos from different angles. Besides, you can also use this software for mirroring your clips. Moreover, you can save your project in various video formats, such as AVI.
Features
- Vertical flip
- Horizontal flip
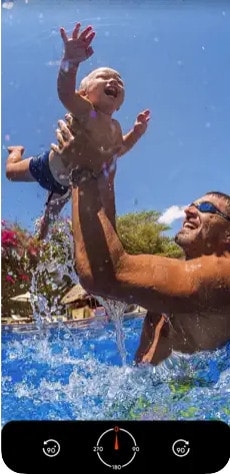
- 180° video rotation
- 90° clockwise video rotation
- 90° counter-clockwise video rotation
- Vertical flip with 90° clockwise video rotation
- Horizontal flip with 90° counter-clockwise video rotation
Pros
- One-click results
- Easy to install and run
- Free and user-friendly software
- Does not contain ads or spyware
- Requires 40.50 MB of hard disk space
- Supports AVI and other video formats
- Supports XP, Windows 7, 8, 10, and 11 versions
Cons
- Unavailable for MAC users
- Lack of additional features, such as color correction, cropping, etc.
XMedia Recode
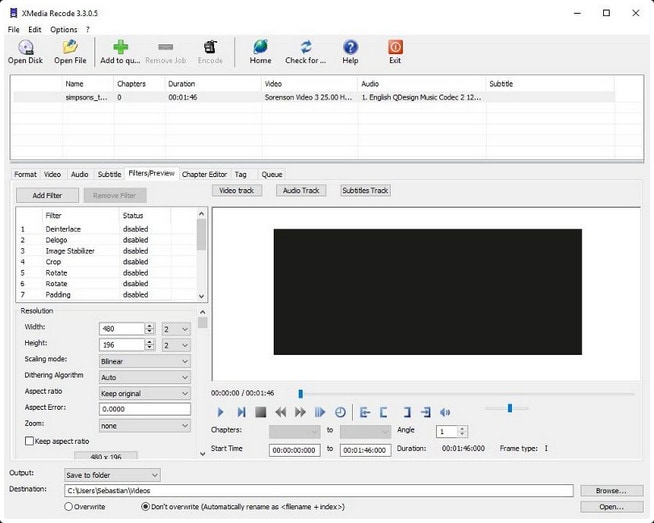
XMedia Recode is a free tool for Windows users. While the software is meant to convert videos into different formats, you can also use it for video rotation. Nevertheless, XMedia Recode has various other options, making it perfect for basic video editing.
Moreover, this software can convert unprotected Blue-rays/DVDs, create different chapters, import subtitle tracks, and many more. However, one of the best features of this video converter-cum-rotator is the video remux. That means you can convert the video container format without changing the original size.
Contrarily, XMedia Recode allows you to rotate and convert videos for countless devices, such as iPhone, iPad, Android, Xbox360, and more. But all this can be done only through Windows operating system. You can download this tool without any paid subscription. However, choose suitable processing for smooth installation, such as Windows 64bit, Windows 32bit, Vista, or XP SP3.
Features
- Blur
- Delogo
- Rotation
- Padding
- Denoise
- Cropping
- Image flip
- Swap U/V
- Clip speed
- Color curves
- Video fading
- Mirror effect
- Image stabilization
- Custom resolution
- Import 32 subtitle tracks
- Direct copy of video and audio stream into your desired format
Pros
- Free software
- Speedy conversion
- Fast batch processing
- Variety of video and audio features
- Works on Windows XP to Windows 10
- Supports 40+ video formats, including AVI
Cons
- A bit complex interface for new users
Altrasoft

Altrasoft is a small software for Windows to help rotate and convert your videos. The total size of the setup is just 971 KB.
This software is best for small video clips, which need to be rotated without wasting time. The program is free to download and use. However, the interface appears a bit old compared to new tools.
Also, unlike XMedia Recode, Altrasoft comes with limited options. So, if you only desire to rotate or flip your video and save it in the AVI or any other format, go ahead and download it.
Features
- Borders
- Zooming
- Rotation
- Color settings
- Audio formatting
- Video codec settings
- Audio codec settings
Pros
- Free to use
- Ideal for short videos
- Extremely light software
- Simple rotation options
- Rotation angle adjustments
Cons
- Outdated interface
- Lack of customer support
Part 3: Top 3 Free Video Rotators on MAC
Have you already lost your MAC storage on downloading some incompetent video rotators which claim to support AVI files? You can try these three video rotators for MAC, which are free and compatible with AVI video formats.
Kdenlive
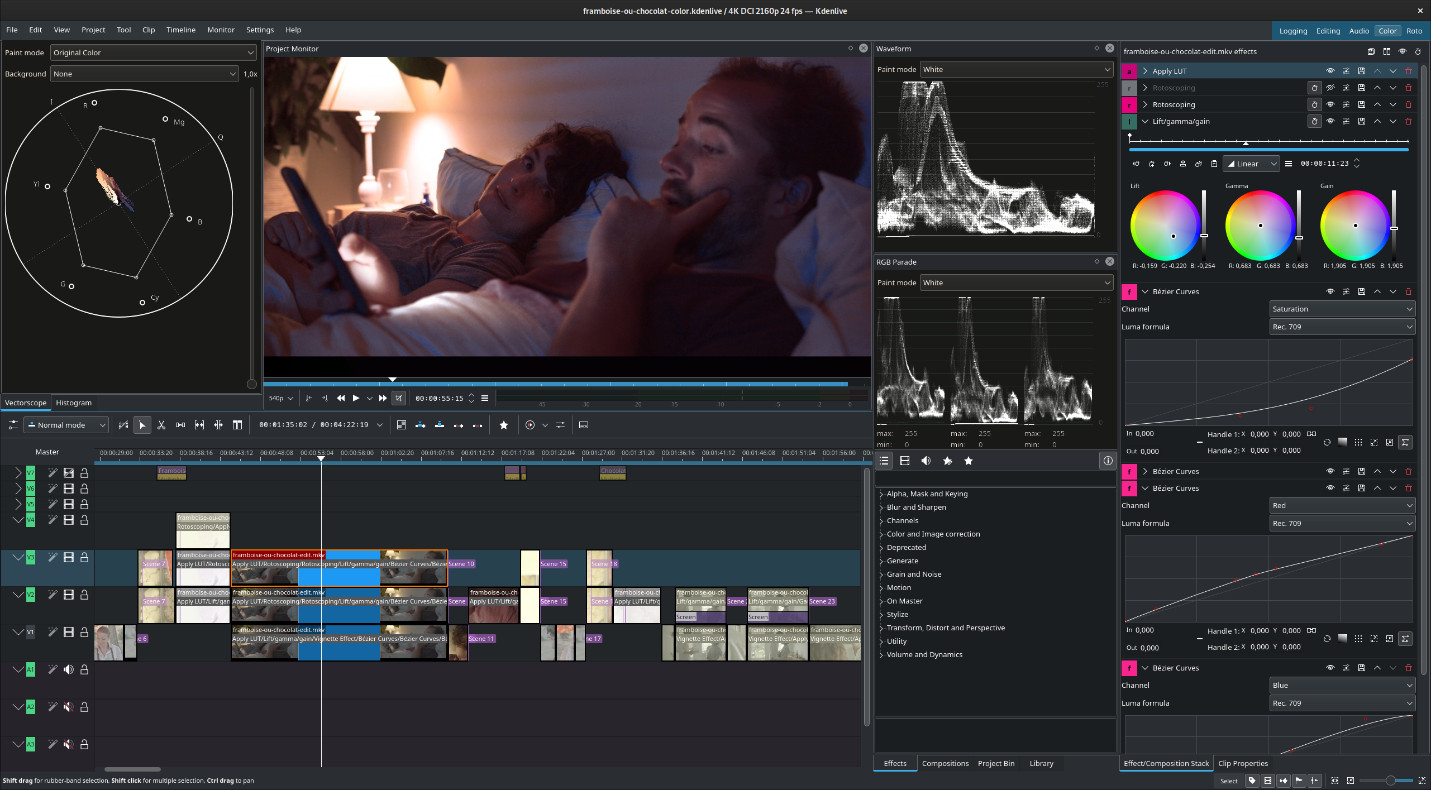
When it comes to free video rotators for MAC, it gets quite challenging to find the right tool. As a MAC OS user, you are left with limited options, especially when trying to rotate videos and save them in AVI format. However, Kdenlive appears to be a problem-solver.
Technically, Kdenlive is a free open source, cross-platform, non-linear video editor with a variety of features. Nevertheless, its Mac version works excellent compared to Windows or Linux.
You can use this software to rotate videos and save them in AVI or any other available format. Also, this program has an attractive interface with a rich library of transition templates and fonts.
Besides, from the video rotation point of view, Kdenlive allows you to turn your videos at any angle.
Features
- Rotate and zoom
- Waveform
- Histogram
- Audio meter
- Vectorscope
- Proxy editing
- Text animation
- Keyframe interpolation
- Color grading and correction
- RGB parade Multi-track video editing
- Custom shortcuts and interface layouts
- Easy line-spacing and letter-spacing adjustment
- Supports seven video formats, including AVI, MOV, HD, UHD, HDV, WEBM, and MP4
Pros
- Free to use
- Fast rendering
- Automatic backup
- Easy video rotation
- Regular bugs fixation
- Cross-platform availability
- Dozens of professional effects and transitions
Cons
- Extremely unstable on Windows OS
IMovie
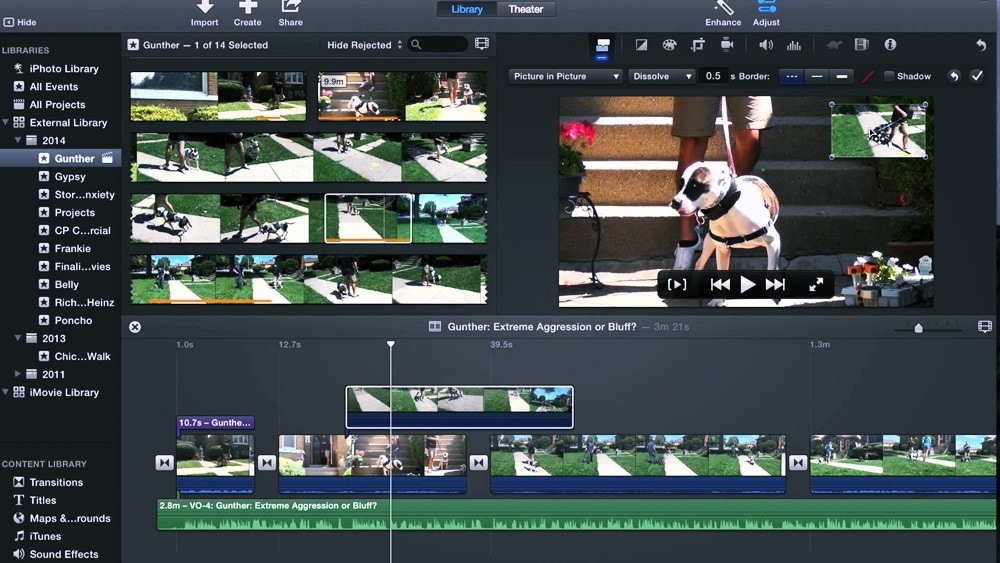
Want to get the job done quickly? Try iMovie in your MAC!
iMovie is a built-in video editing software to help create professional-level videos from your system. But you can also download iMovie if you can’t find it in the system.
Not just videos, but this software also allows you to cut and edit music without changing the files. Many filmmakers also love the tool, as they can add graphics to their projects to get remarkable results.
But that doesn’t stop new users from getting all the benefits the pros get with this software. How? Because it has a pretty straightforward look. You don’t need to click a hundred times to apply a simple effect, as all the options are right in front of you.
And when it’s about rotating a video in AVI format, feel free to rely on iMovie, as it supports several video file formats.
Features
- Video rotation and cropping
- Music and photo import
- 4K and HD video support
- Video transitions and effects
- Pre-installed backdrops and themes
- Supports working on multiple projects
Pros
- Free for MAC users
- Easy to learn
- User-friendly tools
- Extensive audio library
- Excellent movie templates
- Ideal Chroma-keying options
Cons
- Requires high storage space
- Lacks tagging and motion tracking
OpenShot
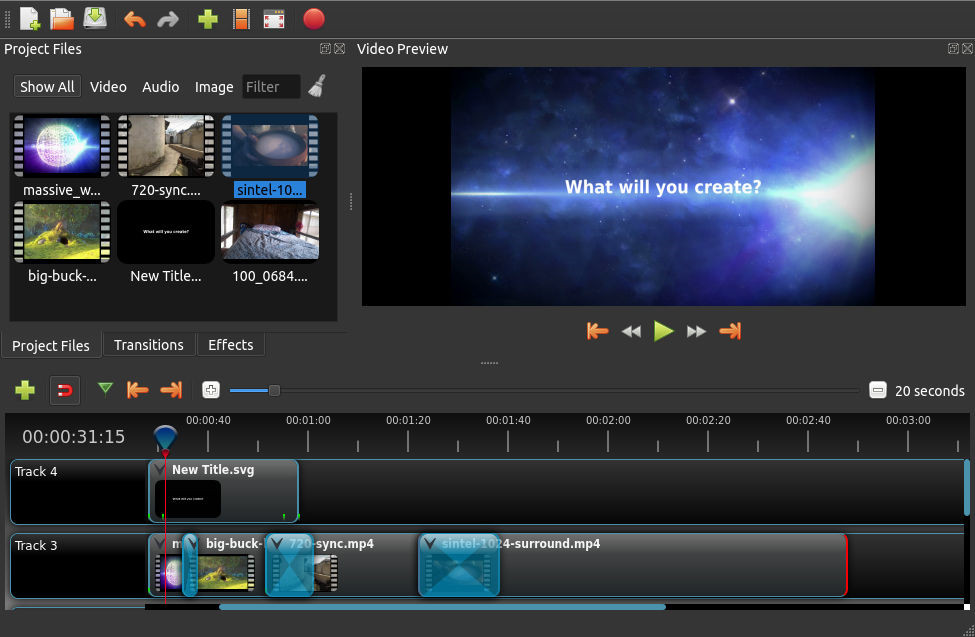
If complex video rotators make you ill, give OpenShot a shot!
It’s a free video editor which is incredibly simple to use. Most professionals around the world appreciate this powerful editing tool. Also, new users can do wonders by simply playing and understanding the options for a few minutes.
So if you plan to use OpenShot Video Editor , you would be glad to know that you can add animations, watermarks, and numerous other effects through this program. Plus, you can also enjoy audio editing within the same platform.
Although OpenShot can be installed for free on multiple operating systems, it still works best on MAC. So there’s no way to ignore this tool for rotating videos in MAC, especially when the options are limited.
Features
- Video rotation and resizing
- Drag and drop support
- Unlimited layers/tracks
- Color correction and settings
- 3D animated effects and titles
- Robust curve-based animations
- Video transitions and real-time previews
- Clip scaling, snapping, cutting, and trimming
- Image overlays, compositing, and watermarks
- Supports AVI and other audio, video, and image formats
Pros
- Free to use
- Easy editing
- No watermarking
- Available in 70+ languages
- Regular updates for improvement
- Stable performance on MAC systems
Cons
- Limited editing options for professionals
- Not suitable for old Windows OS versions
Part 4: Top 3 Free Video Rotators for Android
If using a PC to rotate your videos makes you lazy, you can change the angles of your clips through your Android phone.
So here are the three best video editing apps for Android lovers, which are free to use.
Rotate Video FX
Rotate Video FX is developed by Bizo Mobile. Despite being a small company, it has proven its mettle by offering several apps to its users in more than 100 countries. The firm is also specialized in developing mobile games for multiple platforms.
However, Rotate Video FX is one of its best creations in the world of video rotating mobile applications. This app allows you to choose the video you want to turn directly from your phone’s gallery.
And once the clip has been uploaded, you can rotate it to three different degrees by just touching the “Rotate” button.
Features
- Video rotation to 90, 180, and 270-degree angles
- Clear preview screen with no overlapping options
- Simple play, rotate, and import in a single attempt
- Social media sharing button for quick sending of media
- Automatically saves the rotated video to your phone’s gallery
Pros
- The app is free to use
- More than 1 million downloads
- Works on all android versions
Cons
- No frequent updates
- Not a user-friendly app
- Changes video resolution without permission
Smart Video Rotate and Flip
Clogica is the brainchild behind Smart Video Rotate and Flip video rotator for android. The company has been actively working in app development since 2014. And currently, it has more than 25 apps on the list, with 50 million total users.
Smart Video Rotate and Flip is a simple and smart tool to flip and rotate videos directly from your android device. So if you’re no longer interested in using desktop applications to do the job, here’s your chance to rotate your clips through your mobile phone or tablet.
This app offers a simple way to perform multiple flips and rotations simultaneously. The application works by re-encoding the media or by using the fast mode.
Features
- Allows video rotation and flips on different angles
- The output folder and renaming options
- Big preview screen and fast rendering
- Video recording directly from the application
- Permits you to make a video library within the app
Pros
- Free application
- Easy interface
- The app doesn’t change the video quality
- Allows you to mirror flip and rotate videos
- The latest update makes the app work faster
Cons
- The app contains ads
- Files become large after rotation
- Videos can only be saved to the phone’s internal memory
Rotate Video FREE
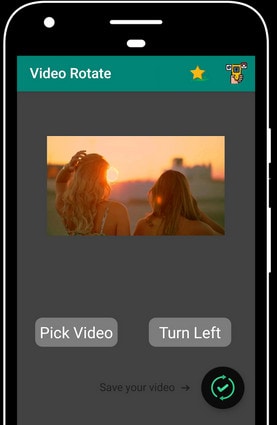
Rotate Video FREE is designed by LKR Studio. From 2014 till now, this app development company has produced seven mobile applications in the “Tools” category. And among its entire portfolio, the Rotate Video FREE app is one of the most popular creations.
Rotate Video FREE is a highly light and easy video rotator for Android devices. It has a simple interface with two main options: ‘ Pick Video’ to select the clip from your phone’s gallery. Then, the “Turn Left” button helps you rotate the video in multiple directions.
Features
- Rotates video to 90, 180, and 270 degrees
- HD video export quality
- Hassle-free rotate options
Pros
- Free of cost app
- Speedy video rotation process on large files
- Saves video directly to your phone’s memory
- Video rotation without affecting the resolution
Cons
- No mirror flipping
- The free version contains advertisements
- Hard to find the location of the saved videos
Part 5: Top 3 Free Video Rotators for iPhone
Are you struggling to find a good video rotator for iPhone? Here’s the list of three best iPhone apps to help you rotate your movies using your smartphone in AVI format.
Video Rotate + Flip Video Easy
Finding a video rotator for iPhone is a bit difficult, as most valuable applications comes after paying the price. But Video Rotate + Flip Video Easy app is totally free to download and use.
The app includes all the basic functions to rotate and flip videos in different angles. After downloading the app, you will notice a simple interface with seven options. So all you need to do is to import your video from the phone’s gallery, use the options to rotate the video, and save the rotated video in your phone.
The app is also available in different languages, including German, French, Japanese, English, Portuguese, Simplified Chinese, Spanish, and Russian.
Features
- Vertical mirror flipping
- Horizontal mirror flipping
- Frame wise video rotation
- 90° degrees clockwise and counter clockwise rotations
- 180° degrees clockwise and counter clockwise rotations
Pros
- Fast video conversion
- Small app size (only 16.1 MB)
- Available in multiple languages
- Supports iOS 11.0 or later versions
- The app is free with no watermarks
- You can install the app on your iPad
- Rotated videos can be played on all media players
- It exports the rotated video directly to your camera roll
Cons
- You need to purchase the app to remove advertisements
RFV
Here’s another free app to rotate and flip your videos. You can download RFV on both Android and iPhone smartphones. However, the iPhone version of the app works flawlessly. In fact, the ratings on both platforms also confirm that there are more happy iPhone users of this app than Android users.
RFV is a quick solution to correct your video orientation. So, if you have recorded the video through your iPhone at the wrong angle, you can use the app to flip and turn the clip’s position without much trouble. And you can do all of this just by selecting the options at the bottom of the app’s interface.
Features
- 90° degrees rotations
- Quick resetting
- Horizontal and vertical mirror flipping
- Turn photos into videos
- Video podcast
Pros
- RFV is a free video rotating app
- Easy installation on iPad
- Supports iOS 12.0 or later versions
- Direct loading of clip on the app from camera roll
Cons
- Large app size (41.7 MB)
- Unavailable for older iPhone versions
- It does not support file sizes above 200 MB
- Problems with saving the video on Android phones
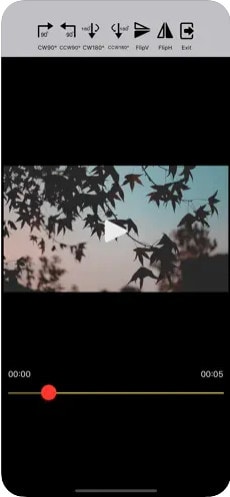
Video Rotate – Flip Video
Video Rotate – Flip Video is the third in line when it comes to free video rotators for iPhones. The tool has pretty straightforward options regarding 90-degree clockwise and counter-clockwise rotations. Moreover, you can also play with different angles to adjust the orientation from 0 to 270 degrees.
Once you’re done rotating your video, you can save the new clip directly to your iPhone’s camera roll. At the same time, this app also allows you to share the rotated video on various social and communication platforms.
Features
- The app is specifically designed to rotate videos
- Uncomplicated app interface
- Live video preview
Pros
- Free and fast video rotator app for iPhone
- You can also install the app on an iPad
- Compatible with iOS 10.0 or later versions
Cons
- The app shows advertisements until you buy it
- No reset option – you have to start all over again
Part 6: Top 3 Free Video Rotators Online
Don’t want to fill your device’s storage with software? Well! You can rotate videos online for free in AVI format with ease. Here are the 3 best online video rotating tools.
Flixier
Flixier is a website that helps you create and edit videos through your internet browser. You can upload multiple videos or photos to add effects, text, and many more characteristics. This online platform allows you to add keyframes and transitions to your clips. Likewise, you can adjust your videos’ positioning, scaling, and resizing.
So can you rotate videos on Flixier?
Yes, you can and without paying a cent. The website offers a variety of options to rotate your clips. All you need to do is select the transform option and choose the rotation or flip option to see the results. And when you’re done rotating the video, simply export the file to your computer.
On the other hand, if you think you want to use Flixier frequently, you are required to buy a premium monthly or annual subscription. But until then, you can enjoy all the great traits for free.
Features
- Video rotation (90 degrees left and right)
- Video flipping (horizontal and vertical)
- Robust timeline
- 50+ transitions
- Green screen
- Live collaboration
- Screen recording
- Webcam recording
- Video effects
- Color correction
- Built-in media stock libraries
Pros
- Flixier is free
- No sign-up required
- Superfast rendering
- Variety of video templates
- Unlimited audio and video tracks
- Allows AVI media import and export
- Live video, microphone, and screen recording
Cons
- You need to purchase paid plans for team collaboration
- The free plan comes with limited projects, downloads, and storage
Clideo
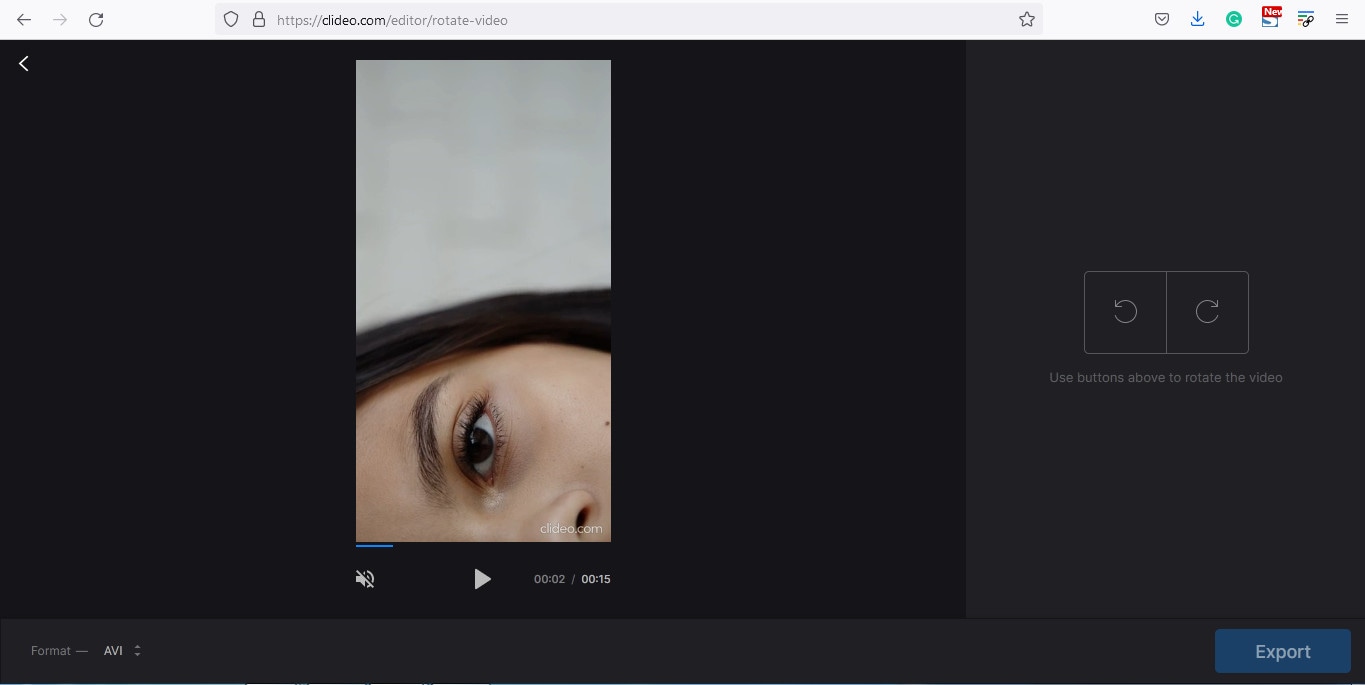
Clideo is a great online tool that allows you to create and edit images and videos in one place. This web-based program comes with a variety of features, including video rotation and flipping.
To make your videos unique, Clideo permits you to add text and music to attract the audience. Moreover, the program supports different video formats, like AVI, MPG, MP4, WMC, MOV, VOB, and more.
You can do everything right from your internet browser without installing the application on your computer. All video files that you import and export on Clideo are well-protected.
As a user, you can select different resolutions, formats, and other features to make exciting videos within a few clicks. And apart from video rotation, the tool offers numerous beneficial options, such as reverse, speed, flip, loop, stop motion, and even memes creation.
Features
- Easy video flipping and rotation
- DPI conversion
- Video compressing
- Speed adjustment
- Slideshow creation
- Filters and presets
- Audio and video cutting
- Video and audio merging
- Subtitles and personalized text
- Color correction and fading effects
Pros
- All basic features are free to use
- Best for beginners
- Non-technical interface
- Supports various video formats (including AVI)
Cons
- This online tool lacks design elements and themes
- You need to buy the premium version to use Clideo daily
Rotate My Video.Net
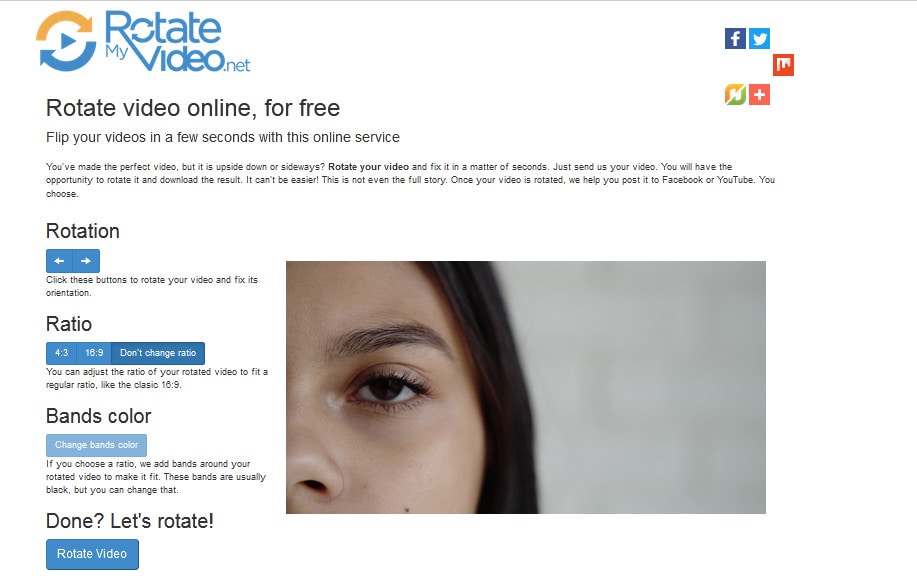
Last but not the least, the Rotate My Video.Net is a free online tool designed for video rotation only. So, if your video is upside down or shot in the wrong direction, feel free to use this tool.
This web-based video rotator allows you to share the video to different social platforms directly from the website. Contrarily, you also save the rotated clips on your system.
Another interesting fact about this tool is that it has no limit. That means you can upload videos on the interface and rotate them as often as possible. However, the tool does not offer other features to groom your videos.
Moreover, the developers claim that the videos are deleted automatically from the server in a few hours. Therefore, your videos stay private and safe.
Features
- 90 degrees clockwise and counter-clockwise rotation
- Video ratio adjustment options (4:3 and 16:9)
- Band color option to fill the empty black space with colors
Pros
- Entirely free – no monthly or yearly subscription required
- Easy and quick process
- Supports AVI video files
- Video quality is not disturbed after rotation
Cons
- Lacks video flipping option
- It does not include any other features
Part 7: Bottom Line
Despite a long list of free video editors, finding the right one that simplifies the task without any trouble is hard. But with these top 16 best free AVI video rotators, you can flip and rotate videos in a couple of minutes. You can find the most suitable rotator Windows, MAC, iPhone, and Android. Or, you can use the online platforms to enjoy rotations at different angles. However, regardless of device or operating system, each rotator has pros and cons. So don’t hesitate to opt for the tool that fulfills all your needs.
Part 8: FAQs
Q1. How do I rotate a video for free?
You can rotate a video for free by downloading a free video rotator according to your operating system. You can also look for online tools for video rotation. Likewise, you can also install Android and iPhone apps to rotate clips from your phone.
Q2. What software can rotate video?
There are many software that helps you rotate videos. However, most of them are paid. So, if you’re looking for some free video rotators on MAC or Windows, you can download Filmora. On the other hand, you can download programs like Altrasoft, XMedia Recode, and Free Video Flip and Rotate for Windows.
Q3. How can I rotate a video without losing quality?
Not all video rotators can promise high-quality results. So if you want to rotate your clip without damaging the quality, you must choose top-notch video editors, like Filmora or iMovie.
Q4. How do you rotate an AVI file on a MAC?
You need to download video rotators, such as Kdenlive, iMovie, or OpenShot, to rotate your AVI files for free. But, you can choose Filmora for MAC to flip and turn your AVI videos to different angles for exceptional results.
Q5. How do I rotate a video online?
To rotate an AVI video online, you need to be extremely picky, as even most online tools don’t support AVI files. But online video editors like Flixier, Clideo, and RotateMyVideo.Net allow you to rotate AVI videos easily.
Did you rush to record a video in a mistaken direction? Or were you just excited to film the moments without noticing the position of your camera? Whatever the case, if you regret recording the clip at the incorrect angle, here’s your chance to do the alteration. The article includes the top 16 best free AVI video rotators you can use on MAC, Windows, iPhone, Android, and online. Plus, if you’re looking for a single platform to rotate or flip videos, you can learn the complete process by following the step-by-step Filmora Video Editor tutorial that works on MAC and Windows.
In this Article
Part 1: Best AVI Video Rotators to Rotate AVI Video on Windows and MAC – Filmora Video Editor [with steps]
Part 2: Top 3 Free Video Rotators on Windows
Part 3: Top 3 Free Video Rotators on MAC
Part 4: Top 3 Free Video Rotators on Android
Part 5: Top 3 Free Video Rotators on iPhone
Part 6: Top 3 Free Video Rotators Online
Part 7: Bottom Line
Part 8: FAQs
Part 1: Best AVI Video Rotators to Rotate AVI Video on Windows and MAC – Filmora Video Editor [with steps]
Heard about Filmora but never used it? Surely, you’re missing great fun if you’re a video professional or a beginner video editor.
Filmora is an award-winning video editing software that works for both PC and MAC users. While the tool comes at an affordable price, you can still download the free setup to start showing your creativity.
This video editor has dozens of new effects, transitions, and many more features, which can help you create engaging videos. You can also enjoy some more key features, including audio ducking, color matching, motion tracking, split screen, video filters and transitions, speed control, and multiple exporting formats.
And, of course, video rotation is as easy as ABC! You can follow this step-by-step tutorial to rotate or flip your videos using Filmora 10. You can apply the same procedure if you have a different version.
Step 1: Download and Install Filmora
Visit Filmora Video Editor’s official website to download the newest version. Click on the “Try it Free” button according to your operating system (look at the icons on the button to identify the OS).
After downloading the setup, double-click the file to install the video editor. Then, open the program.
Feel free to judge the interface (see the image below), as it is pretty simple to understand. So, even if you’re a beginner, you can learn this tool within a few minutes of practice.
Step 2: Import the Video You Want to Rotate
The next is to bring the video file to Filmora’s library before proceeding. To do that, click on the “Movie Clip” icon in the center of the interface to select the clip from your computer’s hard drive.
Double-click or select the video and click the “Open” button to import files. The importing process may take several seconds or a few minutes, depending on the video size.
If you’re using Filmora for the first time, you might see the “Create Proxy File” message popping up right after the video import. So, simply click on the “Yes” button to go ahead.
Your video will be stored in the “Project Media” tab and will be visible next to the preview window.
Step 3: Drag and Drop the Video on Filmora’s Timeline
To rotate the video, first, you need to add it to the track. For that, take your mouse on the video, and select it by clicking the right button on your mouse. Keep holding the button to drag the video on the timeline. Remove your finger from the button after placing the clip on the track.
Right after the above step, you will get another message to help you decide whether you want to keep the resolution of the video to its original settings or match the media. Choose “Match to Media” for fast rendering.
However, if you’re a professional video editor, feel free to select the option that suits you the most.
Step 4: Rotate Your Video with Filmora
Double-click anywhere on the video that is already on the timeline.
You will see three tabs – “Video,” “Color,” and “Animation.” So choose the “Video” tab and click on the “Transform” option.
Once done, you will see three important options, which will help you rotate the video.
First, you will notice the “Rotate” option with an adjustment bar. This option will turn your video to different angles of your choice.
All you need to do is play with the adjustments by grabbing the “Round” knob-like button while keeping an eye on the preview window to see the results.
Just below “Rotate,” you will see the “Flip” option with “Horizontal” and “Vertical” mirror icons. Choosing any one of the icons will make your video mirror flip in horizontal or vertical directions.
The third option is “Scale” beneath the “Flip” option. Similar to the rotate option, this tool also has an adjustment bar. You can make adjustments to magnify or de-magnify the clip to fit the screen. Although this option isn’t mandatory, you can still use it if you find the need.
Now, click the “OK” button to apply rotation and return to the timeline.
Step 5: Save and Export Rotated Video to Your Widows or MAC
Here you will learn how to save the project and then export it. If you have already saved the project in the beginning, skip reading this part and directly hit the “Export” button.
Contrarily, you can also directly export your files without saving the project. But you won’t be able to make changes to the same project in the future as all source files will be lost. Therefore, saving the project and then exporting files is recommended.
So, if you’re done with step 4, save your project before going further.
You can go to the “File” tab, choose “Save Project,” and rename the video.
Rename your file and click on the “Save” button.
The new name will appear at the top of Filmora’s interface.
Lastly, click the “Export” button to save the file on your computer.
F 17
Part 2: Top 3 Free Video Rotators on Windows
No luck with finding free movie rotators for your Windows operating system? Don’t stress! These three AVI video rotators will solve your problem.
Free Video Flip and Rotate
This tool could satisfy your requirements if you’re looking for a core video rotator. As the name sounds, the Free Video Flip and Rotate is software by DVD Video Soft that allows you to modify the orientation of your videos easily. In other words, this is one of the easiest video rotators for Windows users, which is also free to download and use.
It has a simple interface with user-friendly options, which permits you to rotate your videos from different angles. Besides, you can also use this software for mirroring your clips. Moreover, you can save your project in various video formats, such as AVI.
Features
- Vertical flip
- Horizontal flip
- 180° video rotation
- 90° clockwise video rotation
- 90° counter-clockwise video rotation
- Vertical flip with 90° clockwise video rotation
- Horizontal flip with 90° counter-clockwise video rotation
Pros
- One-click results
- Easy to install and run
- Free and user-friendly software
- Does not contain ads or spyware
- Requires 40.50 MB of hard disk space
- Supports AVI and other video formats
- Supports XP, Windows 7, 8, 10, and 11 versions
Cons
- Unavailable for MAC users
- Lack of additional features, such as color correction, cropping, etc.
XMedia Recode
XMedia Recode is a free tool for Windows users. While the software is meant to convert videos into different formats, you can also use it for video rotation. Nevertheless, XMedia Recode has various other options, making it perfect for basic video editing.
Moreover, this software can convert unprotected Blue-rays/DVDs, create different chapters, import subtitle tracks, and many more. However, one of the best features of this video converter-cum-rotator is the video remux. That means you can convert the video container format without changing the original size.
Contrarily, XMedia Recode allows you to rotate and convert videos for countless devices, such as iPhone, iPad, Android, Xbox360, and more. But all this can be done only through Windows operating system. You can download this tool without any paid subscription. However, choose suitable processing for smooth installation, such as Windows 64bit, Windows 32bit, Vista, or XP SP3.
Features
- Blur
- Delogo
- Rotation
- Padding
- Denoise
- Cropping
- Image flip
- Swap U/V
- Clip speed
- Color curves
- Video fading
- Mirror effect
- Image stabilization
- Custom resolution
- Import 32 subtitle tracks
- Direct copy of video and audio stream into your desired format
Pros
- Free software
- Speedy conversion
- Fast batch processing
- Variety of video and audio features
- Works on Windows XP to Windows 10
- Supports 40+ video formats, including AVI
Cons
- A bit complex interface for new users
Altrasoft
Altrasoft is a small software for Windows to help rotate and convert your videos. The total size of the setup is just 971 KB.
This software is best for small video clips, which need to be rotated without wasting time. The program is free to download and use. However, the interface appears a bit old compared to new tools.
Also, unlike XMedia Recode, Altrasoft comes with limited options. So, if you only desire to rotate or flip your video and save it in the AVI or any other format, go ahead and download it.
Features
- Borders
- Zooming
- Rotation
- Color settings
- Audio formatting
- Video codec settings
- Audio codec settings
Pros
- Free to use
- Ideal for short videos
- Extremely light software
- Simple rotation options
- Rotation angle adjustments
Cons
- Outdated interface
- Lack of customer support
Part 3: Top 3 Free Video Rotators on MAC
Have you already lost your MAC storage on downloading some incompetent video rotators which claim to support AVI files? You can try these three video rotators for MAC, which are free and compatible with AVI video formats.
Kdenlive
When it comes to free video rotators for MAC, it gets quite challenging to find the right tool. As a MAC OS user, you are left with limited options, especially when trying to rotate videos and save them in AVI format. However, Kdenlive appears to be a problem-solver.
Technically, Kdenlive is a free open source, cross-platform, non-linear video editor with a variety of features. Nevertheless, its Mac version works excellent compared to Windows or Linux.
You can use this software to rotate videos and save them in AVI or any other available format. Also, this program has an attractive interface with a rich library of transition templates and fonts.
Besides, from the video rotation point of view, Kdenlive allows you to turn your videos at any angle.
Features
- Rotate and zoom
- Waveform
- Histogram
- Audio meter
- Vectorscope
- Proxy editing
- Text animation
- Keyframe interpolation
- Color grading and correction
- RGB parade Multi-track video editing
- Custom shortcuts and interface layouts
- Easy line-spacing and letter-spacing adjustment
- Supports seven video formats, including AVI, MOV, HD, UHD, HDV, WEBM, and MP4
Pros
- Free to use
- Fast rendering
- Automatic backup
- Easy video rotation
- Regular bugs fixation
- Cross-platform availability
- Dozens of professional effects and transitions
Cons
- Extremely unstable on Windows OS
IMovie
Want to get the job done quickly? Try iMovie in your MAC!
iMovie is a built-in video editing software to help create professional-level videos from your system. But you can also download iMovie if you can’t find it in the system.
Not just videos, but this software also allows you to cut and edit music without changing the files. Many filmmakers also love the tool, as they can add graphics to their projects to get remarkable results.
But that doesn’t stop new users from getting all the benefits the pros get with this software. How? Because it has a pretty straightforward look. You don’t need to click a hundred times to apply a simple effect, as all the options are right in front of you.
And when it’s about rotating a video in AVI format, feel free to rely on iMovie, as it supports several video file formats.
Features
- Video rotation and cropping
- Music and photo import
- 4K and HD video support
- Video transitions and effects
- Pre-installed backdrops and themes
- Supports working on multiple projects
Pros
- Free for MAC users
- Easy to learn
- User-friendly tools
- Extensive audio library
- Excellent movie templates
- Ideal Chroma-keying options
Cons
- Requires high storage space
- Lacks tagging and motion tracking
OpenShot
If complex video rotators make you ill, give OpenShot a shot!
It’s a free video editor which is incredibly simple to use. Most professionals around the world appreciate this powerful editing tool. Also, new users can do wonders by simply playing and understanding the options for a few minutes.
So if you plan to use OpenShot Video Editor , you would be glad to know that you can add animations, watermarks, and numerous other effects through this program. Plus, you can also enjoy audio editing within the same platform.
Although OpenShot can be installed for free on multiple operating systems, it still works best on MAC. So there’s no way to ignore this tool for rotating videos in MAC, especially when the options are limited.
Features
- Video rotation and resizing
- Drag and drop support
- Unlimited layers/tracks
- Color correction and settings
- 3D animated effects and titles
- Robust curve-based animations
- Video transitions and real-time previews
- Clip scaling, snapping, cutting, and trimming
- Image overlays, compositing, and watermarks
- Supports AVI and other audio, video, and image formats
Pros
- Free to use
- Easy editing
- No watermarking
- Available in 70+ languages
- Regular updates for improvement
- Stable performance on MAC systems
Cons
- Limited editing options for professionals
- Not suitable for old Windows OS versions
Part 4: Top 3 Free Video Rotators for Android
If using a PC to rotate your videos makes you lazy, you can change the angles of your clips through your Android phone.
So here are the three best video editing apps for Android lovers, which are free to use.
Rotate Video FX
Rotate Video FX is developed by Bizo Mobile. Despite being a small company, it has proven its mettle by offering several apps to its users in more than 100 countries. The firm is also specialized in developing mobile games for multiple platforms.
However, Rotate Video FX is one of its best creations in the world of video rotating mobile applications. This app allows you to choose the video you want to turn directly from your phone’s gallery.
And once the clip has been uploaded, you can rotate it to three different degrees by just touching the “Rotate” button.
Features
- Video rotation to 90, 180, and 270-degree angles
- Clear preview screen with no overlapping options
- Simple play, rotate, and import in a single attempt
- Social media sharing button for quick sending of media
- Automatically saves the rotated video to your phone’s gallery
Pros
- The app is free to use
- More than 1 million downloads
- Works on all android versions
Cons
- No frequent updates
- Not a user-friendly app
- Changes video resolution without permission
Smart Video Rotate and Flip
Clogica is the brainchild behind Smart Video Rotate and Flip video rotator for android. The company has been actively working in app development since 2014. And currently, it has more than 25 apps on the list, with 50 million total users.
Smart Video Rotate and Flip is a simple and smart tool to flip and rotate videos directly from your android device. So if you’re no longer interested in using desktop applications to do the job, here’s your chance to rotate your clips through your mobile phone or tablet.
This app offers a simple way to perform multiple flips and rotations simultaneously. The application works by re-encoding the media or by using the fast mode.
Features
- Allows video rotation and flips on different angles
- The output folder and renaming options
- Big preview screen and fast rendering
- Video recording directly from the application
- Permits you to make a video library within the app
Pros
- Free application
- Easy interface
- The app doesn’t change the video quality
- Allows you to mirror flip and rotate videos
- The latest update makes the app work faster
Cons
- The app contains ads
- Files become large after rotation
- Videos can only be saved to the phone’s internal memory
Rotate Video FREE
Rotate Video FREE is designed by LKR Studio. From 2014 till now, this app development company has produced seven mobile applications in the “Tools” category. And among its entire portfolio, the Rotate Video FREE app is one of the most popular creations.
Rotate Video FREE is a highly light and easy video rotator for Android devices. It has a simple interface with two main options: ‘ Pick Video’ to select the clip from your phone’s gallery. Then, the “Turn Left” button helps you rotate the video in multiple directions.
Features
- Rotates video to 90, 180, and 270 degrees
- HD video export quality
- Hassle-free rotate options
Pros
- Free of cost app
- Speedy video rotation process on large files
- Saves video directly to your phone’s memory
- Video rotation without affecting the resolution
Cons
- No mirror flipping
- The free version contains advertisements
- Hard to find the location of the saved videos
Part 5: Top 3 Free Video Rotators for iPhone
Are you struggling to find a good video rotator for iPhone? Here’s the list of three best iPhone apps to help you rotate your movies using your smartphone in AVI format.
Video Rotate + Flip Video Easy
Finding a video rotator for iPhone is a bit difficult, as most valuable applications comes after paying the price. But Video Rotate + Flip Video Easy app is totally free to download and use.
The app includes all the basic functions to rotate and flip videos in different angles. After downloading the app, you will notice a simple interface with seven options. So all you need to do is to import your video from the phone’s gallery, use the options to rotate the video, and save the rotated video in your phone.
The app is also available in different languages, including German, French, Japanese, English, Portuguese, Simplified Chinese, Spanish, and Russian.
Features
- Vertical mirror flipping
- Horizontal mirror flipping
- Frame wise video rotation
- 90° degrees clockwise and counter clockwise rotations
- 180° degrees clockwise and counter clockwise rotations
Pros
- Fast video conversion
- Small app size (only 16.1 MB)
- Available in multiple languages
- Supports iOS 11.0 or later versions
- The app is free with no watermarks
- You can install the app on your iPad
- Rotated videos can be played on all media players
- It exports the rotated video directly to your camera roll
Cons
- You need to purchase the app to remove advertisements
RFV
Here’s another free app to rotate and flip your videos. You can download RFV on both Android and iPhone smartphones. However, the iPhone version of the app works flawlessly. In fact, the ratings on both platforms also confirm that there are more happy iPhone users of this app than Android users.
RFV is a quick solution to correct your video orientation. So, if you have recorded the video through your iPhone at the wrong angle, you can use the app to flip and turn the clip’s position without much trouble. And you can do all of this just by selecting the options at the bottom of the app’s interface.
Features
- 90° degrees rotations
- Quick resetting
- Horizontal and vertical mirror flipping
- Turn photos into videos
- Video podcast
Pros
- RFV is a free video rotating app
- Easy installation on iPad
- Supports iOS 12.0 or later versions
- Direct loading of clip on the app from camera roll
Cons
- Large app size (41.7 MB)
- Unavailable for older iPhone versions
- It does not support file sizes above 200 MB
- Problems with saving the video on Android phones
Video Rotate – Flip Video
Video Rotate – Flip Video is the third in line when it comes to free video rotators for iPhones. The tool has pretty straightforward options regarding 90-degree clockwise and counter-clockwise rotations. Moreover, you can also play with different angles to adjust the orientation from 0 to 270 degrees.
Once you’re done rotating your video, you can save the new clip directly to your iPhone’s camera roll. At the same time, this app also allows you to share the rotated video on various social and communication platforms.
Features
- The app is specifically designed to rotate videos
- Uncomplicated app interface
- Live video preview
Pros
- Free and fast video rotator app for iPhone
- You can also install the app on an iPad
- Compatible with iOS 10.0 or later versions
Cons
- The app shows advertisements until you buy it
- No reset option – you have to start all over again
Part 6: Top 3 Free Video Rotators Online
Don’t want to fill your device’s storage with software? Well! You can rotate videos online for free in AVI format with ease. Here are the 3 best online video rotating tools.
Flixier
Flixier is a website that helps you create and edit videos through your internet browser. You can upload multiple videos or photos to add effects, text, and many more characteristics. This online platform allows you to add keyframes and transitions to your clips. Likewise, you can adjust your videos’ positioning, scaling, and resizing.
So can you rotate videos on Flixier?
Yes, you can and without paying a cent. The website offers a variety of options to rotate your clips. All you need to do is select the transform option and choose the rotation or flip option to see the results. And when you’re done rotating the video, simply export the file to your computer.
On the other hand, if you think you want to use Flixier frequently, you are required to buy a premium monthly or annual subscription. But until then, you can enjoy all the great traits for free.
Features
- Video rotation (90 degrees left and right)
- Video flipping (horizontal and vertical)
- Robust timeline
- 50+ transitions
- Green screen
- Live collaboration
- Screen recording
- Webcam recording
- Video effects
- Color correction
- Built-in media stock libraries
Pros
- Flixier is free
- No sign-up required
- Superfast rendering
- Variety of video templates
- Unlimited audio and video tracks
- Allows AVI media import and export
- Live video, microphone, and screen recording
Cons
- You need to purchase paid plans for team collaboration
- The free plan comes with limited projects, downloads, and storage
Clideo
Clideo is a great online tool that allows you to create and edit images and videos in one place. This web-based program comes with a variety of features, including video rotation and flipping.
To make your videos unique, Clideo permits you to add text and music to attract the audience. Moreover, the program supports different video formats, like AVI, MPG, MP4, WMC, MOV, VOB, and more.
You can do everything right from your internet browser without installing the application on your computer. All video files that you import and export on Clideo are well-protected.
As a user, you can select different resolutions, formats, and other features to make exciting videos within a few clicks. And apart from video rotation, the tool offers numerous beneficial options, such as reverse, speed, flip, loop, stop motion, and even memes creation.
Features
- Easy video flipping and rotation
- DPI conversion
- Video compressing
- Speed adjustment
- Slideshow creation
- Filters and presets
- Audio and video cutting
- Video and audio merging
- Subtitles and personalized text
- Color correction and fading effects
Pros
- All basic features are free to use
- Best for beginners
- Non-technical interface
- Supports various video formats (including AVI)
Cons
- This online tool lacks design elements and themes
- You need to buy the premium version to use Clideo daily
Rotate My Video.Net
Last but not the least, the Rotate My Video.Net is a free online tool designed for video rotation only. So, if your video is upside down or shot in the wrong direction, feel free to use this tool.
This web-based video rotator allows you to share the video to different social platforms directly from the website. Contrarily, you also save the rotated clips on your system.
Another interesting fact about this tool is that it has no limit. That means you can upload videos on the interface and rotate them as often as possible. However, the tool does not offer other features to groom your videos.
Moreover, the developers claim that the videos are deleted automatically from the server in a few hours. Therefore, your videos stay private and safe.
Features
- 90 degrees clockwise and counter-clockwise rotation
- Video ratio adjustment options (4:3 and 16:9)
- Band color option to fill the empty black space with colors
Pros
- Entirely free – no monthly or yearly subscription required
- Easy and quick process
- Supports AVI video files
- Video quality is not disturbed after rotation
Cons
- Lacks video flipping option
- It does not include any other features
Part 7: Bottom Line
Despite a long list of free video editors, finding the right one that simplifies the task without any trouble is hard. But with these top 16 best free AVI video rotators, you can flip and rotate videos in a couple of minutes. You can find the most suitable rotator Windows, MAC, iPhone, and Android. Or, you can use the online platforms to enjoy rotations at different angles. However, regardless of device or operating system, each rotator has pros and cons. So don’t hesitate to opt for the tool that fulfills all your needs.
Part 8: FAQs
Q1. How do I rotate a video for free?
You can rotate a video for free by downloading a free video rotator according to your operating system. You can also look for online tools for video rotation. Likewise, you can also install Android and iPhone apps to rotate clips from your phone.
Q2. What software can rotate video?
There are many software that helps you rotate videos. However, most of them are paid. So, if you’re looking for some free video rotators on MAC or Windows, you can download Filmora. On the other hand, you can download programs like Altrasoft, XMedia Recode, and Free Video Flip and Rotate for Windows.
Q3. How can I rotate a video without losing quality?
Not all video rotators can promise high-quality results. So if you want to rotate your clip without damaging the quality, you must choose top-notch video editors, like Filmora or iMovie.
Q4. How do you rotate an AVI file on a MAC?
You need to download video rotators, such as Kdenlive, iMovie, or OpenShot, to rotate your AVI files for free. But, you can choose Filmora for MAC to flip and turn your AVI videos to different angles for exceptional results.
Q5. How do I rotate a video online?
To rotate an AVI video online, you need to be extremely picky, as even most online tools don’t support AVI files. But online video editors like Flixier, Clideo, and RotateMyVideo.Net allow you to rotate AVI videos easily.
Also read:
- New In 2024, The Art of Transcribing Audio to Text
- Updated The Ultimate Guide to Making a Movie Simplified
- Revolutionize Your Video Content How to Convert Videos Into Cartoons in Minutes for 2024
- Updated In 2024, Top Tips and Tricks to Keep in Mind When Learning M4R Converter
- Updated Cut Your Videos Without a Price 7 Free Trimmers for 2024
- 2024 Approved Premiere Pro 2023 Importing, Editing, and Exporting Videos for Beginners
- New In 2024, The FCP Factor 10 Successful Movies That Used Final Cut Pro
- Updated Best MKV Cutting Software for Mac
- New MP4 to MP3 Conversion Made Easy Best Software and Online Tools
- Updated Replace Windows Movie Maker on Mac Top Video Editing Solutions for 2024
- New 5 Best Online Stop Motion Makers
- The Ultimate Guide to Video Editing Splitting Videos in Windows Live Movie Maker
- Updated 2024 Approved Make Viral Reaction Videos with These Top Mobile Apps
- Updated Is AVS Video Editor the Best Choice for You , In 2024
- New The Essential Facebook Video Aspect Ratio Guide for Marketers and Creators
- New Mobile Video Editing Best Apps to Blur Unwanted Parts for 2024
- New Movie Making on Mac Top 5 Windows Movie Maker Lookalikes for 2024
- 2024 Approved Unlock the Power of Green Screen 10 Best Free Apps for Mobile
- Updated Download Adobe Premiere Pro CS6 for Mac Free (Latest 2023 Version)
- Updated 2024 Approved Get Ready to Wow Add Slow Mo to Your Videos Without Spending a Dime
- Updated MOD Video Editing on a Budget The Best Free Options for 2024
- Updated 2024 Approved Trim Your Videos Like a Pro Best Free Windows 10 Video Editors
- Updated Transform Your Footage A Beginners Guide to GoPro Quik Editing on MacBook
- New In 2024, 7 Video Joiner Software with No Watermark Output
- Updated The Ultimate List of Reaction Video Makers to Watch
- Updated In 2024, FREE Top10 Best Whiteboard Animation Software
- In 2024, Cut, Trim, and Polish The Best Free Online Video Editors
- Updated In 2024, Free Video Trimming Software 10 Online Options Reviewed
- Adding Subtitles in FCPX A Beginners Tutorial (Updated 2023)
- Updated 2024 Approved What Can Tell You About 12 Best Audio Converter
- Updated 2024 Approved Blur Faces Like a Pro The Best Free Apps for Photo and Video Editing
- Updated In 2024, Hand Drawing Whiteboard Animation Made Easy Top Tools
- New Revolutionize Your Videos Best Free Special Effects Apps for Mobile
- New Premiere Pro 2023 Mastering Video Stabilization for Pro Results
- Updated 2024 Approved Windows Movie Maker Free Download The Ultimate Beginners Guide
- Zero-Cost Video Watermarking Top 5 Software Choices for 2024
- How to Transfer Photos from Vivo Y100 to Laptop Without USB | Dr.fone
- New 8 Reliable Online Tools to Convert Facebook Videos to MP3
- In 2024, How does the stardust trade cost In pokemon go On Realme C67 4G? | Dr.fone
- Mastering Lock Screen Settings How to Enable and Disable on Oppo A18
- Can Life360 Track You When Your Realme 11 Pro is off? | Dr.fone
- Unleash Your Creativity Top Free 3D Animation Apps for Mobile for 2024
- Does find my friends work on Vivo V29e | Dr.fone
- Updated How to Loop a Video for Free Best Tools for Windows, Mac, and Online for 2024
- How To Bypass iCloud Activation Lock On iPod and Apple iPhone 14 Pro Max The Right Way
- In 2024, Unlocking the Power of Smart Lock A Beginners Guide for Vivo Y36 Users
- Can I recover permanently deleted photos from X6
- How to Downgrade iPhone XS to an Older iOS System Version? | Dr.fone
- Top 15 Apps To Hack WiFi Password On Realme C67 5G
- Complete Tutorial to Use GPS Joystick to Fake GPS Location On Oppo A79 5G | Dr.fone
- Ways to stop parent tracking your Samsung Galaxy A34 5G | Dr.fone
- Title: New 2024 Approved Trimming Made Easy A Step-by-Step Guide to Cropping Videos in Avidemux
- Author: Amelia
- Created at : 2024-04-29 19:40:03
- Updated at : 2024-04-30 19:40:03
- Link: https://ai-driven-video-production.techidaily.com/new-2024-approved-trimming-made-easy-a-step-by-step-guide-to-cropping-videos-in-avidemux/
- License: This work is licensed under CC BY-NC-SA 4.0.
