
:max_bytes(150000):strip_icc():format(webp)/asian-woman-talking-into-microphone-722208887-5b2a989730371300373a0447.jpg)
New Looking for a Change? 13 Top Windows Movie Maker Alternates
Looking for a Change? 13 Top Windows Movie Maker Alternates
Windows Movie Maker has been a cornerstone tool for video editors for quite a while. There are a lot of amateurs who’ve made use of the free program and have done wonders with it. As it is discontinued, many Windows Movie Maker alternatives claim to offer ‘just the right video editing tool for you,’ few can live up to their promises—and most are very expensive.
We have ten other programs that can be used to create videos that include everything from Apple iMovie to other basic alternatives.
So whether you’re a beginner who wants to learn how to make a movie, a pro looking for an excellent alternative to Windows Movie Maker, or someone who wants to make a simple slide presentation or online video, you’re bound to find a video creation program here.
- Wondershare Filmora
- Avidemux Video Editor
- VirtualDub
- Sony Vegas Movie Studio
- WeVideo
- Lightworks
- ShotCut
- OpenShot
- Movavi Video Editor Plus
- VSDC Free Video Editor
- VideoPad Video Editor
- HitFilm
- Magix Movie Studio
- How To Edit a Video With a Windows Movie Maker Alternative
- Hot FAQs on Windows Movie Maker Alternatives
Part 1: Top 3 Picks for Windows Movie Maker Alternatives
The world’s best video editing software is about to change. We look at three of the most popular and valuable alternatives to Windows Movie Maker.
You will need to consider these alternatives to ensure they meet your expectations and needs.
1. Wondershare Filmora - Best Overall

Filmora is the best Windows Movie Maker Alternative designed according to your convenience.
Ratings: 4.4 Stars out 5
Starting from $49.99
2. Magix Movie Studio - Best for Collages
This alternative offers a variety of tools and plugins for anyone who wants to create professional-level videos in under a minute.
Download on Windows
Ratings: 4 stars out of 5
30-day free trials, then starts from $69.99 all the way to $129
3. Avidemux Video Editor - Best Open-Source Editor
An open-source editor that supports a wide range of formats is free! Avidemux has an interface similar to Windows Movie Maker, which makes it a perfect alternative.
Download on Windows
Ratings: 4.0 stars out of 5
Free Trial
Part 2: Ultimate Overview on 13 Best Alternatives to Windows Movie Maker
We live in visual culture, and we constantly see, capture, upload, and share videos on our smartphones, tablets, and laptops. So, it is only natural that more people seek ways to edit their videos. Windows Movie Maker was one of the most popular video editing apps. So it’s time to dig into the best Windows Movie Maker alternatives, which are arguably better and feature-rich.
| Software | OS | Media Resources | AI editing | Easy to Use | Free Trial |
|---|---|---|---|---|---|
| Wondershare Filmora | WindowsMacMobile | Yes | Yes | Yes | Yes |
| Avidemux | WindowsOS XLinuxBSD | Yes | No | Yes | Yes |
| Virtual Dub | Windows | No | No | Yes | Yes |
| Vegas Movie Studio | Windows | Yes | Yes | No | No |
| WeVideo | Online | Yes | No | Yes | Yes |
| Lightworks | LinuxOS X Windows | Yes | Yes | No | No |
| ShotCut | WindowsMacLinuxBSD | Yes | No | No | Yes |
| OpenShot | WindowsMacLinuxChrome OS | Yes | No | Yes | Yes |
| Movavi Plus | WindowsMac | Yes | No | Yes | Yes |
| VSDC | Windows | Yes | No | Yes | Yes |
| VideoPad | WindowsMaciPad/iPhone | Yes | No | Yes | Yes |
| HitFilm | WindowsMac | Yes | Yes | Yes | Yes |
| Magix Movie Studio | Windows | Yes | Yes | No | Yes |
Part 3: 13 Best Windows Movie Maker Alternatives for Windows
As we all know, Windows Movie Maker is the most used and trusted tool for creating videos in Windows. With its unique features and user-friendly interface, people often use this software to develop short and entertaining videos.
However, the fact is that Windows Movie Maker is not the current best video editing software for creating complex video projects. For this reason, we compiled a list of the 12 best alternatives to offer you a better option for Windows Movie Maker.
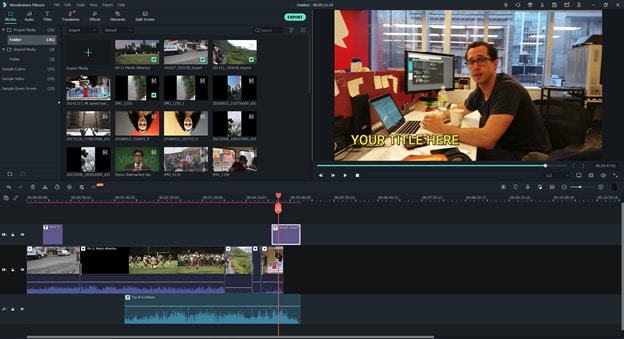
1. Wondershare Filmora
Filmora 11 is a powerful, easy-to-use video editor specially designed to streamline your workflow and save you hours weekly. It supports everything from Windows, Mac, and IOS to Android. The latest update to the flagship app includes several key enhancements that result in a much more efficient video creation workflow and one that’s easier to use than its rivals.
Key features
- Preset Templates
- Instant Mode
- Motion Tracking
- AI Editing Effects
- Auto Synchronization
- Plug-ins
Price
- Annual Plan: $49.99
- Perpetual Plan: $79.99
Pros
- Seamless interface for beginners
- Great customer support
- Plenty of effects and preset templates
- 4K video output options
Cons
- Rendering requires too much time
- The mobile app requires separate subscription
Supported OS: Windows , Mac , iOS , Android , iPad
G2 Ratings: 4.4 stars out of 5
Summary
Filmora’s intuitive interface allows experienced and brand-new users to create incredible videos with flawless special effects. Its high ratings and multiple supported formats make it quite popular among users.
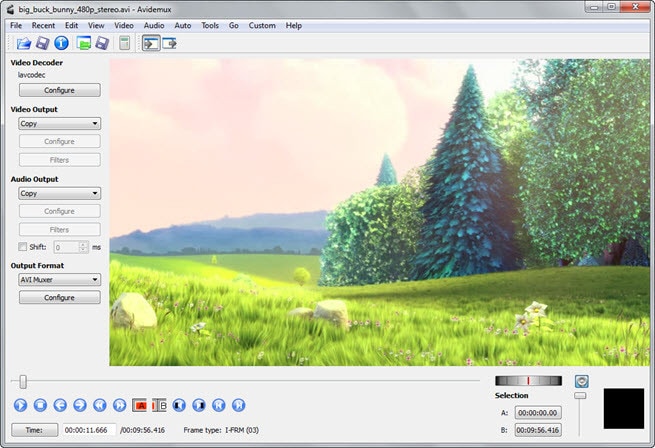
2. Avidemux Video Editor
If you are a beginner and want to use a free, open-source software program for basic video editing, then Avidemux is a good choice. The interface is not as fancy as it could be, but there are some presets that’ll save you a lot of time. Avidemux is a cross-platform video editor that allows you to create custom videos, but it doesn’t feature the ability to share the edited footage to social media directly,
Key features
- Video and Audio Filters
- Support Popular Formats
- Convert Video For Archiving or Publishing
Price: Free
Pros
- It can convert Video To A Smaller Size
- Easy cut, trim, split video
Cons
- Out-dated UI
- Lacks sharing option
Supported OS: Windows , OS X , Linux , BSD
Uptodown Ratings: 4.0 stars out of 5
Summary
An open-source video editor that supports most formats. Due to its obsolete UI and lack of sharing features, Avidemux has average ratings.
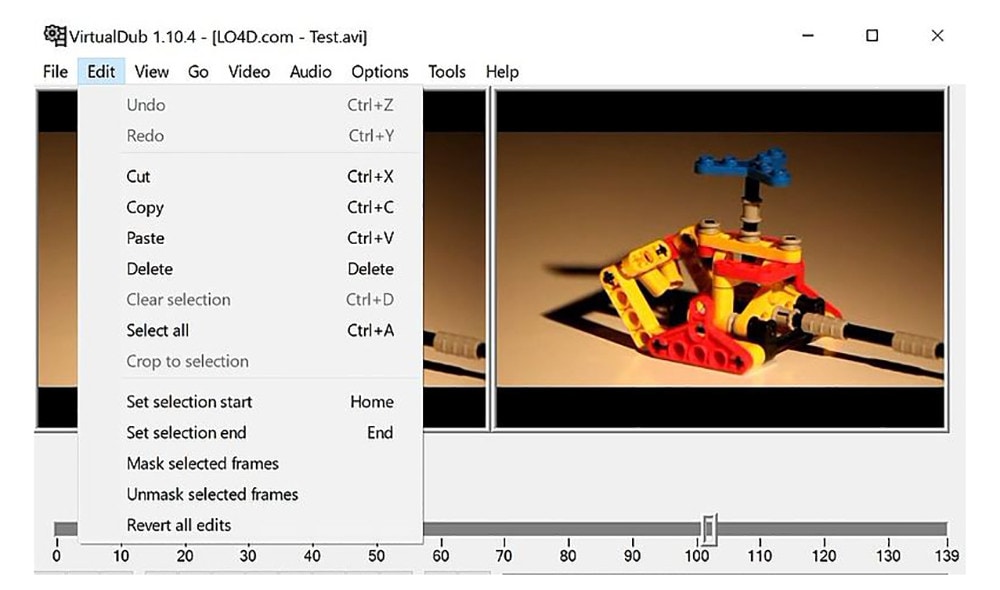
3. VirtualDub
This open-source software is user-friendly and allows users with little experience to navigate the software without much trouble. It supports 3rd party apps and also offers batch-processing, which means working on multiple videos simultaneously makes it possible.
Key features
- Integrated volume and histogram meter
- Optimized disk
- Noise reduction
- Fractional frame rates
Price: Free
Pros
- Clean interface, easy to use
- Keyboard and mouse shortcuts for faster operation
- Free to use
Cons
- Not suitable for 4K editing
- Lack learning material
- Obsolete Interface
Supported OS: Windows
Compare Camp Ratings: 4.0 stars out of 5
Summary
Virtual Dub supports multitasking, and its features are pretty helpful. However, it lacks 4k editing and a friendly interface. Overall Virtual Dub is a good choice.
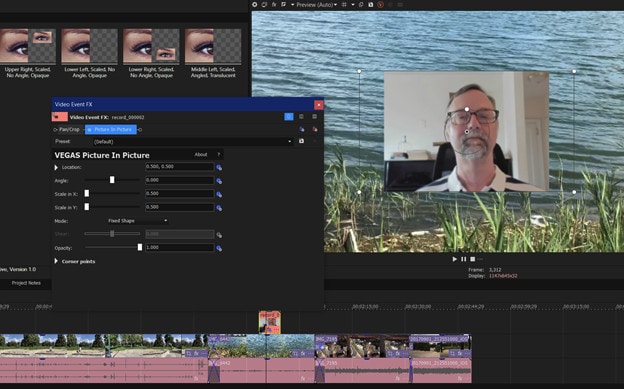
4. Sony Vegas Movie Studio
This video editing software makes it easy to create professional-looking videos in minimum time and effort. Vegas Movie Studio software is best for video editing professionals who have been doing it for some time and are looking for something a little more sophisticated than free alternatives. Not only does it has a high retail price, but its internal elements can be too complex for those just beginning.
Key features
- Color correction
- HDV and AVCHD-editing
- DV batch capture
- Wide variety of file formats and codecs
Price: Starting from $7.99 USD per month
Pros
- Customizable interface
- Multicam editing
- Lots of effects and transitions, with plug-in capability
- Good slow motion and warp flow transition tools
Cons
- Less intuitive interface than competitors
- Import from camcorder not ideal
- Some tools are complex
Supported OS: Windows
G2 Ratings: 4.4 out of 5
Summary
Vegas Movie Studio is the choice of professionals. It does all the work without taking up a lot of resources, and like most programs, there is a learning curve. It’s not always intuitive for beginners, but its professional and powerful features score decent in most reviews.
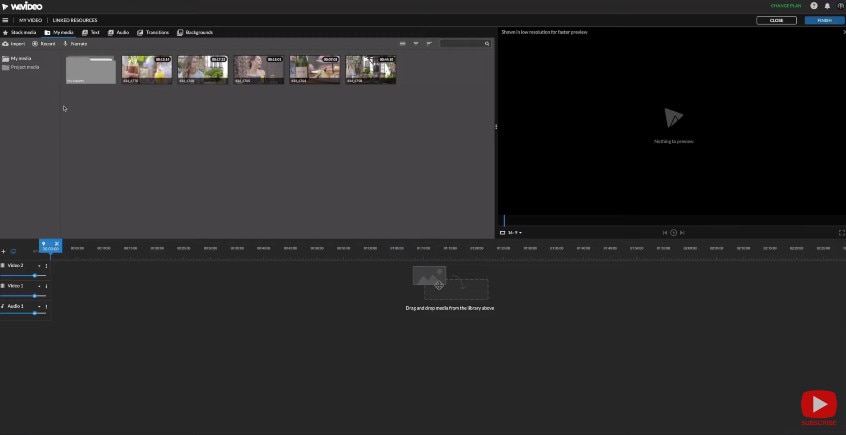
5. WeVideo
This cloud-based application is a simple-to-use video editing and sharing suite. WeVideo is a full-featured video editing application that uses JumpStart technology to create amazing videos. It’s an innovative app that offers a seamless editing experience as it supports multiple formats of video, images, audio, and graphics.
Key features
- WeVideo JumpStart
- Cloud storage
- Built-in graphics
- Customizable environment
- Advanced text editing
- Multi-track editing and storyboard
Price
- Free trial
- Power Plan: $9.99/month
- Unlimited Plan: $15.99/month
- Professional Plan: $39.99/month
- Business Plan: $73.99/month
Pros
- Constantly improving features
- Ease of use
- Storage is cloud-based
Cons
- Old fashion transition
- Leaves a watermark on free trial
Supported OS: Online
Trustpilot Ratings: 4 stars out of 5
Summary
WeVideo is a straightforward yet robust video editor. It offers a variety of features and supports multiple formats, plus its comprehensive pricing plan makes it useful for everyone.
6. Lightworks
Lightworks is the most powerful video editor in its class and an excellent tool for professionals who want to make amazing videos quickly. Lightworks is very fast and straightforward to use, and it has some great features you won’t find in any other video editor. It is available on all popular OS.

Key features
- Audio and Video Effect Plugin Support
- Cloud Connected
- Motion Graphics
- Advanced Metadata
- Proxy Workflows
- Apple ProRes decoding
Price
- Monthly Plan: $9.99/user
- Yearly Plan: $9.99/user
- Perpetual: $154.99
Pros
- High-resolution timeline rendering
- It has social media export templates
- Interfaces for multiple OS are consistent
- Instant autosave
Cons
- Commands are not always intuitive
- A bit pricey as compared to its competitors
Supported OS: Windows , Mac , Linux
Techradar Pro Ratings: 4 stars out of 5
Summary
Lightworks is not any other video editing tool available on the market of video editing tools. This video editing tool provides amateurs with the most sophisticated features in an optimized platform. Its scores are the highest on almost every review site.
7. ShotCut
Shotcut is a multiplatform video editor that lets you work with various formats for audio, video, image files, etc. This video editor makes it easy to mix and match the resolution and frame rates in a video file. All the changes you make in the editor can be undone and redone often. Shotcut is the best choice for video editing, without question.

Key features
- Webcam capture
- Audio scopes and filters
- Deinterlacing
- Eyedropper tool
- Video wipe transitions
- Keyframes for filter parameters
Price: Free
Pros
- Support for 4K resolutions
- Free
Cons
- Less intuitive than commercial apps
- Lacks built-in sharing to popular sites
Supported OS: Windows , Mac , Linux
GetApp Ratings: 4.5 out of 5 stars
Summary
Shotcut is an open-source video editor for creative professionals and is available on mac, Windows, and Linux. The free version of Shotcut has many excellent features, but it doesn’t have the slick interface or advanced techniques of the top paid editors.
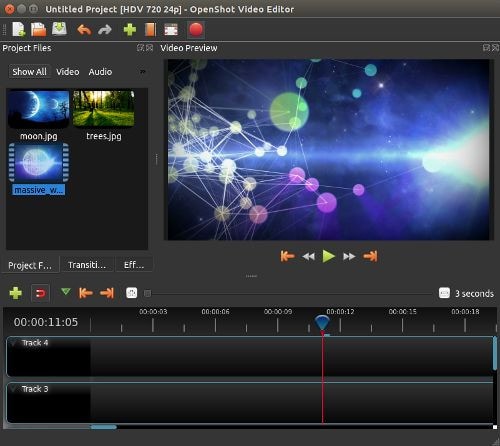
8. OpenShot
An award-winning open-source video editor that creates stunning videos. OpenShot is a fast, easy-to-use, and surprisingly powerful video editor. OpenShot Video Editor allows you to work with many different types of tracks so that your edits will seem natural. OpenShot Video Editor allows you to add your custom animations or titles. The options are endless, so it all depends on your time and interest. It is available in more than 70 languages, making it ideal for all types of users.
Key features
- 3D animations
- Animation and keyframes
- Multiple languages and formats
- Cross-platform
- Video-effects
Price: Free
Pros
- It is a non-linear editor with infinite tracks
- 100% free without watermark
- Frequent updates
Cons
- Obsolete interface
- Unstable performance
- Lacks some editing features
Supported OS: Window , Mac , Linux , Chrome OS
Getapp Ratings: 4.2 stars out of 5
Summary
Another open-source video-editor in the list is named OpenShot. It’s a multi-lingual and multi-supported app with unique features. Despite its unstable performance, OpenShot is still an ideal choice for many users.
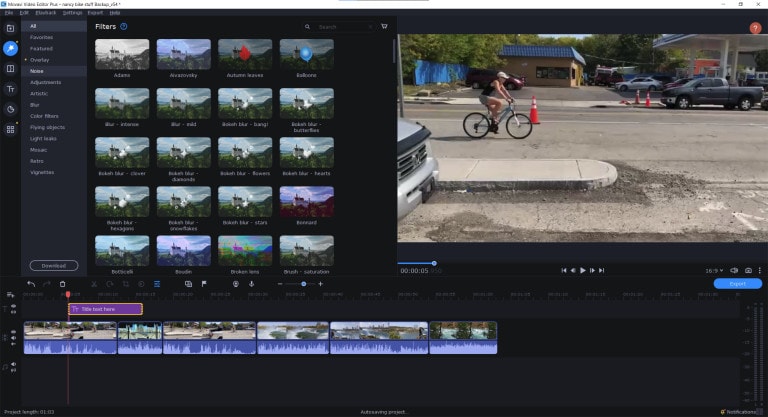
9. Movavi Video Editor Plus
Movavi Video Editor Plus is the perfect tool to bring your creative ideas to life. It has special effects, ready-made intros, and keyframe animation. Using chroma keying, you can change the background of your video clips to any color or pattern that suits your need. Movavi has now redesigned its user interface to make it easy to use.
Key features
- Effects and transitions
- Built-in media pack
- Fast processing of 4K videos
- Keyframe animation
- Automatic video creation
- Cutting, trimming, joining
Price
- Free version: 7 days
- Video Editor Plus 1 year /1 PC: $49.95
- Video Editor Plus Lifetime /1 PC: $69.95
- Video Suite Lifetime /1 PC: $89.95
Pros
- Easy-to-understand user interface
- Transitions with sound
- Motion tracking and picture-in-picture tools
- Chroma-key capability
- Quick movie-creation tool
Cons
- Lacks advanced trim modes
- Slow rendering
PCMag Ratings: 4.0 stars out of 5
Summary
If you want to edit your videos with a minimal learning curve, try Movavi. You get PiP, chroma-keying, titling, basic keying, and motion tracking. The program is simple to use but doesn’t have all the features and stands four stars.
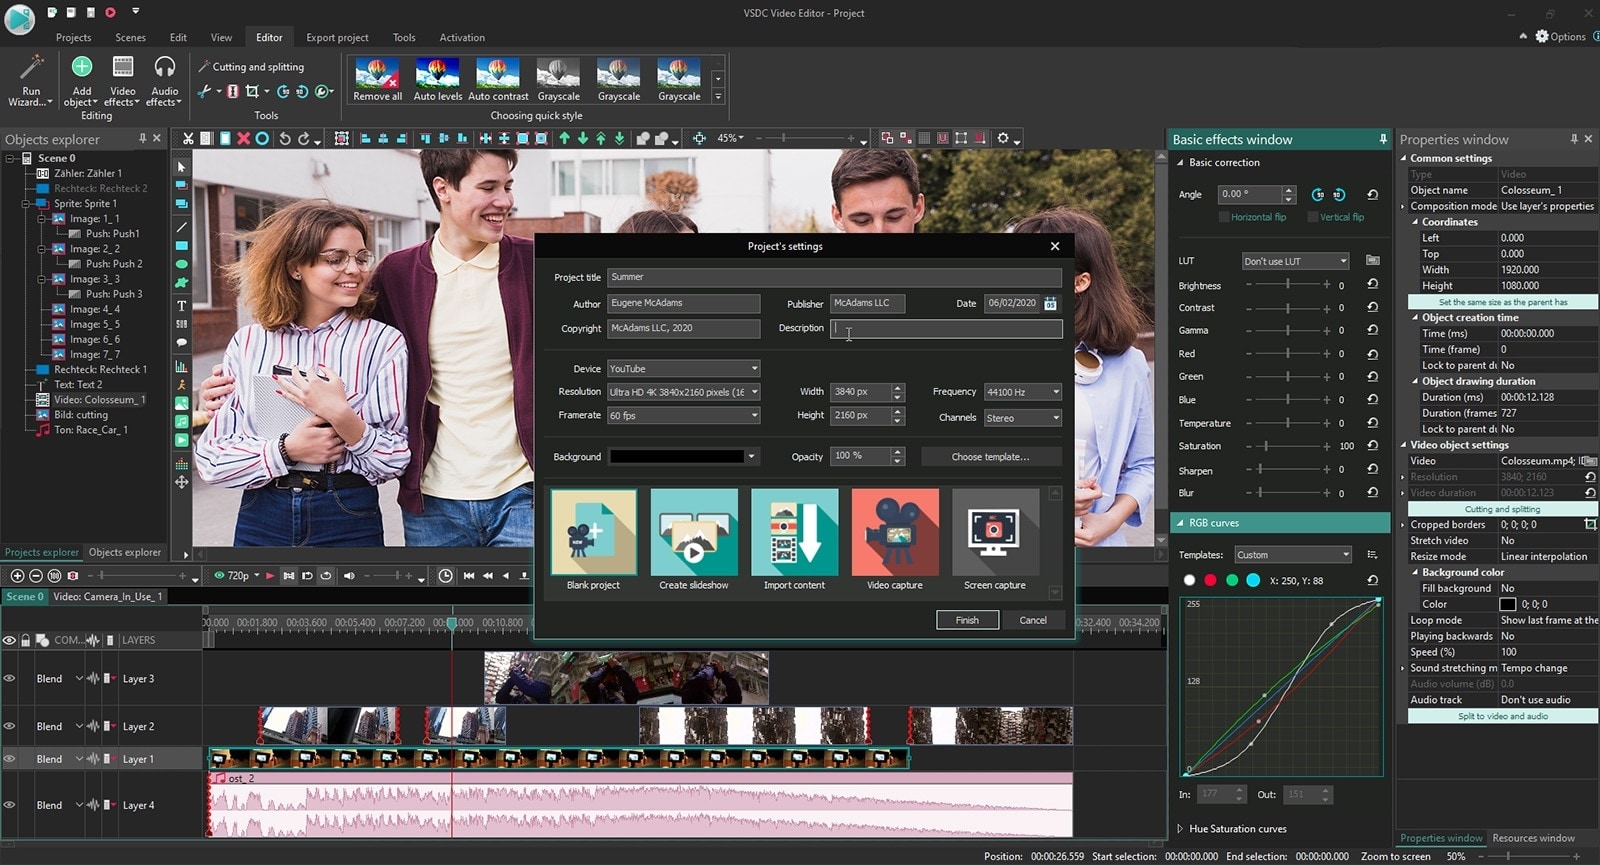
10. VSDC Free Video Editor
VSDC Free Video Editor is an online tool that lets you edit audio and video files to make your creations like movies, YouTube tutorial videos, and more. The audio and video files supported are extensive, and the software includes a codec manager. The Pro version isn’t necessary if you’re using the free edition of the software; it’s more than enough to get the job done.
Key features
- Dark theme
- Subpixel Accuracy
- Powerful Chroma Key tool
- Trendy video effects, filters, and transitions
- Color Blending And Filters
- Built-In DVD Burning Tool
Price: Free
Pros
- Non-linear
- Video effects library
- Video stabilization
- Masking
Cons
- Outdated interface
- Lack keyboard shortcuts
- Only available on Windows
Supported OS: Windows
Capterra Ratings: 4.5 stars out 5
Summary
VSDC is a non-linear editor with extensive format support. It includes all the essential features an editor requires but with an obsolete UI. It is also ideal for many who need a powerful yet free video editor.
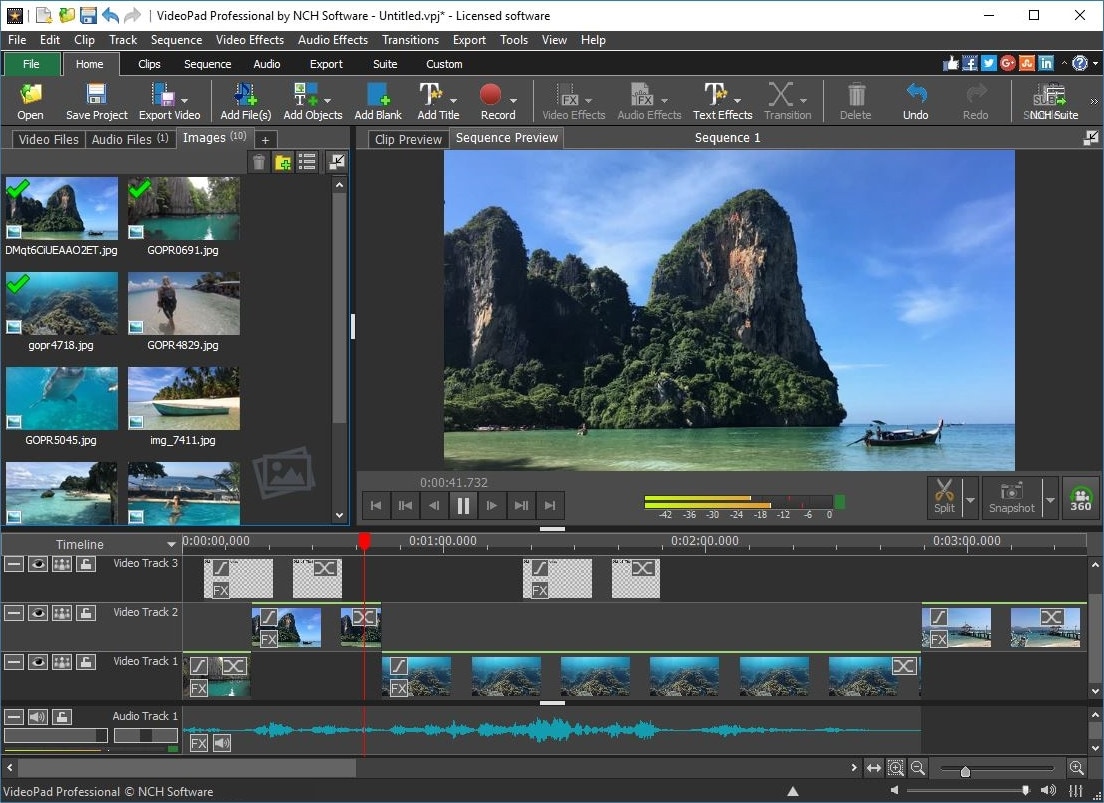
11. VideoPad Video Editor
VideoPad is a free video editor that can create stunning videos and perform basic editing tasks. A good video editor can help you to create videos for different social media platforms. You can make your videos look professional and polished with a few clicks and some simple editing skills. There’s nothing particularly exciting or advanced about this app; it’s simple enough for anyone new to video editing or even for seasoned editors. But the simple and easy-to-use interface makes the entire process very exciting.
Key features
- Text snippets
- Range of transitional effects
- Plug-ins Library
- Burn finished videos to Blu-Ray, DVD, etc.
- Color correction and light balance.
Price: Free
Pros
- Simple and clean interface
- Supports multiple file formats
- Includes video effects
- Lightweight on system resources
Cons
- Lack of advanced features
Supported OS: Windows , Mac , iPad/iPhone
Tom’s guide Ratings: 3.5 stars out of 5
Summary
Video pad is a free video editor designed for beginners that is lightweight and simple. VideoPad is also great for creating quick videos for social media purposes like Youtube and Facebook. The software has a high rating, as shown above, and it’s available on Windows.
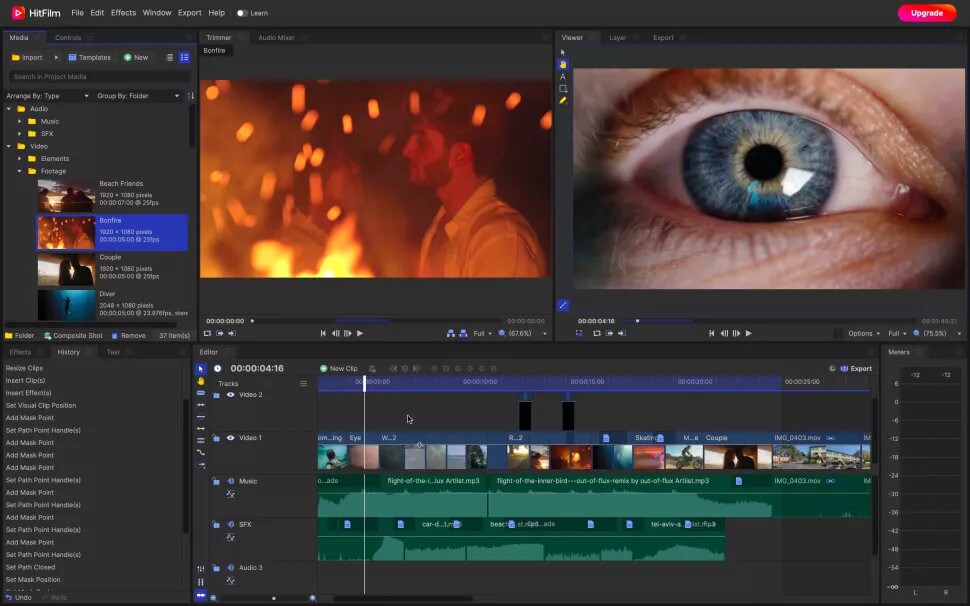
12. HitFilm
HitFilm is a helpful video editing software that makes editing easier for users. In addition to basic features, the program also provides advanced-level functions that make edited videos pop. Hitfilm Express Download has more than 400 features to help casual video editors save time. Features like: visual effects, cinematic elements, and compositing tools preset help unleash your creativity.
Key features
- Color Grading and correction
- Smart search
- Commentator recorder
- Lightning and lens flares
- 3D camera tracker
Price
- Free trial
- Creator: $7.50
- Pro: $12.50
- Enterprise: Custom pricing
Pros
- Intuitive interface
- It offers free tutorials and masterclasses
- Works on both Windows and Mac
Cons
- It requires heavy system requirements
TechRadar Ratings: 4.5 stars out of 5
Summary
HitFilm Express 15 is a powerful free video editing program that enables you to create high-quality videos in minutes with an intuitive interface. It offers advanced editing features such as advanced video trimming, 3D editing, and more.
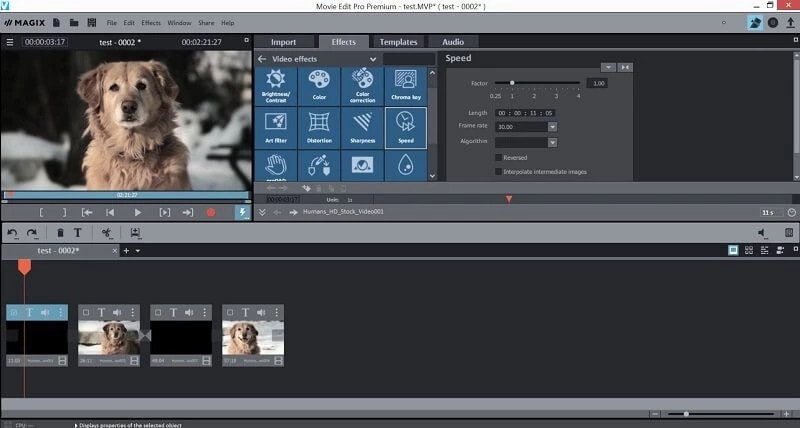
13. Magix Movie Studio
Magix is the world’s leading professional audiovisual media software, with Sequoia being its industry-standard audio editing software. This movie editor is an enthusiast-level video editing software that competes with software from Adobe and CyberLink, and it even boasts support for 4K content and 360 degrees. There are many reasons to upgrade. This year’s update includes stabilization, 8K editing, motion tracking, and an in-app plug-in store.
Key features
- NewBlue effects
- Fly-in animation
- New filter view
- Stabilization
- Motion tracking
- 8k support
Price
- Movie Studio 2024: $69.99 (30-day free trial)
- Movie Studio 2024 Platinum: $99.99 (30-day free trial)
- Movie Studio 2024 Suite: $129.00 (30-day free trial)
Pros
- Lots of video effects
- Responsive editing interface
- Multicam
- Trailer-like movie templates
- Solid audio editing
Cons
- Slower project rendering than others
- Lacks import and organization tools
Supported OS: Windows
PCMag Ratings: 3 stars out of 5
Summary
Magix movie studio is a powerful all-around video editing tool with many features that professional users have come to expect. It’s also relatively simple to use. But usability and performance are poor compared to other software programs like Filmora .
Part 4: How To Edit a Video With a Windows Movie Maker Alternative
Windows Movie Maker was great for editing a video, but it’s no match for some of the best video editing software. We’re talking about software capable of creating a cinematic experience in seconds, all on your computer.
When you need to edit a video with simple, quick edits, like adding a special effect or changing the background, try Filmora . Filmora is an easy-to-use application that allows you to create a movie using simple tools that don’t require additional training. You can’t beat this option if you want to create a professional-quality video for your blog or website.
Let’s dive into a quick tutorial on editing videos in Filmora:
Free Download For Win 7 or later(64-bit)
Free Download For macOS 10.14 or later
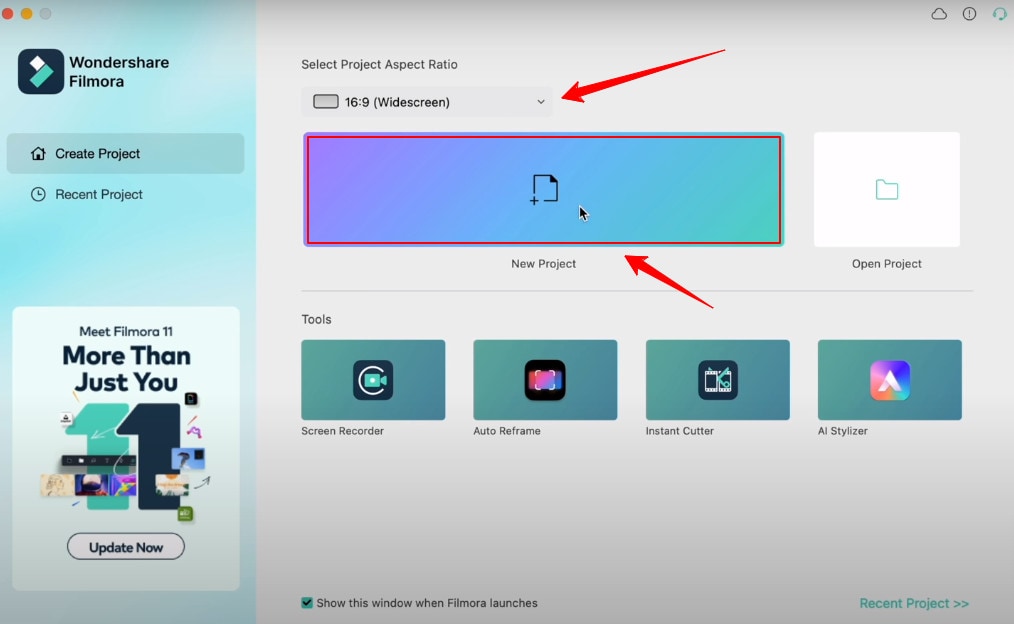
Step1 Open Wondershare Filmora on your PC or Mac
You can start a new project by clicking on ‘New Project’. And you can also change the ‘Aspect Ratio’ according to your project demand.
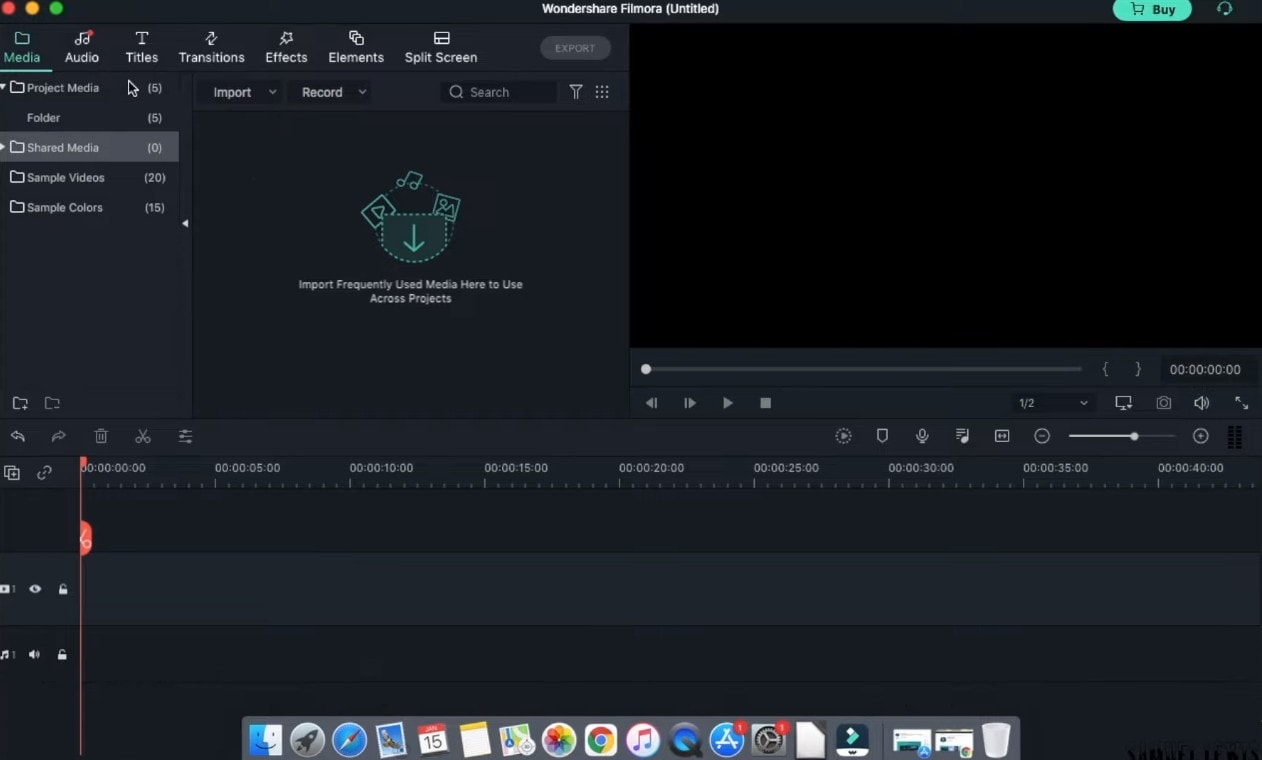
Step2 Import Videos
You can import your file by clicking the import tab on the upper-left side or clicking the import icon on the main window.
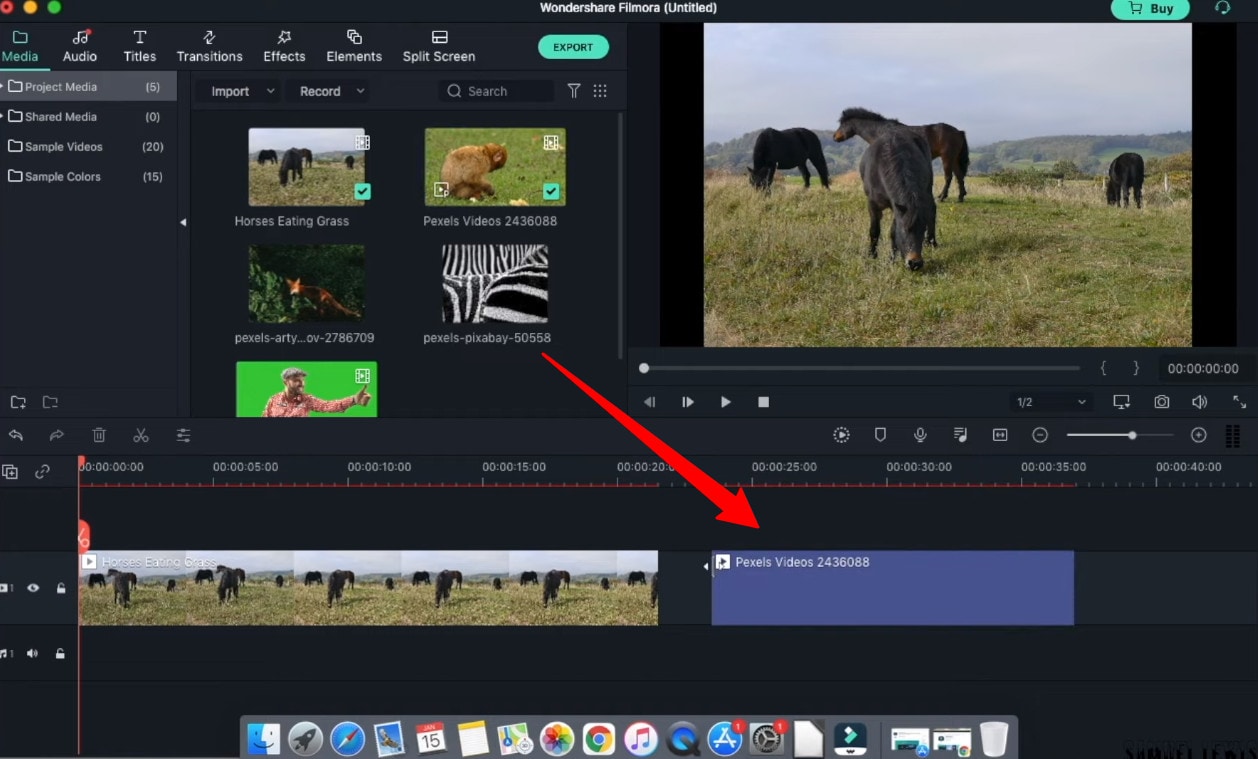
Step3 Drag and drop your footage to the timeline
After importing all the files, click and hold each individual video and drag and drop it to the timeline area according to your ideal sequence.
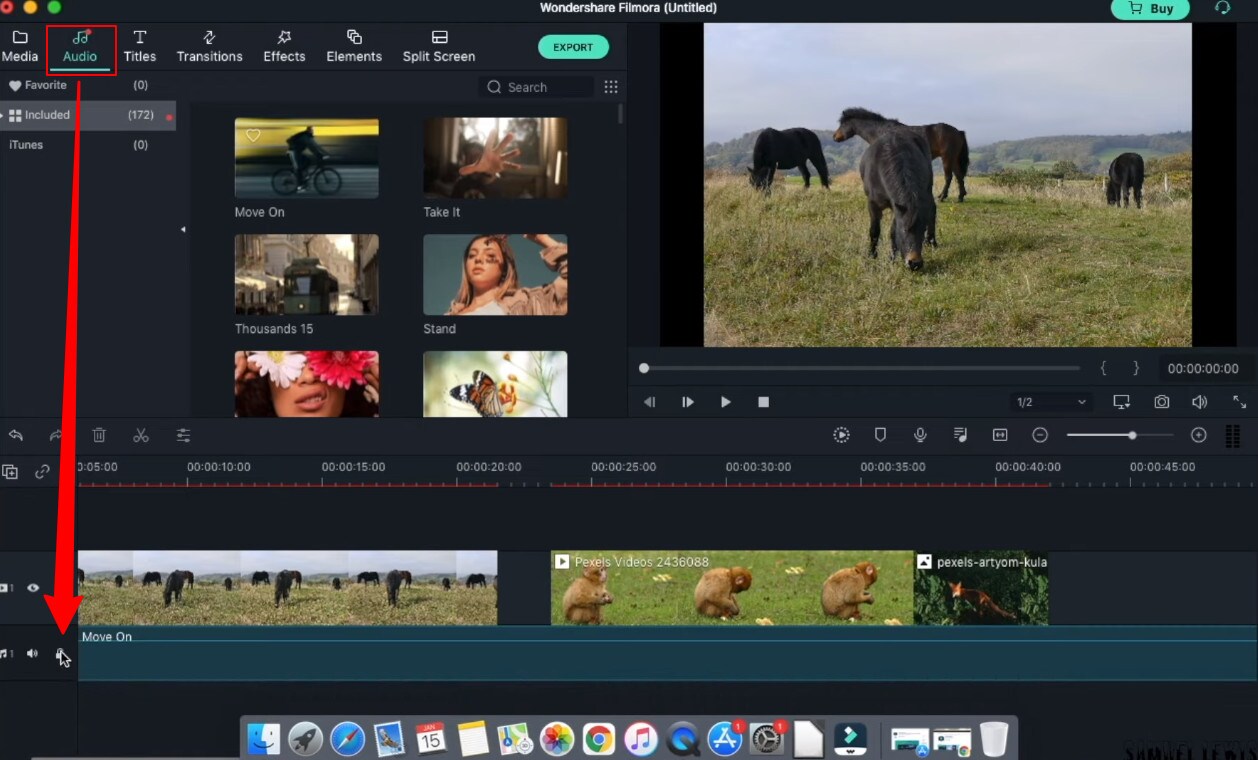
Step4 Add Audio
Go to the ‘Audio’ tab and select the audio file from the audio library. Once selected, drag and drop the audio file into the music timeline.
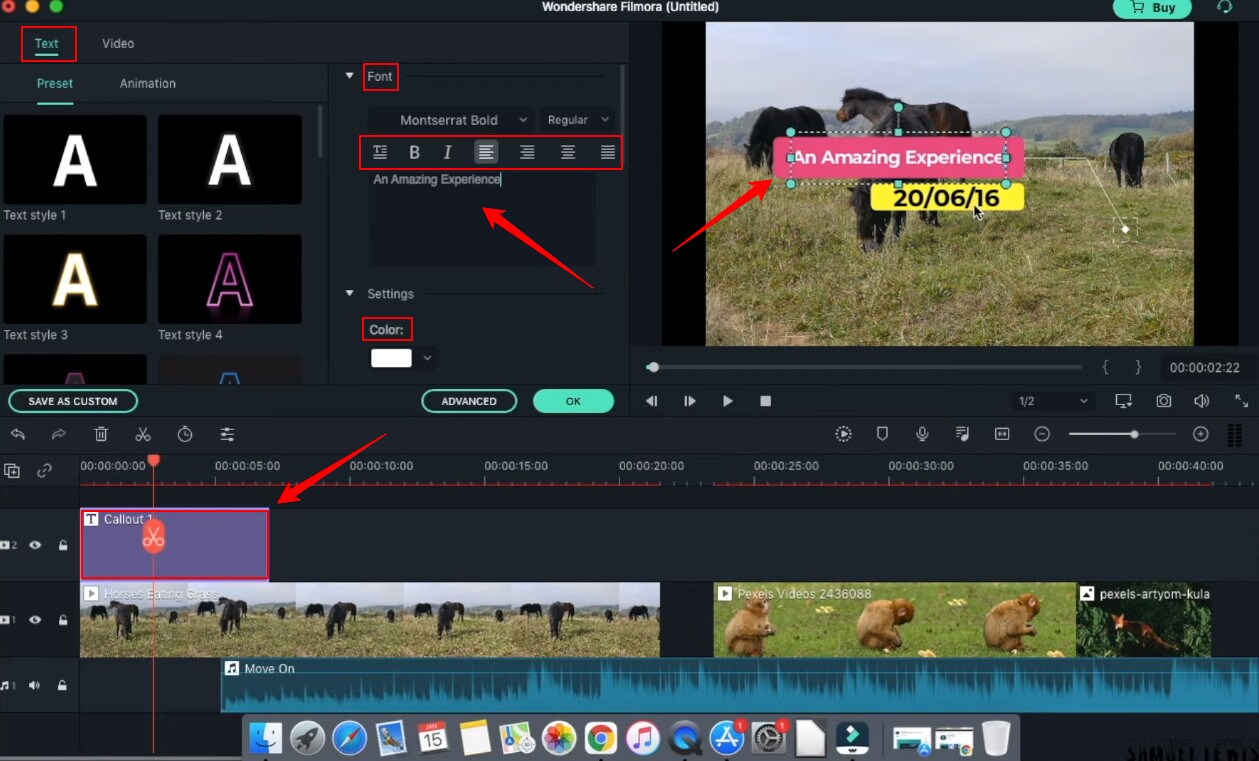
Step5 Add Titles
In your video intro, you can insert some title text. Go to the ‘Titles’ tab and select the one you like, and drag and drop it on top of the timeline. Double-click and edit the text and state your ideal statements. You can customize your text fonts and color too.
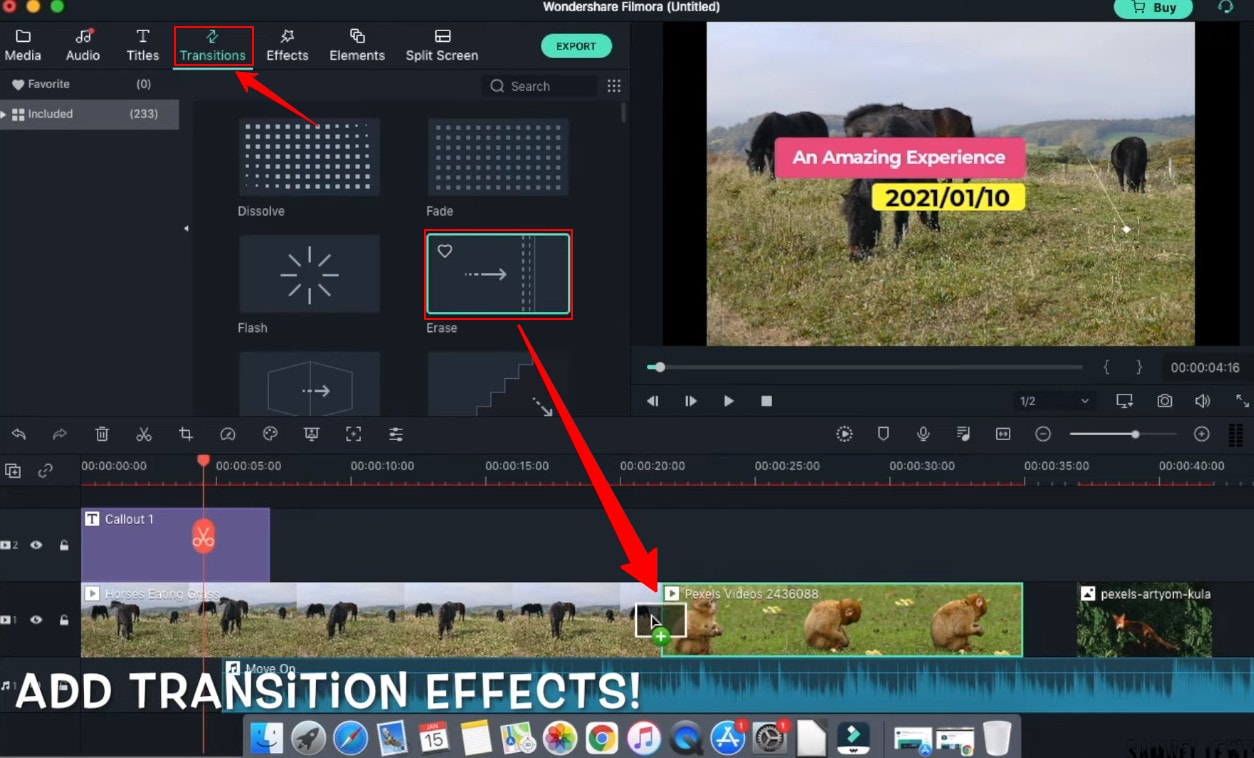
Step6 Add Transitions
You can add transition effects to ensure a smooth transition from one scene to another. The overall will get more professional look.
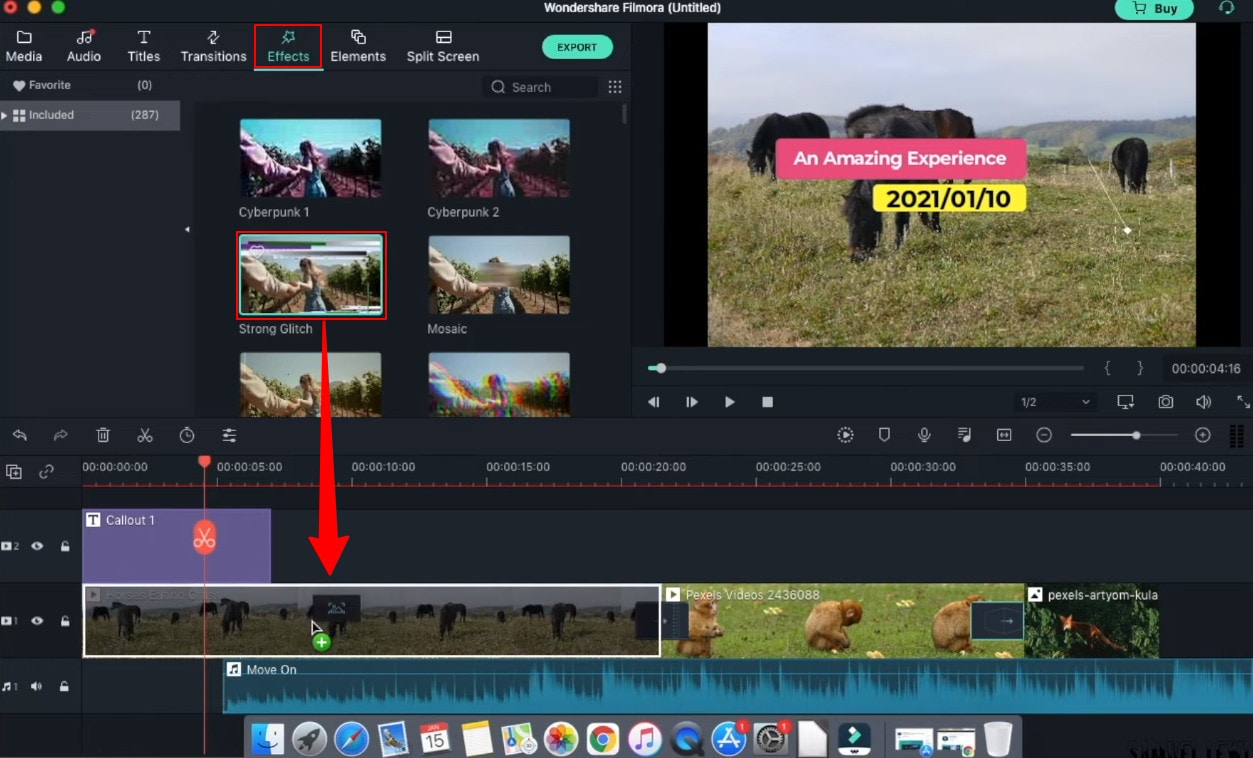
Step7 Add Effects
Next; you can get special effects to your video to make them more attractive and engaging to watch. Simple drag down the effect to your video and watch the effect take place in your selective scene.
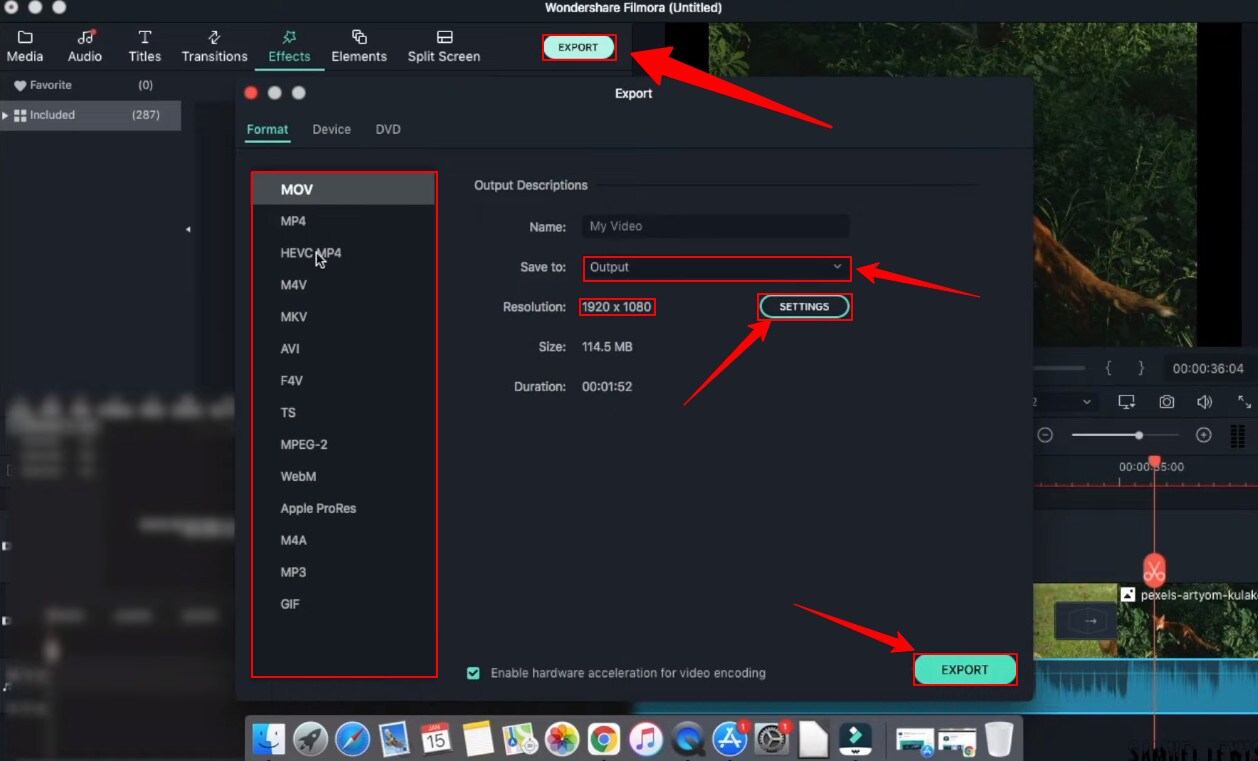
Step8 Export your work
Once all the changes have been made, hit ‘export’ from the top tab. A window will appear where you can change the settings, resolution, frame rate, bit rate, etc. Next, click the ‘export’ button down on that window, and then you can save the file in your drive.
Part 5: Hot FAQs on Windows Movie Maker Alternatives
1. Why is Windows Movie Maker discontinued?
Microsoft’s video editing program, Windows Movie Maker, did not become a big hit with the public because it failed to do well on the market. Microsoft couldn’t get the support they were looking for from the program’s users. As a result, Microsoft had to cease its support of the program.
2. Is there a free version of Windows Movie Maker?
Microsoft Windows Movie maker was always accessible and pre-installed every windows product. Microsoft has discontinued support for Movie Maker and warns about free downloads of Movie Maker provided by third parties that might contain malware, viruses, or other issues.
3. What are the best free Windows Movie Maker Alternatives for Mac?
After switching to a Mac, you’ll find that the Windows Movie Maker alternatives offer much more than just a simple video editor. They provide advanced features, easy transitions, and less technical know-how to create pro-quality results. You should try using these platforms on your Mac if you have a video to edit.
- Wondershare Filmora
- Movavi
- OpenShot
Final Words
Windows Movie Maker is an excellent Windows video editor application for Windows users. But in recent years, it has become outdated due to the continuous development of new technologies. There are many alternatives for Windows Movie Maker, and here we listed some of the best ones. Most of them are free and featured packs. Each program has its unique set of features and capabilities, and each one excels in different areas. Check them out and see what you think.
Free Download For Win 7 or later(64-bit)
Free Download For macOS 10.14 or later
Part 1: Top 3 Picks for Windows Movie Maker Alternatives
The world’s best video editing software is about to change. We look at three of the most popular and valuable alternatives to Windows Movie Maker.
You will need to consider these alternatives to ensure they meet your expectations and needs.
1. Wondershare Filmora - Best Overall
Filmora is the best Windows Movie Maker Alternative designed according to your convenience.
Ratings: 4.4 Stars out 5
Starting from $49.99
2. Magix Movie Studio - Best for Collages
This alternative offers a variety of tools and plugins for anyone who wants to create professional-level videos in under a minute.
Download on Windows
Ratings: 4 stars out of 5
30-day free trials, then starts from $69.99 all the way to $129
3. Avidemux Video Editor - Best Open-Source Editor
An open-source editor that supports a wide range of formats is free! Avidemux has an interface similar to Windows Movie Maker, which makes it a perfect alternative.
Download on Windows
Ratings: 4.0 stars out of 5
Free Trial
Part 2: Ultimate Overview on 13 Best Alternatives to Windows Movie Maker
We live in visual culture, and we constantly see, capture, upload, and share videos on our smartphones, tablets, and laptops. So, it is only natural that more people seek ways to edit their videos. Windows Movie Maker was one of the most popular video editing apps. So it’s time to dig into the best Windows Movie Maker alternatives, which are arguably better and feature-rich.
| Software | OS | Media Resources | AI editing | Easy to Use | Free Trial |
|---|---|---|---|---|---|
| Wondershare Filmora | WindowsMacMobile | Yes | Yes | Yes | Yes |
| Avidemux | WindowsOS XLinuxBSD | Yes | No | Yes | Yes |
| Virtual Dub | Windows | No | No | Yes | Yes |
| Vegas Movie Studio | Windows | Yes | Yes | No | No |
| WeVideo | Online | Yes | No | Yes | Yes |
| Lightworks | LinuxOS X Windows | Yes | Yes | No | No |
| ShotCut | WindowsMacLinuxBSD | Yes | No | No | Yes |
| OpenShot | WindowsMacLinuxChrome OS | Yes | No | Yes | Yes |
| Movavi Plus | WindowsMac | Yes | No | Yes | Yes |
| VSDC | Windows | Yes | No | Yes | Yes |
| VideoPad | WindowsMaciPad/iPhone | Yes | No | Yes | Yes |
| HitFilm | WindowsMac | Yes | Yes | Yes | Yes |
| Magix Movie Studio | Windows | Yes | Yes | No | Yes |
Part 3: 13 Best Windows Movie Maker Alternatives for Windows
As we all know, Windows Movie Maker is the most used and trusted tool for creating videos in Windows. With its unique features and user-friendly interface, people often use this software to develop short and entertaining videos.
However, the fact is that Windows Movie Maker is not the current best video editing software for creating complex video projects. For this reason, we compiled a list of the 12 best alternatives to offer you a better option for Windows Movie Maker.
1. Wondershare Filmora
Filmora 11 is a powerful, easy-to-use video editor specially designed to streamline your workflow and save you hours weekly. It supports everything from Windows, Mac, and IOS to Android. The latest update to the flagship app includes several key enhancements that result in a much more efficient video creation workflow and one that’s easier to use than its rivals.
Key features
- Preset Templates
- Instant Mode
- Motion Tracking
- AI Editing Effects
- Auto Synchronization
- Plug-ins
Price
- Annual Plan: $49.99
- Perpetual Plan: $79.99
Pros
- Seamless interface for beginners
- Great customer support
- Plenty of effects and preset templates
- 4K video output options
Cons
- Rendering requires too much time
- The mobile app requires separate subscription
Supported OS: Windows , Mac , iOS , Android , iPad
G2 Ratings: 4.4 stars out of 5
Summary
Filmora’s intuitive interface allows experienced and brand-new users to create incredible videos with flawless special effects. Its high ratings and multiple supported formats make it quite popular among users.
2. Avidemux Video Editor
If you are a beginner and want to use a free, open-source software program for basic video editing, then Avidemux is a good choice. The interface is not as fancy as it could be, but there are some presets that’ll save you a lot of time. Avidemux is a cross-platform video editor that allows you to create custom videos, but it doesn’t feature the ability to share the edited footage to social media directly,
Key features
- Video and Audio Filters
- Support Popular Formats
- Convert Video For Archiving or Publishing
Price: Free
Pros
- It can convert Video To A Smaller Size
- Easy cut, trim, split video
Cons
- Out-dated UI
- Lacks sharing option
Supported OS: Windows , OS X , Linux , BSD
Uptodown Ratings: 4.0 stars out of 5
Summary
An open-source video editor that supports most formats. Due to its obsolete UI and lack of sharing features, Avidemux has average ratings.
3. VirtualDub
This open-source software is user-friendly and allows users with little experience to navigate the software without much trouble. It supports 3rd party apps and also offers batch-processing, which means working on multiple videos simultaneously makes it possible.
Key features
- Integrated volume and histogram meter
- Optimized disk
- Noise reduction
- Fractional frame rates
Price: Free
Pros
- Clean interface, easy to use
- Keyboard and mouse shortcuts for faster operation
- Free to use
Cons
- Not suitable for 4K editing
- Lack learning material
- Obsolete Interface
Supported OS: Windows
Compare Camp Ratings: 4.0 stars out of 5
Summary
Virtual Dub supports multitasking, and its features are pretty helpful. However, it lacks 4k editing and a friendly interface. Overall Virtual Dub is a good choice.
4. Sony Vegas Movie Studio
This video editing software makes it easy to create professional-looking videos in minimum time and effort. Vegas Movie Studio software is best for video editing professionals who have been doing it for some time and are looking for something a little more sophisticated than free alternatives. Not only does it has a high retail price, but its internal elements can be too complex for those just beginning.
Key features
- Color correction
- HDV and AVCHD-editing
- DV batch capture
- Wide variety of file formats and codecs
Price: Starting from $7.99 USD per month
Pros
- Customizable interface
- Multicam editing
- Lots of effects and transitions, with plug-in capability
- Good slow motion and warp flow transition tools
Cons
- Less intuitive interface than competitors
- Import from camcorder not ideal
- Some tools are complex
Supported OS: Windows
G2 Ratings: 4.4 out of 5
Summary
Vegas Movie Studio is the choice of professionals. It does all the work without taking up a lot of resources, and like most programs, there is a learning curve. It’s not always intuitive for beginners, but its professional and powerful features score decent in most reviews.
5. WeVideo
This cloud-based application is a simple-to-use video editing and sharing suite. WeVideo is a full-featured video editing application that uses JumpStart technology to create amazing videos. It’s an innovative app that offers a seamless editing experience as it supports multiple formats of video, images, audio, and graphics.
Key features
- WeVideo JumpStart
- Cloud storage
- Built-in graphics
- Customizable environment
- Advanced text editing
- Multi-track editing and storyboard
Price
- Free trial
- Power Plan: $9.99/month
- Unlimited Plan: $15.99/month
- Professional Plan: $39.99/month
- Business Plan: $73.99/month
Pros
- Constantly improving features
- Ease of use
- Storage is cloud-based
Cons
- Old fashion transition
- Leaves a watermark on free trial
Supported OS: Online
Trustpilot Ratings: 4 stars out of 5
Summary
WeVideo is a straightforward yet robust video editor. It offers a variety of features and supports multiple formats, plus its comprehensive pricing plan makes it useful for everyone.
6. Lightworks
Lightworks is the most powerful video editor in its class and an excellent tool for professionals who want to make amazing videos quickly. Lightworks is very fast and straightforward to use, and it has some great features you won’t find in any other video editor. It is available on all popular OS.
Key features
- Audio and Video Effect Plugin Support
- Cloud Connected
- Motion Graphics
- Advanced Metadata
- Proxy Workflows
- Apple ProRes decoding
Price
- Monthly Plan: $9.99/user
- Yearly Plan: $9.99/user
- Perpetual: $154.99
Pros
- High-resolution timeline rendering
- It has social media export templates
- Interfaces for multiple OS are consistent
- Instant autosave
Cons
- Commands are not always intuitive
- A bit pricey as compared to its competitors
Supported OS: Windows , Mac , Linux
Techradar Pro Ratings: 4 stars out of 5
Summary
Lightworks is not any other video editing tool available on the market of video editing tools. This video editing tool provides amateurs with the most sophisticated features in an optimized platform. Its scores are the highest on almost every review site.
7. ShotCut
Shotcut is a multiplatform video editor that lets you work with various formats for audio, video, image files, etc. This video editor makes it easy to mix and match the resolution and frame rates in a video file. All the changes you make in the editor can be undone and redone often. Shotcut is the best choice for video editing, without question.
Key features
- Webcam capture
- Audio scopes and filters
- Deinterlacing
- Eyedropper tool
- Video wipe transitions
- Keyframes for filter parameters
Price: Free
Pros
- Support for 4K resolutions
- Free
Cons
- Less intuitive than commercial apps
- Lacks built-in sharing to popular sites
Supported OS: Windows , Mac , Linux
GetApp Ratings: 4.5 out of 5 stars
Summary
Shotcut is an open-source video editor for creative professionals and is available on mac, Windows, and Linux. The free version of Shotcut has many excellent features, but it doesn’t have the slick interface or advanced techniques of the top paid editors.
8. OpenShot
An award-winning open-source video editor that creates stunning videos. OpenShot is a fast, easy-to-use, and surprisingly powerful video editor. OpenShot Video Editor allows you to work with many different types of tracks so that your edits will seem natural. OpenShot Video Editor allows you to add your custom animations or titles. The options are endless, so it all depends on your time and interest. It is available in more than 70 languages, making it ideal for all types of users.
Key features
- 3D animations
- Animation and keyframes
- Multiple languages and formats
- Cross-platform
- Video-effects
Price: Free
Pros
- It is a non-linear editor with infinite tracks
- 100% free without watermark
- Frequent updates
Cons
- Obsolete interface
- Unstable performance
- Lacks some editing features
Supported OS: Window , Mac , Linux , Chrome OS
Getapp Ratings: 4.2 stars out of 5
Summary
Another open-source video-editor in the list is named OpenShot. It’s a multi-lingual and multi-supported app with unique features. Despite its unstable performance, OpenShot is still an ideal choice for many users.
9. Movavi Video Editor Plus
Movavi Video Editor Plus is the perfect tool to bring your creative ideas to life. It has special effects, ready-made intros, and keyframe animation. Using chroma keying, you can change the background of your video clips to any color or pattern that suits your need. Movavi has now redesigned its user interface to make it easy to use.
Key features
- Effects and transitions
- Built-in media pack
- Fast processing of 4K videos
- Keyframe animation
- Automatic video creation
- Cutting, trimming, joining
Price
- Free version: 7 days
- Video Editor Plus 1 year /1 PC: $49.95
- Video Editor Plus Lifetime /1 PC: $69.95
- Video Suite Lifetime /1 PC: $89.95
Pros
- Easy-to-understand user interface
- Transitions with sound
- Motion tracking and picture-in-picture tools
- Chroma-key capability
- Quick movie-creation tool
Cons
- Lacks advanced trim modes
- Slow rendering
PCMag Ratings: 4.0 stars out of 5
Summary
If you want to edit your videos with a minimal learning curve, try Movavi. You get PiP, chroma-keying, titling, basic keying, and motion tracking. The program is simple to use but doesn’t have all the features and stands four stars.
10. VSDC Free Video Editor
VSDC Free Video Editor is an online tool that lets you edit audio and video files to make your creations like movies, YouTube tutorial videos, and more. The audio and video files supported are extensive, and the software includes a codec manager. The Pro version isn’t necessary if you’re using the free edition of the software; it’s more than enough to get the job done.
Key features
- Dark theme
- Subpixel Accuracy
- Powerful Chroma Key tool
- Trendy video effects, filters, and transitions
- Color Blending And Filters
- Built-In DVD Burning Tool
Price: Free
Pros
- Non-linear
- Video effects library
- Video stabilization
- Masking
Cons
- Outdated interface
- Lack keyboard shortcuts
- Only available on Windows
Supported OS: Windows
Capterra Ratings: 4.5 stars out 5
Summary
VSDC is a non-linear editor with extensive format support. It includes all the essential features an editor requires but with an obsolete UI. It is also ideal for many who need a powerful yet free video editor.
11. VideoPad Video Editor
VideoPad is a free video editor that can create stunning videos and perform basic editing tasks. A good video editor can help you to create videos for different social media platforms. You can make your videos look professional and polished with a few clicks and some simple editing skills. There’s nothing particularly exciting or advanced about this app; it’s simple enough for anyone new to video editing or even for seasoned editors. But the simple and easy-to-use interface makes the entire process very exciting.
Key features
- Text snippets
- Range of transitional effects
- Plug-ins Library
- Burn finished videos to Blu-Ray, DVD, etc.
- Color correction and light balance.
Price: Free
Pros
- Simple and clean interface
- Supports multiple file formats
- Includes video effects
- Lightweight on system resources
Cons
- Lack of advanced features
Supported OS: Windows , Mac , iPad/iPhone
Tom’s guide Ratings: 3.5 stars out of 5
Summary
Video pad is a free video editor designed for beginners that is lightweight and simple. VideoPad is also great for creating quick videos for social media purposes like Youtube and Facebook. The software has a high rating, as shown above, and it’s available on Windows.
12. HitFilm
HitFilm is a helpful video editing software that makes editing easier for users. In addition to basic features, the program also provides advanced-level functions that make edited videos pop. Hitfilm Express Download has more than 400 features to help casual video editors save time. Features like: visual effects, cinematic elements, and compositing tools preset help unleash your creativity.
Key features
- Color Grading and correction
- Smart search
- Commentator recorder
- Lightning and lens flares
- 3D camera tracker
Price
- Free trial
- Creator: $7.50
- Pro: $12.50
- Enterprise: Custom pricing
Pros
- Intuitive interface
- It offers free tutorials and masterclasses
- Works on both Windows and Mac
Cons
- It requires heavy system requirements
TechRadar Ratings: 4.5 stars out of 5
Summary
HitFilm Express 15 is a powerful free video editing program that enables you to create high-quality videos in minutes with an intuitive interface. It offers advanced editing features such as advanced video trimming, 3D editing, and more.
13. Magix Movie Studio
Magix is the world’s leading professional audiovisual media software, with Sequoia being its industry-standard audio editing software. This movie editor is an enthusiast-level video editing software that competes with software from Adobe and CyberLink, and it even boasts support for 4K content and 360 degrees. There are many reasons to upgrade. This year’s update includes stabilization, 8K editing, motion tracking, and an in-app plug-in store.
Key features
- NewBlue effects
- Fly-in animation
- New filter view
- Stabilization
- Motion tracking
- 8k support
Price
- Movie Studio 2024: $69.99 (30-day free trial)
- Movie Studio 2024 Platinum: $99.99 (30-day free trial)
- Movie Studio 2024 Suite: $129.00 (30-day free trial)
Pros
- Lots of video effects
- Responsive editing interface
- Multicam
- Trailer-like movie templates
- Solid audio editing
Cons
- Slower project rendering than others
- Lacks import and organization tools
Supported OS: Windows
PCMag Ratings: 3 stars out of 5
Summary
Magix movie studio is a powerful all-around video editing tool with many features that professional users have come to expect. It’s also relatively simple to use. But usability and performance are poor compared to other software programs like Filmora .
Part 4: How To Edit a Video With a Windows Movie Maker Alternative
Windows Movie Maker was great for editing a video, but it’s no match for some of the best video editing software. We’re talking about software capable of creating a cinematic experience in seconds, all on your computer.
When you need to edit a video with simple, quick edits, like adding a special effect or changing the background, try Filmora . Filmora is an easy-to-use application that allows you to create a movie using simple tools that don’t require additional training. You can’t beat this option if you want to create a professional-quality video for your blog or website.
Let’s dive into a quick tutorial on editing videos in Filmora:
Free Download For Win 7 or later(64-bit)
Free Download For macOS 10.14 or later
Step1 Open Wondershare Filmora on your PC or Mac
You can start a new project by clicking on ‘New Project’. And you can also change the ‘Aspect Ratio’ according to your project demand.
Step2 Import Videos
You can import your file by clicking the import tab on the upper-left side or clicking the import icon on the main window.
Step3 Drag and drop your footage to the timeline
After importing all the files, click and hold each individual video and drag and drop it to the timeline area according to your ideal sequence.
Step4 Add Audio
Go to the ‘Audio’ tab and select the audio file from the audio library. Once selected, drag and drop the audio file into the music timeline.
Step5 Add Titles
In your video intro, you can insert some title text. Go to the ‘Titles’ tab and select the one you like, and drag and drop it on top of the timeline. Double-click and edit the text and state your ideal statements. You can customize your text fonts and color too.
Step6 Add Transitions
You can add transition effects to ensure a smooth transition from one scene to another. The overall will get more professional look.
Step7 Add Effects
Next; you can get special effects to your video to make them more attractive and engaging to watch. Simple drag down the effect to your video and watch the effect take place in your selective scene.
Step8 Export your work
Once all the changes have been made, hit ‘export’ from the top tab. A window will appear where you can change the settings, resolution, frame rate, bit rate, etc. Next, click the ‘export’ button down on that window, and then you can save the file in your drive.
Part 5: Hot FAQs on Windows Movie Maker Alternatives
1. Why is Windows Movie Maker discontinued?
Microsoft’s video editing program, Windows Movie Maker, did not become a big hit with the public because it failed to do well on the market. Microsoft couldn’t get the support they were looking for from the program’s users. As a result, Microsoft had to cease its support of the program.
2. Is there a free version of Windows Movie Maker?
Microsoft Windows Movie maker was always accessible and pre-installed every windows product. Microsoft has discontinued support for Movie Maker and warns about free downloads of Movie Maker provided by third parties that might contain malware, viruses, or other issues.
3. What are the best free Windows Movie Maker Alternatives for Mac?
After switching to a Mac, you’ll find that the Windows Movie Maker alternatives offer much more than just a simple video editor. They provide advanced features, easy transitions, and less technical know-how to create pro-quality results. You should try using these platforms on your Mac if you have a video to edit.
- Wondershare Filmora
- Movavi
- OpenShot
Final Words
Windows Movie Maker is an excellent Windows video editor application for Windows users. But in recent years, it has become outdated due to the continuous development of new technologies. There are many alternatives for Windows Movie Maker, and here we listed some of the best ones. Most of them are free and featured packs. Each program has its unique set of features and capabilities, and each one excels in different areas. Check them out and see what you think.
Free Download For Win 7 or later(64-bit)
Free Download For macOS 10.14 or later
Optimal Video Size for Instagram: A Guide to Aspect Ratios
BEST Video Dimensions for Instagram? Aspect Ratios Explained
An easy yet powerful editor
Numerous effects to choose from
Detailed tutorials provided by the official channel
Instagram is an immensely popular application worldwide that can easily help you to boost your market and brand value and promote your business. However, it also requires some technical specifications.
In this article
01 [Instagram Video Size Requirements and Why They Matter](#Part 1)
02 [How to Change Instagram Aspect Ratio](#Part 2)
03 [5 Tools for Creating and Editing Instagram Videos](#Part 3)
Part 1 Instagram Video Size Requirements and Why They Matter
Instagram is also a usual social media platform like all the other ones. Just similar to the rest, Instagram also has some technical requirements for its posts and videos. It is because a perfect size requirement makes the videos more professional and engaging. On Instagram, size requirements are not limited to the dimensions only there are many other aspects that make a video on Instagram have a high quality and worth sharing. These may include the Instagram video aspect ratio and file size too.
01What is the largest file size allowed on Instagram?
The largest file size that is allowed on Instagram is 1920*1080 PX.
02Are 1920 x 1080 files ok on Instagram?
Nowadays,the most suitable file size on Instagram is 1920*1080 PX. This is because this size goes well on Instagram stories, reels, IGTV videos, live videos, etc. As per the increased demand, the quality of the videos has also been improved.
03The ideal ratio and resolution for Instagram posts
The ideal ratio for Instagram posts is 9:16 and the best resolution is 1080*1920 PX.
*****With the correct video settings one can flawlessly post his videos for his followers. Here mentioned are some types of video post that can show you the ideal aspect ratio and best resolution for Instagram:
❶ Instagram reels
● Description: Reels are seen vertically on the mobile phones. Also these are shot using the Instagram application only so you can take the advantage of transitions and effects present within the application to create your reels effectively. The maximum length for Instagram reels must be 60 seconds. Usually the bottom part of these reel videos is for captions and descriptions, so there should be no important information at that place.
● Ideal Aspect Ratio: The ideal aspect ratio for Instagram reels is 9:16.
● Best Resolution: For Instagram reels; best recommended resolution is 1080*1920 PX.

❷ Instagram Feed
● Description: The first thing that a user sees is the feed as soon he opens his Instagram. People love to scroll their Instagram feeds and this is the reason why feed videos are getting popular day by day. Instagram feed supports so many sizes and dimensions of the videos. As this app does not rotate on smartphones so it is better to keep the resolution less.
● Ideal Aspect Ratio: For your feed videos, best aspect ratio would be 4:5.
● Best Resolution: The videos must have the resolution of 1080 by 1350 PX so that they can be considered as the best one.

❸ Instagram IGTV videos
● Description: IGTV videos have become popular these days as they are the best source to play videos of long duration on Instagram. These videos particularly come on your screen with a preview of 15 to 20 seconds and further the complete IGTV video is aligned with it. As there are two things to consider when it comes to IGTV video, you must keep the best possible video aspect and resolution on the ground.
● Ideal Aspect Ratio: IGTV videos on Instagram have an ideal aspect ratio of 9:16.
● Best Resolution: If you are posting IGTV videos on your Instagram account then the best resolution must be1080*1920 PX.

❹ Instagram stories
● Description: Instagram stories drag people’s attention effectively. However, these videos can only be of 15 seconds and in case any longer video is posted then it splits into several segments of 15 seconds until it completes 1 minute. The videos allow engaging features and support candid also.
● Ideal Aspect Ratio: As users prefer to watch the stories in full screen so the best aspect ratio for such purpose must be 9:16.
● Best Resolution: The best resolution for Instagram stories is 1080*1920 PX.

❺ Instagram live videos
● Description: As the live videos reach to the audience as soon they are created so it is a matter of consideration to keep the video tact. The live streaming videos are kept horizontal and can’t be changed to vertical so it the size and dimensions must be according to the protocols.
● Ideal Aspect Ratio: If you talk about ideal aspect ratio for live videos then it should be 9:16.
● Best Resolution: 1080*1920 PX would be the best resolution for your Instagram live videos.

❻ Instagram Carousel videos
● Description: Through this you can post multiple videos on Instagram at a time. This is done in a consecutive order. If you want to tell a process to your viewers or just tell a story to them then these videos can be best for you. These videos can be square or landscape depending on the needs.
● Ideal Aspect Ratio: As these videos constitute of many at once so the ideal aspect ratio for these videos can be 4:5.
● Best Resolution: 1080*1350 PX can be the best resolution for these videos.

Part 2 How to Change Instagram Aspect Ratio
All you need to do is follow some simple steps to change the Instagram video ratio and resize it into the desired ones:
Step 1: First of all, you will need to download any video editing tool from play store. It is better to keep a thorough check on all the available options and choose the best amongst them that has all the latest features.
Step 2: Next you will need to choose the video that you want to crop or edit and then click on check at the tool bar present on the corner.
Step 3: Further you will see your video on the screen and also the various aspect ratios below the video on your screen.
Step 4: Now choose amongst the aspect ratios that you want to crop your video in and then simply slide the video using your frame via the frame that will appear there.
Step 5: Select the corners and crop the video according. Once you are done, click on the icon of downloading and save it to the camera roll. Further you can post your edited wherever you want.
Part 3 5 Tools for Creating and Editing Instagram Videos
Creating videos on Instagram is quite easier and interesting. All you need to have the right tools to do so. Here mentioned are some tools that you can use for creating interesting and impressive Instagram videos:
01Quik
Quik is a popular video editing tool that is used to edit the videos shot on other devices too. You can edit the images also. This tool is built by GoPro. Main features of this tool are as follows:
● You can import maximum 500 items at a particular time using this tool.
● Music and text can also be added with emojis, text overlays and title slides.
● There is a large collection of filters amongst which you can choose the best for you.
● You can import files in MOV and MP4 formats.
● Footage can be played in slow as well as fast motion.

02 Adobe premiere rush
It is a free video editing tool that makes the use of AI. In this tool, you can get two different types of editing. First one is freeform, in which, you can control all the desired aspects of editing. The other one is automatic mode, in which, the video gets smooth transitions and get created automatically.
● This tool has the feature of sync to cloud.
● You can download videos from and on any device that you want.
● In this tool, you can get the features of built-in filters, texts, and transitions, etc.
● This tool is free to use and download.
● You will also get 2GB of storage space for free.

03Horizon
Horizon is one of those tools that allow full screen recording of the videos. In this tool, you can create the videos in vertical as well as in landscape format. The core features of this tool are:
● You can shoot videos using this tool in a resolution of 2k.
● It also allows direct to application uploads of videos and footages.
● This tool has the feature of some amazing real time filters.
● The free version of this tool limits its features. However, you can unlock all the features by purchasing the paid version.
● These videos can be shot in fast and slow motions.

01**Wondershare Filmora Video Editor **
This video tool is specially meant for all the video creators who want to empower their imagination. This tool is laced with many additional features to make your videos more exciting and engaging. Some of these features are:
● In this tool, you can get overlays, filters, custom titles andtransitions, etc.
● You can import multiple videos at a time with latest effects.
● You can utilize 100 layers of different media to make your videos and stories easily.
● Audio editing features and removal of background sounds make your videos more amazing and impressive.
● Here, you can also get professional 3D LUTs and advanced correction of colors in the videos and images.
For Win 7 or later (64-bit)
For macOS 10.12 or later
05Inshot
This is a simple tool used for video editing. Its simple features make it less complex than other such tools. This tool can easily be used on Androids and iOS. Have a look on some of its features:
● The videos can be trimmed, split and cut using this tool and you can also add text and stickers to them.
● Audio and volume can easily be adjusted and set accordingly with features of video flipping and rotation.
● This tool provides you with the features of adjusting the aspect ratio and also blurs the unused background areas.
● Slow and fast motion affects add some more quality to your videos.
● You can get this tool absolutely free with upgrading options.

Key Takeaways from This Episode
● Instagram is a popular social media platform that can be used for promoting and advertising the brands and products. Also here videos are made and uploaded for recreational and educational purposes. However, these videos need to withstand specific requirements.
● If your videos meet all the necessary requirements as per the Instagram protocols, then it can boost your social media value and also leave a positive impact on the marketing accounts.
● There are various tools that are used at a wide range to make such videos. Also tools like Filmora can be used to create and edit Instagram videos more effectively.
Instagram is an immensely popular application worldwide that can easily help you to boost your market and brand value and promote your business. However, it also requires some technical specifications.
In this article
01 [Instagram Video Size Requirements and Why They Matter](#Part 1)
02 [How to Change Instagram Aspect Ratio](#Part 2)
03 [5 Tools for Creating and Editing Instagram Videos](#Part 3)
Part 1 Instagram Video Size Requirements and Why They Matter
Instagram is also a usual social media platform like all the other ones. Just similar to the rest, Instagram also has some technical requirements for its posts and videos. It is because a perfect size requirement makes the videos more professional and engaging. On Instagram, size requirements are not limited to the dimensions only there are many other aspects that make a video on Instagram have a high quality and worth sharing. These may include the Instagram video aspect ratio and file size too.
01What is the largest file size allowed on Instagram?
The largest file size that is allowed on Instagram is 1920*1080 PX.
02Are 1920 x 1080 files ok on Instagram?
Nowadays,the most suitable file size on Instagram is 1920*1080 PX. This is because this size goes well on Instagram stories, reels, IGTV videos, live videos, etc. As per the increased demand, the quality of the videos has also been improved.
03The ideal ratio and resolution for Instagram posts
The ideal ratio for Instagram posts is 9:16 and the best resolution is 1080*1920 PX.
*****With the correct video settings one can flawlessly post his videos for his followers. Here mentioned are some types of video post that can show you the ideal aspect ratio and best resolution for Instagram:
❶ Instagram reels
● Description: Reels are seen vertically on the mobile phones. Also these are shot using the Instagram application only so you can take the advantage of transitions and effects present within the application to create your reels effectively. The maximum length for Instagram reels must be 60 seconds. Usually the bottom part of these reel videos is for captions and descriptions, so there should be no important information at that place.
● Ideal Aspect Ratio: The ideal aspect ratio for Instagram reels is 9:16.
● Best Resolution: For Instagram reels; best recommended resolution is 1080*1920 PX.
❷ Instagram Feed
● Description: The first thing that a user sees is the feed as soon he opens his Instagram. People love to scroll their Instagram feeds and this is the reason why feed videos are getting popular day by day. Instagram feed supports so many sizes and dimensions of the videos. As this app does not rotate on smartphones so it is better to keep the resolution less.
● Ideal Aspect Ratio: For your feed videos, best aspect ratio would be 4:5.
● Best Resolution: The videos must have the resolution of 1080 by 1350 PX so that they can be considered as the best one.
❸ Instagram IGTV videos
● Description: IGTV videos have become popular these days as they are the best source to play videos of long duration on Instagram. These videos particularly come on your screen with a preview of 15 to 20 seconds and further the complete IGTV video is aligned with it. As there are two things to consider when it comes to IGTV video, you must keep the best possible video aspect and resolution on the ground.
● Ideal Aspect Ratio: IGTV videos on Instagram have an ideal aspect ratio of 9:16.
● Best Resolution: If you are posting IGTV videos on your Instagram account then the best resolution must be1080*1920 PX.
❹ Instagram stories
● Description: Instagram stories drag people’s attention effectively. However, these videos can only be of 15 seconds and in case any longer video is posted then it splits into several segments of 15 seconds until it completes 1 minute. The videos allow engaging features and support candid also.
● Ideal Aspect Ratio: As users prefer to watch the stories in full screen so the best aspect ratio for such purpose must be 9:16.
● Best Resolution: The best resolution for Instagram stories is 1080*1920 PX.
❺ Instagram live videos
● Description: As the live videos reach to the audience as soon they are created so it is a matter of consideration to keep the video tact. The live streaming videos are kept horizontal and can’t be changed to vertical so it the size and dimensions must be according to the protocols.
● Ideal Aspect Ratio: If you talk about ideal aspect ratio for live videos then it should be 9:16.
● Best Resolution: 1080*1920 PX would be the best resolution for your Instagram live videos.
❻ Instagram Carousel videos
● Description: Through this you can post multiple videos on Instagram at a time. This is done in a consecutive order. If you want to tell a process to your viewers or just tell a story to them then these videos can be best for you. These videos can be square or landscape depending on the needs.
● Ideal Aspect Ratio: As these videos constitute of many at once so the ideal aspect ratio for these videos can be 4:5.
● Best Resolution: 1080*1350 PX can be the best resolution for these videos.
Part 2 How to Change Instagram Aspect Ratio
All you need to do is follow some simple steps to change the Instagram video ratio and resize it into the desired ones:
Step 1: First of all, you will need to download any video editing tool from play store. It is better to keep a thorough check on all the available options and choose the best amongst them that has all the latest features.
Step 2: Next you will need to choose the video that you want to crop or edit and then click on check at the tool bar present on the corner.
Step 3: Further you will see your video on the screen and also the various aspect ratios below the video on your screen.
Step 4: Now choose amongst the aspect ratios that you want to crop your video in and then simply slide the video using your frame via the frame that will appear there.
Step 5: Select the corners and crop the video according. Once you are done, click on the icon of downloading and save it to the camera roll. Further you can post your edited wherever you want.
Part 3 5 Tools for Creating and Editing Instagram Videos
Creating videos on Instagram is quite easier and interesting. All you need to have the right tools to do so. Here mentioned are some tools that you can use for creating interesting and impressive Instagram videos:
01Quik
Quik is a popular video editing tool that is used to edit the videos shot on other devices too. You can edit the images also. This tool is built by GoPro. Main features of this tool are as follows:
● You can import maximum 500 items at a particular time using this tool.
● Music and text can also be added with emojis, text overlays and title slides.
● There is a large collection of filters amongst which you can choose the best for you.
● You can import files in MOV and MP4 formats.
● Footage can be played in slow as well as fast motion.
02 Adobe premiere rush
It is a free video editing tool that makes the use of AI. In this tool, you can get two different types of editing. First one is freeform, in which, you can control all the desired aspects of editing. The other one is automatic mode, in which, the video gets smooth transitions and get created automatically.
● This tool has the feature of sync to cloud.
● You can download videos from and on any device that you want.
● In this tool, you can get the features of built-in filters, texts, and transitions, etc.
● This tool is free to use and download.
● You will also get 2GB of storage space for free.
03Horizon
Horizon is one of those tools that allow full screen recording of the videos. In this tool, you can create the videos in vertical as well as in landscape format. The core features of this tool are:
● You can shoot videos using this tool in a resolution of 2k.
● It also allows direct to application uploads of videos and footages.
● This tool has the feature of some amazing real time filters.
● The free version of this tool limits its features. However, you can unlock all the features by purchasing the paid version.
● These videos can be shot in fast and slow motions.
01**Wondershare Filmora Video Editor **
This video tool is specially meant for all the video creators who want to empower their imagination. This tool is laced with many additional features to make your videos more exciting and engaging. Some of these features are:
● In this tool, you can get overlays, filters, custom titles andtransitions, etc.
● You can import multiple videos at a time with latest effects.
● You can utilize 100 layers of different media to make your videos and stories easily.
● Audio editing features and removal of background sounds make your videos more amazing and impressive.
● Here, you can also get professional 3D LUTs and advanced correction of colors in the videos and images.
For Win 7 or later (64-bit)
For macOS 10.12 or later
05Inshot
This is a simple tool used for video editing. Its simple features make it less complex than other such tools. This tool can easily be used on Androids and iOS. Have a look on some of its features:
● The videos can be trimmed, split and cut using this tool and you can also add text and stickers to them.
● Audio and volume can easily be adjusted and set accordingly with features of video flipping and rotation.
● This tool provides you with the features of adjusting the aspect ratio and also blurs the unused background areas.
● Slow and fast motion affects add some more quality to your videos.
● You can get this tool absolutely free with upgrading options.
Key Takeaways from This Episode
● Instagram is a popular social media platform that can be used for promoting and advertising the brands and products. Also here videos are made and uploaded for recreational and educational purposes. However, these videos need to withstand specific requirements.
● If your videos meet all the necessary requirements as per the Instagram protocols, then it can boost your social media value and also leave a positive impact on the marketing accounts.
● There are various tools that are used at a wide range to make such videos. Also tools like Filmora can be used to create and edit Instagram videos more effectively.
Reviewing Minitool Movie Maker: Features, Pros, and Cons, and Alternative Options
We all spend so much time on YouTube, watching our favorite YouTubers’ videos. There are two reasons why we get attracted to any video. One attraction factor is the content. Whereas the other attractive factor to any video is the editing.
The internet is full of great videos, and the market is flooded with amazing editors. This is all because of the competition and the editing skills everyone has. If you are not confident with your editing, then this article might be a miracle for you. MiniTool Movie Maker will be discussed in detail. This article will be a complete guide on MiniTool MovieMaker; along with that, we will also share its alternatives.
In this article
01 What Is Minitool Movie Maker?
02 How to Use Minitool Movie Maker [Step by Step]
03 4 Best Alternatives for Minitool Movie Maker
Part 1. What Is MiniTool Movie Maker?
MiniTool Movie Maker is a very powerful tool used to edit videos. With MiniTool movie maker, you can create unlimited videos. The tool is free. Using MiniTool, you can edit stunning, eye-catching videos that everyone will love to watch. Mini Tool MovieMaker is the secret behind every mind-blowing video that you love to watch.
The best thing about Mini movie maker is that it has a very easy-to-use interface. Even beginners can easily create videos on MiniTool. You don’t need any video designing experience to create a video on this movie maker. The procedure to edit videos is also very basic. You just have to import the media to MiniTool MovieMaker, and then the cool editing elements will do a magical makeover to your video.
MiniTool MovieMaker is a well-known and very famous tool because of its unmatched features. With MiniTool MovieMaker, you can create perfect aesthetic videos that everyone loves to watch. The tool is full of wonders and surprises. If you are impatient to learn about its features, then the wait is over. Let us shed light on its incomparable features.
- MiniTool movie makersupports Windows 8.1 and Windows 10. Whereas from old Windows version, it supports Windows 7.
- With the stunning Mini movie maker, you can do batch processing where you can edit multiple videos and images with just one click.
- The MovieMaker also lets you edit the audio from the original video. Which includes mute, fade in/ fade out, and volume control.
- The tool offers a variety of effects, transitions, text templates, and a lot more. All these elements enhance your video visually.
Part 2. How to Use MiniTool Movie Maker [Step by Step]
Now that the features of MiniTool Moviemaker have been discussed, you all must be very impressed by the tool. It is the secret ingredient that we all fall for because this makes your video stand out. Editing is a very crucial part of movie-making. It is said that editing can either make it or break it. This is why you should always select a powerful tool for editing.
One such tool is being discussed here today. Mini Tool Movie Maker is the editor that falls perfectly in this category where you can edit brilliant movies. If this tool is new for you, then you can take guidance from this article because we are going to share its step-by-step guideline with you.
Step 1: The first step to start using MiniTool movie maker is to launch it on your device. Then, from the main screen, the Project Library window, select ‘New Project.’

Step 2: Now, it’s time to import the media files. For this, click on ‘Import Media Files. After that, you have to locate the files that you want to import. Once done, click on ‘Open’; this will load all the media files. You will be able to see the files in the Media Library.

Step 3: After the media has been imported, now comes the fun part where you have to edit the movie. With MiniTool movie maker, you can add various transitions to your clips. By visiting the “Transitions” tab, you can select your favorite transition, and then by right-clicking on it, you can apply it.

Step 4: Like transitions, you can also add multiple effects to your movie and make it visually attractive. The “Effects” tab is full of classic and cool effects. You just have to explore the effects and then drag and drop the best effect on the target clip.

Step 5: With MiniTool Movie Maker, you can also add text to your movie. The wonderful tool has several title templates that could be used to add text to your videos. All these templates are under the “Text” section. You can completely customize the text.

Step 6: Along with these amazing services, Mini Tool Movie Maker has a lot to offer. You can add “Motion” effects to your movie clips. With this tool, you can trim and even split the video. Even editing audio of the original video and reversing a video are offered by this tool.

Step 7: Lastly, after all the fancy edits, you can export the movie to your device. For this, click on the Export option from the toolbar. You can select a file format and hit the ‘Export’ button to get the movie.

Part 3. 4 Best Alternatives for Minitool Movie Maker
This article is a complete guide on Mini Tool moviemaker. Everything you need to know about this crazy powerful tool is in this article. Not just this tool, but we also promised to talk about its alternatives. In this section, we will discuss the 4 best alternatives for MiniTool moviemaker.
1. Wondershare Filmora
The very first and best alternative for mini-movie makers is Wondershare Filmora. This movie editing software rules over the editing world because of its unique and impressive features. You can do professional editing with Filmora.
It lets you do countless edits. Filmora owns a massive asset library that is full of images, audio effects, transitions, filters, elements, and whatnot. Filmora is a one-stop-shop where you can get every possible thing required for editing.

For Win 7 or later (64-bit)
For macOS 10.12 or later
2. OpenShot
The next famous and amazing alternative is OpenShot. With OpenShot, you can trim, merge and even cut your movie clips. Another very interesting and attractive element seen in movies is the split-screen. OpenShot also offers a split-screen. You can export movies without a watermark in 2.5K and also in 4K.

3. VSDC Free Video Editor
Another alternative is VSDC Free Video Editor. The editor is very beneficial to use because of its unmatched features. The fascinating thing about this editor is that it has a built-in DVD Burning Tool. The video editor offers color blending along with various amazing filters. It supports HD and 4K file formats.

4. Windows Movie Maker
The last alternative to be discussed is Windows Movie Maker. The Windows Movie Maker is famous because it has simple controls, a user-friendly interface, and automatic preview. This Movie Maker has transition overlays that enhance the movie visually. The editor also has a title customization tool from which you can add and edit stylish titles.

Final Thoughts
As mentioned earlier that this article is a complete pack of information on moviemakers. After learning about MiniTool Movie Maker from this article, you will surely use it to edit your movies. The MovieMaker promises to deliver quality material. Its unique and matchless features make the tool worthy of trying.
Versatile Video Editor - Wondershare Filmora
An easy yet powerful editor
Numerous effects to choose from
Detailed tutorials provided by the official channel
02 How to Use Minitool Movie Maker [Step by Step]
03 4 Best Alternatives for Minitool Movie Maker
Part 1. What Is MiniTool Movie Maker?
MiniTool Movie Maker is a very powerful tool used to edit videos. With MiniTool movie maker, you can create unlimited videos. The tool is free. Using MiniTool, you can edit stunning, eye-catching videos that everyone will love to watch. Mini Tool MovieMaker is the secret behind every mind-blowing video that you love to watch.
The best thing about Mini movie maker is that it has a very easy-to-use interface. Even beginners can easily create videos on MiniTool. You don’t need any video designing experience to create a video on this movie maker. The procedure to edit videos is also very basic. You just have to import the media to MiniTool MovieMaker, and then the cool editing elements will do a magical makeover to your video.
MiniTool MovieMaker is a well-known and very famous tool because of its unmatched features. With MiniTool MovieMaker, you can create perfect aesthetic videos that everyone loves to watch. The tool is full of wonders and surprises. If you are impatient to learn about its features, then the wait is over. Let us shed light on its incomparable features.
- MiniTool movie makersupports Windows 8.1 and Windows 10. Whereas from old Windows version, it supports Windows 7.
- With the stunning Mini movie maker, you can do batch processing where you can edit multiple videos and images with just one click.
- The MovieMaker also lets you edit the audio from the original video. Which includes mute, fade in/ fade out, and volume control.
- The tool offers a variety of effects, transitions, text templates, and a lot more. All these elements enhance your video visually.
Part 2. How to Use MiniTool Movie Maker [Step by Step]
Now that the features of MiniTool Moviemaker have been discussed, you all must be very impressed by the tool. It is the secret ingredient that we all fall for because this makes your video stand out. Editing is a very crucial part of movie-making. It is said that editing can either make it or break it. This is why you should always select a powerful tool for editing.
One such tool is being discussed here today. Mini Tool Movie Maker is the editor that falls perfectly in this category where you can edit brilliant movies. If this tool is new for you, then you can take guidance from this article because we are going to share its step-by-step guideline with you.
Step 1: The first step to start using MiniTool movie maker is to launch it on your device. Then, from the main screen, the Project Library window, select ‘New Project.’
Step 2: Now, it’s time to import the media files. For this, click on ‘Import Media Files. After that, you have to locate the files that you want to import. Once done, click on ‘Open’; this will load all the media files. You will be able to see the files in the Media Library.
Step 3: After the media has been imported, now comes the fun part where you have to edit the movie. With MiniTool movie maker, you can add various transitions to your clips. By visiting the “Transitions” tab, you can select your favorite transition, and then by right-clicking on it, you can apply it.
Step 4: Like transitions, you can also add multiple effects to your movie and make it visually attractive. The “Effects” tab is full of classic and cool effects. You just have to explore the effects and then drag and drop the best effect on the target clip.
Step 5: With MiniTool Movie Maker, you can also add text to your movie. The wonderful tool has several title templates that could be used to add text to your videos. All these templates are under the “Text” section. You can completely customize the text.
Step 6: Along with these amazing services, Mini Tool Movie Maker has a lot to offer. You can add “Motion” effects to your movie clips. With this tool, you can trim and even split the video. Even editing audio of the original video and reversing a video are offered by this tool.
Step 7: Lastly, after all the fancy edits, you can export the movie to your device. For this, click on the Export option from the toolbar. You can select a file format and hit the ‘Export’ button to get the movie.
Part 3. 4 Best Alternatives for Minitool Movie Maker
This article is a complete guide on Mini Tool moviemaker. Everything you need to know about this crazy powerful tool is in this article. Not just this tool, but we also promised to talk about its alternatives. In this section, we will discuss the 4 best alternatives for MiniTool moviemaker.
1. Wondershare Filmora
The very first and best alternative for mini-movie makers is Wondershare Filmora. This movie editing software rules over the editing world because of its unique and impressive features. You can do professional editing with Filmora.
It lets you do countless edits. Filmora owns a massive asset library that is full of images, audio effects, transitions, filters, elements, and whatnot. Filmora is a one-stop-shop where you can get every possible thing required for editing.
For Win 7 or later (64-bit)
For macOS 10.12 or later
2. OpenShot
The next famous and amazing alternative is OpenShot. With OpenShot, you can trim, merge and even cut your movie clips. Another very interesting and attractive element seen in movies is the split-screen. OpenShot also offers a split-screen. You can export movies without a watermark in 2.5K and also in 4K.
3. VSDC Free Video Editor
Another alternative is VSDC Free Video Editor. The editor is very beneficial to use because of its unmatched features. The fascinating thing about this editor is that it has a built-in DVD Burning Tool. The video editor offers color blending along with various amazing filters. It supports HD and 4K file formats.
4. Windows Movie Maker
The last alternative to be discussed is Windows Movie Maker. The Windows Movie Maker is famous because it has simple controls, a user-friendly interface, and automatic preview. This Movie Maker has transition overlays that enhance the movie visually. The editor also has a title customization tool from which you can add and edit stylish titles.
Final Thoughts
As mentioned earlier that this article is a complete pack of information on moviemakers. After learning about MiniTool Movie Maker from this article, you will surely use it to edit your movies. The MovieMaker promises to deliver quality material. Its unique and matchless features make the tool worthy of trying.
Versatile Video Editor - Wondershare Filmora
An easy yet powerful editor
Numerous effects to choose from
Detailed tutorials provided by the official channel
Capture Your Screen: A Step-by-Step Guide to Using Filmora Scrn
How to Record Your Desktop with Filmora Scrn

Ollie Mattison
Mar 27, 2024• Proven solutions
![]()

The All-in-One Screen Recorder & Video Editor
- Record desktop screen, voiceover, and webcam simultaneously
- Edit recorded clips quickly with a wide range of professional tools
- Built-in plentiful templates and effects
- Export to MP4, MOV, MKV, GIF and multiple formats
For Win 7 or later (64-bit)
For macOS 10.12 or later
 Secure Download
Desktop recording or recording the screen activity on the PC can be fun and sometimes it gives guidance to many people. All sorts of videos are shaped with the help of a desktop recorder. If you are just starting off to learn those video skills, it can be a difficult task for you. Considering this fact, we have brought this post that contains a simple guide on how to record desktop easily and quickly via an ideal desktop capturing tool. Scroll down a little to get the name of that tool revealed.
How to record desktop with Filmora Scrn
Step 1 – Get the Program on Your PC
Initially, Download it and install it. After completing all installation formalities, launch Filmora Scrn on your computer.
Step 2 – Go for the Appropriate Option
Now, the main interface will provide you three options which are “Get Started”, “Quick Capture” and “Video Editor”.
Get Started – If you wish to hit on this tab, you will be brought up to a new interface where you can customize the recording parameters according to your preferences.
For instance, customizing audio settings or adjusting the recording area, frame rate, or also to set recording source as webcam (if you need) along with recording your desktop screen.
Quick Capture – If you prefer to record your desktop with the default settings, you should then hit on this tab to immediately launch the capturing console.
Video Editor – This tab is specifically for the video lovers who wish to edit and enhance their videos by adding annotation effects, cursor effects or by doing some basic video editing (crop, split, resize, rotate and more).
Hit the one that suits you, in this case, hit on “Get Started”.

Step 3 – Customizing Record Settings
Right after pushing the “Get Started” tab, the “Setup” interface will load up. You will now have 4 different categories to customize the Record Settings.
Screen – Customize capturing area on your desktop (full screen, target window or a specific region), set the preferred frame rate (up to 120 FPS) for your video. Or select, “Game” if you wish to record gameplay.

Audio – Under this section, specify the preferred audio source for your video, either from Computer or Microphone or both. By default, it is set on both.

Camera – If you have a webcam installed, you can record video via your webcam along with capturing your screen. Get into this section and select your camera, preferred resolution and frame rate.

Advanced – Here in this section, you can set the path for your recorded video, enable or disable GPU acceleration and setup hot keys for your convenience.

Once finished with customization, hit on “Capture” to launch the recording console.
Step 4 – Ready to Capture
Now, the recording console will pop up on your screen and you are just a click away to record your desktop. Hit on the big “Record” button at the top of the console or hit “F10” on your keyboard. A countdown will begin and right after that your recording starts.
If you wish to pause the video, hit “F9” on your keyboard and similarly, hit the same “F9” to resume the recording again. Or, if you wish to stop the video, just have to hit on “F10” key on your keyboard.
Step 5 – Edit Video, Add Effects and Export
Finally, in this last step your video will be loaded in the built-in video editor for the final touch up to enhance your video before it is exported to your local storage. You can add annotation effects, cursor effects to your video. Or, do some video editing like crop, split, resize, rotate and more.
When you’re done, export the final file to your local storage and enjoy.

Filmora Scrn – Best Desktop Recorder
Here is what we were talking about a moment ago – Filmora Scrn. This is remarkable desktop capturing software that is designed to work with both Windows and Mac computers. Along with being a high-quality desktop recorder, Filmora Scrn makes sure to elevate the captured video quality by offering numerous powerful editing features. Its modern and intuitive design helps the users to effortlessly record their desktop screen ultimately removing their concern of how to record desktop without any barrier or hitch. Filmora Scrn is a risk-free and quick tool to record the desktop which makes the users to make their projects faster making it a good option for the people who are in hurry and want no inconvenience while recording.
Key Features of Filmora Scrn
- This screen recorder comes with the ability to record 15-120 FPS.
- This desktop recorder also allows users to import over 50 file formats.
- You can record Webcam as well as screen at the same time via this software.
- You can also export your file to multiple formats with Filmora Scrn.
Conclusion
This was all about how to record desktop using an exceptionally easy desktop recorder. We have given you the best way through which you can record your desktop with no trouble. And more than that, Filmora Scrn is not just desktop capture software, but offers many video enhancing tools and a wide range of possibility to give the recorded video a little more finishing. We hope you found what you want and got the results you expected with this software. Your given time is really appreciated and many thanks to read this post. It will be a content feeling if you could share your experience or feedback with us by dropping a comment below.


Ollie Mattison
Ollie Mattison is a writer and a lover of all things video.
Follow @Ollie Mattison
Ollie Mattison
Mar 27, 2024• Proven solutions
![]()
The All-in-One Screen Recorder & Video Editor
- Record desktop screen, voiceover, and webcam simultaneously
- Edit recorded clips quickly with a wide range of professional tools
- Built-in plentiful templates and effects
- Export to MP4, MOV, MKV, GIF and multiple formats
For Win 7 or later (64-bit)
For macOS 10.12 or later
Secure Download
Desktop recording or recording the screen activity on the PC can be fun and sometimes it gives guidance to many people. All sorts of videos are shaped with the help of a desktop recorder. If you are just starting off to learn those video skills, it can be a difficult task for you. Considering this fact, we have brought this post that contains a simple guide on how to record desktop easily and quickly via an ideal desktop capturing tool. Scroll down a little to get the name of that tool revealed.
How to record desktop with Filmora Scrn
Step 1 – Get the Program on Your PC
Initially, Download it and install it. After completing all installation formalities, launch Filmora Scrn on your computer.
Step 2 – Go for the Appropriate Option
Now, the main interface will provide you three options which are “Get Started”, “Quick Capture” and “Video Editor”.
Get Started – If you wish to hit on this tab, you will be brought up to a new interface where you can customize the recording parameters according to your preferences.
For instance, customizing audio settings or adjusting the recording area, frame rate, or also to set recording source as webcam (if you need) along with recording your desktop screen.
Quick Capture – If you prefer to record your desktop with the default settings, you should then hit on this tab to immediately launch the capturing console.
Video Editor – This tab is specifically for the video lovers who wish to edit and enhance their videos by adding annotation effects, cursor effects or by doing some basic video editing (crop, split, resize, rotate and more).
Hit the one that suits you, in this case, hit on “Get Started”.
Step 3 – Customizing Record Settings
Right after pushing the “Get Started” tab, the “Setup” interface will load up. You will now have 4 different categories to customize the Record Settings.
Screen – Customize capturing area on your desktop (full screen, target window or a specific region), set the preferred frame rate (up to 120 FPS) for your video. Or select, “Game” if you wish to record gameplay.
Audio – Under this section, specify the preferred audio source for your video, either from Computer or Microphone or both. By default, it is set on both.
Camera – If you have a webcam installed, you can record video via your webcam along with capturing your screen. Get into this section and select your camera, preferred resolution and frame rate.
Advanced – Here in this section, you can set the path for your recorded video, enable or disable GPU acceleration and setup hot keys for your convenience.
Once finished with customization, hit on “Capture” to launch the recording console.
Step 4 – Ready to Capture
Now, the recording console will pop up on your screen and you are just a click away to record your desktop. Hit on the big “Record” button at the top of the console or hit “F10” on your keyboard. A countdown will begin and right after that your recording starts.
If you wish to pause the video, hit “F9” on your keyboard and similarly, hit the same “F9” to resume the recording again. Or, if you wish to stop the video, just have to hit on “F10” key on your keyboard.
Step 5 – Edit Video, Add Effects and Export
Finally, in this last step your video will be loaded in the built-in video editor for the final touch up to enhance your video before it is exported to your local storage. You can add annotation effects, cursor effects to your video. Or, do some video editing like crop, split, resize, rotate and more.
When you’re done, export the final file to your local storage and enjoy.
Filmora Scrn – Best Desktop Recorder
Here is what we were talking about a moment ago – Filmora Scrn. This is remarkable desktop capturing software that is designed to work with both Windows and Mac computers. Along with being a high-quality desktop recorder, Filmora Scrn makes sure to elevate the captured video quality by offering numerous powerful editing features. Its modern and intuitive design helps the users to effortlessly record their desktop screen ultimately removing their concern of how to record desktop without any barrier or hitch. Filmora Scrn is a risk-free and quick tool to record the desktop which makes the users to make their projects faster making it a good option for the people who are in hurry and want no inconvenience while recording.
Key Features of Filmora Scrn
- This screen recorder comes with the ability to record 15-120 FPS.
- This desktop recorder also allows users to import over 50 file formats.
- You can record Webcam as well as screen at the same time via this software.
- You can also export your file to multiple formats with Filmora Scrn.
Conclusion
This was all about how to record desktop using an exceptionally easy desktop recorder. We have given you the best way through which you can record your desktop with no trouble. And more than that, Filmora Scrn is not just desktop capture software, but offers many video enhancing tools and a wide range of possibility to give the recorded video a little more finishing. We hope you found what you want and got the results you expected with this software. Your given time is really appreciated and many thanks to read this post. It will be a content feeling if you could share your experience or feedback with us by dropping a comment below.
Ollie Mattison
Ollie Mattison is a writer and a lover of all things video.
Follow @Ollie Mattison
Also read:
- Elevate Your Video Production on Mac with Adobe Premiere Pro for 2024
- Top 10 Free Video Rotators to Rotate/Flip Videos
- New FCPX Audio Workflow Efficient Use of L-Cuts and J-Cuts for 2024
- 2024 Approved GoPro Studio Alternatives Top Picks for Editing Your Action Cam Videos
- Updated Adobe Premiere vs Sony Vegas Which Video Editor Reigns Supreme , In 2024
- Updated In 2024, Expert-Approved Audio Editing Software for High-Quality Productions
- New 2024 Approved The Funniest Meme Creator Apps for Android and iOS (Updated 2023)
- New In 2024, Reveal the Details How to Play Videos in Slow Motion with VLC Media Player
- Updated In 2024, Best Free DAWs for Music Production Expert Reviews
- Updated Easter Exclusive Wondershare Filmora Discount Code - Limited Time Offer
- Best Free Video Dubbing Software for Windows 10/11
- Updated Update Top 5 iPad Video Editors for Creators and Beginners for 2024
- New In 2024, Final Cut Pro vs Express Which One Reigns Supreme?
- FCP X Effects for Beginners A Quick and Easy 3-Step Process
- Elevate Your View Converting Standard Videos to VR Masterpieces for 2024
- In 2024, Convert Video to Image A Step-by-Step Guide with 10 Best Tools
- New Nikon Video Workflow Efficient Editing for Stunning Results
- Updated In 2024, The Best of Both Worlds Top 10 Desktop and Online Video Trimmers
- Cutting-Edge Cinema 10 Famous Films Edited with Final Cut Pro
- New Best of the Best 4K/8K Video Editing Software for Professionals
- New 2024 Approved Free Video Rotation Made Easy Top 10 Tools and Software
- Updated In 2024, Time-Lapse Mastery Top Apps for iPhone and Android Users
- New 2024 Approved Get Steady Expert Tips for Video Stabilization in FCPX
- New In 2024, Crack the Code 7 Easy Ways to Get Filmora Coupons
- Updated Unleashing the Power of Color in Final Cut Pro for 2024
- New 2024 Approved 10 Free Online Subtitle Editors You Need to Know
- New AVCHD Video Editors Compared Top 5 Contenders
- Updated Times Running Out! Learn to Add a Countdown Timer in FCPX Now for 2024
- In 2024, Have You Ever Got Shaky Videos Shot on Your Camera? If Yes, This Article Is for You! Well Share How to Stabilize Shaky Videos with Adobe Premiere Pro Into Smooth and Steady Shots
- Updated AVS Video Editor 2023 Review A Beginners Guide to Video Editing Software for 2024
- Top Mac Video Editors for Creators
- New In 2024, Color Code Cracked How to Match Video Clips in PowerDirector Like a Pro
- In 2024, Instant Image Resize Online Aspect Ratio Converters
- Top 5 Best Free WMV Video Joiners
- Updated Video Metadata Made Easy 8 Best Mac Editors
- 2024 Approved The Ultimate VHS Experience Best Mobile Apps for Retro Lovers
- 2024 Approved Best FLAC Conversion Software A Comprehensive Roundup
- New Minitool Movie Maker A Comprehensive Review and User Guide
- New In 2024, Best 5 Free Tools to Combine MPEG Videos
- Updated Shaky Footage? No Problem! Adobe Premiere Pro Stabilization Guide
- 2024 Approved Taking Control of Your Workflow XML Files in FCPX Explained
- 2024 Approved Ditch Windows 10 Photos Explore These 8 Amazing Alternatives
- Updated In 2024, Edit Videos for Free Top Software Without Watermarks This Year
- The 6 Most Popular Audio Converter Programs Reviewed
- In 2024, Understanding HD Video Resolution A Beginners Handbook
- New 2024 Approved Windows Video Editing Made Easy Top 6 Software Options
- New 2024 Approved The Ultimate Guide to Instagram Aspect Ratios Get the Most Out of Your Videos
- New In 2024, Convert Soundcloud to MP3 Like a Pro Expert Advice
- In 2024, Troubleshoot Like a Pro Resetting Final Cut Pro X for Smooth Editing
- New In 2024, Dial Down the Distractions Effective Background Noise Removal in FCPX
- In 2024, How to Change Google Play Location On Vivo Y56 5G | Dr.fone
- In 2024, Full Guide on Mirroring Your ZTE Axon 40 Lite to Your PC/Mac | Dr.fone
- Updated Best Cinematic LUTs For Premiere Pro Recommendation
- What To Do When Realme GT Neo 5 Has Black Screen of Death? | Dr.fone
- In 2024, The Ultimate Guide How to Bypass Swipe Screen to Unlock on Samsung Galaxy S24+ Device
- Guide to Discovering the Voice Generators/Changers with the Most Anime
- A Detailed Guide on Faking Your Location in Mozilla Firefox On Realme Narzo 60x 5G | Dr.fone
- In 2024, How To Bypass Tecno Spark Go (2023) FRP In 3 Different Ways
- How to Bypass Google FRP Lock on Meizu 21 Pro Devices
- How to Fake Snapchat Location on Oppo A78 5G | Dr.fone
- New Realistic AI Avatars
- In 2024, Hassle-Free Ways to Remove FRP Lock on Samsung Galaxy M34 Phones with/without a PC
- Top 4 Ways to Trace Lava Agni 2 5G Location | Dr.fone
- In 2024, How to Stream Apple iPhone 14 to Computer? | Dr.fone
- Hassle-Free Ways to Remove FRP Lock from Vivo V27 Pro Phones with/without a PC
- 8 Solutions to Solve YouTube App Crashing on Xiaomi 13T | Dr.fone
- Top 10 Oppo Android SIM Unlock APK
- How to Reset Poco M6 Pro 4G without Losing Data | Dr.fone
- In 2024, Top 4 SIM Location Trackers To Easily Find Your Lost Xiaomi Redmi K70 Device
- Failed to play MP4 movies with Motorola Moto G84 5G
- Top 12 Prominent Infinix Smart 8 Fingerprint Not Working Solutions
- In 2024, How to Unlock Xiaomi Redmi K70E Pattern Lock if Forgotten? 6 Ways
- How does the stardust trade cost In pokemon go On Apple iPhone SE (2020)? | Dr.fone
- A Complete Guide To OEM Unlocking on Samsung Galaxy S24
- 3 Effective Methods to Fake GPS location on Android For your Tecno Pova 6 Pro 5G | Dr.fone
- New In 2024, If You Want to Know How to Live Stream Pre-Recorded Video, You Are in the Right Place. We Will Give You a Complete Guide on 8 Ways You Can Live Stream Pre-Recorded Videos Successfully
- 2024 Approved Best Movie Making Apps for Android Top Picks
- In 2024, Unlocking the Power of Smart Lock A Beginners Guide for Realme 12 5G Users
- In 2024, Top Apps and Online Tools To Track Samsung Galaxy A15 4G Phone With/Without IMEI Number
- Complete guide for recovering contacts files on Huawei P60.
- In 2024, How to Use Life360 on Windows PC For Samsung Galaxy S24? | Dr.fone
- In 2024, Forgot Your Apple ID Password and Email On Apple iPhone XS Max? Heres the Best Fixes
- In 2024, How To Bypass iCloud By Checkra1n Even From iPhone 12 If Youve Tried Everything
- Unlocking an iCloud Locked iPad and Apple iPhone 14 Pro
- The way to recover deleted pictures on Nubia without backup.
- How to Share Location in Messenger On Vivo Y100t? | Dr.fone
- In 2024, Unlocking an iCloud Locked iPad and Apple iPhone SE
- Top 4 Ways to Trace Vivo X100 Pro Location | Dr.fone
- How to convert AVCHD MTS to MP4 for Motorola Razr 40?
- In 2024, Unlock Apple iPhone 15 With Forgotten Passcode Different Methods You Can Try
- Spoofing Life360 How to Do it on Vivo S18 Pro? | Dr.fone
- Why is iPogo not working On Vivo V30 Lite 5G? Fixed | Dr.fone
- Title: New Looking for a Change? 13 Top Windows Movie Maker Alternates
- Author: Amelia
- Created at : 2024-05-19 11:47:36
- Updated at : 2024-05-20 11:47:36
- Link: https://ai-driven-video-production.techidaily.com/new-looking-for-a-change-13-top-windows-movie-maker-alternates/
- License: This work is licensed under CC BY-NC-SA 4.0.
