
:max_bytes(150000):strip_icc():format(webp)/YoungAsianmanusinglaptopandreadingnewspaperonplane-59960904685fbe00103478bd.jpg)
The Art of Time Manipulation in Final Cut Pro X for 2024
The Art of Time Manipulation in Final Cut Pro X
Final Cut Pro X: Freeze-Frames and Slow Motion

Benjamin Arango
Mar 27, 2024• Proven solutions
A very simple, yet very effective effect is changing the speed of a video clip. This could be a simple still-frame (also called “Freeze Frame”) or playing a clip in slow or fast motion.
This article shows you how to do this using Final Cut Pro X.
For more tutorials on slow-motion please refer to this article: Top 10 Slow Motion Video Editing Software.
Freeze-Frames and Slow Motion in Final Cut Pro X
1. STILL FRAMES

A still-frame freezes action. For instance, here is a clip of a hummingbird getting ready to land on a bird feeder. I want to create a freeze-frame of the bird in flight. (Um, yeah, I use “freeze-frame” and “still-frame” interchangeably.)
In Final Cut Pro X, put the playhead (or skimmer) on the frame you want to freeze and type Option+F.

This creates a two-second freeze-frame at the position of the playhead.

Adjust the duration of the frame by trimming the edge; just like any other clip. Here, for example, I’m making the duration of the freeze-frame 11 frames shorter.

In case you were wondering, this is what the freeze looks like. It freezes the flight of the hummingbird in the middle of playback, allowing us to add graphics or other text then resume the action as though nothing had happened.
Very cool, except….
Well, the good news is that this is fast and easy. The bad news is that we can’t change the location of the still frame.
So, here’s another way to do this.
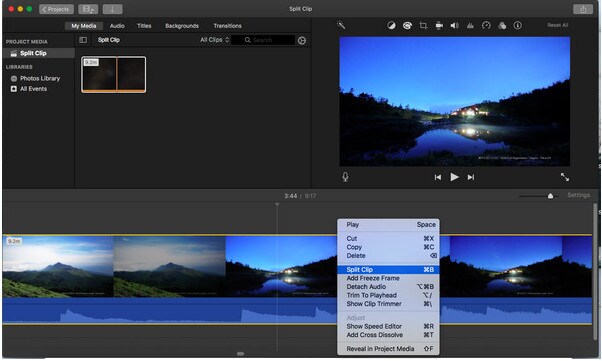
Put the playhead (or skimmer, but I prefer the playhead) on the frame you want to freeze, select the clip, then type Shift+F.

This locates the source clip in the Browser, selects both the Browser and the clip, and matches the position of the In, Out, and playhead.

Now, with the Browser selected, type Option+F. This creates a freeze-frame of the Browser clip and places it at the location of the playhead as a connected clip in the Timeline.
As a connected clip, we can move this new freeze-frame wherever we want. However, be careful in moving the clip, because, unless you mark the original frame with a marker (type “M”), there’s no easy way to match the still frame with the source frame, once the still frame is moved somewhere else.
I use both these techniques in many different projects.
2. HOLD FRAME
A Hold Frame is similar to an in-line still frame, but with more flexibility.

Put the playhead (or skimmer) on the frame you want to hold. Then, Then, using either Modify > Retime or the “Smurf-on-a-headset” Toolbar icon, choose Hold Frame (or type: Shift+H).

This displays the orange Retime editor bar above the clip, with a small red portion indicating the Hold frame.

Change the duration of the Hold frame by dragging the small thumb at the right end of the red bar.

Add a speed ramp transition at the end of the Hold frame by clicking the downward-pointing arrow next to the word “Hold” in the Retime Editor.

To change the actual frame being held, double-click the bar icon to the LEFT of the red Hold section and choose Source Frame (Edit). This allows you to slide the Hold frame selection left or right.
NOTE: Changing the source frame is a feature that I like a LOT!
3. SLOW (or FAST) MOTION

We use slow-motion to show events that are too fast for the unaided eye to see. And fast motion to speed up very slow events. Both of these effects use what’s called a “constant speed change,” where the entire clip changes by the same amount - either faster or slower.
WE create either effect using the same tools, just different values. Here’s how.

Select the clip who’s speed you want to change. Then, using either Modify > Retime or the “Smurf” Toolbar icon, select Slow (or Fast).
Choose one of the available speeds; in this case, 50%. (Yes, you can change this to any value you want, I’ll show you how in a minute.)

Three things happen at once:
- The duration of the clip changes
- The orange Retiming bar appears over the top of the clip
- The speed of the clip changes

To reset the speed back to normal (100%), click the downward-pointing arrow in the Retiming bar and choose Normal (100%).
There are two ways to change the speed of a clip.

The easy way is to grab the small handle at the end of the clip and drag left or right. The speed will change as you drag it.
Or, for more precision, click the downward-pointing arrow in the Retiming bar and choose Custom.

This opens a new dialog allowing a number of changes:
- Reverse. Plays the clip in reverse.
- Rate. Select a specific speed change as a percentage of normal speed for a clip. Less than 100% is slow-motion. More than 100% is fast-motion.
- Duration. Select a specific duration for a clip and FCP X will calculate how fast or slow it needs to go.
- Ripple. When checked, adjusts the duration of a clip based upon the speed. When unchecked, the clip duration remains fixed even when speed changes.
You will get the smoothest speed changes when the percentage you choose divides evenly into 200. For example, 100, 66, 50, 40, 33, 25, 20, 10 and so on.
4. EXTRA CREDIT
There is one more setting to consider when slowing a clip. (This does not apply when creating fast motion.)

Using, again, either Modify > Retime or the “Smurf” menu, select Video Quality.
- Normal. This is the best choice for speeds of 50% or faster.
- Frame Blending. This is the best choice for speeds of about 20% to 50%.
- Optical Flow. This is the best choice for speeds slower than about 20%.
Frame blending puts a short dissolve between frames when running in slow motion to improve the illusion of motion. Optical Flow invents in-between frames to minimize the jerkiness of extremely slow motion.
Frame blending is relatively fast and easy. Optical Flow will look better in most cases, but takes a long time to render.
This is a basic tutorial about Apple Final Cut Pro X, a professional video editing software. However, if video editing is new to you, consider Wondershare Filmora for Mac . This is a powerful but easy-to-use tool for users just starting out. Download the free trial version below.
 Download Mac Version ](https://tools.techidaily.com/wondershare/filmora/download/ )
SUMMARY
Whether you want your clips to speed up, slow down or just plain stop, Final Cut Pro X makes the entire process easy.
Benjamin Arango
Benjamin Arango is a writer and a lover of all things video.
Follow @Benjamin Arango
Benjamin Arango
Mar 27, 2024• Proven solutions
A very simple, yet very effective effect is changing the speed of a video clip. This could be a simple still-frame (also called “Freeze Frame”) or playing a clip in slow or fast motion.
This article shows you how to do this using Final Cut Pro X.
For more tutorials on slow-motion please refer to this article: Top 10 Slow Motion Video Editing Software.
Freeze-Frames and Slow Motion in Final Cut Pro X
1. STILL FRAMES
A still-frame freezes action. For instance, here is a clip of a hummingbird getting ready to land on a bird feeder. I want to create a freeze-frame of the bird in flight. (Um, yeah, I use “freeze-frame” and “still-frame” interchangeably.)
In Final Cut Pro X, put the playhead (or skimmer) on the frame you want to freeze and type Option+F.
This creates a two-second freeze-frame at the position of the playhead.
Adjust the duration of the frame by trimming the edge; just like any other clip. Here, for example, I’m making the duration of the freeze-frame 11 frames shorter.
In case you were wondering, this is what the freeze looks like. It freezes the flight of the hummingbird in the middle of playback, allowing us to add graphics or other text then resume the action as though nothing had happened.
Very cool, except….
Well, the good news is that this is fast and easy. The bad news is that we can’t change the location of the still frame.
So, here’s another way to do this.
Put the playhead (or skimmer, but I prefer the playhead) on the frame you want to freeze, select the clip, then type Shift+F.
This locates the source clip in the Browser, selects both the Browser and the clip, and matches the position of the In, Out, and playhead.
Now, with the Browser selected, type Option+F. This creates a freeze-frame of the Browser clip and places it at the location of the playhead as a connected clip in the Timeline.
As a connected clip, we can move this new freeze-frame wherever we want. However, be careful in moving the clip, because, unless you mark the original frame with a marker (type “M”), there’s no easy way to match the still frame with the source frame, once the still frame is moved somewhere else.
I use both these techniques in many different projects.
2. HOLD FRAME
A Hold Frame is similar to an in-line still frame, but with more flexibility.
Put the playhead (or skimmer) on the frame you want to hold. Then, Then, using either Modify > Retime or the “Smurf-on-a-headset” Toolbar icon, choose Hold Frame (or type: Shift+H).
This displays the orange Retime editor bar above the clip, with a small red portion indicating the Hold frame.
Change the duration of the Hold frame by dragging the small thumb at the right end of the red bar.
Add a speed ramp transition at the end of the Hold frame by clicking the downward-pointing arrow next to the word “Hold” in the Retime Editor.
To change the actual frame being held, double-click the bar icon to the LEFT of the red Hold section and choose Source Frame (Edit). This allows you to slide the Hold frame selection left or right.
NOTE: Changing the source frame is a feature that I like a LOT!
3. SLOW (or FAST) MOTION
We use slow-motion to show events that are too fast for the unaided eye to see. And fast motion to speed up very slow events. Both of these effects use what’s called a “constant speed change,” where the entire clip changes by the same amount - either faster or slower.
WE create either effect using the same tools, just different values. Here’s how.
Select the clip who’s speed you want to change. Then, using either Modify > Retime or the “Smurf” Toolbar icon, select Slow (or Fast).
Choose one of the available speeds; in this case, 50%. (Yes, you can change this to any value you want, I’ll show you how in a minute.)
Three things happen at once:
- The duration of the clip changes
- The orange Retiming bar appears over the top of the clip
- The speed of the clip changes
To reset the speed back to normal (100%), click the downward-pointing arrow in the Retiming bar and choose Normal (100%).
There are two ways to change the speed of a clip.
The easy way is to grab the small handle at the end of the clip and drag left or right. The speed will change as you drag it.
Or, for more precision, click the downward-pointing arrow in the Retiming bar and choose Custom.
This opens a new dialog allowing a number of changes:
- Reverse. Plays the clip in reverse.
- Rate. Select a specific speed change as a percentage of normal speed for a clip. Less than 100% is slow-motion. More than 100% is fast-motion.
- Duration. Select a specific duration for a clip and FCP X will calculate how fast or slow it needs to go.
- Ripple. When checked, adjusts the duration of a clip based upon the speed. When unchecked, the clip duration remains fixed even when speed changes.
You will get the smoothest speed changes when the percentage you choose divides evenly into 200. For example, 100, 66, 50, 40, 33, 25, 20, 10 and so on.
4. EXTRA CREDIT
There is one more setting to consider when slowing a clip. (This does not apply when creating fast motion.)
Using, again, either Modify > Retime or the “Smurf” menu, select Video Quality.
- Normal. This is the best choice for speeds of 50% or faster.
- Frame Blending. This is the best choice for speeds of about 20% to 50%.
- Optical Flow. This is the best choice for speeds slower than about 20%.
Frame blending puts a short dissolve between frames when running in slow motion to improve the illusion of motion. Optical Flow invents in-between frames to minimize the jerkiness of extremely slow motion.
Frame blending is relatively fast and easy. Optical Flow will look better in most cases, but takes a long time to render.
This is a basic tutorial about Apple Final Cut Pro X, a professional video editing software. However, if video editing is new to you, consider Wondershare Filmora for Mac . This is a powerful but easy-to-use tool for users just starting out. Download the free trial version below.
Download Mac Version ](https://tools.techidaily.com/wondershare/filmora/download/ )
SUMMARY
Whether you want your clips to speed up, slow down or just plain stop, Final Cut Pro X makes the entire process easy.
Benjamin Arango
Benjamin Arango is a writer and a lover of all things video.
Follow @Benjamin Arango
Trim AVI Videos Like a Pro: Top Tools for Every Platform
With the growing fame of video-sharing and social media applications like Twitter, Instagram, and TikTok, the demand for simple and fast video cutting and trimming tools has dramatically increased. Nowadays, you don’t have to play with complex video editing tools to produce high-quality videos.
Thanks to several user-friendly editing software to make things easy for everybody. However, finding the right programs to trim/cut videos is still challenging, especially in AVI format.
But, guess what? These top 16 AVI video cutters for Windows, MAC, Android, iPhone, and online will make video cutting and trimming fun, especially when you learn to do it using Filmora.
In this Article
Part 1: Best AVI Video Cutter to Trim/Cut AVI Video on Windows and MAC – Filmora Video Cutter [with steps}
Part 2: Top 3 Free AVI Video Cutter on Windows
Part 3: Top 3 Free AVI Video Cutter on MAC
Part 4: Top 3 Free AVI Video Cutter on Android
Part 5: Top 3 Free AVI Video Cutter on iPhone
Part 6: Top 3 Free AVI Video Cutter Online
Part 7: Bottom Line
Part 8: FAQs
Part 1: Best AVI Video Cutter to Trim/Cut AVI Video on Windows and MAC – Filmora Video Cutter [with steps]
Filmora by Wondershare is a star video editor with outstanding outcomes. Whether you have a MAC or Windows PC, you can download Filmora regardless of your operating system. The program best serves those who intend to make high-quality videos. The software provides editing support for all video formats, including AVI.
Although Filmora is an affordable editor with tons of audio and video editing options, you can still download the software for free and create projects if watermarks don’t bother you. Moreover, you can count this tool’s capabilities in cropping, resizing, and Chroma screen support. But that’s not the only sweet fruit.
In fact, Filmora is equipped with many jaw-dropping features, including preset templates, auto beat sync, split-screen, speed ramping, motion tracking, keyframing, creative transitions, titles, filters, and much more. And the best part is, you can learn and understand Filmora in no time. That’s why the program is loved and supported by all types of users.
So does Filmora helps cut and trim AVI videos? Yes! It does if you follow these steps correctly.
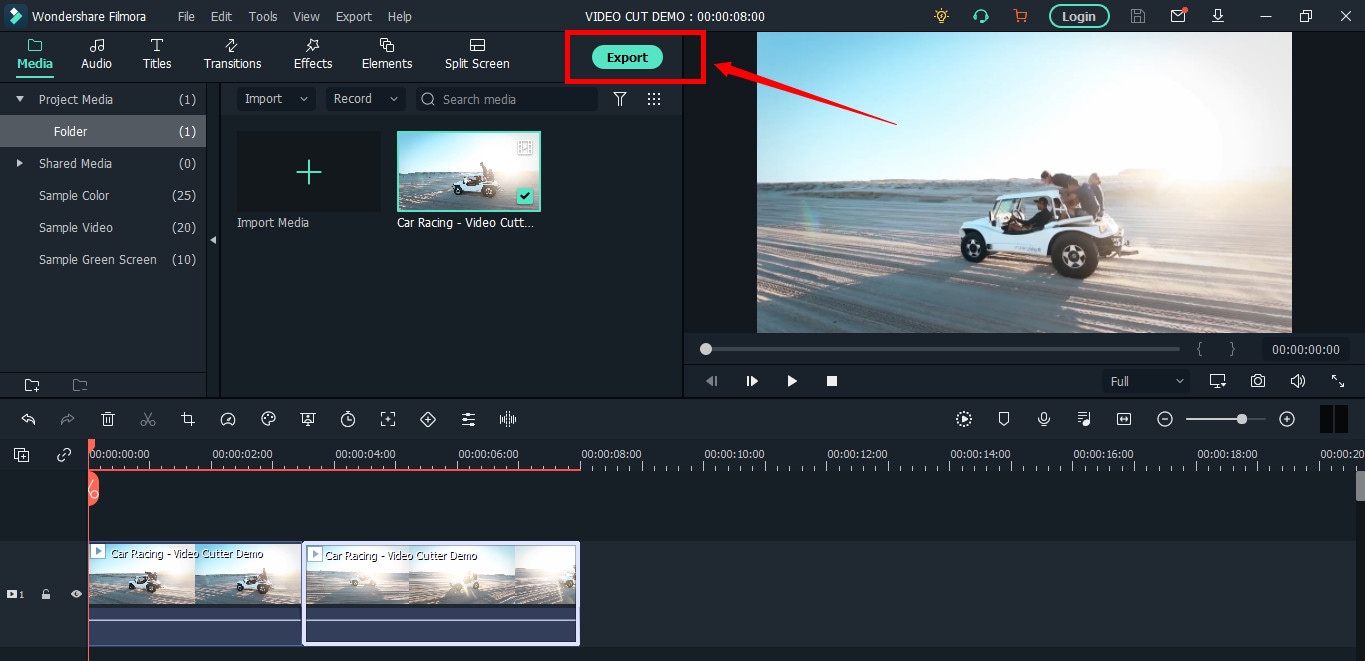
Step 1: Download Filmora Video Editor
First, download Filmora Video Editor by choosing your operating system, as seen in the screenshot below.
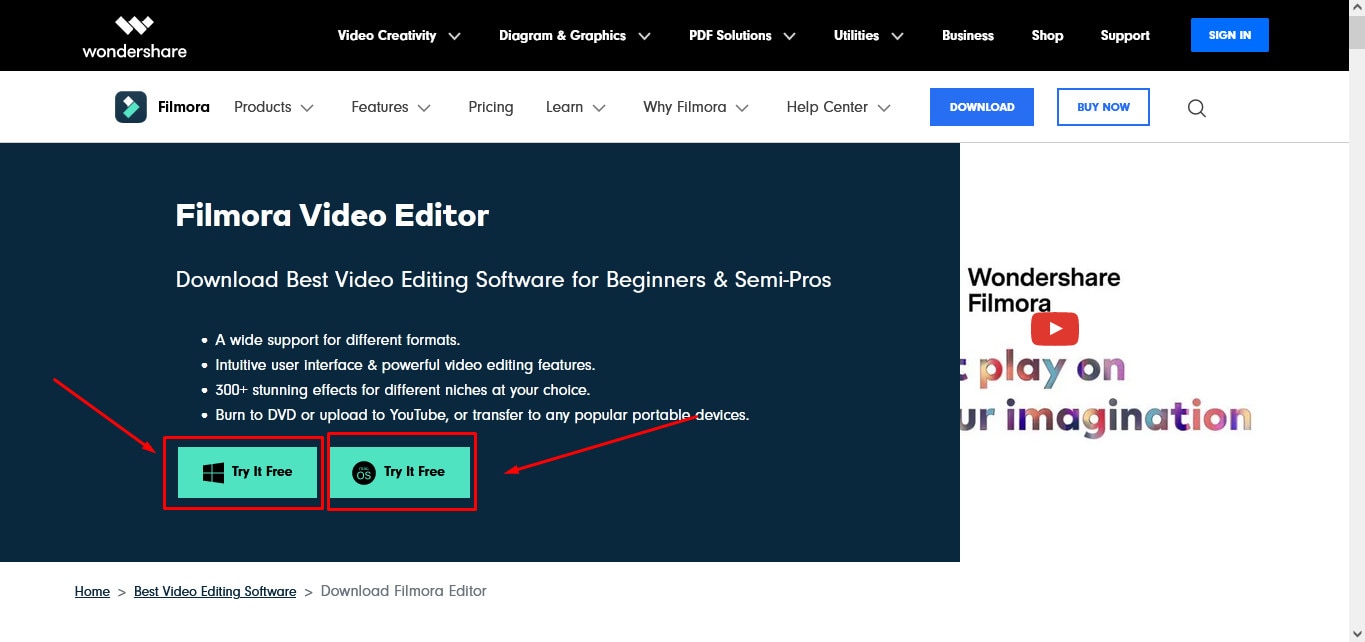
Run the setup and let it finish without any pause or break.
Step 2: Import Your Video to Filmora Video Editor
Importing your AVI video is a very simple process. Just click on the “Film Clip” icon.
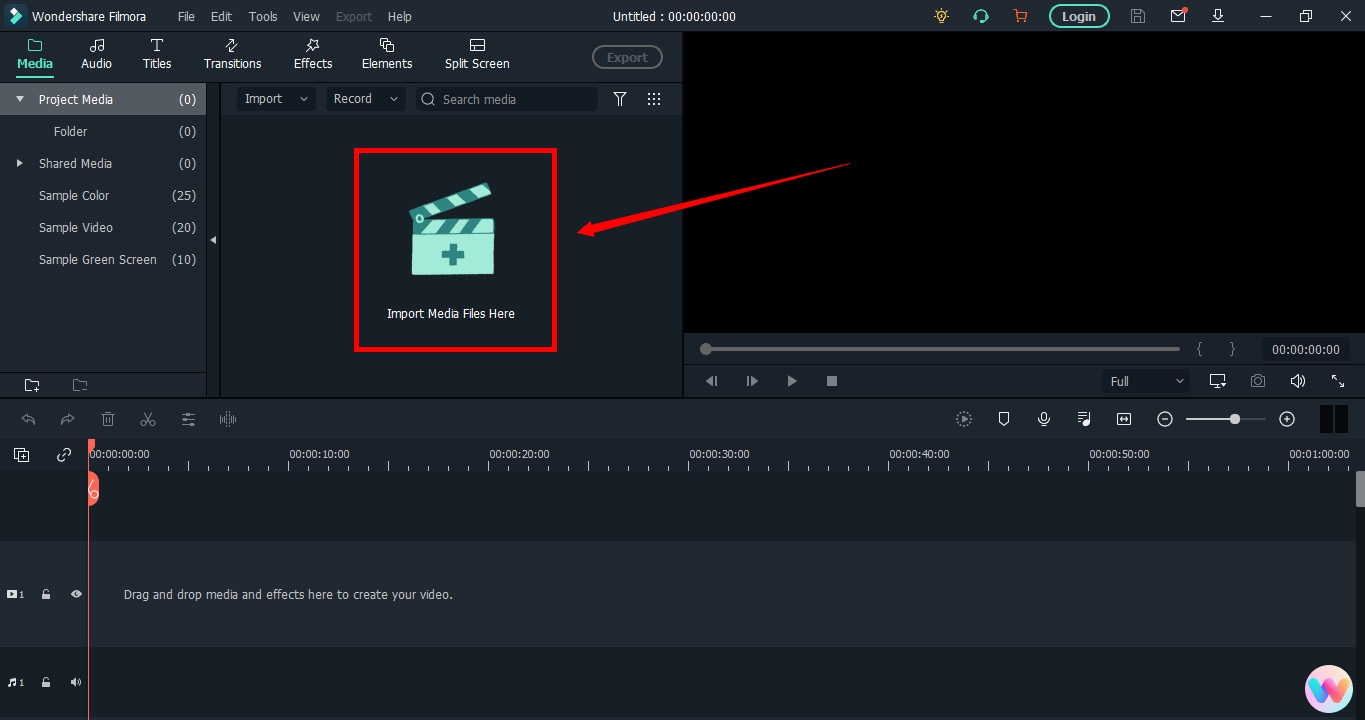
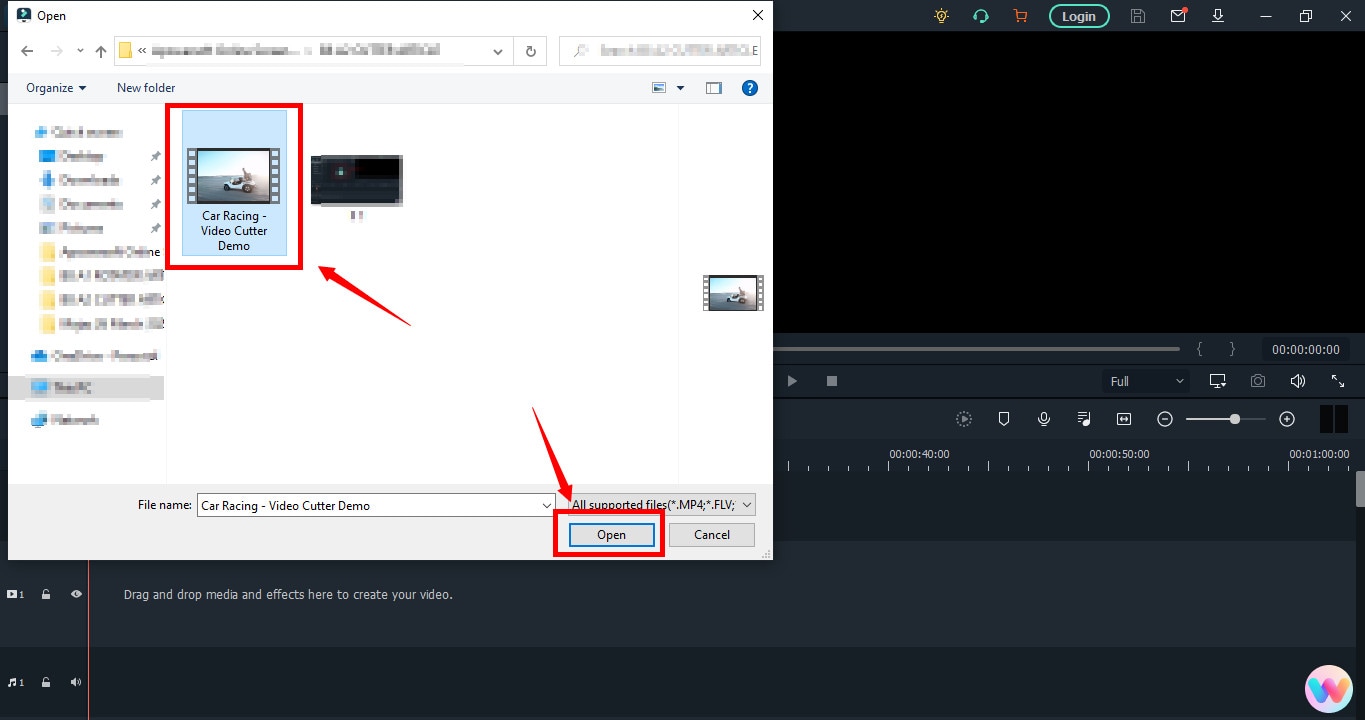
It will open a new window screen on your computer to select the video from the directory. Find the clip you want to import and cut. Use your mouse to select it and click the “Open” button.
The video will be loaded in the “Media” folder of Filmora. The clip’s thumbnail should be visible to assure you have done everything correctly.
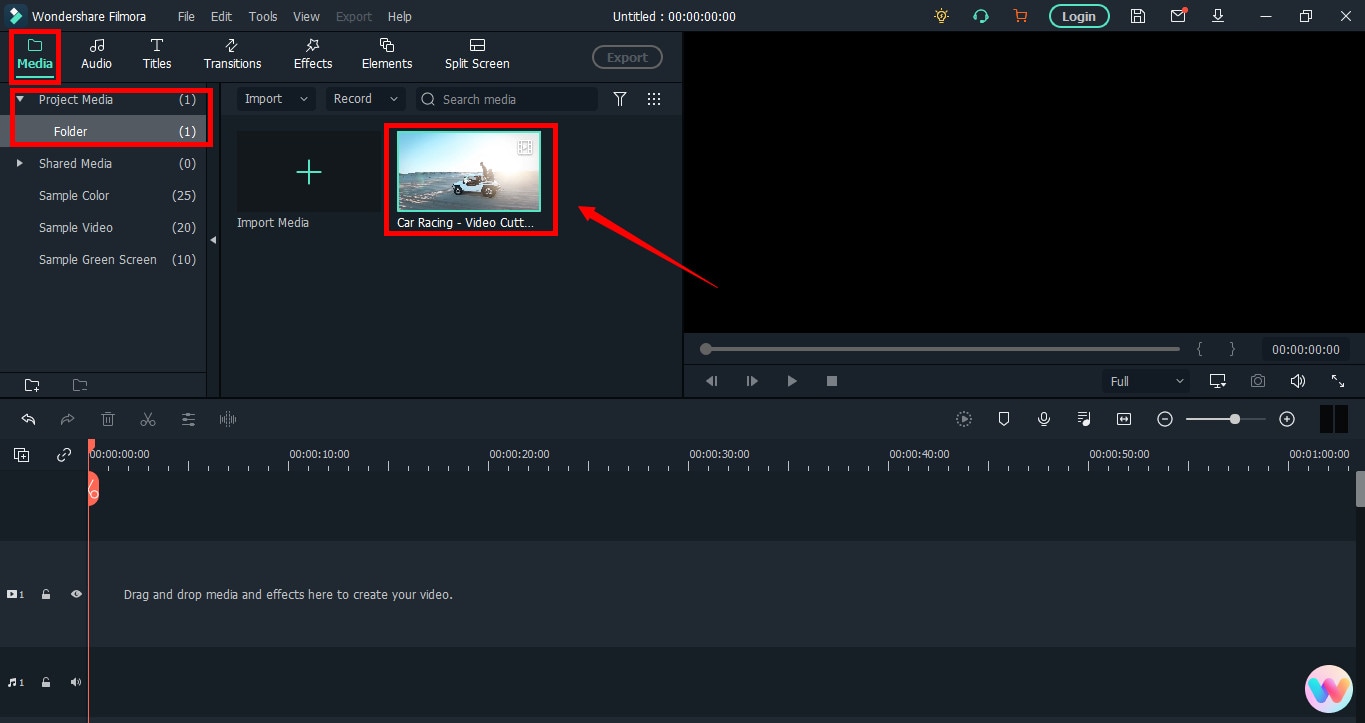
If you can see that, let’s go to the next step.
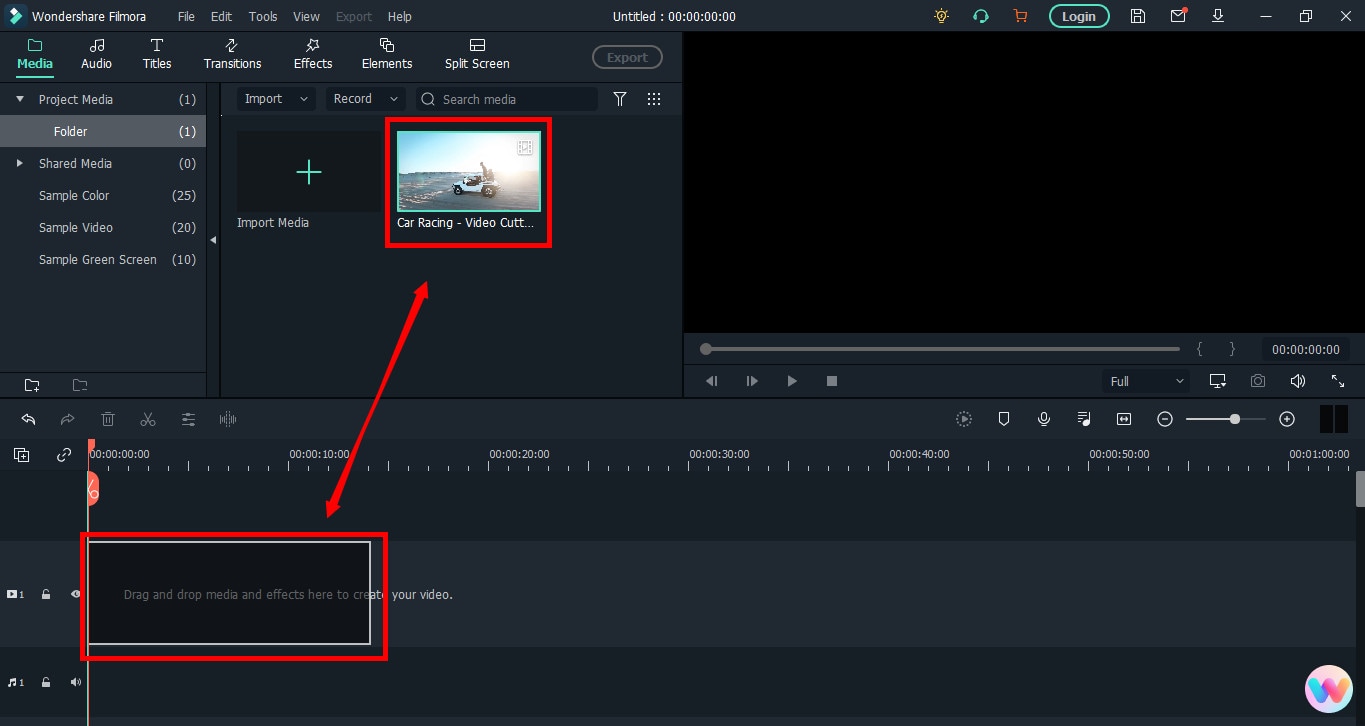
Step 3: Drag and Drop Video to Filmora’s Timeline
Select the video in the media folder by clicking over it once. Now, without leaving the hold of the left button of your mouse, slide the video down to the track in the timeline.
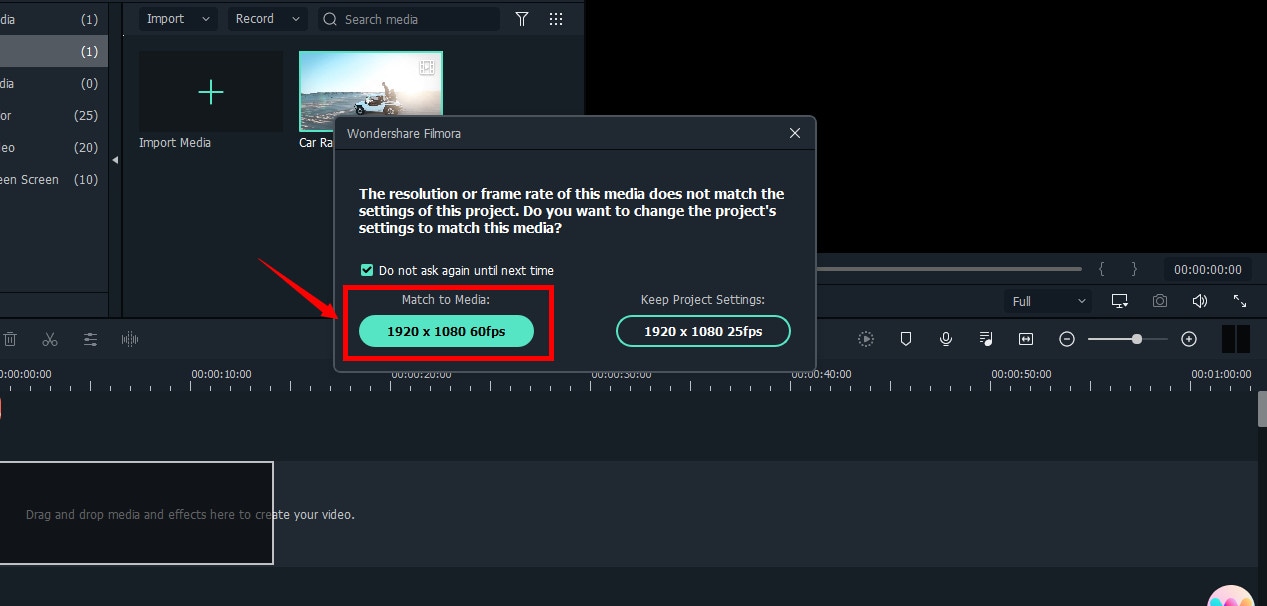
After that, a message will pop up, asking about your preference for the project settings. It is recommended to choose the “Match to Media” option unless you’re an experienced video editor who knows how to play with the resolution and frame rates.
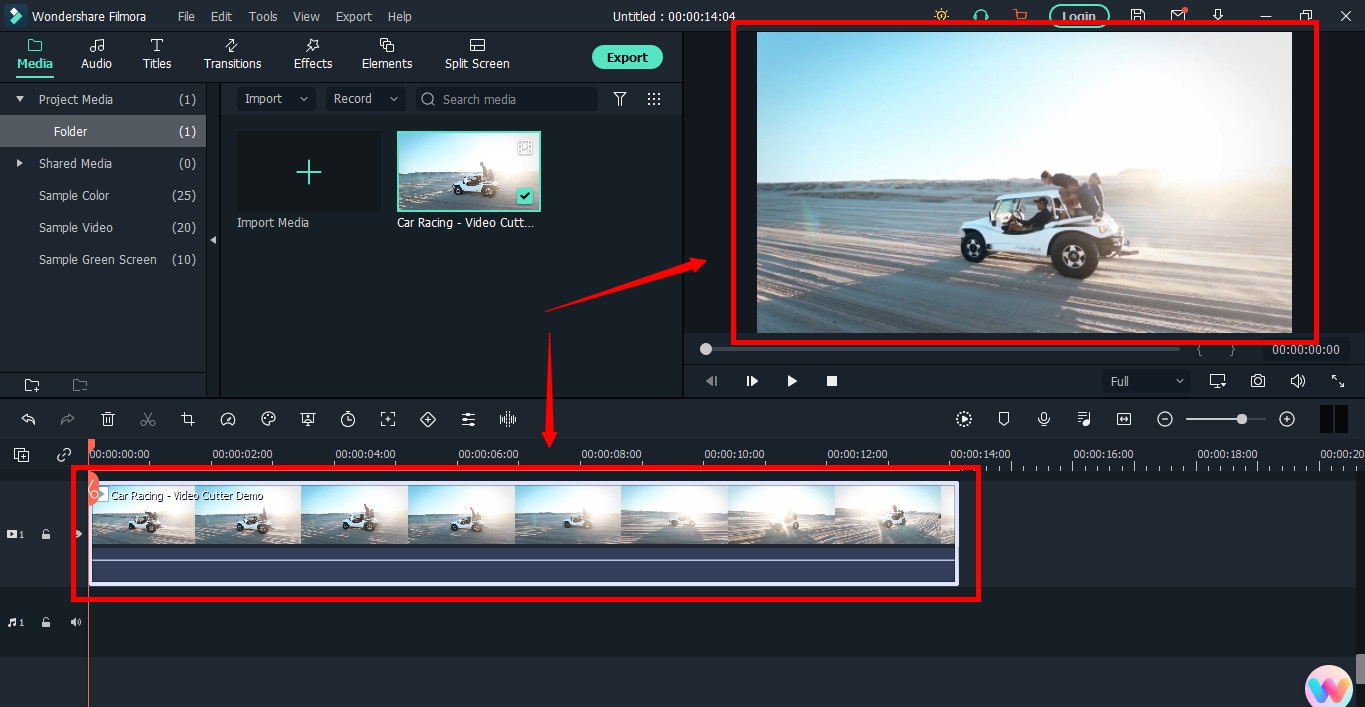
You will see the video on the timeline with its preview on the “Preview Screen” on the right side of the interface.
Step 4: Cutting Your Video in Filmora
Here comes the core step you have been waiting for. But before you go any further, you need to know about the “Playhead.”
Playhead is an orange-reddish marker you can find on the timeline.
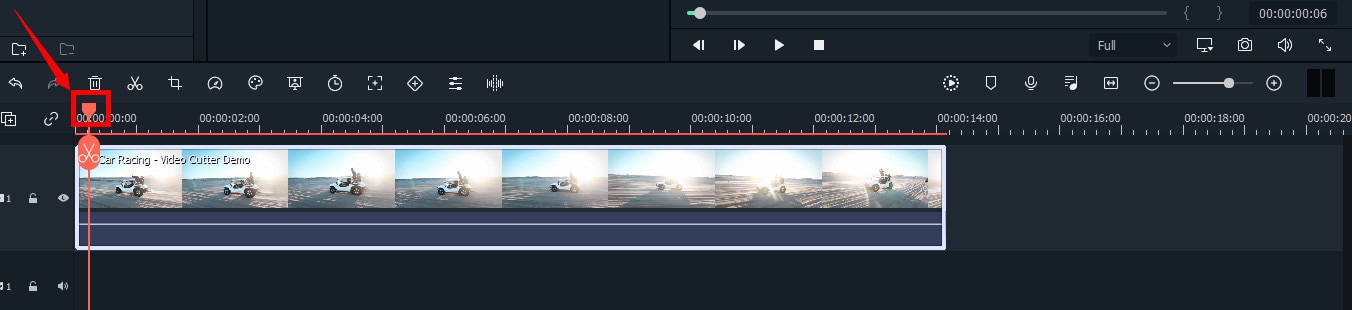
It has an important role in cutting your videos.
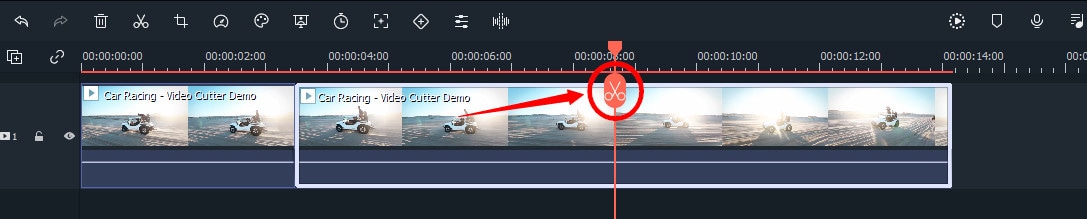
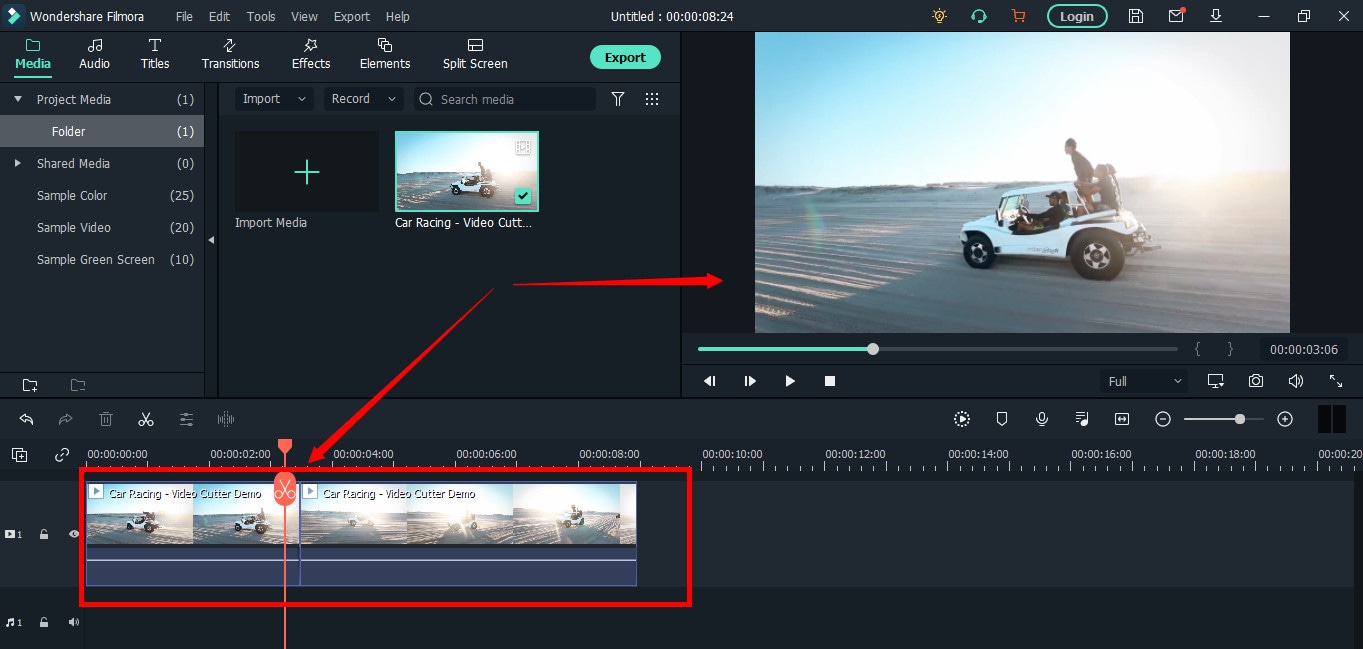
So, move the playhead to your desired frame and click on the “scissor” icon to make the “starting” cut.
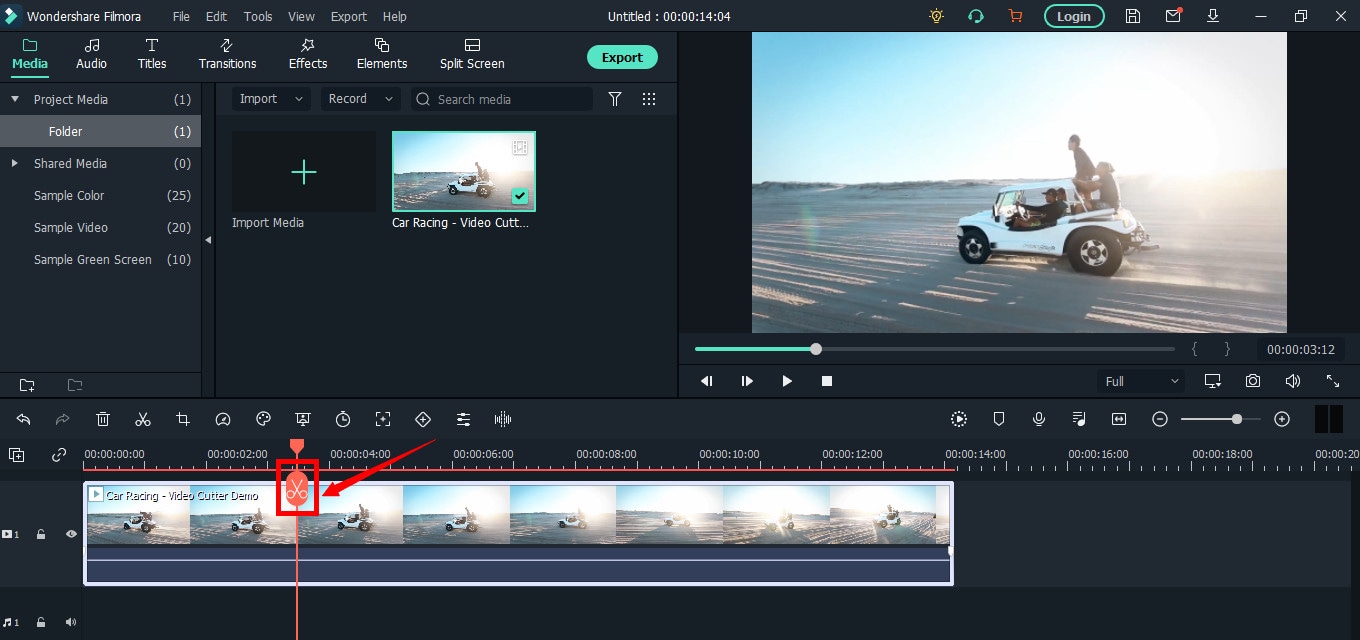
As soon as you do it, you will see that the single clip is now divided into two parts similar to this image.
The “Red” marked area in the above screenshot ensures a gap between the clips on the timeline. The “Yellow” arrows confirm two separate clips of the same video.
Place the two clips together as seen in this “Green” area.
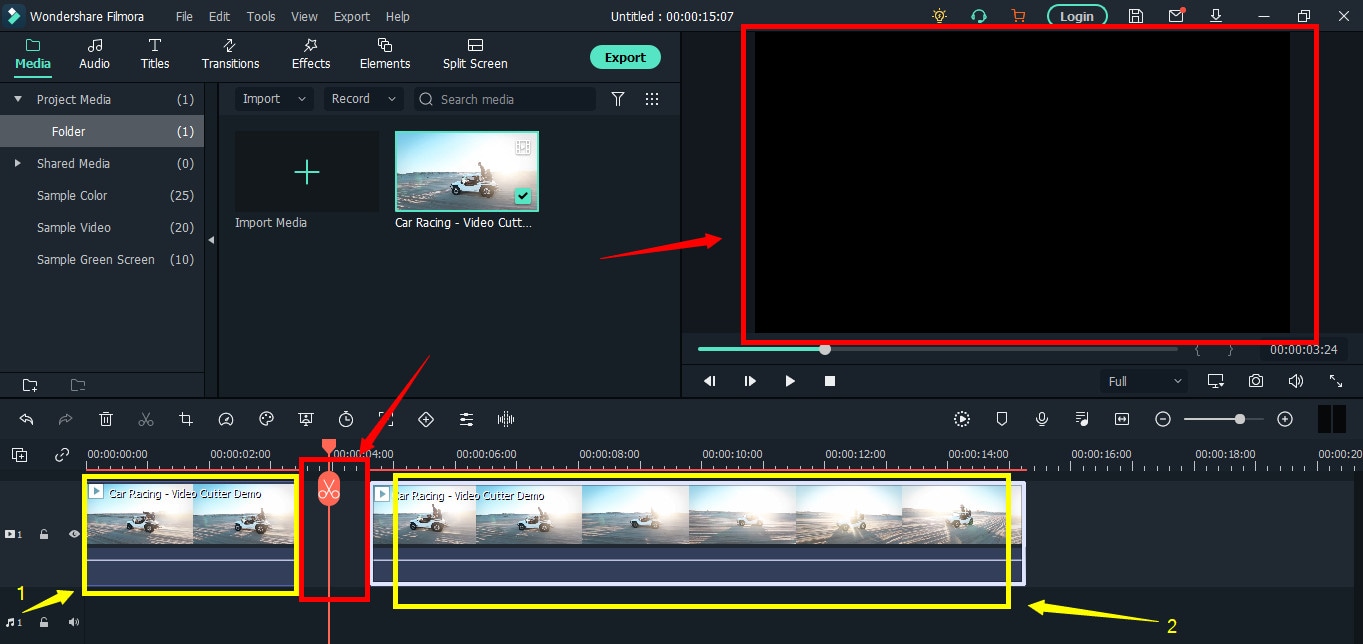
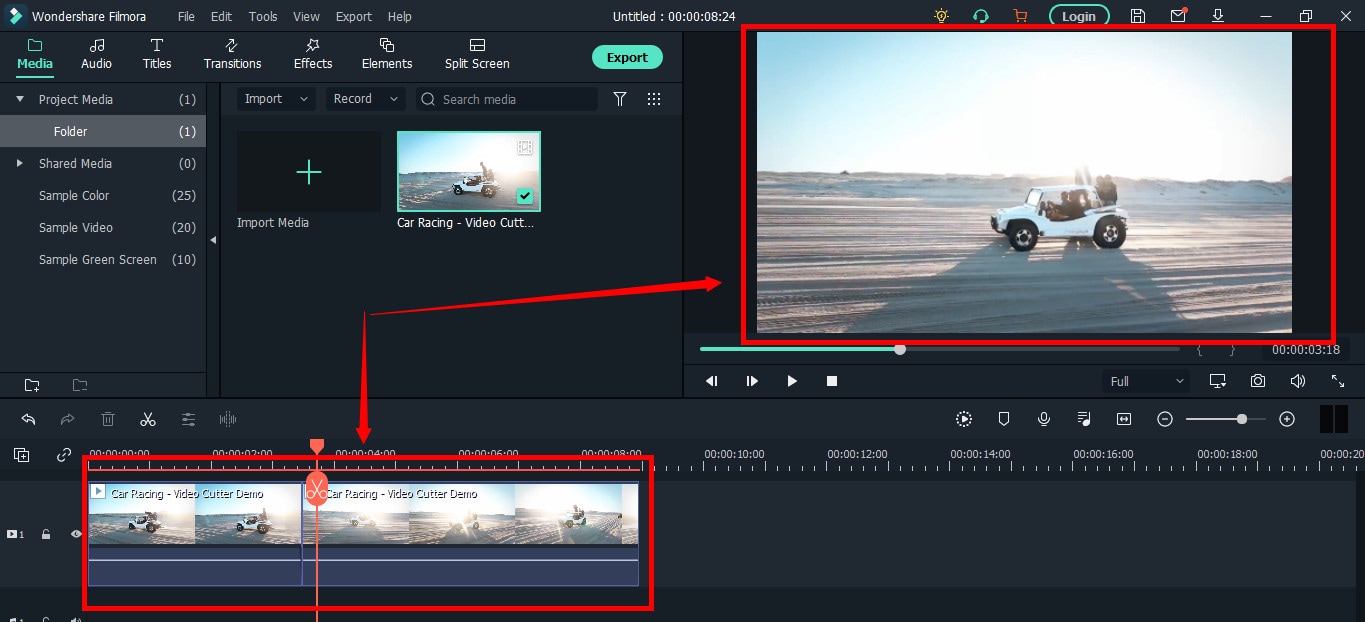
And place the playhead anywhere on the clip. And click on the “scissor” icon once again to make the “ending” cut (second cut).
If done correctly, there should be three clips now of the same video, as you can observe in this screenshot.
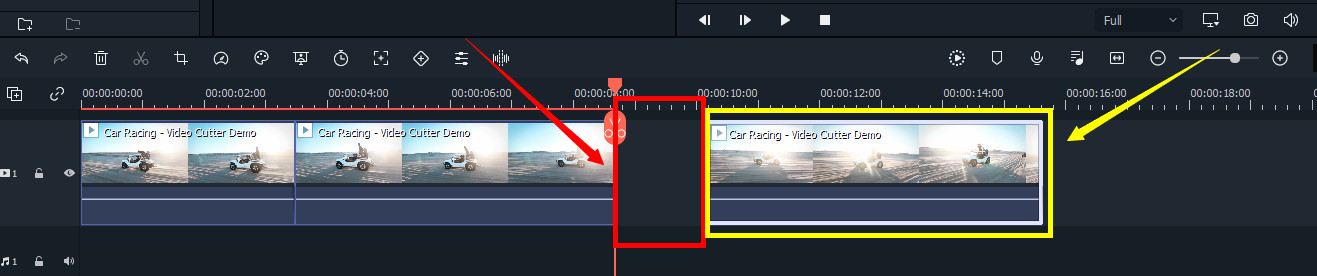
Again, the “Red” area in the above photo indicates the gap, and the “Yellow” area ensures a third segment of the video.
Note: The gaps you can see in the divided clips are made intentionally for understanding. Practically, Filmora doesn’t move the clip or make gaps in between after you have made the cuts.
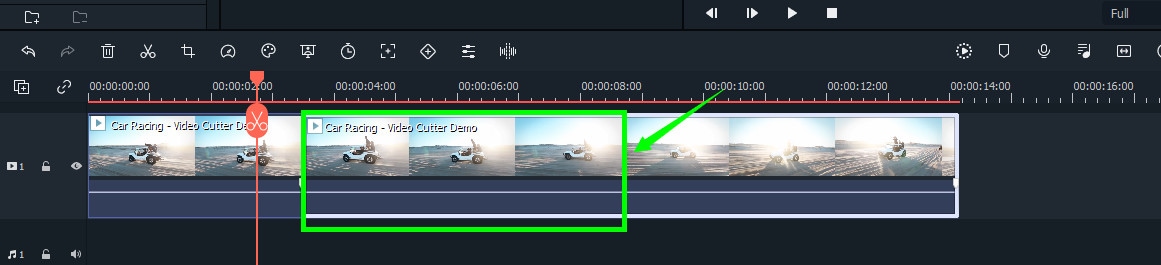
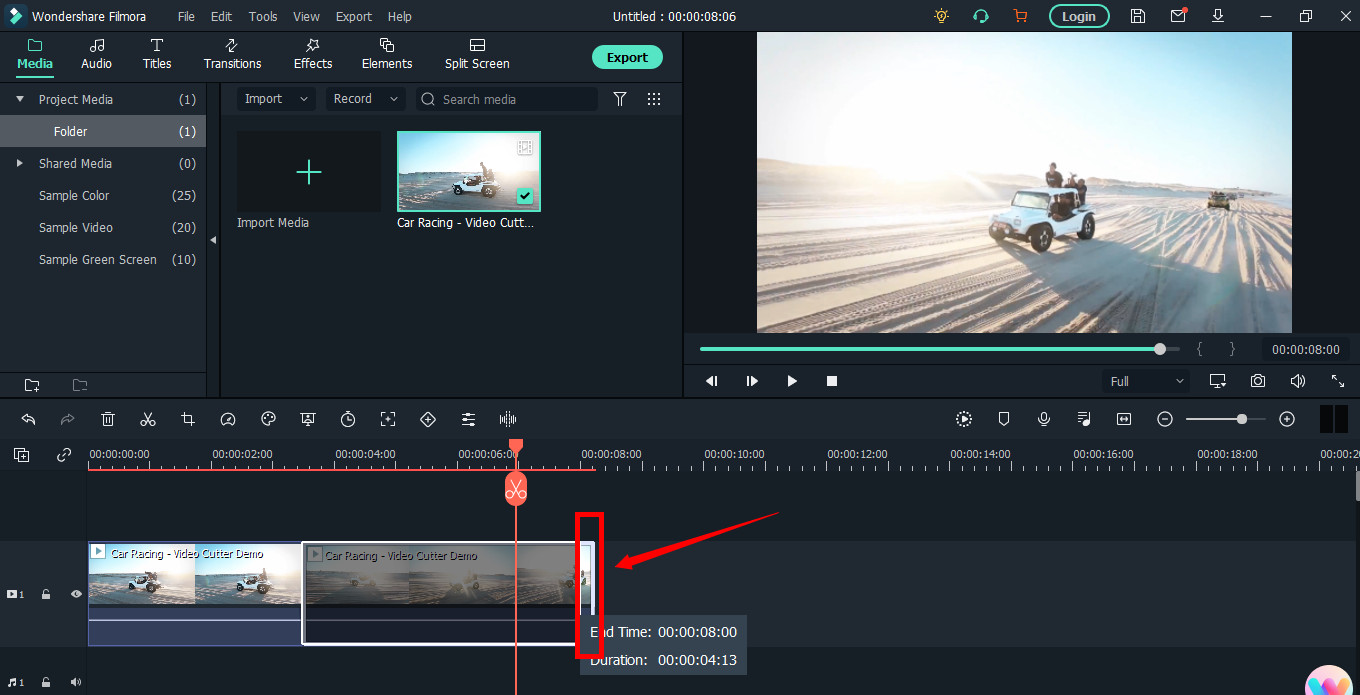
Keep in mind that there are three clips on the timeline. Now, if you want to remove the second clip from the video, you need to select that portion first by clicking on it.
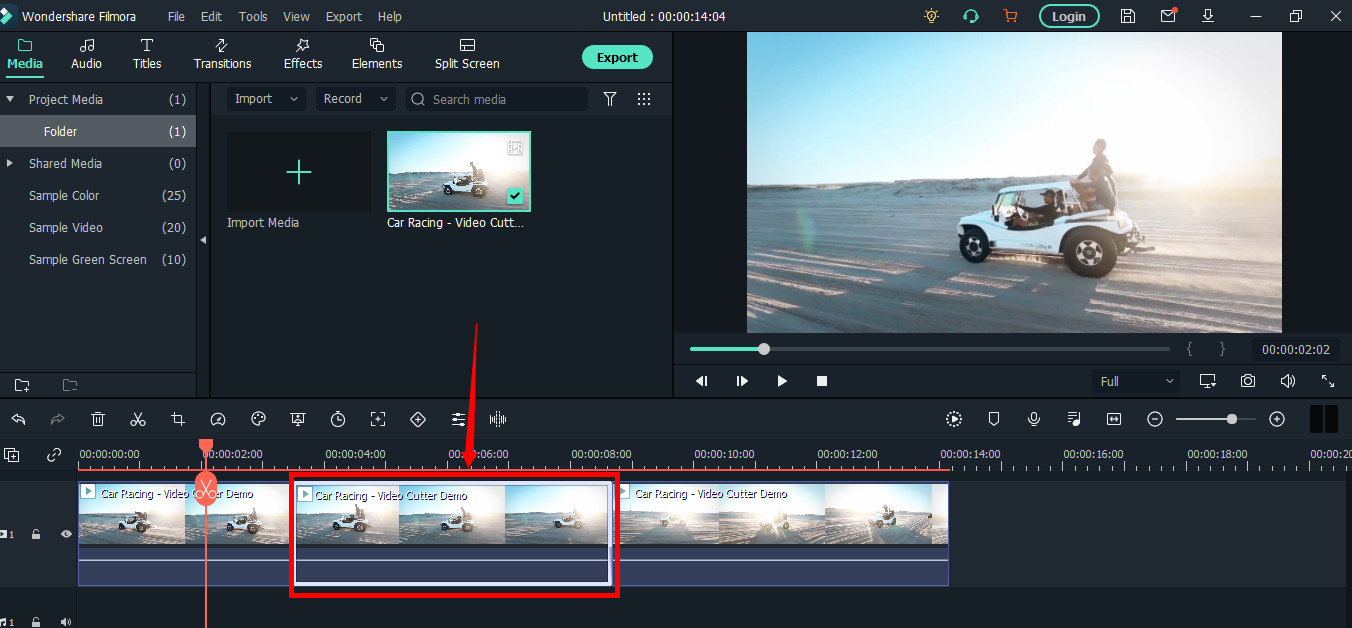
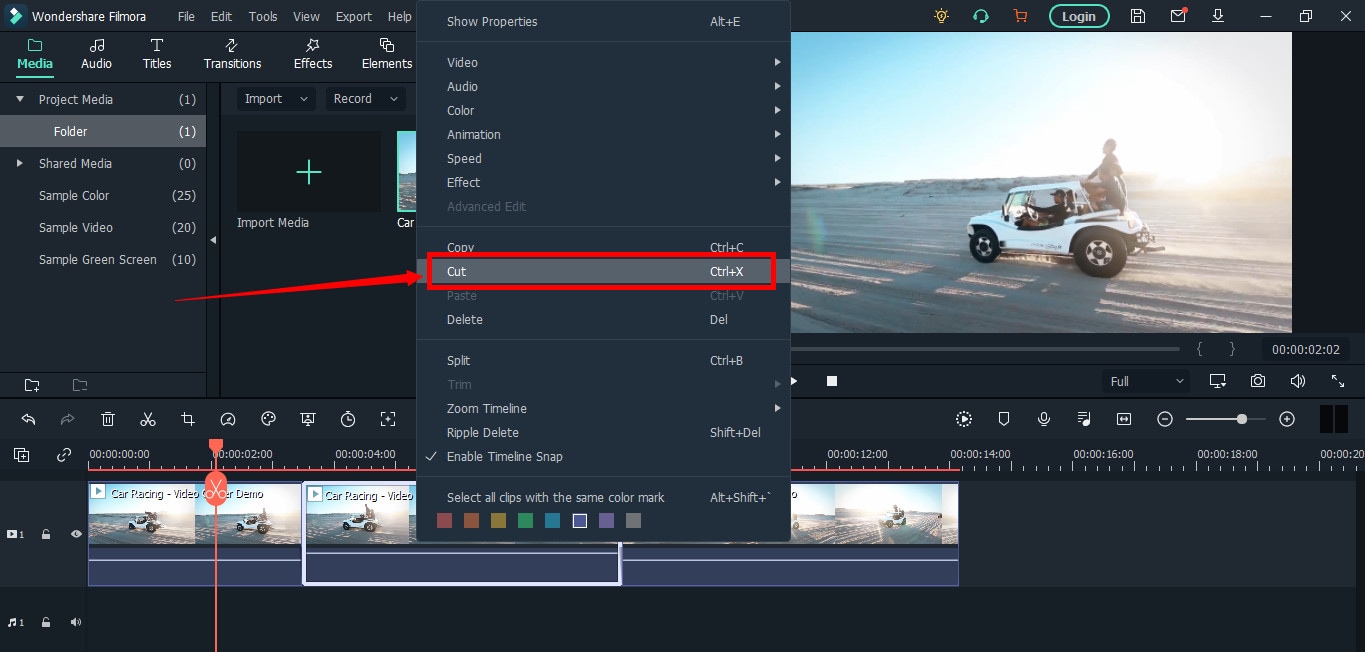
Then, right-click on the mouse and choose “Cut” from the menu.
Within a semi-second, the selected portion will be removed from the timeline. And you will be able to see the remaining parts of the video. Now, pull the second clip using your mouse and place it at the end of the first clip without leaving a gap in between.
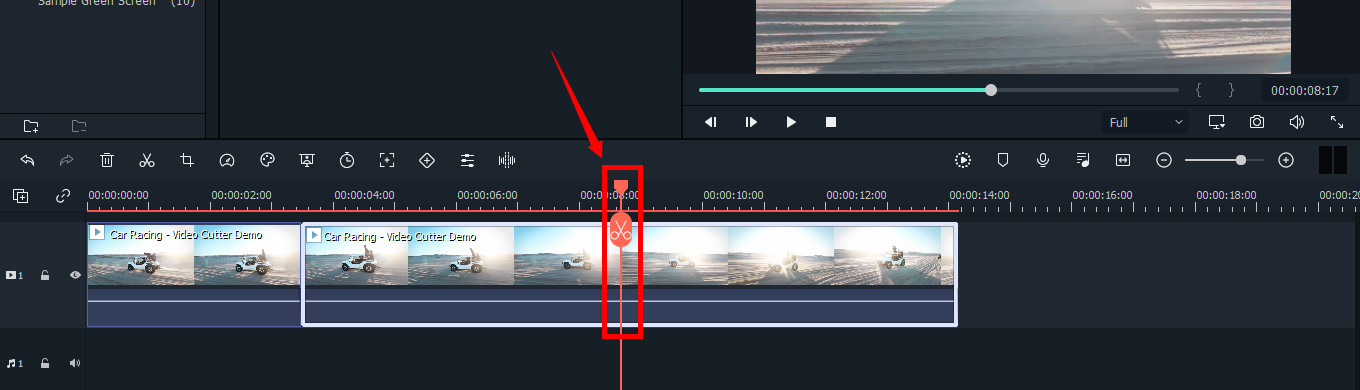
Then, click the “Play” button under the preview screen to see the results.
You can see in the above two screenshots that there’s a jump between the scenes due to cuts, confirming that video has been cut significantly.
Step 5: Trimming Your Video in Filmora
Remember that cutting and trimming in Filmora are two different things. Trimming allows you to remove a particular video part from visibility without deleting the portion.
So feel free to skip this step if you’re happy learning the cutting technique. But if you’re interested in trimming, here’s how you do it.
Take your mouse cursor at the beginning or end of the clip you want to trim. Keep holding the clip’s corner and slide the mouse back or front to trim the part
Note: Since the trim tool doesn’t delete the video, the final project based on trimming will be of a larger size. Therefore, it is advised to cut videos rather than trimming for fast rendering, better results, and small video size.
Step 6: Save Project and Export Your Cut/Trimmed AVI Video
Choose “Save Project” from the “File” menu.
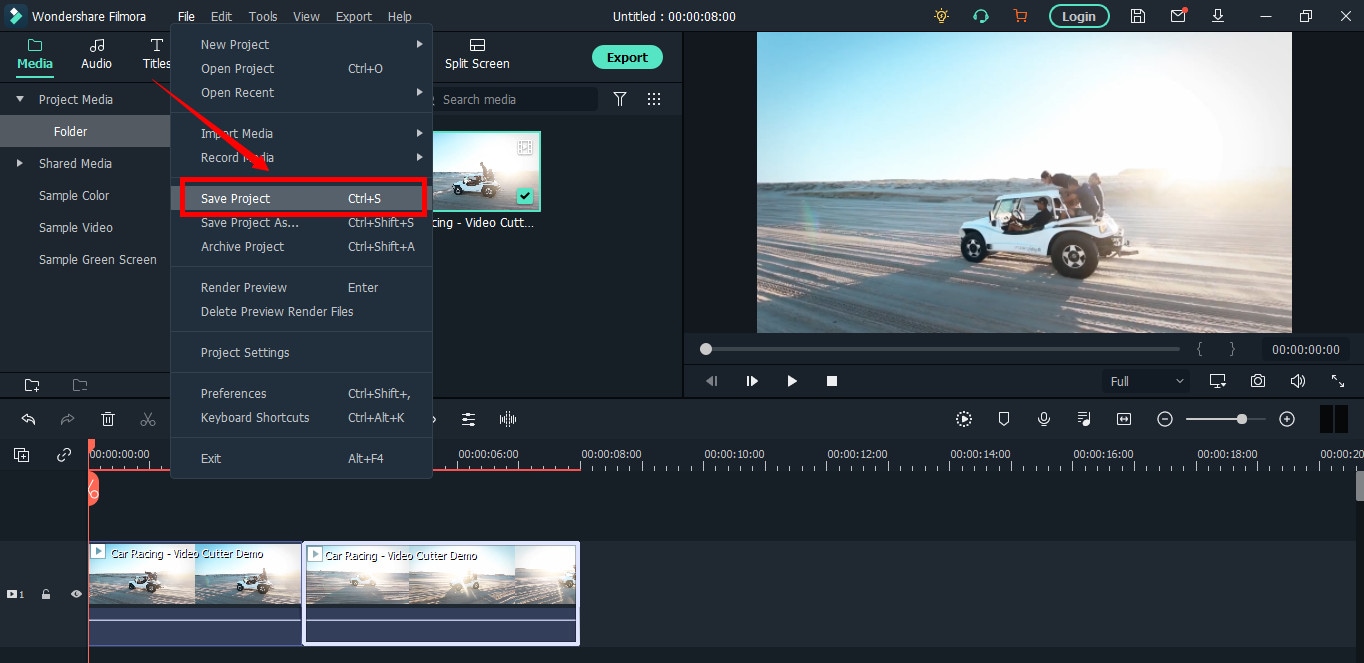
Select the directory to save the project, rename the new video, and click the “Save” button.

Click on the “Export” button to save the video in AVI or any other video format of your choice on your computer.
Part 2: Top 3 Free AVI Video Cutter on Windows
As a Windows user, finding an excellent video cutter is relatively easy. However, not all software permits importing AVI videos. In the same way, some video trimmers come at a price. So if you really don’t want to pay and enjoy cutting your AVI files, try using these three video cutting tools.
Microsoft Photos (Windows 10)
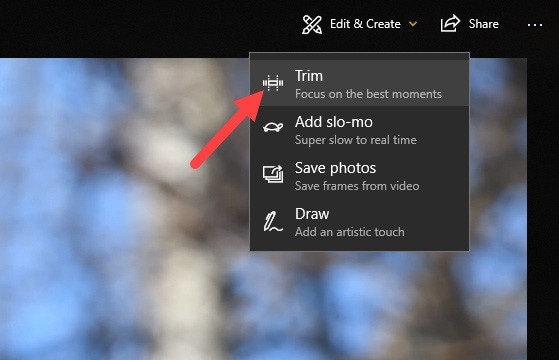
Microsoft Photos or Photo App is a free photo viewer and editor with your Windows 10. It offers incredible photo editing and enhancement along with different tools for organizing and editing videos in a very friendly way. Likewise, you can create drawings over the videos and add 3D effects and background music to your clips.
You can also trim AVI videos with Microsoft Photos quickly. All you need to do is open your clip with the Photo App, choose the “Trim” option, select a portion of the video you want to trim, and go ahead.
That’s it!
Features
- Quick video trimming
- Cool text effects
- 3D library and effects
- It has a clear interface
- You can find and tag people’s faces
- The program has 15+ filters for editing
- Motion tracking option for drawing on videos
- Allows you to view and organize your files easily
Pros
- Microsoft Photos is free for Windows users
- It automatically creates albums
- The program has a touch-friendly interface
- You can integrate your OneDrive with the software
Cons
- Lacks before and after view
- Not included in older Windows versions
- It doesn’t support selective focus or panorama stitching
Handbrake
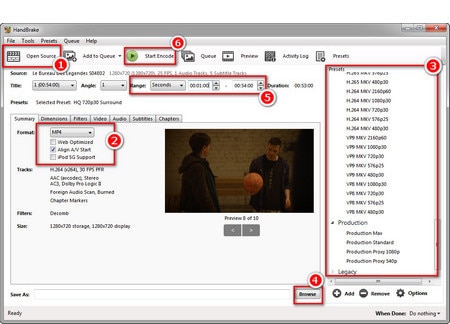
Handbrake is best-known for its video transcoding traits. Unlike typical video editors, this open-source tool includes limited options to rip Blu-rays and DVDs. Moreover, you can mix the 5.1 soundtracks and convert them to stereo to make the audio compatible with your TV speakers.
But the exciting thing about Handbrake is that you can use this software on your macOS 10.13 or later versions to cut AVI videos for free. However, it’s a bit technical process, as there’s no timeline to help you trim or make cuts on the clips directly with the help of your mouse.
You are required to mention a time range (seconds, minutes, or hours) to keep a specific part of the video while the software removes the non-ranged parts of the clip. For instance, you have a video of 10 seconds. You start the range from 5 seconds and end it at 10 seconds. So, the first four seconds of the video will be cut from the entire clip.
Features
- Video cutting, cropping, and resizing
- Low-quality and old video restoration
- Video conversion from any format to MKV or MP4
Pros
- Handbrake is free
- You can convert batch videos with ease
- It supports MAC, Windows, and Linux OS
- Allows you to import video files in all major formats
- The software comes with various video conversion presets
Cons
- Handbrake is not a user-friendly tool
- The video file output is limited to two formats (MKV and MP4) only
Gihosoft Video Cutter
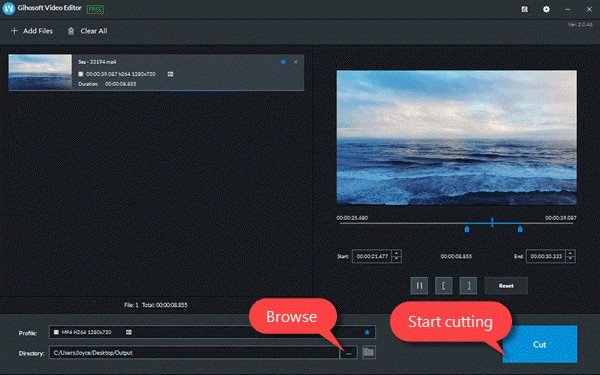
Gihosoft is a clean, free, lossless video cutter on your Windows PC. It’s a simple tool that helps you cut video files into various output formats. So be it AVI, MPEG, or any other file, with Gihosoft, everything becomes handy.
Another fascinating fact about this software is that it allows you to cut videos in three simple steps without losing the quality. So right after installing the program, you simply need to import your file, choose the start and end time, and click the “Cut” button to remove the part of the video.
Features
- Fast video and audio cutting
- Easy drag and drop audio/video files
- It supports most audio and video formats
Pros
- Free for both Windows and MAC operating systems
- The cutter saves video in original quality
Cons
- It does not include basic video editing features
Part 3: Top 3 Free AVI Video Cutter on MAC
Are you looking for a great AVI video cutter for your MAC? Sadly, you have limited product choices as compared to Windows users. But to ensure you don’t waste time looking for a suitable tool, here’s a list of three AVI video cutting programs you can use on your Macintosh.
iMovie
The first and foremost recommended software for free video cutting on MAC is Apple’s own tool, iMovie . It is a built-in program that comes with your system, so there is no need to spend extra on a video editor. iMovie allows you to browse and import most video files, including AVI, right from your computer. Also, this tool is equipped with multiple functions, such as audio editing, video quality enhancement, and much more.
This MAC’s video editor is ideal for beginners. Many home users and small business owners find this tool extremely simple, as they don’t like to be confused with complex features. So, if you want to make cuts to your video clips, start working on iMovie. And within a few clicks, you can trim or cut your videos for free.
Features
- Video cutting and trimming
- Cropping and rotation
- Effects and transitions
- Built-in themes
- HD and 4K video support
- Movie sharing
- Audio adjustments
- Chroma screen controls
- Character tracking
Pros
- Free to use for MAC users
- Clean timeline
- One-click video cutting and trimming
- Easy-to-remember keyboard shortcuts
- Direct share projects to your social media, like YouTube
Cons
- It takes a lot of time to export videos
- iMovie needs high HDD storage space
VideoPad by NCH

VideoPad by NCH is a beginner-level video editor with all the basic features. The software is specifically designed for home movie makers. That is why VideoPad is easy to understand and use.
VideoPad is entirely free of cost for non-commercial purposes, but it has limited features. On the other hand, if you want to enjoy full traits, you can purchase the tool.
VideoPad supports video files, including AVI, WMV, MPEG, MOV, MP4, ASF, and XviD. Likewise, you can also burn movies to Blu-ray, DVD, HD-DVD, or CD. And most importantly, you can easily cut or trim AVI videos on your MAC, as the software is available on both MAC and Windows systems.
Features
- Audio tools
- Video rotation
- Video sharing
- Visual effects
- Video transitions
- 3D Video editing
- Color correction
- Overlays and texts
- Video optimization
- Great plugin support
- Direct video uploading
- Multiple video resolutions
- Video cutting and trimming
- Files exportation to various devices
- Stereoscopic conversion from 2D to 3D
Pros
- You can use the basic tools for free
- Allows 360-degree video production
- It supports a wide range of video formats
- Compatible with MAC and Windows computers
Cons
- The auto speech feature performs poorly
- The free version has annoying notifications
Xilisoft Video Cutter
Xilisoft Video Cutter is the simplest tool to cut videos on MAC. This software has a straightforward option to cut the clip after importing it to the timeline. The program is fast and has a user-friendly interface.
Moreover, you can polish your videos by merging multiple clips or increasing the video quality once you’re done with the cutting process. At the same time, this video cutter allows you to import all video formats, including XviD, DivX, MOV, FLV, MP4, MPEG-4/, MKV, MPEG, WMV, and AVI.
Features
- Video joining
- Support multiple output video formats, including HD
Pros
- Easy video cutting and merging
- It doesn’t require a large storage space
- Extremely uncomplicated interface
- Real-time preview to make better cuts
- Available on both MAC and Windows systems
Cons
- The trial version is free to use but limits you from enjoying extra features
Part 4: Top 3 Free AVI Video Cutter on Android
After capturing nice videos with your Android mobile phone, you may need to cut unnecessary scenes to make your clips look professional. While there are numerous Android cutters, not all support the AVI format. So below, you will find the 3 best AVI video cutters for Android, which are free to use.
Quick – Video Editor & Maker
Quick – Video Editor & Maker is a free video editor with PRO results. Many photographers and vloggers love using this app to cut clips immediately. Furthermore, the application offers a wide range of options to assure you don’t have to look to any other tool to rotate or compress video. Quick – Video Editor & Maker lets you import videos in all major formats, including AVI, MPEG, WMA, and more.
Features
- Video cutting, fading, and rotation
- Speed control tools
- Conversion from video to GIF
Pros
- Free app
- Simple interface
Cons
- Lack of updates
- Some users complain about app crash
Funimate Video Editor & Maker
If you want to make some professional-grade video edits quickly, you are welcome to download and use Funimate Video Editor & Maker on your Android device. It’s a free tool to cut videos. It has an easy procedure, and you can cut AVI videos in a few seconds.
Plus, you can use the app to add custom animations, effects, and many other exciting elements. You can share your makes on social media like TikTok, Instagram, and other platforms. Contrarily, the app itself is a community with millions of Funimate-users who share their creations daily. You can also join or watch videos from other creators to learn more about new techniques and trends in video editing.
Features
- Video trimming and splitting
- Animation and cropping
- Filters and AI effects
- Speed adjustment
- Keyframing and video merging
Pros
- Free Android application with several editing tools
- Easy trimming, splitting, and cropping
- Aspect ratio, border, and color customization
- Direct social media sharing
Cons
- Free users cannot use templates
- The free version stamps watermarks on each project
Part 5: Top 3 Free AVI Video Cutter on iPhone
No wonder iPhone’s camera captures high-quality videos. But the problem begins when there’s no free app to cut AVI videos. So if you’re recording great spots, but deep inside, you really want to remove some parts, then these 3 free AVI video cutters will work smoothly on your iPhone.
Cut, Trim, Split Video Editor
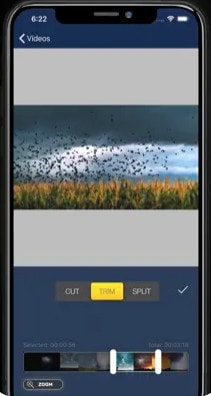
Download Cut, Trim, Split Video Editor on your iPhone to delete/cut unwanted portions of your video clips. The tool is also best for trimming iPhone-recorded clips without messing with the frames. Or, if you just want to split the video into multiple parts for your next WhatsApp status, this iPhone app can do that job for you.
The app supports multiple video file types, including MOV, MP4, AVI, MPEG, MPEG-2, and 3GPP
Features
- Easy trimming and cutting video clips
- Splitting big-sized videos into two smaller clips
- Import video from file-sharing platforms, like iCloud, using Wi-Fi
Pros
- Free app for fast video cutting and sharing
- Simple UI interface
Cons
- The free version shows advertisements
Splice - Video Editor & Maker
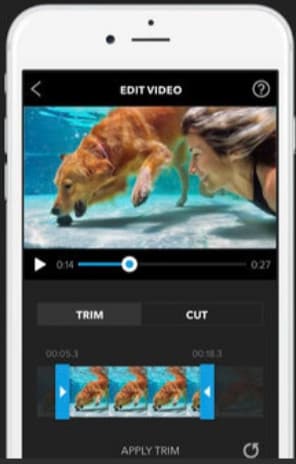
Splice is an extraordinary video editor that makes it easy to make fully customized and professional videos from your iPhone. The app is also best for video cutting. Besides, it has many interesting features, which you can use from your device.
Features
- Cutting, trimming, and cropping your videos
- Exposure, saturation, and exposure adjustment
- Slow and fast motion with speed ramping option
- Video masking and overlay
- Color correction and text overlays
Pros
- Free basic features, such as video cutting
- iTunes integration
- Supports AVI video input
- User-friendly application
- Access to the music library
- Quick and simple social sharing
Cons
- Output videos require high mobile storage space
Part 6: Top 3 Free AVI Video Cutter Online
Don’t want to install video cutters on your MAC, Windows, smartphone, or any other device? No problem! You can use online video cutters and trimmers to split, cut, or trim your clips for free.
However, the problem still exists in online tools, as not all web-based editors allow importing AVI files. So to save your time and energy, you can directly go to the following online AVI cutters to complete your tasks.
Kapwing
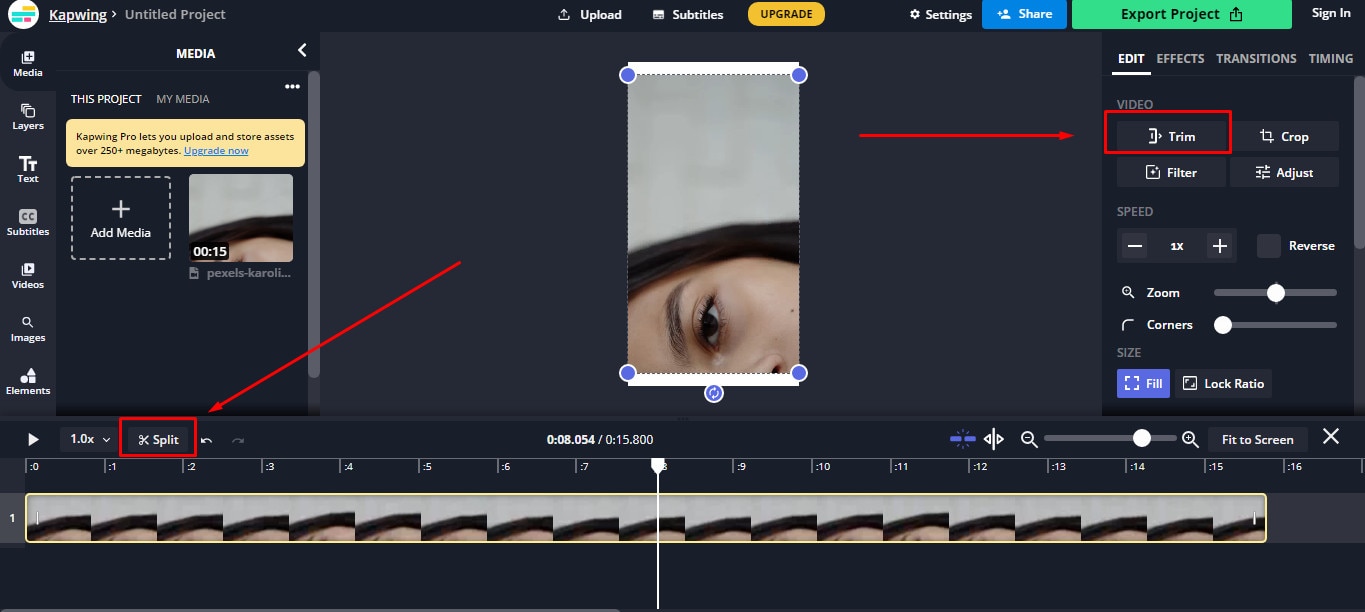
Kapwing is an online video editor best for casual creatives, such as Vloggers and YouTubers. You can use this web-based platform to cut your videos. Gladly, Kapwing supports all AVI incomings. You can upload your AVI video files to this platform and use its trim or split feature. To do that, you need to upload your AVI video and choose the “Trim” or “Split” tool to see the magic. Once done with the trimming process, you can explore Kapwing’s other incredible traits and apply them to your project.
Features
- Video splitting, trimming, and merging
- Audio capturing
- Speed adjustment
- Image and video library
- Text editing and overlay
- Auto-generated subtitles
- Several collaboration tools
- Video creation from scratch
- Templates, shapes, and emojis
- Simple drag-and-drop interface
- Video transitions, plugins, and elements
Pros
- Free online video trimmer
- User-friendly interface
- You can export 30-minutes long projects
- Allows you to export unlimited videos with a watermark
- One watermark-free video export is available each month
Cons
- Cannot export long videos with a free account
- Only 10 minutes transcription limit is available for free users
- You need to purchase a monthly or annual subscription to remove the watermark from multiple videos
Clideo
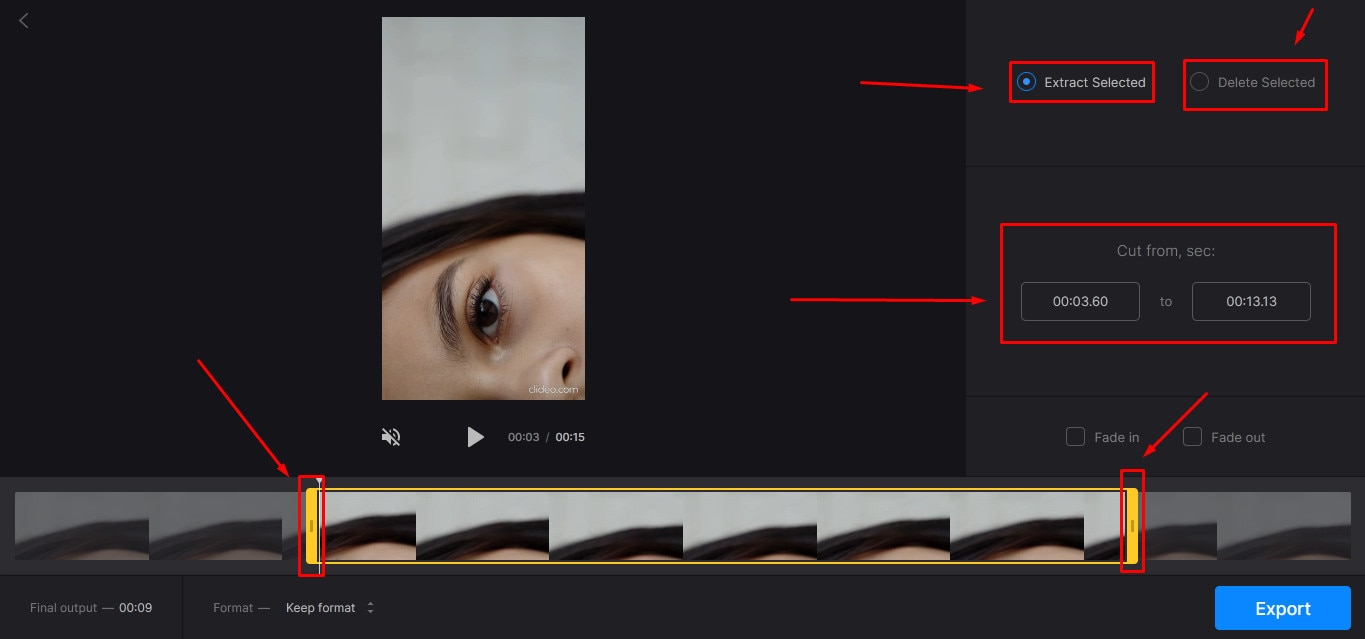
Clideo is not just a video cutter but an online solution to all your video editing problems. The tool is super popular, with 4 million+ users a month. And why not? This is one of those web-based platforms that allow AVI video files to be imported and exported without converting them into any other formats.
Nevertheless, if you’re only looking for video cutting options, this tool makes your life easy. Simply upload your video, and select the portion of it by setting start and end times. Choose whether you want to delete or extract the selected part from the clip, and hit the “Export” button.
And within a few moments, you can enjoy a trimmed video clip. And if you plan to be more creative, you can look for other Clideo features to make videos more fascinating.
Features
- Video combining and cutting
- Resize and crop clips
- Compress your videos
- Add text and subtitles
- Add music to your video files
- Filters and color correction tools
- Audio mute, cutting, and muting
- Video rotation, flipping, and speed adjustment
Pros
- Basic tools can be used for free
- Best for beginners and intermediate users
- Ideal for AVI videos and also supports other video formats
Cons
- You cannot use the free version regularly
Aspose
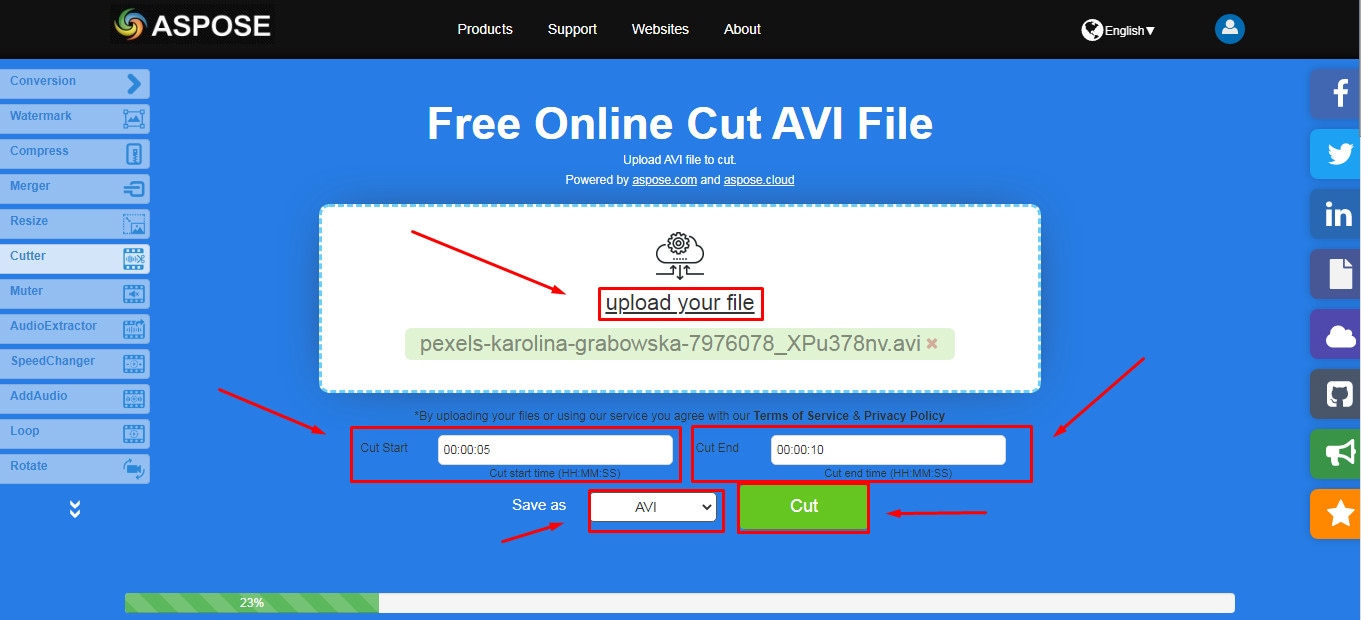
Aspose is a free web-based application to cut clips. You can use this tool on any operating system. It supports all major video file formats, including AVI, MKV, MOV, MP4, FLV, WMV, WEBM, and GIF. Additionally, you can use Aspose for various other reasons, such as audio extraction, video resizing, and more.
Features
- Video cutting and compressing
- Looping, rotation, and video merging
- Adding watermarks on videos
- Sound muting
- Speed change and audio addition
Pros
- Aspose is a free online tool
- It offers straightforward options to cut and edit videos
Cons
- No color correction option
- Slow video cutting process
- Lacks timeline and other valuable features
Part 7: Bottom Line
Tired of finding AVI cutters? Relax and try these top 16 AVI video cutters for Windows, MAC, iPhone, Android, and online. Almost all these tools are free to use and are extremely handy. On the other hand, if you want to cut and trim videos professionally, download Filmora and follow the step-by-step guide in this article for making clean cuts.
Part 8: FAQs
Q1. How do I trim an AVI video?
To trim an AVI video file, ensure that the software or tool you use supports AVI input. Generally, you need to upload or import a clip on the program, select the portion of the video, and apply the cut/trim feature to make it happen.
Q2. Which is the best online video cutter?
Kapwing and Clideo are the two best online video cutters you can use for free. Both web-based tools also allow you to cut your AVI videos.
Q3. Which is the best video cutter and joiner software?
Filmora, iMovie, and Kapwing are some of the best video cutters and joiner tools. These video editors are also free to use and come with different features.
Q4. How do I trim an AVI file in Windows 10?
Trimming an AVI video file in Windows 10 is very simple. Launch the Microsoft Photos (Photo App) application on your computer, add clip, and select the “Trim” tool to trim a specific video part.
Q5. How can I cut a video on my computer for free?
MAC and Windows users can download Filmora to cut videos for free. Filmora also offers a wide range of other features to make your clips exciting. Contrarily, Windows users can use the built-in Photo App in Windows 10 or download Gihosoft or Handbrake software to cut clips. Likewise, MAC users can download VideoPad, Xilisoft Video Cutter, or iMovie for free.
With the growing fame of video-sharing and social media applications like Twitter, Instagram, and TikTok, the demand for simple and fast video cutting and trimming tools has dramatically increased. Nowadays, you don’t have to play with complex video editing tools to produce high-quality videos.
Thanks to several user-friendly editing software to make things easy for everybody. However, finding the right programs to trim/cut videos is still challenging, especially in AVI format.
But, guess what? These top 16 AVI video cutters for Windows, MAC, Android, iPhone, and online will make video cutting and trimming fun, especially when you learn to do it using Filmora.
In this Article
Part 1: Best AVI Video Cutter to Trim/Cut AVI Video on Windows and MAC – Filmora Video Cutter [with steps}
Part 2: Top 3 Free AVI Video Cutter on Windows
Part 3: Top 3 Free AVI Video Cutter on MAC
Part 4: Top 3 Free AVI Video Cutter on Android
Part 5: Top 3 Free AVI Video Cutter on iPhone
Part 6: Top 3 Free AVI Video Cutter Online
Part 7: Bottom Line
Part 8: FAQs
Part 1: Best AVI Video Cutter to Trim/Cut AVI Video on Windows and MAC – Filmora Video Cutter [with steps]
Filmora by Wondershare is a star video editor with outstanding outcomes. Whether you have a MAC or Windows PC, you can download Filmora regardless of your operating system. The program best serves those who intend to make high-quality videos. The software provides editing support for all video formats, including AVI.
Although Filmora is an affordable editor with tons of audio and video editing options, you can still download the software for free and create projects if watermarks don’t bother you. Moreover, you can count this tool’s capabilities in cropping, resizing, and Chroma screen support. But that’s not the only sweet fruit.
In fact, Filmora is equipped with many jaw-dropping features, including preset templates, auto beat sync, split-screen, speed ramping, motion tracking, keyframing, creative transitions, titles, filters, and much more. And the best part is, you can learn and understand Filmora in no time. That’s why the program is loved and supported by all types of users.
So does Filmora helps cut and trim AVI videos? Yes! It does if you follow these steps correctly.
Step 1: Download Filmora Video Editor
First, download Filmora Video Editor by choosing your operating system, as seen in the screenshot below.
Run the setup and let it finish without any pause or break.
Step 2: Import Your Video to Filmora Video Editor
Importing your AVI video is a very simple process. Just click on the “Film Clip” icon.
It will open a new window screen on your computer to select the video from the directory. Find the clip you want to import and cut. Use your mouse to select it and click the “Open” button.
The video will be loaded in the “Media” folder of Filmora. The clip’s thumbnail should be visible to assure you have done everything correctly.
If you can see that, let’s go to the next step.
Step 3: Drag and Drop Video to Filmora’s Timeline
Select the video in the media folder by clicking over it once. Now, without leaving the hold of the left button of your mouse, slide the video down to the track in the timeline.
After that, a message will pop up, asking about your preference for the project settings. It is recommended to choose the “Match to Media” option unless you’re an experienced video editor who knows how to play with the resolution and frame rates.
You will see the video on the timeline with its preview on the “Preview Screen” on the right side of the interface.
Step 4: Cutting Your Video in Filmora
Here comes the core step you have been waiting for. But before you go any further, you need to know about the “Playhead.”
Playhead is an orange-reddish marker you can find on the timeline.
It has an important role in cutting your videos.
So, move the playhead to your desired frame and click on the “scissor” icon to make the “starting” cut.
As soon as you do it, you will see that the single clip is now divided into two parts similar to this image.
The “Red” marked area in the above screenshot ensures a gap between the clips on the timeline. The “Yellow” arrows confirm two separate clips of the same video.
Place the two clips together as seen in this “Green” area.
And place the playhead anywhere on the clip. And click on the “scissor” icon once again to make the “ending” cut (second cut).
If done correctly, there should be three clips now of the same video, as you can observe in this screenshot.
Again, the “Red” area in the above photo indicates the gap, and the “Yellow” area ensures a third segment of the video.
Note: The gaps you can see in the divided clips are made intentionally for understanding. Practically, Filmora doesn’t move the clip or make gaps in between after you have made the cuts.
Keep in mind that there are three clips on the timeline. Now, if you want to remove the second clip from the video, you need to select that portion first by clicking on it.
Then, right-click on the mouse and choose “Cut” from the menu.
Within a semi-second, the selected portion will be removed from the timeline. And you will be able to see the remaining parts of the video. Now, pull the second clip using your mouse and place it at the end of the first clip without leaving a gap in between.
Then, click the “Play” button under the preview screen to see the results.
You can see in the above two screenshots that there’s a jump between the scenes due to cuts, confirming that video has been cut significantly.
Step 5: Trimming Your Video in Filmora
Remember that cutting and trimming in Filmora are two different things. Trimming allows you to remove a particular video part from visibility without deleting the portion.
So feel free to skip this step if you’re happy learning the cutting technique. But if you’re interested in trimming, here’s how you do it.
Take your mouse cursor at the beginning or end of the clip you want to trim. Keep holding the clip’s corner and slide the mouse back or front to trim the part
Note: Since the trim tool doesn’t delete the video, the final project based on trimming will be of a larger size. Therefore, it is advised to cut videos rather than trimming for fast rendering, better results, and small video size.
Step 6: Save Project and Export Your Cut/Trimmed AVI Video
Choose “Save Project” from the “File” menu.
Select the directory to save the project, rename the new video, and click the “Save” button.
Click on the “Export” button to save the video in AVI or any other video format of your choice on your computer.
Part 2: Top 3 Free AVI Video Cutter on Windows
As a Windows user, finding an excellent video cutter is relatively easy. However, not all software permits importing AVI videos. In the same way, some video trimmers come at a price. So if you really don’t want to pay and enjoy cutting your AVI files, try using these three video cutting tools.
Microsoft Photos (Windows 10)
Microsoft Photos or Photo App is a free photo viewer and editor with your Windows 10. It offers incredible photo editing and enhancement along with different tools for organizing and editing videos in a very friendly way. Likewise, you can create drawings over the videos and add 3D effects and background music to your clips.
You can also trim AVI videos with Microsoft Photos quickly. All you need to do is open your clip with the Photo App, choose the “Trim” option, select a portion of the video you want to trim, and go ahead.
That’s it!
Features
- Quick video trimming
- Cool text effects
- 3D library and effects
- It has a clear interface
- You can find and tag people’s faces
- The program has 15+ filters for editing
- Motion tracking option for drawing on videos
- Allows you to view and organize your files easily
Pros
- Microsoft Photos is free for Windows users
- It automatically creates albums
- The program has a touch-friendly interface
- You can integrate your OneDrive with the software
Cons
- Lacks before and after view
- Not included in older Windows versions
- It doesn’t support selective focus or panorama stitching
Handbrake
Handbrake is best-known for its video transcoding traits. Unlike typical video editors, this open-source tool includes limited options to rip Blu-rays and DVDs. Moreover, you can mix the 5.1 soundtracks and convert them to stereo to make the audio compatible with your TV speakers.
But the exciting thing about Handbrake is that you can use this software on your macOS 10.13 or later versions to cut AVI videos for free. However, it’s a bit technical process, as there’s no timeline to help you trim or make cuts on the clips directly with the help of your mouse.
You are required to mention a time range (seconds, minutes, or hours) to keep a specific part of the video while the software removes the non-ranged parts of the clip. For instance, you have a video of 10 seconds. You start the range from 5 seconds and end it at 10 seconds. So, the first four seconds of the video will be cut from the entire clip.
Features
- Video cutting, cropping, and resizing
- Low-quality and old video restoration
- Video conversion from any format to MKV or MP4
Pros
- Handbrake is free
- You can convert batch videos with ease
- It supports MAC, Windows, and Linux OS
- Allows you to import video files in all major formats
- The software comes with various video conversion presets
Cons
- Handbrake is not a user-friendly tool
- The video file output is limited to two formats (MKV and MP4) only
Gihosoft Video Cutter
Gihosoft is a clean, free, lossless video cutter on your Windows PC. It’s a simple tool that helps you cut video files into various output formats. So be it AVI, MPEG, or any other file, with Gihosoft, everything becomes handy.
Another fascinating fact about this software is that it allows you to cut videos in three simple steps without losing the quality. So right after installing the program, you simply need to import your file, choose the start and end time, and click the “Cut” button to remove the part of the video.
Features
- Fast video and audio cutting
- Easy drag and drop audio/video files
- It supports most audio and video formats
Pros
- Free for both Windows and MAC operating systems
- The cutter saves video in original quality
Cons
- It does not include basic video editing features
Part 3: Top 3 Free AVI Video Cutter on MAC
Are you looking for a great AVI video cutter for your MAC? Sadly, you have limited product choices as compared to Windows users. But to ensure you don’t waste time looking for a suitable tool, here’s a list of three AVI video cutting programs you can use on your Macintosh.
iMovie
The first and foremost recommended software for free video cutting on MAC is Apple’s own tool, iMovie . It is a built-in program that comes with your system, so there is no need to spend extra on a video editor. iMovie allows you to browse and import most video files, including AVI, right from your computer. Also, this tool is equipped with multiple functions, such as audio editing, video quality enhancement, and much more.
This MAC’s video editor is ideal for beginners. Many home users and small business owners find this tool extremely simple, as they don’t like to be confused with complex features. So, if you want to make cuts to your video clips, start working on iMovie. And within a few clicks, you can trim or cut your videos for free.
Features
- Video cutting and trimming
- Cropping and rotation
- Effects and transitions
- Built-in themes
- HD and 4K video support
- Movie sharing
- Audio adjustments
- Chroma screen controls
- Character tracking
Pros
- Free to use for MAC users
- Clean timeline
- One-click video cutting and trimming
- Easy-to-remember keyboard shortcuts
- Direct share projects to your social media, like YouTube
Cons
- It takes a lot of time to export videos
- iMovie needs high HDD storage space
VideoPad by NCH
VideoPad by NCH is a beginner-level video editor with all the basic features. The software is specifically designed for home movie makers. That is why VideoPad is easy to understand and use.
VideoPad is entirely free of cost for non-commercial purposes, but it has limited features. On the other hand, if you want to enjoy full traits, you can purchase the tool.
VideoPad supports video files, including AVI, WMV, MPEG, MOV, MP4, ASF, and XviD. Likewise, you can also burn movies to Blu-ray, DVD, HD-DVD, or CD. And most importantly, you can easily cut or trim AVI videos on your MAC, as the software is available on both MAC and Windows systems.
Features
- Audio tools
- Video rotation
- Video sharing
- Visual effects
- Video transitions
- 3D Video editing
- Color correction
- Overlays and texts
- Video optimization
- Great plugin support
- Direct video uploading
- Multiple video resolutions
- Video cutting and trimming
- Files exportation to various devices
- Stereoscopic conversion from 2D to 3D
Pros
- You can use the basic tools for free
- Allows 360-degree video production
- It supports a wide range of video formats
- Compatible with MAC and Windows computers
Cons
- The auto speech feature performs poorly
- The free version has annoying notifications
Xilisoft Video Cutter
Xilisoft Video Cutter is the simplest tool to cut videos on MAC. This software has a straightforward option to cut the clip after importing it to the timeline. The program is fast and has a user-friendly interface.
Moreover, you can polish your videos by merging multiple clips or increasing the video quality once you’re done with the cutting process. At the same time, this video cutter allows you to import all video formats, including XviD, DivX, MOV, FLV, MP4, MPEG-4/, MKV, MPEG, WMV, and AVI.
Features
- Video joining
- Support multiple output video formats, including HD
Pros
- Easy video cutting and merging
- It doesn’t require a large storage space
- Extremely uncomplicated interface
- Real-time preview to make better cuts
- Available on both MAC and Windows systems
Cons
- The trial version is free to use but limits you from enjoying extra features
Part 4: Top 3 Free AVI Video Cutter on Android
After capturing nice videos with your Android mobile phone, you may need to cut unnecessary scenes to make your clips look professional. While there are numerous Android cutters, not all support the AVI format. So below, you will find the 3 best AVI video cutters for Android, which are free to use.
Quick – Video Editor & Maker
Quick – Video Editor & Maker is a free video editor with PRO results. Many photographers and vloggers love using this app to cut clips immediately. Furthermore, the application offers a wide range of options to assure you don’t have to look to any other tool to rotate or compress video. Quick – Video Editor & Maker lets you import videos in all major formats, including AVI, MPEG, WMA, and more.
Features
- Video cutting, fading, and rotation
- Speed control tools
- Conversion from video to GIF
Pros
- Free app
- Simple interface
Cons
- Lack of updates
- Some users complain about app crash
Funimate Video Editor & Maker
If you want to make some professional-grade video edits quickly, you are welcome to download and use Funimate Video Editor & Maker on your Android device. It’s a free tool to cut videos. It has an easy procedure, and you can cut AVI videos in a few seconds.
Plus, you can use the app to add custom animations, effects, and many other exciting elements. You can share your makes on social media like TikTok, Instagram, and other platforms. Contrarily, the app itself is a community with millions of Funimate-users who share their creations daily. You can also join or watch videos from other creators to learn more about new techniques and trends in video editing.
Features
- Video trimming and splitting
- Animation and cropping
- Filters and AI effects
- Speed adjustment
- Keyframing and video merging
Pros
- Free Android application with several editing tools
- Easy trimming, splitting, and cropping
- Aspect ratio, border, and color customization
- Direct social media sharing
Cons
- Free users cannot use templates
- The free version stamps watermarks on each project
Part 5: Top 3 Free AVI Video Cutter on iPhone
No wonder iPhone’s camera captures high-quality videos. But the problem begins when there’s no free app to cut AVI videos. So if you’re recording great spots, but deep inside, you really want to remove some parts, then these 3 free AVI video cutters will work smoothly on your iPhone.
Cut, Trim, Split Video Editor
Download Cut, Trim, Split Video Editor on your iPhone to delete/cut unwanted portions of your video clips. The tool is also best for trimming iPhone-recorded clips without messing with the frames. Or, if you just want to split the video into multiple parts for your next WhatsApp status, this iPhone app can do that job for you.
The app supports multiple video file types, including MOV, MP4, AVI, MPEG, MPEG-2, and 3GPP
Features
- Easy trimming and cutting video clips
- Splitting big-sized videos into two smaller clips
- Import video from file-sharing platforms, like iCloud, using Wi-Fi
Pros
- Free app for fast video cutting and sharing
- Simple UI interface
Cons
- The free version shows advertisements
Splice - Video Editor & Maker
Splice is an extraordinary video editor that makes it easy to make fully customized and professional videos from your iPhone. The app is also best for video cutting. Besides, it has many interesting features, which you can use from your device.
Features
- Cutting, trimming, and cropping your videos
- Exposure, saturation, and exposure adjustment
- Slow and fast motion with speed ramping option
- Video masking and overlay
- Color correction and text overlays
Pros
- Free basic features, such as video cutting
- iTunes integration
- Supports AVI video input
- User-friendly application
- Access to the music library
- Quick and simple social sharing
Cons
- Output videos require high mobile storage space
Part 6: Top 3 Free AVI Video Cutter Online
Don’t want to install video cutters on your MAC, Windows, smartphone, or any other device? No problem! You can use online video cutters and trimmers to split, cut, or trim your clips for free.
However, the problem still exists in online tools, as not all web-based editors allow importing AVI files. So to save your time and energy, you can directly go to the following online AVI cutters to complete your tasks.
Kapwing
Kapwing is an online video editor best for casual creatives, such as Vloggers and YouTubers. You can use this web-based platform to cut your videos. Gladly, Kapwing supports all AVI incomings. You can upload your AVI video files to this platform and use its trim or split feature. To do that, you need to upload your AVI video and choose the “Trim” or “Split” tool to see the magic. Once done with the trimming process, you can explore Kapwing’s other incredible traits and apply them to your project.
Features
- Video splitting, trimming, and merging
- Audio capturing
- Speed adjustment
- Image and video library
- Text editing and overlay
- Auto-generated subtitles
- Several collaboration tools
- Video creation from scratch
- Templates, shapes, and emojis
- Simple drag-and-drop interface
- Video transitions, plugins, and elements
Pros
- Free online video trimmer
- User-friendly interface
- You can export 30-minutes long projects
- Allows you to export unlimited videos with a watermark
- One watermark-free video export is available each month
Cons
- Cannot export long videos with a free account
- Only 10 minutes transcription limit is available for free users
- You need to purchase a monthly or annual subscription to remove the watermark from multiple videos
Clideo
Clideo is not just a video cutter but an online solution to all your video editing problems. The tool is super popular, with 4 million+ users a month. And why not? This is one of those web-based platforms that allow AVI video files to be imported and exported without converting them into any other formats.
Nevertheless, if you’re only looking for video cutting options, this tool makes your life easy. Simply upload your video, and select the portion of it by setting start and end times. Choose whether you want to delete or extract the selected part from the clip, and hit the “Export” button.
And within a few moments, you can enjoy a trimmed video clip. And if you plan to be more creative, you can look for other Clideo features to make videos more fascinating.
Features
- Video combining and cutting
- Resize and crop clips
- Compress your videos
- Add text and subtitles
- Add music to your video files
- Filters and color correction tools
- Audio mute, cutting, and muting
- Video rotation, flipping, and speed adjustment
Pros
- Basic tools can be used for free
- Best for beginners and intermediate users
- Ideal for AVI videos and also supports other video formats
Cons
- You cannot use the free version regularly
Aspose
Aspose is a free web-based application to cut clips. You can use this tool on any operating system. It supports all major video file formats, including AVI, MKV, MOV, MP4, FLV, WMV, WEBM, and GIF. Additionally, you can use Aspose for various other reasons, such as audio extraction, video resizing, and more.
Features
- Video cutting and compressing
- Looping, rotation, and video merging
- Adding watermarks on videos
- Sound muting
- Speed change and audio addition
Pros
- Aspose is a free online tool
- It offers straightforward options to cut and edit videos
Cons
- No color correction option
- Slow video cutting process
- Lacks timeline and other valuable features
Part 7: Bottom Line
Tired of finding AVI cutters? Relax and try these top 16 AVI video cutters for Windows, MAC, iPhone, Android, and online. Almost all these tools are free to use and are extremely handy. On the other hand, if you want to cut and trim videos professionally, download Filmora and follow the step-by-step guide in this article for making clean cuts.
Part 8: FAQs
Q1. How do I trim an AVI video?
To trim an AVI video file, ensure that the software or tool you use supports AVI input. Generally, you need to upload or import a clip on the program, select the portion of the video, and apply the cut/trim feature to make it happen.
Q2. Which is the best online video cutter?
Kapwing and Clideo are the two best online video cutters you can use for free. Both web-based tools also allow you to cut your AVI videos.
Q3. Which is the best video cutter and joiner software?
Filmora, iMovie, and Kapwing are some of the best video cutters and joiner tools. These video editors are also free to use and come with different features.
Q4. How do I trim an AVI file in Windows 10?
Trimming an AVI video file in Windows 10 is very simple. Launch the Microsoft Photos (Photo App) application on your computer, add clip, and select the “Trim” tool to trim a specific video part.
Q5. How can I cut a video on my computer for free?
MAC and Windows users can download Filmora to cut videos for free. Filmora also offers a wide range of other features to make your clips exciting. Contrarily, Windows users can use the built-in Photo App in Windows 10 or download Gihosoft or Handbrake software to cut clips. Likewise, MAC users can download VideoPad, Xilisoft Video Cutter, or iMovie for free.
Best 4K Video Editing Software for Proxy Editing
Top 8 Video Editing Apps for 4K Proxy Video Editing

Max Wales
Mar 27, 2024• Proven solutions
Shooting videos in high resolutions can help you create visually impressive content your followers on social media are going to adore. The only trouble is that the size of 4K videos can slow you down during the video editing process if your computer doesn’t have enough RAM memory or processing power. Additionally, quite a few inexpensive or free video editing apps don’t allow their users to create low-resolution proxy files that make the process of editing 4K videos much faster. That’s why in this article we are going to take you through the best 8 video editors you can use for 4K proxy video editing.
The Best Video Editing Apps for Proxy Editing in 2020
Some of the video editing apps we featured in this article can only run on computers that already have the advanced hardware setups. However, even if you have a computer setup that can easily support processing of the 4K video files, proxy editing can still be useful as it can reduce the amount of time you will have to spend on performing complex video editing tasks. Let’s take a look at some of the best video editors that support proxy editing.
1. Filmora
Price: Free version available, subscription plans start at $49.99 per year
Compatibility: macOS, Windows

The wide range of video editing options, support for nearly all popular video file formats or quick and simple exporting process are only a few reasons why Filmora is one of the best video editors you can use this year. Creating proxy files in Filmora is not a difficult task, because the software generates them automatically for you. You just have to choose between the 1280x720p or 1920x1080p resolutions and Filmora will create proxies for all media files that are larger than the resolution you’ve selected. However, the amount of time Filmora is going to need to create proxies depends on your computer’s processing power, but also on the size and the number of the RAW files you imported into a project.
2. Adobe Premiere Pro CC
Price: $20,99 per month, different subscription plans available
Compatibility: Windows, macOS
This is probably one of the best, if not the best non-linear video editing software ever created, so it is hardly surprising that you can easily create proxy files for all videos you use in a project you create in Adobe Premiere Pro. So, to create proxy files you just need to open the folder that contains those files from the Media Browser and then click on the Ingest button. You should then click on the wrench tool and pick the Create Proxies option from the drop-down menu located next to the Ingest option. Afterward, you should select one of the available resolution presets and proceed to import the footage into the project. However, before you can start editing with proxies you have to click on the Toggle Proxy button.
3. Final Cut Pro X
Price: Free trial available, $299,99
Compatibility: macOS
Transcoding media with FCPX doesn’t require too much effort, as the software offers a couple of options that make the editing process faster. You can opt to generate optimized media files by transcoding the original video clips into Apple ProRes 422 codec format that shortens the amount of time needed for rendering and provides excellent quality of color that is required for compositing. The proxy media files will also be created by transcoding the videos to Apple ProRes 422 codec format that retains original aspect ratio and frame rate of the video clips you transcoded. It is also worth noting that FCPX transcodes all mp3 files you import into a project to MOV audio files.
4. Vegas Pro
Price: Subscription plans start from $249,00
Compatibility: Windows
This video editor is often overlooked in conversations about the most powerful video editing apps, but the tools it offers are powerful enough to enable you to edit videos at a professional level. Creating proxy files in Vegas Pro is remarkably easy, as you just have to import the files into a new project, select each file you want to transcode and then choose the Create Video Proxy option from the right-click menu. Just keep in mind that you must create proxy files before you do any actual editing because otherwise, the transcoding process is not going work.
5. Blender
Price: Free
Compatibility: Linux, macOS, Windows
Blender is a 3D modeling and VFX software that lets you track objects or use 3D painting tools among numerous other options. Even though creating proxies with this app is not a particularly complicated process, you still have to be familiar with Blender in order to make full use of its transcoding options. The software allows you to generate proxy files whose size is only 25% of the video’s original size, although you can also create proxies that have 50% and 75% of the video’s original size. After you’ve adjusted the transcoding settings you should simply click on the Rebuild Proxy and Timecode Indices button.
6. Shotcut
Price: Free
Compatibility: Windows, macOS, Linux
Despite the fact that this cross-platform video editor supports 4K and ProRes files that can cause it to lag at times, creating proxies in Shotcut is a highly technical process. In case you decide to make a proxy file by yourself, you will have to export a version of the file that is two or four times smaller than the original. You must also remember that you have to go through the entire process of creating proxies before you make any edits. The trick to creating proxies in Shotcut is to make a project file with the larger version of the video, then replace the larger version of the file with a smaller version of that same video file, before you actually start editing. Once you’ve completed the editing process, you can then once again add the larger source file to the project and export your video in high resolution.
7. Lightworks
Price: Free trial available, subscription plans start at $24,99 per month
Compatibility: Linux, macOS, Windows
The process of creating proxies in Lightworks is rather simple since you just have to import the video files you’d like to edit into the software and make sure they are selected before you right-click on them. Once the right-click menu appears on the screen you should click on the Media submenu and select the Make Proxies option. The amount of time Lightworks is going to need to generate the proxy files depends on the number of the source files and their size. You can then proceed to add the proxies to the timeline, edit them and Lightworks will automatically use the source files instead of proxies during the rendering process.
8. HitFilm Express
Price: Free
Compatibility: macOS, Windows
Once you create a new project and import all video clips you want to use in that project into the editor you should just go to the Assets menu that is located in the Media panel and click on the Make Proxy option. You will be able to continue editing while the transcoding process is still in progress, and after the source files are transcoded they will be replaced by proxies. However, making adjustments to a proxy version of a composite shot will invalidate that proxy file, which is why it is important to make all edits on that shot before you create its proxy.
Conclusion
Reducing the size of video clips you use in your projects is going to save you a lot of time during the video editing process. Each video editing software we featured in this article allows its users to generate proxy files effortlessly. Which video editor are you going to be using for proxy video editing? Leave a comment below and let us know.
Max Wales
Max Wales is a writer and a lover of all things video.
Follow @Max Wales
Max Wales
Mar 27, 2024• Proven solutions
Shooting videos in high resolutions can help you create visually impressive content your followers on social media are going to adore. The only trouble is that the size of 4K videos can slow you down during the video editing process if your computer doesn’t have enough RAM memory or processing power. Additionally, quite a few inexpensive or free video editing apps don’t allow their users to create low-resolution proxy files that make the process of editing 4K videos much faster. That’s why in this article we are going to take you through the best 8 video editors you can use for 4K proxy video editing.
The Best Video Editing Apps for Proxy Editing in 2020
Some of the video editing apps we featured in this article can only run on computers that already have the advanced hardware setups. However, even if you have a computer setup that can easily support processing of the 4K video files, proxy editing can still be useful as it can reduce the amount of time you will have to spend on performing complex video editing tasks. Let’s take a look at some of the best video editors that support proxy editing.
1. Filmora
Price: Free version available, subscription plans start at $49.99 per year
Compatibility: macOS, Windows
The wide range of video editing options, support for nearly all popular video file formats or quick and simple exporting process are only a few reasons why Filmora is one of the best video editors you can use this year. Creating proxy files in Filmora is not a difficult task, because the software generates them automatically for you. You just have to choose between the 1280x720p or 1920x1080p resolutions and Filmora will create proxies for all media files that are larger than the resolution you’ve selected. However, the amount of time Filmora is going to need to create proxies depends on your computer’s processing power, but also on the size and the number of the RAW files you imported into a project.
2. Adobe Premiere Pro CC
Price: $20,99 per month, different subscription plans available
Compatibility: Windows, macOS
This is probably one of the best, if not the best non-linear video editing software ever created, so it is hardly surprising that you can easily create proxy files for all videos you use in a project you create in Adobe Premiere Pro. So, to create proxy files you just need to open the folder that contains those files from the Media Browser and then click on the Ingest button. You should then click on the wrench tool and pick the Create Proxies option from the drop-down menu located next to the Ingest option. Afterward, you should select one of the available resolution presets and proceed to import the footage into the project. However, before you can start editing with proxies you have to click on the Toggle Proxy button.
3. Final Cut Pro X
Price: Free trial available, $299,99
Compatibility: macOS
Transcoding media with FCPX doesn’t require too much effort, as the software offers a couple of options that make the editing process faster. You can opt to generate optimized media files by transcoding the original video clips into Apple ProRes 422 codec format that shortens the amount of time needed for rendering and provides excellent quality of color that is required for compositing. The proxy media files will also be created by transcoding the videos to Apple ProRes 422 codec format that retains original aspect ratio and frame rate of the video clips you transcoded. It is also worth noting that FCPX transcodes all mp3 files you import into a project to MOV audio files.
4. Vegas Pro
Price: Subscription plans start from $249,00
Compatibility: Windows
This video editor is often overlooked in conversations about the most powerful video editing apps, but the tools it offers are powerful enough to enable you to edit videos at a professional level. Creating proxy files in Vegas Pro is remarkably easy, as you just have to import the files into a new project, select each file you want to transcode and then choose the Create Video Proxy option from the right-click menu. Just keep in mind that you must create proxy files before you do any actual editing because otherwise, the transcoding process is not going work.
5. Blender
Price: Free
Compatibility: Linux, macOS, Windows
Blender is a 3D modeling and VFX software that lets you track objects or use 3D painting tools among numerous other options. Even though creating proxies with this app is not a particularly complicated process, you still have to be familiar with Blender in order to make full use of its transcoding options. The software allows you to generate proxy files whose size is only 25% of the video’s original size, although you can also create proxies that have 50% and 75% of the video’s original size. After you’ve adjusted the transcoding settings you should simply click on the Rebuild Proxy and Timecode Indices button.
6. Shotcut
Price: Free
Compatibility: Windows, macOS, Linux
Despite the fact that this cross-platform video editor supports 4K and ProRes files that can cause it to lag at times, creating proxies in Shotcut is a highly technical process. In case you decide to make a proxy file by yourself, you will have to export a version of the file that is two or four times smaller than the original. You must also remember that you have to go through the entire process of creating proxies before you make any edits. The trick to creating proxies in Shotcut is to make a project file with the larger version of the video, then replace the larger version of the file with a smaller version of that same video file, before you actually start editing. Once you’ve completed the editing process, you can then once again add the larger source file to the project and export your video in high resolution.
7. Lightworks
Price: Free trial available, subscription plans start at $24,99 per month
Compatibility: Linux, macOS, Windows
The process of creating proxies in Lightworks is rather simple since you just have to import the video files you’d like to edit into the software and make sure they are selected before you right-click on them. Once the right-click menu appears on the screen you should click on the Media submenu and select the Make Proxies option. The amount of time Lightworks is going to need to generate the proxy files depends on the number of the source files and their size. You can then proceed to add the proxies to the timeline, edit them and Lightworks will automatically use the source files instead of proxies during the rendering process.
8. HitFilm Express
Price: Free
Compatibility: macOS, Windows
Once you create a new project and import all video clips you want to use in that project into the editor you should just go to the Assets menu that is located in the Media panel and click on the Make Proxy option. You will be able to continue editing while the transcoding process is still in progress, and after the source files are transcoded they will be replaced by proxies. However, making adjustments to a proxy version of a composite shot will invalidate that proxy file, which is why it is important to make all edits on that shot before you create its proxy.
Conclusion
Reducing the size of video clips you use in your projects is going to save you a lot of time during the video editing process. Each video editing software we featured in this article allows its users to generate proxy files effortlessly. Which video editor are you going to be using for proxy video editing? Leave a comment below and let us know.
Max Wales
Max Wales is a writer and a lover of all things video.
Follow @Max Wales
Free Video Looping Software for Windows and Mac
Video loops are common online. Most of them may be found on Twitter, YouTube, Facebook, Instagram, and other social media platforms. This may be an excellent way to emphasize a point or make the information more enjoyable.
In addition, it’s a great idea to play the video in repeat mode when you find a certain piece of a video or an entire clip very intriguing and want to watch it again and again for yourself, your friends, or your intended audience on your social media account.
The loopers come in here because they help make the movie loop several times. In this article, we will share a list of free Video Looper online solutions that, according to their regulations, enable you to repeat a piece of video.
In this article
01 Best Video Loopers to Loop Videos for Free on Windows and Mac
02 Create Boomerang Loop withWondershare Filmora Video Editor
Part 1: Best Video Loopers to Loop Videos for Free on Windows and Mac
Whatever you are motivated to create a video loop, you should know that it’s a straightforward process. If you wish to create a looping video, you’ll need to download a video editing tool. Here we will cover the best free video looper for you and how you can create a loop video.
1. Window Media Player
Windows Media Player offers a clean and intuitive interface, outstanding performance, particularly with big media libraries, and solid integration with Urge, the company’s de facto music streaming service. Whenever Windows Media Player approaches the finish of a video, it gives you the option to repeat it manually, but it does not do it routinely.
Enabling the Repeat function, on the other hand, directs Media Player to play the video in a constant loop until you actively stop it or shut the software. Looping a video impacts the rest of the video from start to finish; Media Player does not only allow you to loop a portion of it but more.
How to Loop Video in Windows Media Player?
Step 1: Drag your mouse pointer over the Media Player window in Now Playing status to reveal the playback settings.
Step 2: To continually repeat the movie, click the Turn Repeat On button, denoted by a circular arrow, and glows blue when toggled on.
(Note: If you don’t see this button in a tiny playing window, select the square Maximize symbol or drag the video corners to expand the window bigger).
Step 3: Until you exit the application or click the Turn Repeat Off icon, the Repeat option will repeat the whole video.

Note: When you close the window, your prior feature selection is retained; thus, the next video you watch will play in a loop until you turn off the Repeat feature.
2. QuickTime Player
QuickTime Player is a basic application that allows you to watch videos and record screencasts on your Mac. You may also produce your videos and audio recordings and do rapid changes. Basic activities such as video flipping and clip splitting are included in edits.
You can record a screencast of a lecture, or capture a portion of the screen with QuickTime, which is ideal for creating a video lesson for an application. Using QuickTime, you may cut the length of video clips or merge many pieces into a single film. Drag the clips to a film window - QuickTime dynamically scales or trims them to fit the size of the movie.
It can also play your video on loop. Here’s how:
How to Loop Video with QuickTime Player?
If you’re using a Mac and wish to generate a video loop in QuickTime Player, follow these steps:
Step 1: Launch the QuickTime player to watch any video.
Step 2: In the taskbar at the top right of the screen, select View.
Step 3: From the drop-down option, select Loop. And that’s it. You have put a video on loop.

These two video programs simplify setting up videos to run on repeat; they don’t allow you to loop individual video parts. To do so, you’ll need more powerful software, such as the well-known VLC Media Player.
3. VLC Media Player
The VLC media player is a program that allows you to play video and music files on your computer. The VLC player can operate on several operating systems, including Windows 2021, XP, and Mac OS X, because of the device’s powerful CPUs.
This makes the VLC Media Player an excellent alternative for anybody searching for a media player that can simultaneously run many programs. This free video editing program also includes special capabilities that allow it to execute numerous jobs simultaneously, including video editing, data transmission, graphic display, sound editing, and much more.
How to Loop a part of the Video in VLC Media Player Continuously?
Create a beginning point A and an ending point B, which are in the center of VLC’s timeline. There is a control button for the A to B looping function in the Advanced Controls. The starting and ending positions inside a media file can be specified by bringing up the advanced controls first. Now follow these steps to put a video on loop in the VLC media player:
Step 1: Open the video with VLC media player. Go to View. Select the Advanced Controls option.

Step 2: Go to the bottom of the VLC media player, and you will find 4 controls above the play button. Click the third button Loop from Piont A to Point B continuously to mark the starting point of the loop; and then click the third button again to mark the end of the loop.

Step 3: Click the Play button and you will find the video is playing loop. Until you press the Loop from point A to point B option for the third time to discontinue the looped playback, the segment of the clip you’ve put up will keep on playing on loop.
4. iMovie
iMovie is a fantastic tool for making beautiful short films, music videos, picture slideshows, and other creative projects. You may also loop videos straight in the iMovie software; however, you’ll need to utilize QuickTime to loop movies continually if you want to export them. Here are the quick and easy ways to loop a movie into iMovie.
How to Loop Video in iMovie?
Step 1: Open iMovie and then the video clip you want to loop in.
Step 2: Select the Loop Playback option from the View menu. Once the video begins to play, it will loop indefinitely until you stop it.
5. Windows Photos App
Microsoft Photos, a free photo viewer and editor bundled with Windows 10, provides capable image editing and photo improvements and capabilities for organizing and editing movies, all in a touch-friendly interface.
You may doodle on photographs, apply background music and 3D effects to videos , and use automated object tagging to make searching easier. Microsoft Photos is a wonderful tool for dealing with digital photographs, and for certain users, it may even replace third-party photo applications.
How to Loop Video in Windows 10 Photos app?
Windows 10 comes with the Photos app preinstalled. It can also assist you in making your movie loop. Here’s how to do it.
Step 1: Import your video to the Photos app, and use the trim tool to get the part you want to loop.

Step 2: Copy and paste the trimmed video to the storyboard as many times as you like. And then click the Finish Video button to export the video.

Part 2: Create Boomerang Loop with Wondershare Filmora Video Editor
Looping a movie is not a difficult chore for anyone, even a novice. As we all know, most video players cease playing when a video approaches its climax. You can manually reverse the portion if you wish to see it with Boomerang effects.
You may loop and enjoy the video you like continuously when you do a new project in Wondershare Filmora Video Editor , a video editor for all video content creators.
For Win 7 or later (64-bit)
For macOS 10.12 or later
Furthermore, this multi-functional program may trim, clip, divide or combine films to your liking. To loop any video in Filmora, follow these steps:
Step 1: Launch the Filmora video editor and import the video file. Click on File>Import Media>Import Media Files. And then drag the video file to the timeline. Do some basic editing such as trimming and cutting to get the segments that you want to loop with the Boomerang effect, if necessary.

Step 2: Copy and paste the video file on the timeline, and then change the speed of the pasted video to apply the Reverse effect. Repeat the process to loop the video as many times as you want.

Step 3: Export the video files when you’re done. Click on Export and save the looping video as a video or gif, and then select the location where you want to save the file.
Summary
Depending on your taste, the number of video loops required, and the amount of information you need when creating a full-fledged film with repeats, you can use any software described above. If you need a more advanced option, Wondershare Filmora video editor is your best alternative in terms of Video Loopers. It is not only a free video looper, but it also has several additional capabilities that allow you to create a full output with granular changes.
02 Create Boomerang Loop withWondershare Filmora Video Editor
Part 1: Best Video Loopers to Loop Videos for Free on Windows and Mac
Whatever you are motivated to create a video loop, you should know that it’s a straightforward process. If you wish to create a looping video, you’ll need to download a video editing tool. Here we will cover the best free video looper for you and how you can create a loop video.
1. Window Media Player
Windows Media Player offers a clean and intuitive interface, outstanding performance, particularly with big media libraries, and solid integration with Urge, the company’s de facto music streaming service. Whenever Windows Media Player approaches the finish of a video, it gives you the option to repeat it manually, but it does not do it routinely.
Enabling the Repeat function, on the other hand, directs Media Player to play the video in a constant loop until you actively stop it or shut the software. Looping a video impacts the rest of the video from start to finish; Media Player does not only allow you to loop a portion of it but more.
How to Loop Video in Windows Media Player?
Step 1: Drag your mouse pointer over the Media Player window in Now Playing status to reveal the playback settings.
Step 2: To continually repeat the movie, click the Turn Repeat On button, denoted by a circular arrow, and glows blue when toggled on.
(Note: If you don’t see this button in a tiny playing window, select the square Maximize symbol or drag the video corners to expand the window bigger).
Step 3: Until you exit the application or click the Turn Repeat Off icon, the Repeat option will repeat the whole video.
Note: When you close the window, your prior feature selection is retained; thus, the next video you watch will play in a loop until you turn off the Repeat feature.
2. QuickTime Player
QuickTime Player is a basic application that allows you to watch videos and record screencasts on your Mac. You may also produce your videos and audio recordings and do rapid changes. Basic activities such as video flipping and clip splitting are included in edits.
You can record a screencast of a lecture, or capture a portion of the screen with QuickTime, which is ideal for creating a video lesson for an application. Using QuickTime, you may cut the length of video clips or merge many pieces into a single film. Drag the clips to a film window - QuickTime dynamically scales or trims them to fit the size of the movie.
It can also play your video on loop. Here’s how:
How to Loop Video with QuickTime Player?
If you’re using a Mac and wish to generate a video loop in QuickTime Player, follow these steps:
Step 1: Launch the QuickTime player to watch any video.
Step 2: In the taskbar at the top right of the screen, select View.
Step 3: From the drop-down option, select Loop. And that’s it. You have put a video on loop.
These two video programs simplify setting up videos to run on repeat; they don’t allow you to loop individual video parts. To do so, you’ll need more powerful software, such as the well-known VLC Media Player.
3. VLC Media Player
The VLC media player is a program that allows you to play video and music files on your computer. The VLC player can operate on several operating systems, including Windows 2021, XP, and Mac OS X, because of the device’s powerful CPUs.
This makes the VLC Media Player an excellent alternative for anybody searching for a media player that can simultaneously run many programs. This free video editing program also includes special capabilities that allow it to execute numerous jobs simultaneously, including video editing, data transmission, graphic display, sound editing, and much more.
How to Loop a part of the Video in VLC Media Player Continuously?
Create a beginning point A and an ending point B, which are in the center of VLC’s timeline. There is a control button for the A to B looping function in the Advanced Controls. The starting and ending positions inside a media file can be specified by bringing up the advanced controls first. Now follow these steps to put a video on loop in the VLC media player:
Step 1: Open the video with VLC media player. Go to View. Select the Advanced Controls option.
Step 2: Go to the bottom of the VLC media player, and you will find 4 controls above the play button. Click the third button Loop from Piont A to Point B continuously to mark the starting point of the loop; and then click the third button again to mark the end of the loop.
Step 3: Click the Play button and you will find the video is playing loop. Until you press the Loop from point A to point B option for the third time to discontinue the looped playback, the segment of the clip you’ve put up will keep on playing on loop.
4. iMovie
iMovie is a fantastic tool for making beautiful short films, music videos, picture slideshows, and other creative projects. You may also loop videos straight in the iMovie software; however, you’ll need to utilize QuickTime to loop movies continually if you want to export them. Here are the quick and easy ways to loop a movie into iMovie.
How to Loop Video in iMovie?
Step 1: Open iMovie and then the video clip you want to loop in.
Step 2: Select the Loop Playback option from the View menu. Once the video begins to play, it will loop indefinitely until you stop it.
5. Windows Photos App
Microsoft Photos, a free photo viewer and editor bundled with Windows 10, provides capable image editing and photo improvements and capabilities for organizing and editing movies, all in a touch-friendly interface.
You may doodle on photographs, apply background music and 3D effects to videos , and use automated object tagging to make searching easier. Microsoft Photos is a wonderful tool for dealing with digital photographs, and for certain users, it may even replace third-party photo applications.
How to Loop Video in Windows 10 Photos app?
Windows 10 comes with the Photos app preinstalled. It can also assist you in making your movie loop. Here’s how to do it.
Step 1: Import your video to the Photos app, and use the trim tool to get the part you want to loop.
Step 2: Copy and paste the trimmed video to the storyboard as many times as you like. And then click the Finish Video button to export the video.
Part 2: Create Boomerang Loop with Wondershare Filmora Video Editor
Looping a movie is not a difficult chore for anyone, even a novice. As we all know, most video players cease playing when a video approaches its climax. You can manually reverse the portion if you wish to see it with Boomerang effects.
You may loop and enjoy the video you like continuously when you do a new project in Wondershare Filmora Video Editor , a video editor for all video content creators.
For Win 7 or later (64-bit)
For macOS 10.12 or later
Furthermore, this multi-functional program may trim, clip, divide or combine films to your liking. To loop any video in Filmora, follow these steps:
Step 1: Launch the Filmora video editor and import the video file. Click on File>Import Media>Import Media Files. And then drag the video file to the timeline. Do some basic editing such as trimming and cutting to get the segments that you want to loop with the Boomerang effect, if necessary.
Step 2: Copy and paste the video file on the timeline, and then change the speed of the pasted video to apply the Reverse effect. Repeat the process to loop the video as many times as you want.
Step 3: Export the video files when you’re done. Click on Export and save the looping video as a video or gif, and then select the location where you want to save the file.
Summary
Depending on your taste, the number of video loops required, and the amount of information you need when creating a full-fledged film with repeats, you can use any software described above. If you need a more advanced option, Wondershare Filmora video editor is your best alternative in terms of Video Loopers. It is not only a free video looper, but it also has several additional capabilities that allow you to create a full output with granular changes.
Also read:
- New Solving the Sync Problem Audio and Video Alignment in FCPX 2024
- New Best Chroma Key Software for Mac Reviews and Comparisons for 2024
- New 2024 Approved Unlocking Wav Conversion The One-Stop Solution
- New Trailer Magic Top Video Editing Software for Mac and PC for 2024
- Create Stunning Intros Top 10 Websites for Video Openers for 2024
- Updated 2024 Approved Color Correction Mastery Blending Video Clips Seamlessly in PowerDirector
- Updated MOV Video Trimming Made Easy Top 6 Free Tools
- The Best Free Video Cutting Software for MP4 Files
- Updated 2024 Approved The Inside Scoop on Mp3 Converter Windows An Essential Read for Anyone Who Loves Music
- 2024 Approved Avidemux No Sound Error How to Fix It
- 2024 Approved Diving Into Splice Video Editor A Full Evaluation and Recommendation
- Updated In 2024, Apples Finest Best Video Editing Software for Mac
- Updated In 2024, Make an Impact 10 Best Free Invitation Video Creators Online
- High-Definition Video for Beginners Pixel Size, Resolution, and Beyond for 2024
- Unleash Stunning Videos Top 4K/8K Video Editing Software Revealed
- FLV Video Editor for Windows 8 A Comprehensive Review for 2024
- New 2024 Approved Free Video Editing Software Without Watermark
- New Streamline Your Workflow Top Adobe Premiere Shortcuts You Need for 2024
- In 2024, Get Noticed with These 20 Eye-Catching Adobe Premiere Intro Templates Free Download
- Updated In 2024, Still Moments From Moving Pictures A Review of 10 Video to Image Converters
- Updated From Shaky to Smooth Video Stabilization Techniques for Adobe Premiere Pro Users
- Updated 2024 Approved The Best of the Best Top-Rated 2D Animation Software Free Trials & Paid Plans
- New Discover the Best Vegas Pro Substitutes for Mac Free Trials and Paid Options for 2024
- New Movie Magic Made Easy Upgrade Your Home Videos to Hollywood Quality for 2024
- Updated VN Video Editor on Mac A Review and Comparison with Alternative Editors
- Updated Top Online Video Editing Tools for Vertical Videos for 2024
- Updated Adding Titles in FCPX A Beginners Guide to Professional Results
- Updated Animate Your World 8 Must-Try Video Animation Apps for Mobile
- Updated Unlimited Fake Faces at Your Fingertips Free Online Generators for 2024
- Updated 2024 Approved Virtualdub A Comprehensive Review and Comparison to Rivals
- Updated In 2024, Cloud Animation Studio Stop Motion Software Options and Best Practices
- Updated S Leading Video Editors for Music and Sound Effects
- The Ultimate Guide to Cloud-Based Stop Motion Animation Software for 2024
- Updated Audio to Text How to Transcribe Your Recordings with Ease
- Updated In 2024, Final Cut Pro X Essentials Adding and Customizing Titles
- New In 2024, Young Filmmakers Unleashed A Kids Guide to Movie Creation
- Updated In 2024, Best Android Apps for Creating Stunning Videos
- Updated 2024 Approved Make Your WhatsApp Status Pop Best Video Makers (Free & Paid)
- New 2024 Approved Unlocking Camtasias Power Speed Up, Slow Down, and More
- New Top Video Editing Tools You Need to Know for 2024
- New Affordable Video Editing Solutions for Creators for 2024
- Updated How to Convert WebM to MP3 Top Conversion Software Compared
- New 2024 Approved The Ultimate Mp3 Converter Windows Resource Why You Need It
- New 2024 Approved Mac Video Editing Made Easy VN Video Editor and More
- Updated Best Vertical Video Editing Apps for iOS and Android Devices for 2024
- New In 2024, The Lowdown on Splice A Full Review of the Video Editing App
- In 2024, Get Ahead with FCP Top 5 Editing Shortcuts and Workarounds
- How to Bypass Google FRP Lock from Infinix Hot 30i Devices
- 5 Hassle-Free Solutions to Fake Location on Find My Friends Of Vivo V27e | Dr.fone
- Does Life360 Notify When You Log Out On Nubia Red Magic 8S Pro+? | Dr.fone
- 4 solution to get rid of pokemon fail to detect location On Vivo V29 Pro | Dr.fone
- In 2024, Ways to trade pokemon go from far away On Oppo Find N3 Flip? | Dr.fone
- In 2024, Quick Steps to Change Weather Location on Apple iPhone 15 | Dr.fone
- New In 2024, Elevate Your Sound The 10 Most Powerful Audio Editing Software
- How to retrieve lost files from Xiaomi Redmi K70?
- 4 Ways to Transfer Music from Realme GT Neo 5 SE to iPhone | Dr.fone
- How to Unlock Itel S23+ Bootloader Easily
- How to Screen Mirroring Xiaomi 13 Ultra to PC? | Dr.fone
- How Can We Unlock Our Oppo A2 Phone Screen?
- In 2024, Recommended Best Applications for Mirroring Your Realme C67 4G Screen | Dr.fone
- How to Fix Android App Not Installed Error on Nokia 130 Music Quickly? | Dr.fone
- How to Fix Unfortunately, Contacts Has Stopped Error on OnePlus 11 5G | Dr.fone
- Google Play Services Wont Update? 12 Fixes are Here on Vivo T2 5G | Dr.fone
- Useful ways that can help to effectively recover deleted files from Realme GT 5
- 4 Easy Ways for Your Vivo Y100 Hard Reset | Dr.fone
- The Magnificent Art of Pokemon Go Streaming On Realme 11 Pro+? | Dr.fone
- How to Delete All Photos from iPhone 8 Beyond Scope of Recovery? | Stellar
- In 2024, Effective Ways To Fix Checkra1n Error 31 On iPhone 12
- Full Guide to Hard Reset Your Samsung Galaxy Z Flip 5 | Dr.fone
- In 2024, How To Unlock Infinix Hot 30i Phone Without Password?
- How do I reset my Honor Magic 6 Pro Phone without technical knowledge? | Dr.fone
- How to Unlock Vivo V29 Phone Pattern Lock without Factory Reset
- Best Anti Tracker Software For Realme 12 5G | Dr.fone
- In 2024, Unlocking the Power of Smart Lock A Beginners Guide for Realme Users
- Easy Guide How To Bypass Huawei Nova Y71 FRP Android 10/11/12/13
- 15 Best Strongest Pokémon To Use in Pokémon GO PvP Leagues For Poco X6 | Dr.fone
- Filter Not Working Error in Excel 2016 Fix 2024
- 4 Feasible Ways to Fake Location on Facebook For your Vivo Y100t | Dr.fone
- 3 Ways to Fake GPS Without Root On Realme C33 2023 | Dr.fone
- New 2024 Approved The Best of the Best 28 Video to GIF Converter Reviews
- Title: The Art of Time Manipulation in Final Cut Pro X for 2024
- Author: Amelia
- Created at : 2024-05-19 11:47:50
- Updated at : 2024-05-20 11:47:50
- Link: https://ai-driven-video-production.techidaily.com/the-art-of-time-manipulation-in-final-cut-pro-x-for-2024/
- License: This work is licensed under CC BY-NC-SA 4.0.
