
:max_bytes(150000):strip_icc():format(webp)/E-reader-57b936e05f9b58cdfd3e07e1.jpg)
Updated 2024 Approved Chromebook Video Editing Software Top Picks
Chromebook Video Editing Software: Top Picks
Best Online Video Editors for Chromebook

Ollie Mattison
Mar 27, 2024• Proven solutions
The increase in popularity of Chromebooks, over the past several years is more than justified because these devices have proven that they are much more than just a web-browsing tool. Using a Chromebook for educational purposes or to widen your network of business associates is becoming more common, while new upgrades of the OS bring improvements at an astounding rate.
However, editing visual content isn’t that easy for Chromebook users, because Windows or Mac applications can’t be used that easily on these devices. That is the reason why online video editors play a large role for all Chromebook owners who want to create videos that meet at least some of the professional standards. Luckily, currently, there is a large number of online video editors available that can offer a solid video editing experience to users who would like to piece their video clips together into visually attractive content.
If you want more decent editing, check out and click the download button right here:
- How to Run Windows and Mac OS Video Editing Apps on Your Chromebook
- Best Android Video Editor Apps for Chromebook


Best Online Video Editors for Chromebook
In such abundance of different online video editors, most Chromebook owners will find themselves wondering, which online video editor is the best for me. Although the answer to this question will depend on the user’s need and the reasons why they want to create a video, it is safe to say that the online video editors listed in this article are among the best that are currently available on the Internet. Let’s have a look at some of the best online video editors that will help you create visually engaging videos.
2.Magisto

Price: Starts at $2,49 per month and goes up to $39,99 per month
What we like: Creates high-quality videos and it uses artificial intelligence to help its users produce better videos.
What we don’t like: Premium and professional pricing plans have video duration limits
Assembling a great video has been made easy with this online video editor. Creating a video with the Magisto online video editor can be completed in three simple steps. Upload your photos or videos, select the video editing style that best reflects the type of video you want to create, select the music from the editor’s music library and let the A.I. video maker analyze the images and create the video you want. With Magisto there is no need to spend countless hours editing your business videos, however different pricing plans offer different amounts of options. The pricing plan for Marketers that comes at $39,99 per month allows its users to create video optimized for branding and advertising.
This pricing plan doesn’t have any restrictions regarding the duration of the videos, while Professional and Premium pricing plans limit users to movies that last from 2:30 up to 4:00 minutes. The owners of the Marketers version of this online video editor can use the editor’s stock footage collection that contains over 100,000 videos, and in addition, they can create videos in Facebook or YouTube styles. Magisto online video editor is a great option for businesses that want to create amazing video content fast and without much trouble.
3.Loopster

Price: Pricing plans range from $4,99 per month to $129 billed every three months
What we like: A large amount of storage space for videos on the cloud
What we don’t like: Loopster offers a very limited amount of transitions and other video editing tools, and you have to pay before using
Loopster’s functional and yet smart design makes this video online editor easy to use. Even the people who haven’t edited a video in their lives can learn how to use this remarkable video editor in a short period of time. Loopster offers a lot of storage space to its members, but the maximum file size users can upload is limited to 2GB. Depending on the price package users can have access to 20 or 30-minute timelines, which limits the possibilities of users who would like to produce longer videos. Even though a number of visual effects offered by Loopster isn’t as big as some users could expect, the online video editor enables them to slow down or speed up videos up to five times.
The owners of Movie Producer Membership, Education, and Business packages have access to over 600 sound effects, while all packages allow users to add text and graphics to the images they are processing. The maximum video resolution this online video editor can produce is 1080p, regardless of the pricing plan, but if you opt to use the free version of Loopster, the maximum video resolution is 480p. Even though Loopster provides only basic video editing options it is still one of the best choices as an online video editor for Chromebook users.
4.Animatron Wave

Price: Free trial version, pricing plans for upgrades range from $39 to $149
What we like: Acess to over 2,5 million royalty free stock footage videos
What we don’t like: Lacks more advanced video editing features
Increase the traffic to your website, generate a better brand awareness and tell captivating stories by using the Aminatron Wave. This online video editor enables you to create amazing marketing videos from over 2,5 million free stock video clips. Using Animatron Wave is an efficient way to cut video production expenses and maintain the same level of quality of the videos that tell the story of your brand. The online video editor also permits you to upload your own footage and apply transitions or Call-to-Action effects you can preview in real time.
Animatron Wave is a great tool for producing social media videos online. Users can add text in many different styles to the footage they are processing while setting the aspect ratio of each video is also an option. Animatron Wave features a music library that contains 100,000 royalty free songs that cover various genres of music, which means that users of this online video editor will never have to worry about the soundtracks of their videos. This online video editor is an excellent choice for all Chromebook users who want to create videos that help their businesses grow.
5. Kizoa

Price: From $29,99 to 299,99 depending on the pricing plan
What we like: Kizoa offers a lot of different transitions and effects
What we don’t like: Editor’s timeline could be better organized
Kizoa online movie editor offers a fast and easy way for Chromebook users to put together their holiday memories or any other precious moments from their lives. Kizoa offers a large number of different movie templates that feature fully customizable transitions and text boxes. All you need to do is select the videos or photos you want to include in the video and Kizoa will take care of the rest. The editor’s menu is composed of several tabs that offer access to transitions, effects, text, animation, and music. Users can choose from hundreds of different effects that enable them to apply color filters, special effects or motion effects, and in addition, the editor offers a large number of different transitions that can fit a wide range of different kinds of videos.
The music library offers royalty free content that enables users to create soundtracks, and users can also upload their own music. The editor offers the 4K video editing support, although this feature isn’t available with the free version of the editor. Kizoa can be purchased with several different pricing plans and you must only purchase it once and you gain the lifetime membership for one one of the best online video editors for Chromebook.
6.PowToon

Price: Free Trial, $19/month - $59/month
What we like: Makes animating videos easy
What we don’t like: Pricey
PowToon web-based video editor is designed to enable non-professionals to create engaging and visually stunning animations. This animation software is available in Free, Pro, Business and Team pricing options, although the Free version of the software can offer only a small portion of the software’s true potential. The price for Pro, Team and Business options ranges from $19 per month for a Pro version of the software to $59 per month for the Business option.
PowToon is a perfect tool for creation of business presentations and storyboards that tell your stories in an effective way. Users can have access to unlimited amounts of royalty free music, create animated charts and graphs or use a large number of visual effects. The software allows you to export 60 minutes of HD or 8 minutes of Full HD content per month, while you can download files in MP4, PDF or PPT file formats. Despite many advantages PowToon offers, it still may be considered expensive by some users.
Ollie Mattison
Ollie Mattison is a writer and a lover of all things video.
Follow @Ollie Mattison
Ollie Mattison
Mar 27, 2024• Proven solutions
The increase in popularity of Chromebooks, over the past several years is more than justified because these devices have proven that they are much more than just a web-browsing tool. Using a Chromebook for educational purposes or to widen your network of business associates is becoming more common, while new upgrades of the OS bring improvements at an astounding rate.
However, editing visual content isn’t that easy for Chromebook users, because Windows or Mac applications can’t be used that easily on these devices. That is the reason why online video editors play a large role for all Chromebook owners who want to create videos that meet at least some of the professional standards. Luckily, currently, there is a large number of online video editors available that can offer a solid video editing experience to users who would like to piece their video clips together into visually attractive content.
If you want more decent editing, check out and click the download button right here:
- How to Run Windows and Mac OS Video Editing Apps on Your Chromebook
- Best Android Video Editor Apps for Chromebook
Best Online Video Editors for Chromebook
In such abundance of different online video editors, most Chromebook owners will find themselves wondering, which online video editor is the best for me. Although the answer to this question will depend on the user’s need and the reasons why they want to create a video, it is safe to say that the online video editors listed in this article are among the best that are currently available on the Internet. Let’s have a look at some of the best online video editors that will help you create visually engaging videos.
2.Magisto
Price: Starts at $2,49 per month and goes up to $39,99 per month
What we like: Creates high-quality videos and it uses artificial intelligence to help its users produce better videos.
What we don’t like: Premium and professional pricing plans have video duration limits
Assembling a great video has been made easy with this online video editor. Creating a video with the Magisto online video editor can be completed in three simple steps. Upload your photos or videos, select the video editing style that best reflects the type of video you want to create, select the music from the editor’s music library and let the A.I. video maker analyze the images and create the video you want. With Magisto there is no need to spend countless hours editing your business videos, however different pricing plans offer different amounts of options. The pricing plan for Marketers that comes at $39,99 per month allows its users to create video optimized for branding and advertising.
This pricing plan doesn’t have any restrictions regarding the duration of the videos, while Professional and Premium pricing plans limit users to movies that last from 2:30 up to 4:00 minutes. The owners of the Marketers version of this online video editor can use the editor’s stock footage collection that contains over 100,000 videos, and in addition, they can create videos in Facebook or YouTube styles. Magisto online video editor is a great option for businesses that want to create amazing video content fast and without much trouble.
3.Loopster
Price: Pricing plans range from $4,99 per month to $129 billed every three months
What we like: A large amount of storage space for videos on the cloud
What we don’t like: Loopster offers a very limited amount of transitions and other video editing tools, and you have to pay before using
Loopster’s functional and yet smart design makes this video online editor easy to use. Even the people who haven’t edited a video in their lives can learn how to use this remarkable video editor in a short period of time. Loopster offers a lot of storage space to its members, but the maximum file size users can upload is limited to 2GB. Depending on the price package users can have access to 20 or 30-minute timelines, which limits the possibilities of users who would like to produce longer videos. Even though a number of visual effects offered by Loopster isn’t as big as some users could expect, the online video editor enables them to slow down or speed up videos up to five times.
The owners of Movie Producer Membership, Education, and Business packages have access to over 600 sound effects, while all packages allow users to add text and graphics to the images they are processing. The maximum video resolution this online video editor can produce is 1080p, regardless of the pricing plan, but if you opt to use the free version of Loopster, the maximum video resolution is 480p. Even though Loopster provides only basic video editing options it is still one of the best choices as an online video editor for Chromebook users.
4.Animatron Wave
Price: Free trial version, pricing plans for upgrades range from $39 to $149
What we like: Acess to over 2,5 million royalty free stock footage videos
What we don’t like: Lacks more advanced video editing features
Increase the traffic to your website, generate a better brand awareness and tell captivating stories by using the Aminatron Wave. This online video editor enables you to create amazing marketing videos from over 2,5 million free stock video clips. Using Animatron Wave is an efficient way to cut video production expenses and maintain the same level of quality of the videos that tell the story of your brand. The online video editor also permits you to upload your own footage and apply transitions or Call-to-Action effects you can preview in real time.
Animatron Wave is a great tool for producing social media videos online. Users can add text in many different styles to the footage they are processing while setting the aspect ratio of each video is also an option. Animatron Wave features a music library that contains 100,000 royalty free songs that cover various genres of music, which means that users of this online video editor will never have to worry about the soundtracks of their videos. This online video editor is an excellent choice for all Chromebook users who want to create videos that help their businesses grow.
5. Kizoa
Price: From $29,99 to 299,99 depending on the pricing plan
What we like: Kizoa offers a lot of different transitions and effects
What we don’t like: Editor’s timeline could be better organized
Kizoa online movie editor offers a fast and easy way for Chromebook users to put together their holiday memories or any other precious moments from their lives. Kizoa offers a large number of different movie templates that feature fully customizable transitions and text boxes. All you need to do is select the videos or photos you want to include in the video and Kizoa will take care of the rest. The editor’s menu is composed of several tabs that offer access to transitions, effects, text, animation, and music. Users can choose from hundreds of different effects that enable them to apply color filters, special effects or motion effects, and in addition, the editor offers a large number of different transitions that can fit a wide range of different kinds of videos.
The music library offers royalty free content that enables users to create soundtracks, and users can also upload their own music. The editor offers the 4K video editing support, although this feature isn’t available with the free version of the editor. Kizoa can be purchased with several different pricing plans and you must only purchase it once and you gain the lifetime membership for one one of the best online video editors for Chromebook.
6.PowToon
Price: Free Trial, $19/month - $59/month
What we like: Makes animating videos easy
What we don’t like: Pricey
PowToon web-based video editor is designed to enable non-professionals to create engaging and visually stunning animations. This animation software is available in Free, Pro, Business and Team pricing options, although the Free version of the software can offer only a small portion of the software’s true potential. The price for Pro, Team and Business options ranges from $19 per month for a Pro version of the software to $59 per month for the Business option.
PowToon is a perfect tool for creation of business presentations and storyboards that tell your stories in an effective way. Users can have access to unlimited amounts of royalty free music, create animated charts and graphs or use a large number of visual effects. The software allows you to export 60 minutes of HD or 8 minutes of Full HD content per month, while you can download files in MP4, PDF or PPT file formats. Despite many advantages PowToon offers, it still may be considered expensive by some users.
Ollie Mattison
Ollie Mattison is a writer and a lover of all things video.
Follow @Ollie Mattison
Cut, Trim, and Edit AVI Videos with the Best Tools [Windows, MAC, Android, iPhone, Online]
With the growing fame of video-sharing and social media applications like Twitter, Instagram, and TikTok, the demand for simple and fast video cutting and trimming tools has dramatically increased. Nowadays, you don’t have to play with complex video editing tools to produce high-quality videos.
Thanks to several user-friendly editing software to make things easy for everybody. However, finding the right programs to trim/cut videos is still challenging, especially in AVI format.
But, guess what? These top 16 AVI video cutters for Windows, MAC, Android, iPhone, and online will make video cutting and trimming fun, especially when you learn to do it using Filmora.
In this Article
Part 1: Best AVI Video Cutter to Trim/Cut AVI Video on Windows and MAC – Filmora Video Cutter [with steps}
Part 2: Top 3 Free AVI Video Cutter on Windows
Part 3: Top 3 Free AVI Video Cutter on MAC
Part 4: Top 3 Free AVI Video Cutter on Android
Part 5: Top 3 Free AVI Video Cutter on iPhone
Part 6: Top 3 Free AVI Video Cutter Online
Part 7: Bottom Line
Part 8: FAQs
Part 1: Best AVI Video Cutter to Trim/Cut AVI Video on Windows and MAC – Filmora Video Cutter [with steps]
Filmora by Wondershare is a star video editor with outstanding outcomes. Whether you have a MAC or Windows PC, you can download Filmora regardless of your operating system. The program best serves those who intend to make high-quality videos. The software provides editing support for all video formats, including AVI.
Although Filmora is an affordable editor with tons of audio and video editing options, you can still download the software for free and create projects if watermarks don’t bother you. Moreover, you can count this tool’s capabilities in cropping, resizing, and Chroma screen support. But that’s not the only sweet fruit.
In fact, Filmora is equipped with many jaw-dropping features, including preset templates, auto beat sync, split-screen, speed ramping, motion tracking, keyframing, creative transitions, titles, filters, and much more. And the best part is, you can learn and understand Filmora in no time. That’s why the program is loved and supported by all types of users.
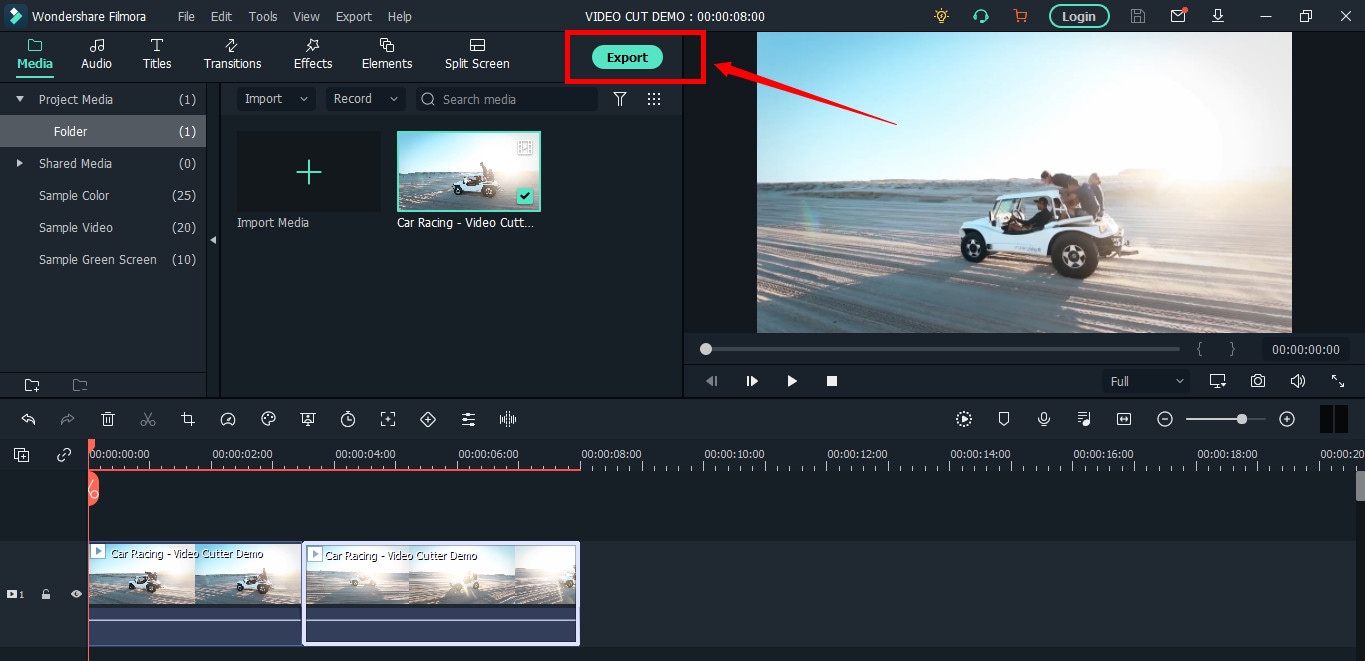
So does Filmora helps cut and trim AVI videos? Yes! It does if you follow these steps correctly.
Step 1: Download Filmora Video Editor
First, download Filmora Video Editor by choosing your operating system, as seen in the screenshot below.
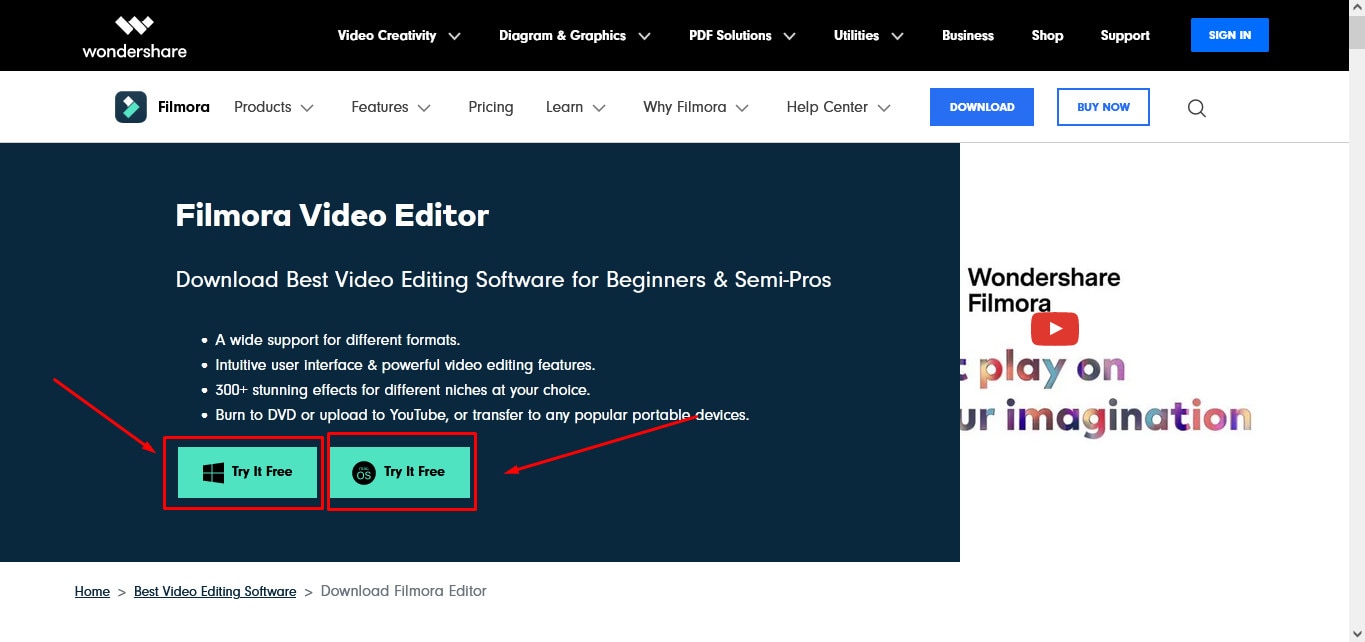
Run the setup and let it finish without any pause or break.
Step 2: Import Your Video to Filmora Video Editor
Importing your AVI video is a very simple process. Just click on the “Film Clip” icon.
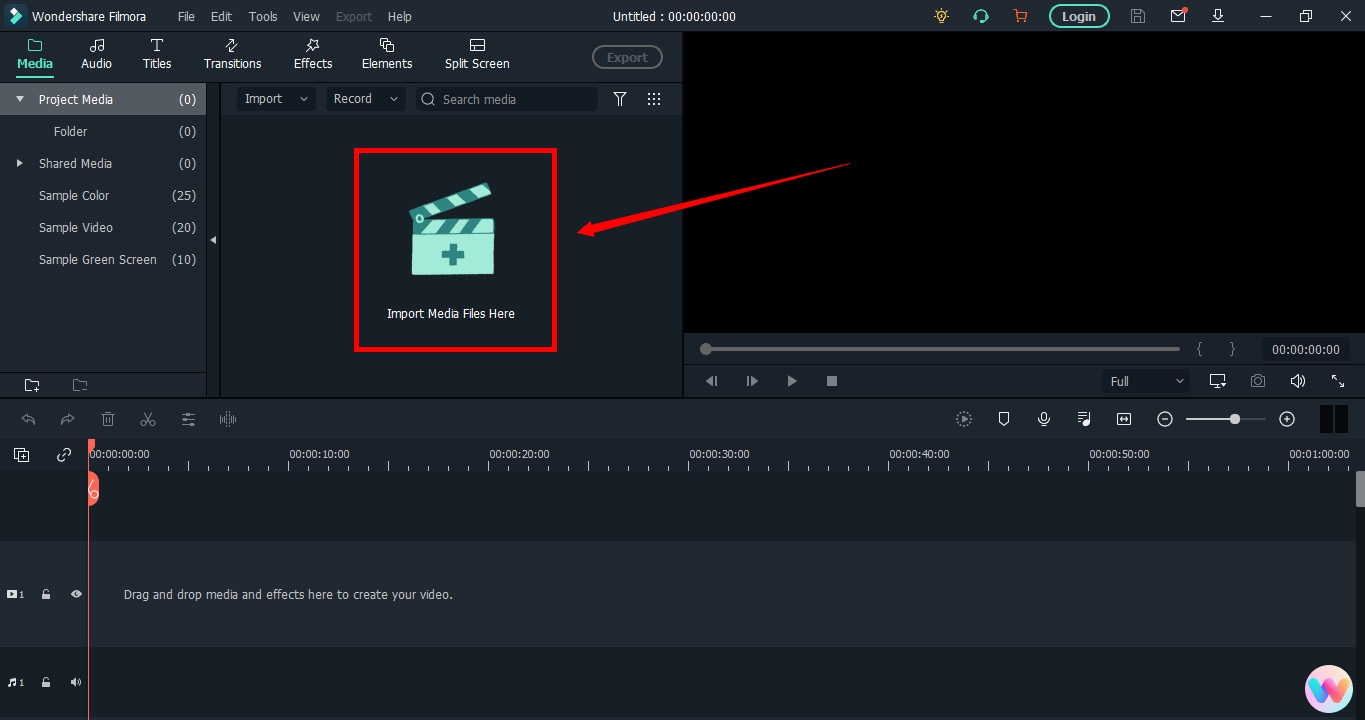
It will open a new window screen on your computer to select the video from the directory. Find the clip you want to import and cut. Use your mouse to select it and click the “Open” button.
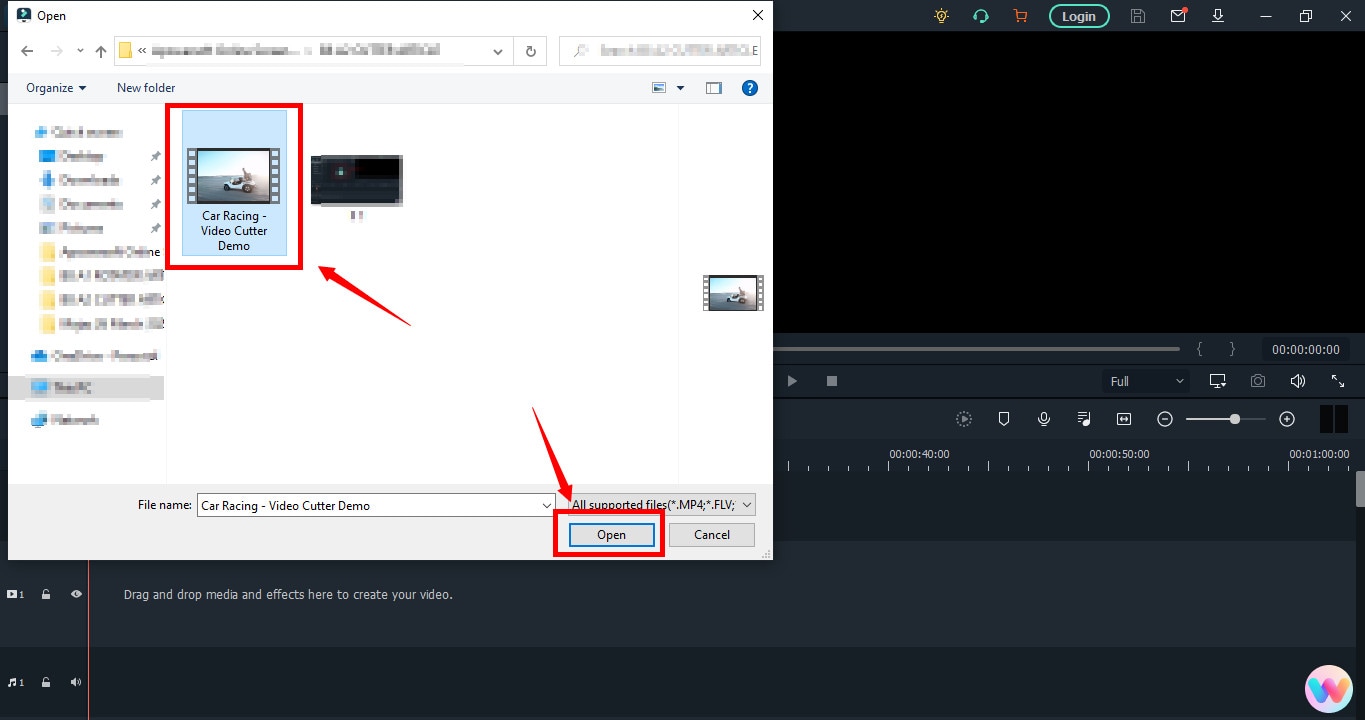
The video will be loaded in the “Media” folder of Filmora. The clip’s thumbnail should be visible to assure you have done everything correctly.
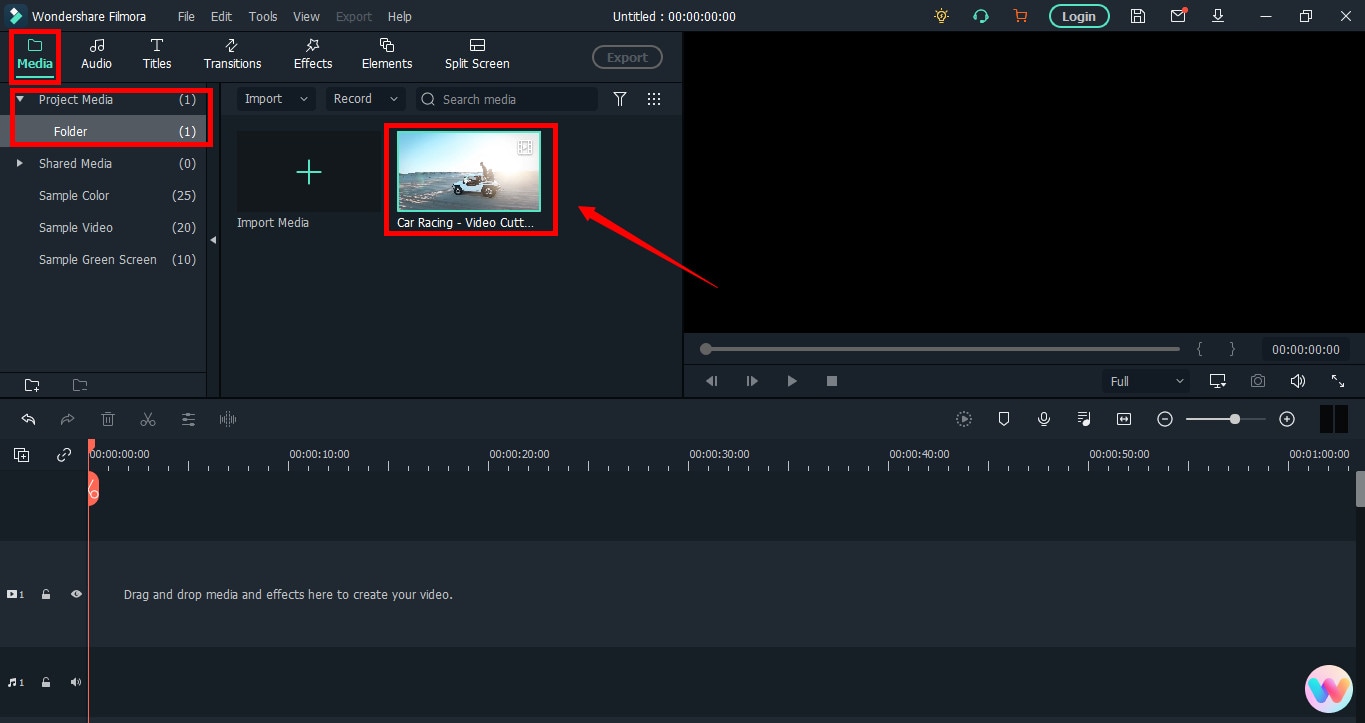
If you can see that, let’s go to the next step.
Step 3: Drag and Drop Video to Filmora’s Timeline
Select the video in the media folder by clicking over it once. Now, without leaving the hold of the left button of your mouse, slide the video down to the track in the timeline.
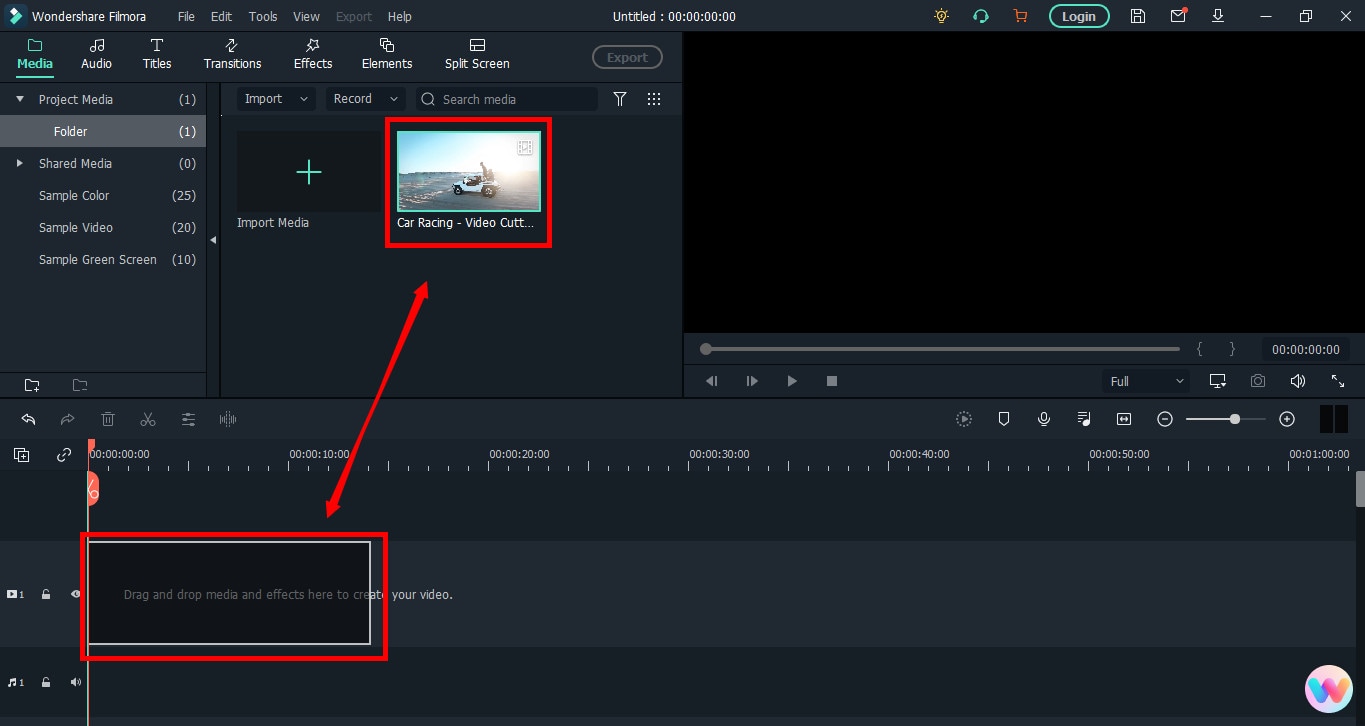
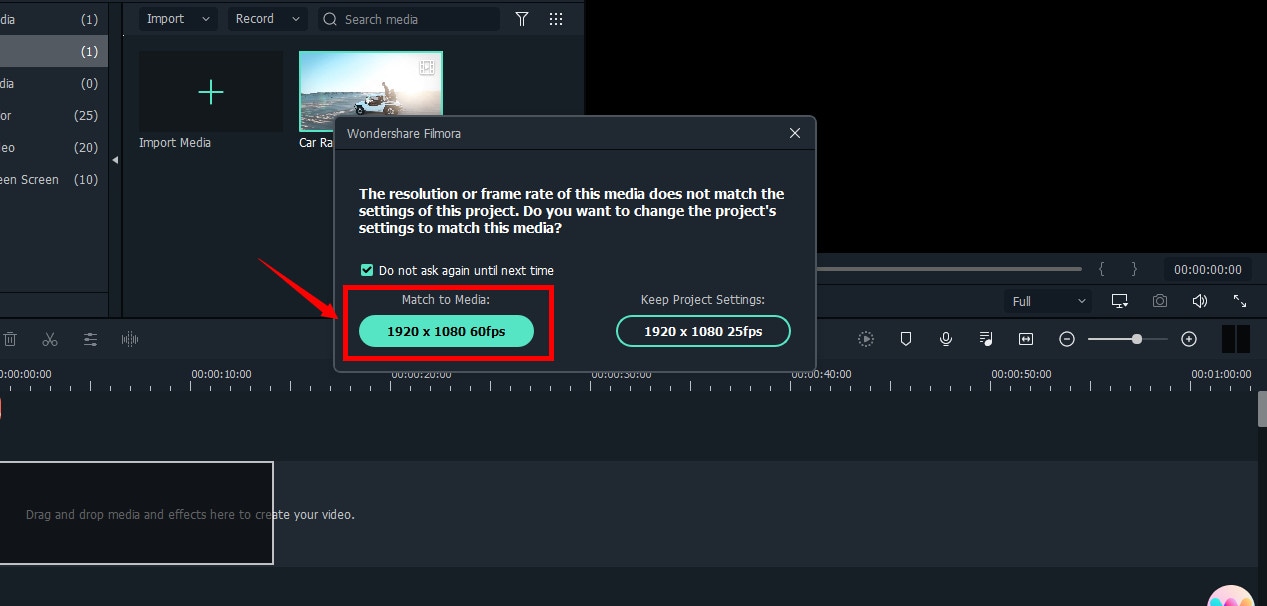
After that, a message will pop up, asking about your preference for the project settings. It is recommended to choose the “Match to Media” option unless you’re an experienced video editor who knows how to play with the resolution and frame rates.
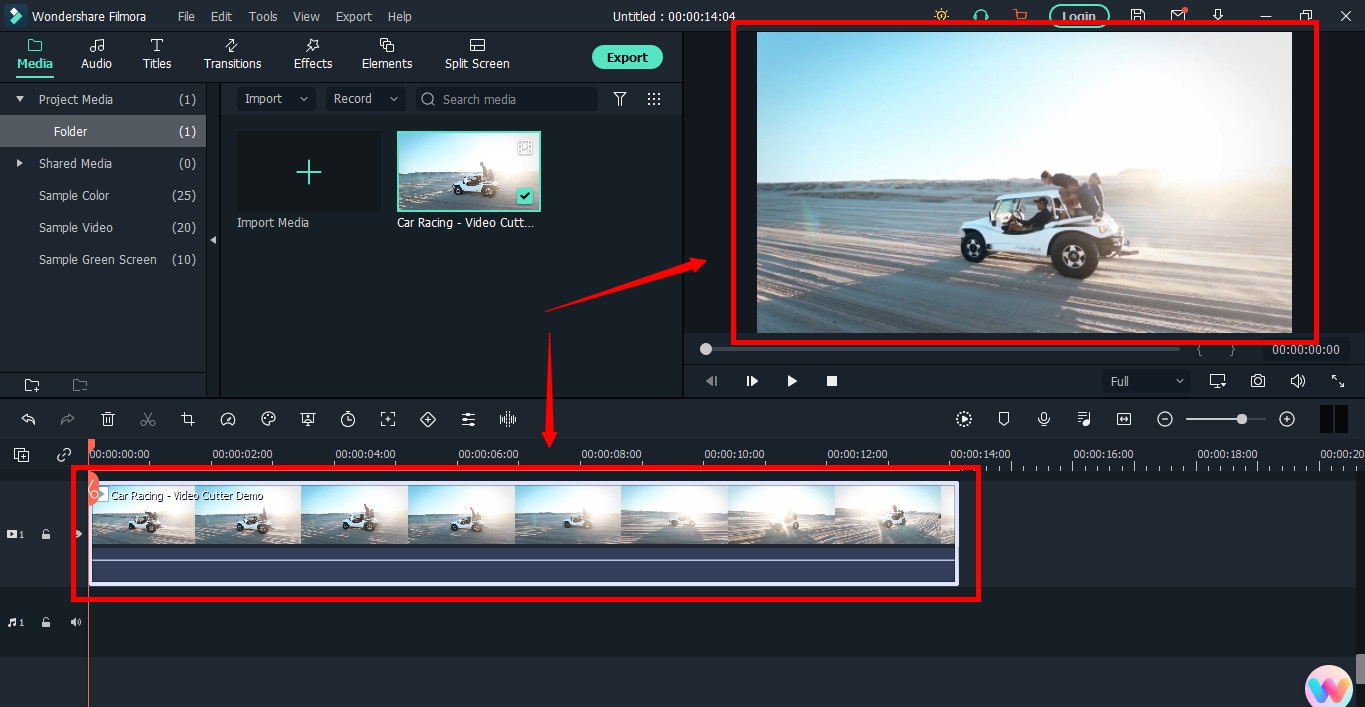
You will see the video on the timeline with its preview on the “Preview Screen” on the right side of the interface.
Step 4: Cutting Your Video in Filmora
Here comes the core step you have been waiting for. But before you go any further, you need to know about the “Playhead.”
Playhead is an orange-reddish marker you can find on the timeline.
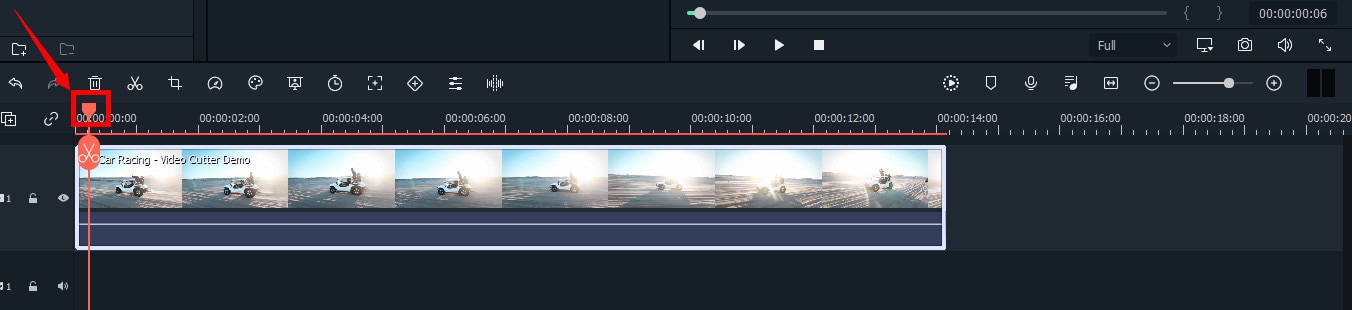
It has an important role in cutting your videos.
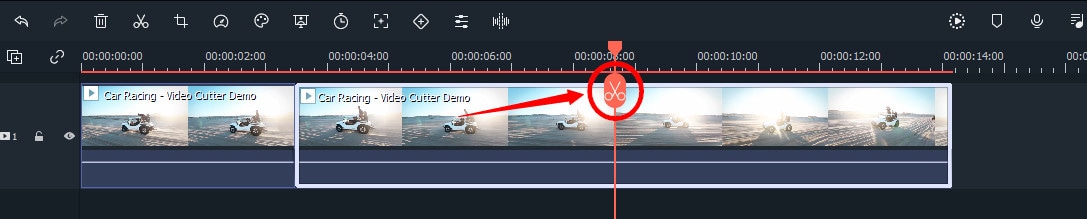
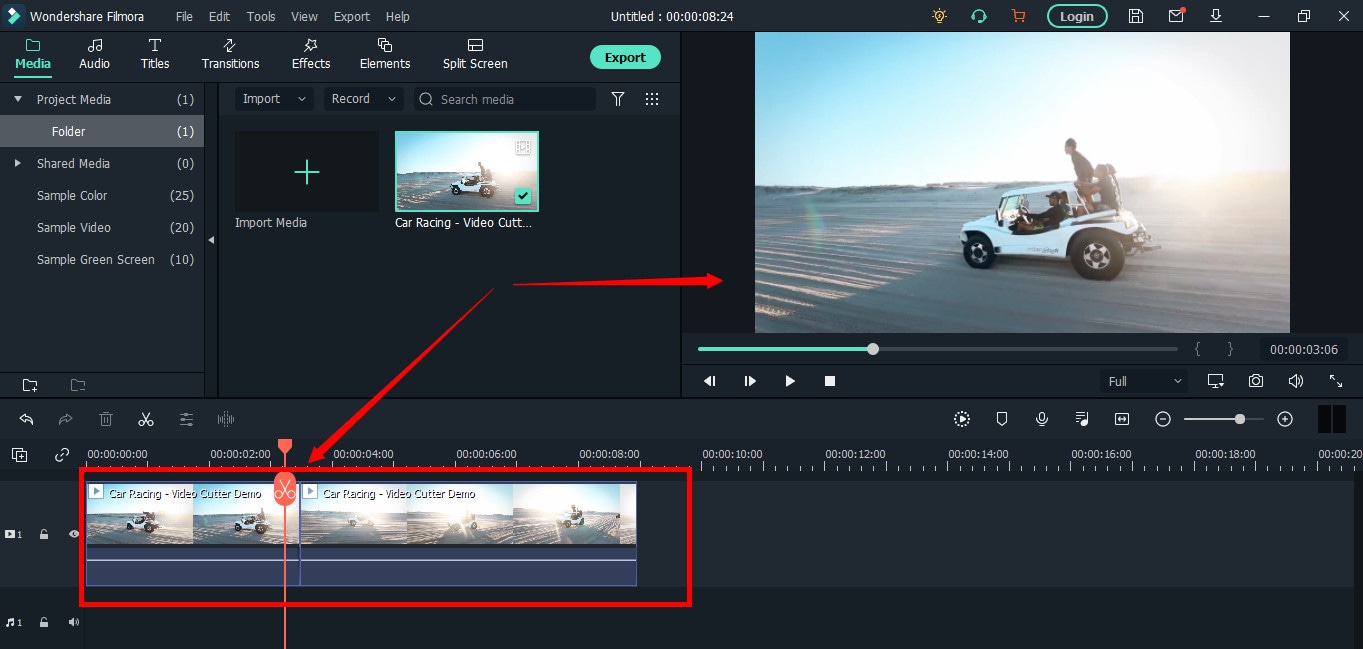
So, move the playhead to your desired frame and click on the “scissor” icon to make the “starting” cut.
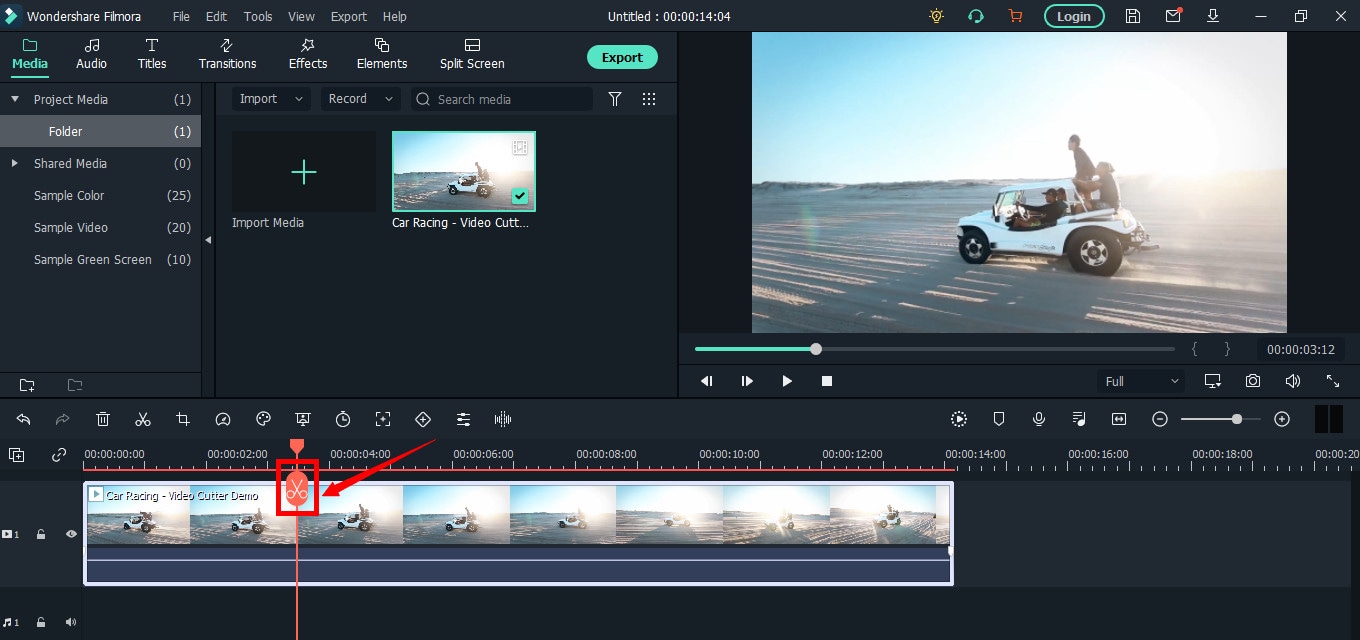
As soon as you do it, you will see that the single clip is now divided into two parts similar to this image.
The “Red” marked area in the above screenshot ensures a gap between the clips on the timeline. The “Yellow” arrows confirm two separate clips of the same video.
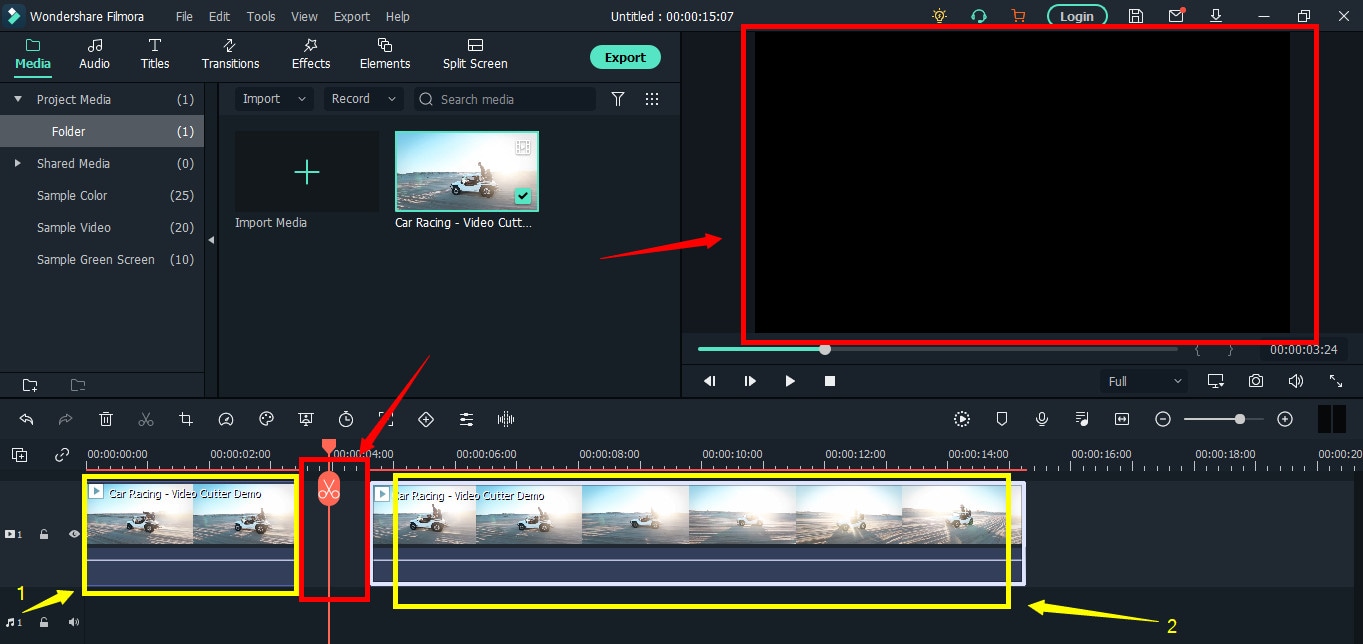
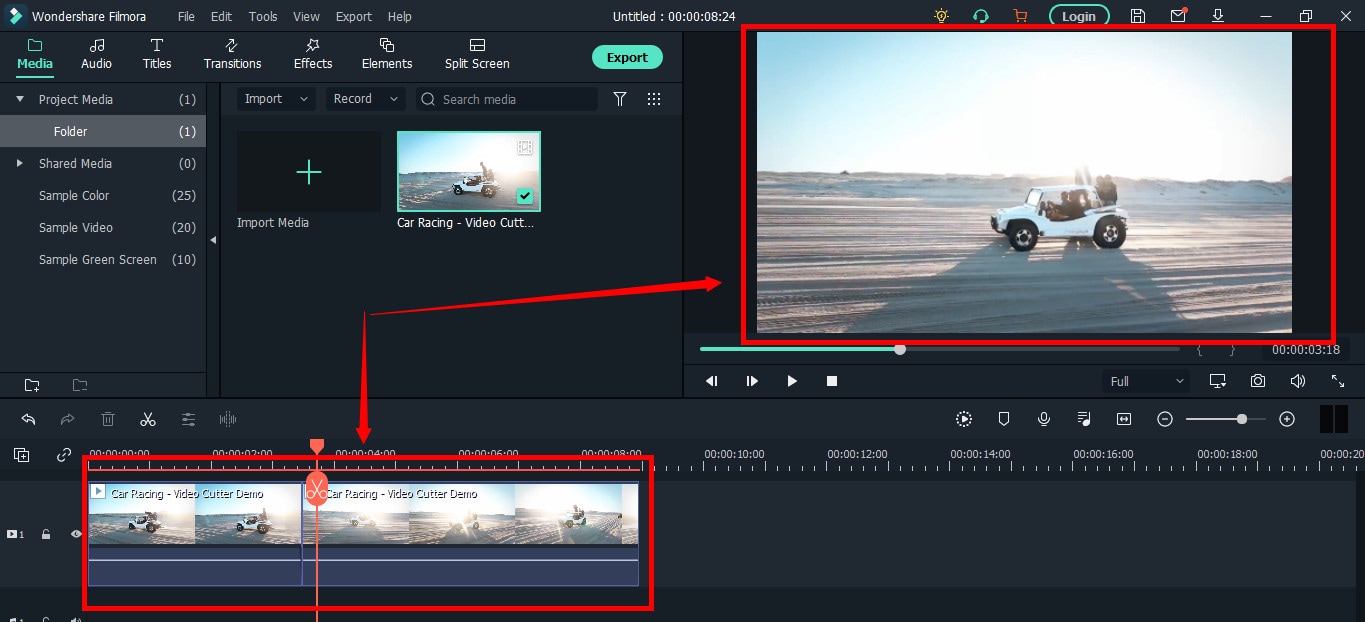
Place the two clips together as seen in this “Green” area.
And place the playhead anywhere on the clip. And click on the “scissor” icon once again to make the “ending” cut (second cut).
If done correctly, there should be three clips now of the same video, as you can observe in this screenshot.
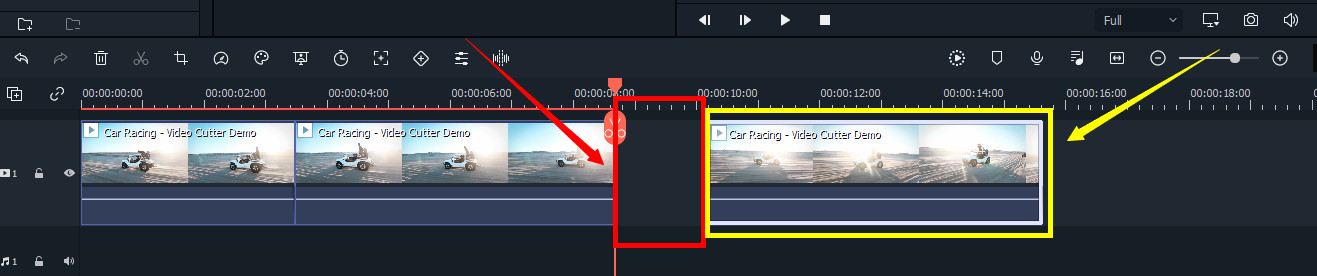
Again, the “Red” area in the above photo indicates the gap, and the “Yellow” area ensures a third segment of the video.
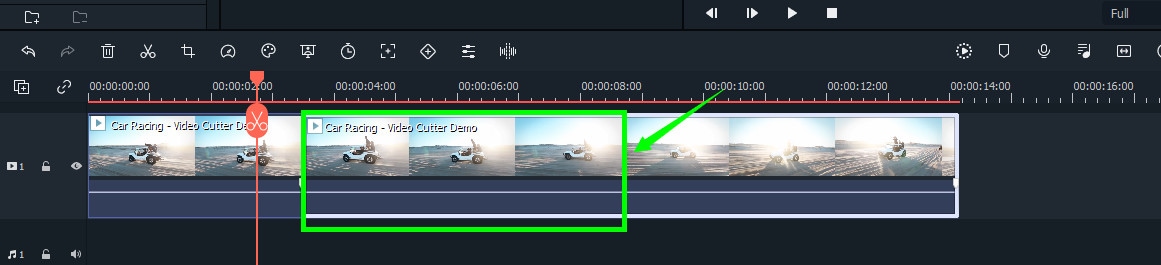
Note: The gaps you can see in the divided clips are made intentionally for understanding. Practically, Filmora doesn’t move the clip or make gaps in between after you have made the cuts.
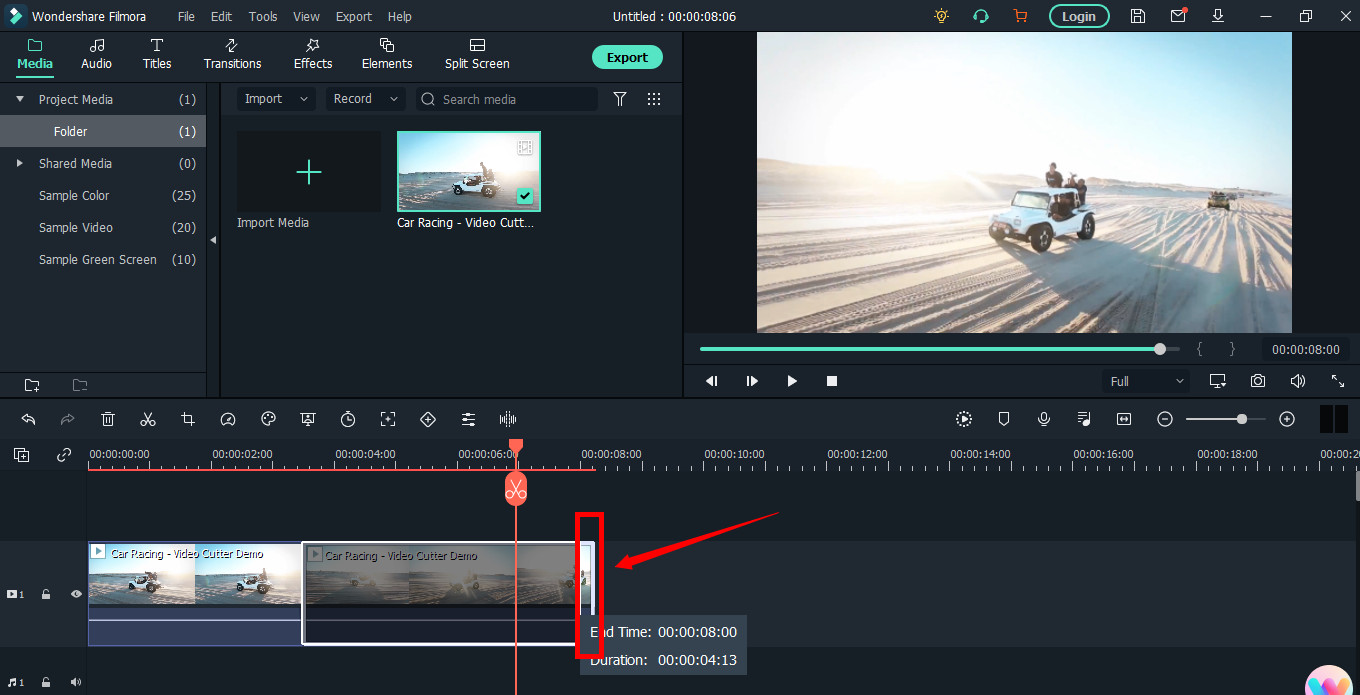
Keep in mind that there are three clips on the timeline. Now, if you want to remove the second clip from the video, you need to select that portion first by clicking on it.
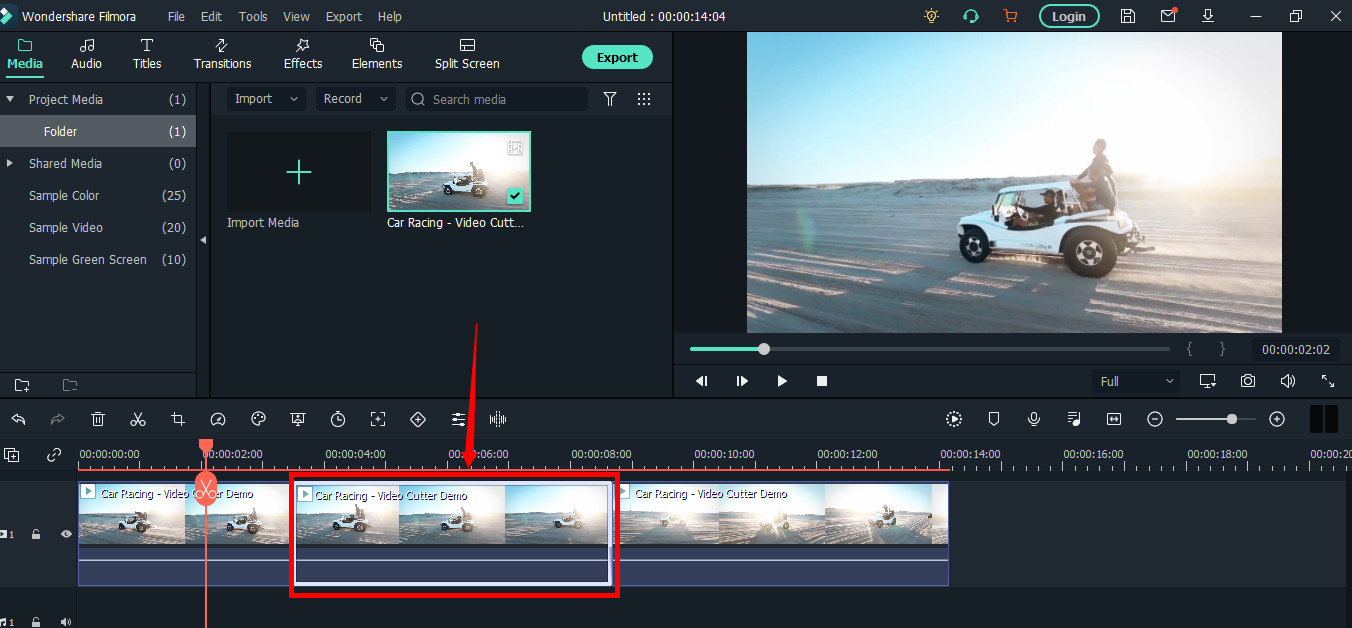
Then, right-click on the mouse and choose “Cut” from the menu.
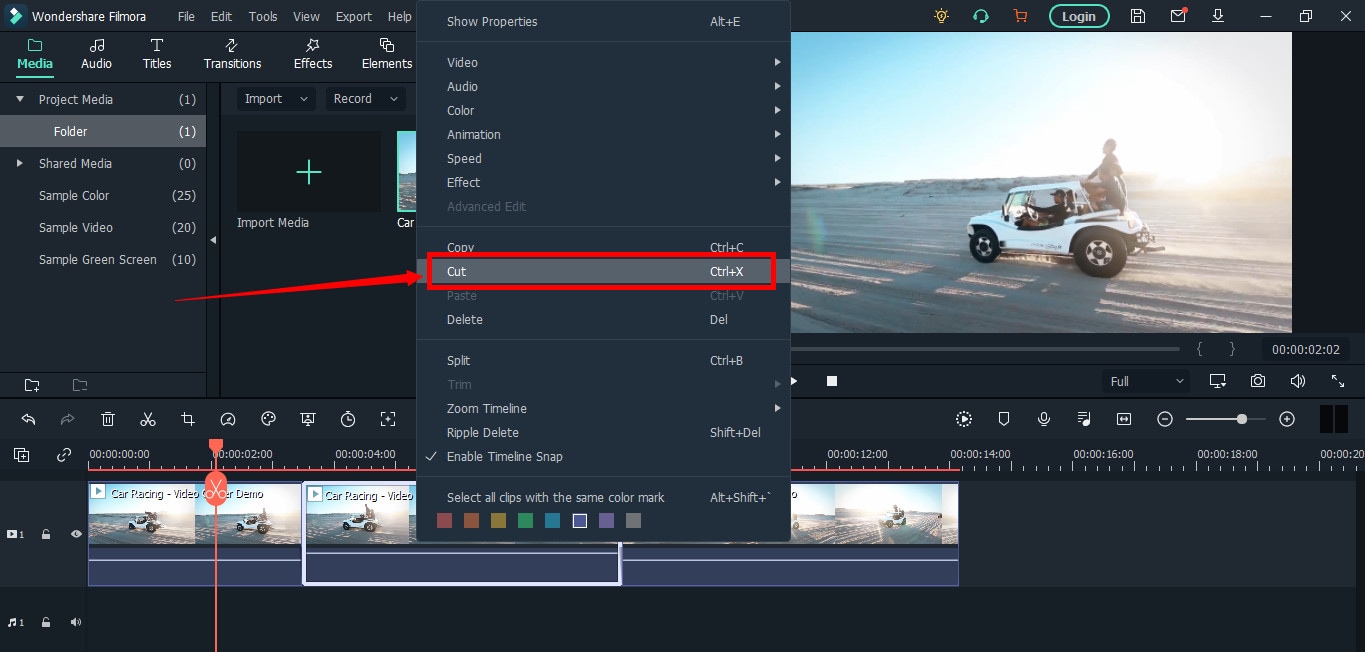
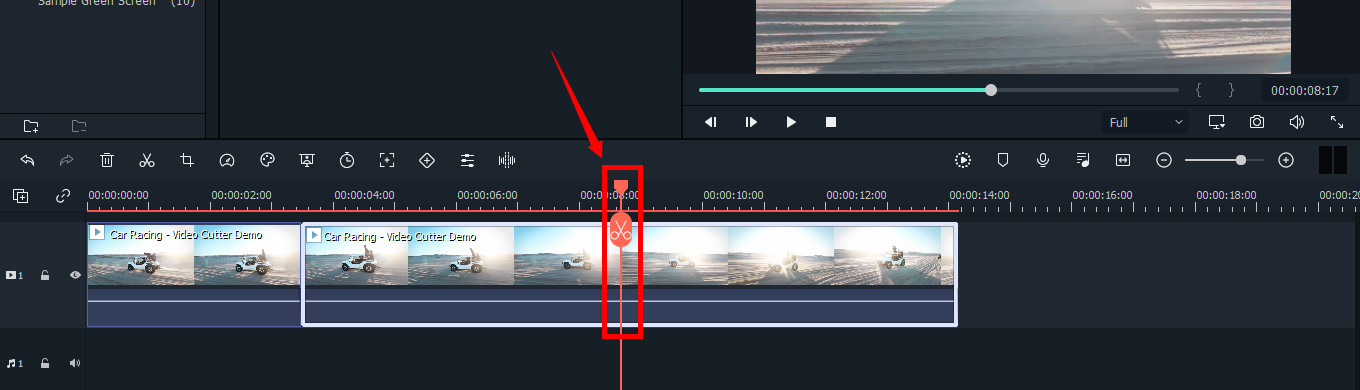
Within a semi-second, the selected portion will be removed from the timeline. And you will be able to see the remaining parts of the video. Now, pull the second clip using your mouse and place it at the end of the first clip without leaving a gap in between.
Then, click the “Play” button under the preview screen to see the results.
You can see in the above two screenshots that there’s a jump between the scenes due to cuts, confirming that video has been cut significantly.
Step 5: Trimming Your Video in Filmora
Remember that cutting and trimming in Filmora are two different things. Trimming allows you to remove a particular video part from visibility without deleting the portion.
So feel free to skip this step if you’re happy learning the cutting technique. But if you’re interested in trimming, here’s how you do it.
Take your mouse cursor at the beginning or end of the clip you want to trim. Keep holding the clip’s corner and slide the mouse back or front to trim the part
Note: Since the trim tool doesn’t delete the video, the final project based on trimming will be of a larger size. Therefore, it is advised to cut videos rather than trimming for fast rendering, better results, and small video size.
Step 6: Save Project and Export Your Cut/Trimmed AVI Video
Choose “Save Project” from the “File” menu.
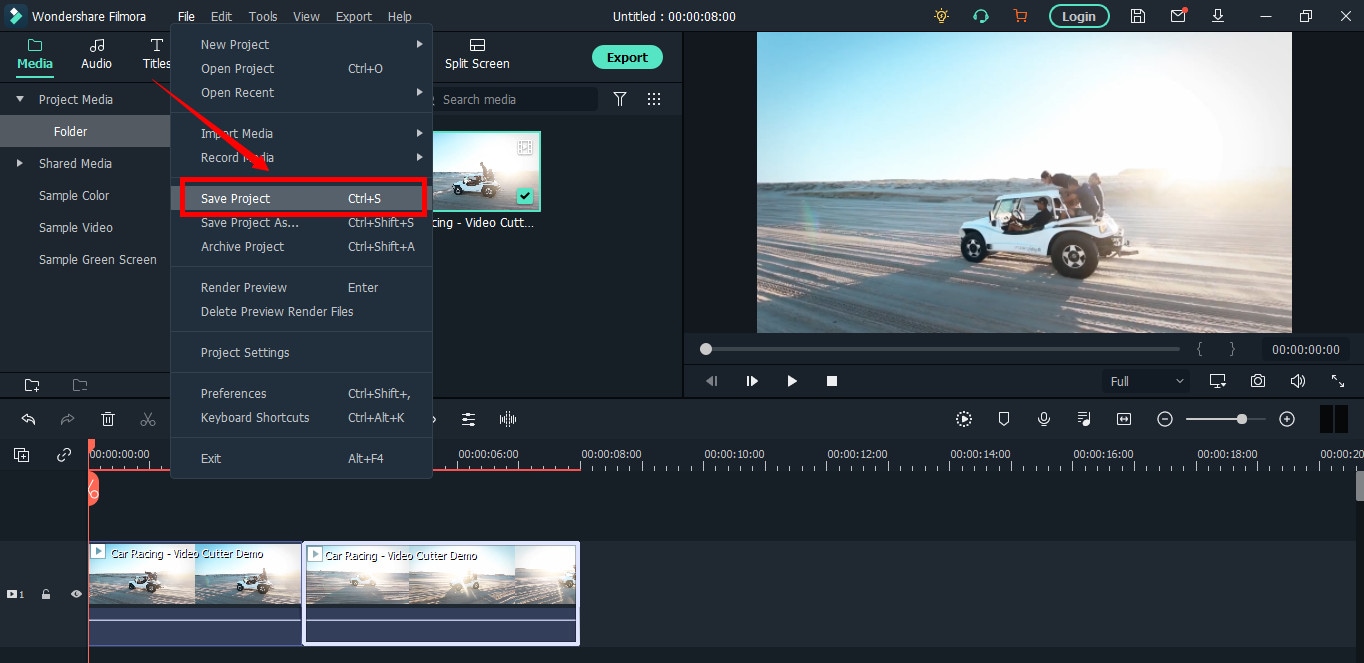
Select the directory to save the project, rename the new video, and click the “Save” button.

Click on the “Export” button to save the video in AVI or any other video format of your choice on your computer.
Part 2: Top 3 Free AVI Video Cutter on Windows
As a Windows user, finding an excellent video cutter is relatively easy. However, not all software permits importing AVI videos. In the same way, some video trimmers come at a price. So if you really don’t want to pay and enjoy cutting your AVI files, try using these three video cutting tools.
Microsoft Photos (Windows 10)
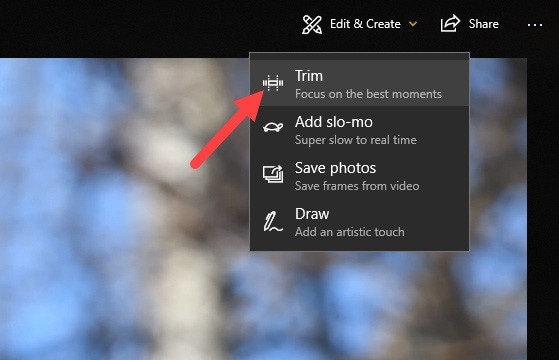
Microsoft Photos or Photo App is a free photo viewer and editor with your Windows 10. It offers incredible photo editing and enhancement along with different tools for organizing and editing videos in a very friendly way. Likewise, you can create drawings over the videos and add 3D effects and background music to your clips.
You can also trim AVI videos with Microsoft Photos quickly. All you need to do is open your clip with the Photo App, choose the “Trim” option, select a portion of the video you want to trim, and go ahead.
That’s it!
Features
- Quick video trimming
- Cool text effects
- 3D library and effects
- It has a clear interface
- You can find and tag people’s faces
- The program has 15+ filters for editing
- Motion tracking option for drawing on videos
- Allows you to view and organize your files easily
Pros
- Microsoft Photos is free for Windows users
- It automatically creates albums
- The program has a touch-friendly interface
- You can integrate your OneDrive with the software
Cons
- Lacks before and after view
- Not included in older Windows versions
- It doesn’t support selective focus or panorama stitching
Handbrake
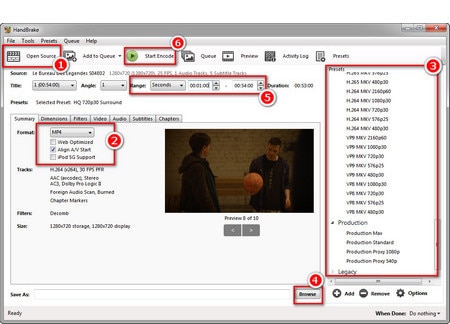
Handbrake is best-known for its video transcoding traits. Unlike typical video editors, this open-source tool includes limited options to rip Blu-rays and DVDs. Moreover, you can mix the 5.1 soundtracks and convert them to stereo to make the audio compatible with your TV speakers.
But the exciting thing about Handbrake is that you can use this software on your macOS 10.13 or later versions to cut AVI videos for free. However, it’s a bit technical process, as there’s no timeline to help you trim or make cuts on the clips directly with the help of your mouse.
You are required to mention a time range (seconds, minutes, or hours) to keep a specific part of the video while the software removes the non-ranged parts of the clip. For instance, you have a video of 10 seconds. You start the range from 5 seconds and end it at 10 seconds. So, the first four seconds of the video will be cut from the entire clip.
Features
- Video cutting, cropping, and resizing
- Low-quality and old video restoration
- Video conversion from any format to MKV or MP4
Pros
- Handbrake is free
- You can convert batch videos with ease
- It supports MAC, Windows, and Linux OS
- Allows you to import video files in all major formats
- The software comes with various video conversion presets
Cons
- Handbrake is not a user-friendly tool
- The video file output is limited to two formats (MKV and MP4) only
Gihosoft Video Cutter
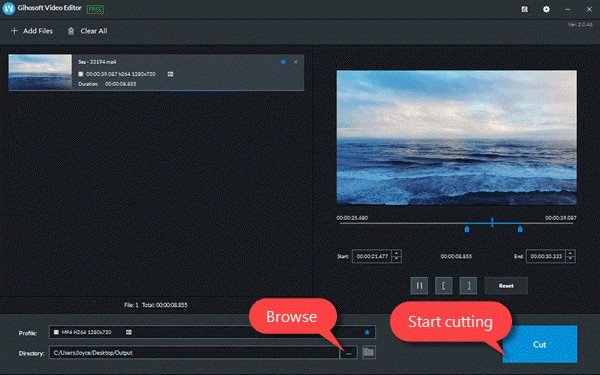
Gihosoft is a clean, free, lossless video cutter on your Windows PC. It’s a simple tool that helps you cut video files into various output formats. So be it AVI, MPEG, or any other file, with Gihosoft, everything becomes handy.
Another fascinating fact about this software is that it allows you to cut videos in three simple steps without losing the quality. So right after installing the program, you simply need to import your file, choose the start and end time, and click the “Cut” button to remove the part of the video.
Features
- Fast video and audio cutting
- Easy drag and drop audio/video files
- It supports most audio and video formats
Pros
- Free for both Windows and MAC operating systems
- The cutter saves video in original quality
Cons
- It does not include basic video editing features
Part 3: Top 3 Free AVI Video Cutter on MAC
Are you looking for a great AVI video cutter for your MAC? Sadly, you have limited product choices as compared to Windows users. But to ensure you don’t waste time looking for a suitable tool, here’s a list of three AVI video cutting programs you can use on your Macintosh.
iMovie
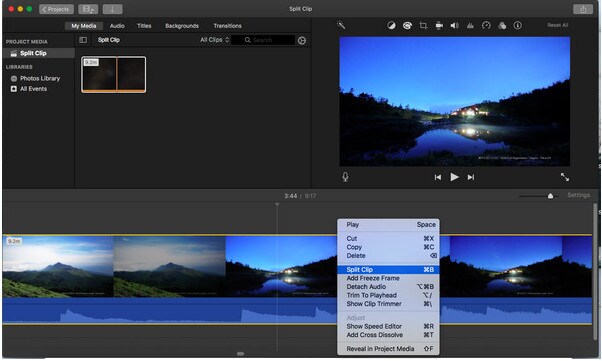
The first and foremost recommended software for free video cutting on MAC is Apple’s own tool, iMovie . It is a built-in program that comes with your system, so there is no need to spend extra on a video editor. iMovie allows you to browse and import most video files, including AVI, right from your computer. Also, this tool is equipped with multiple functions, such as audio editing, video quality enhancement, and much more.
This MAC’s video editor is ideal for beginners. Many home users and small business owners find this tool extremely simple, as they don’t like to be confused with complex features. So, if you want to make cuts to your video clips, start working on iMovie. And within a few clicks, you can trim or cut your videos for free.
Features
- Video cutting and trimming
- Cropping and rotation
- Effects and transitions
- Built-in themes
- HD and 4K video support
- Movie sharing
- Audio adjustments
- Chroma screen controls
- Character tracking
Pros
- Free to use for MAC users
- Clean timeline
- One-click video cutting and trimming
- Easy-to-remember keyboard shortcuts
- Direct share projects to your social media, like YouTube
Cons
- It takes a lot of time to export videos
- iMovie needs high HDD storage space
VideoPad by NCH

VideoPad by NCH is a beginner-level video editor with all the basic features. The software is specifically designed for home movie makers. That is why VideoPad is easy to understand and use.
VideoPad is entirely free of cost for non-commercial purposes, but it has limited features. On the other hand, if you want to enjoy full traits, you can purchase the tool.
VideoPad supports video files, including AVI, WMV, MPEG, MOV, MP4, ASF, and XviD. Likewise, you can also burn movies to Blu-ray, DVD, HD-DVD, or CD. And most importantly, you can easily cut or trim AVI videos on your MAC, as the software is available on both MAC and Windows systems.
Features
- Audio tools
- Video rotation
- Video sharing
- Visual effects
- Video transitions
- 3D Video editing
- Color correction
- Overlays and texts
- Video optimization
- Great plugin support
- Direct video uploading
- Multiple video resolutions
- Video cutting and trimming
- Files exportation to various devices
- Stereoscopic conversion from 2D to 3D
Pros
- You can use the basic tools for free
- Allows 360-degree video production
- It supports a wide range of video formats
- Compatible with MAC and Windows computers
Cons
- The auto speech feature performs poorly
- The free version has annoying notifications
Xilisoft Video Cutter
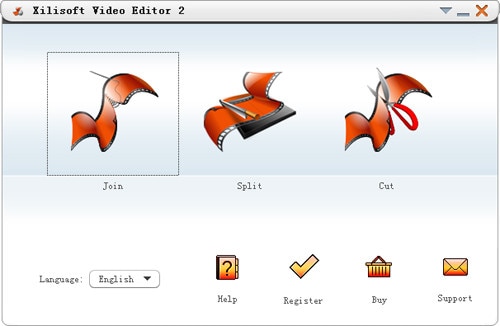
Xilisoft Video Cutter is the simplest tool to cut videos on MAC. This software has a straightforward option to cut the clip after importing it to the timeline. The program is fast and has a user-friendly interface.
Moreover, you can polish your videos by merging multiple clips or increasing the video quality once you’re done with the cutting process. At the same time, this video cutter allows you to import all video formats, including XviD, DivX, MOV, FLV, MP4, MPEG-4/, MKV, MPEG, WMV, and AVI.
Features
- Video joining
- Support multiple output video formats, including HD
Pros
- Easy video cutting and merging
- It doesn’t require a large storage space
- Extremely uncomplicated interface
- Real-time preview to make better cuts
- Available on both MAC and Windows systems
Cons
- The trial version is free to use but limits you from enjoying extra features
Part 4: Top 3 Free AVI Video Cutter on Android
After capturing nice videos with your Android mobile phone, you may need to cut unnecessary scenes to make your clips look professional. While there are numerous Android cutters, not all support the AVI format. So below, you will find the 3 best AVI video cutters for Android, which are free to use.
Quick – Video Editor & Maker
Quick – Video Editor & Maker is a free video editor with PRO results. Many photographers and vloggers love using this app to cut clips immediately. Furthermore, the application offers a wide range of options to assure you don’t have to look to any other tool to rotate or compress video. Quick – Video Editor & Maker lets you import videos in all major formats, including AVI, MPEG, WMA, and more.
Features
- Video cutting, fading, and rotation
- Speed control tools
- Conversion from video to GIF
Pros
- Free app
- Simple interface
Cons
- Lack of updates
- Some users complain about app crash
Funimate Video Editor & Maker
If you want to make some professional-grade video edits quickly, you are welcome to download and use Funimate Video Editor & Maker on your Android device. It’s a free tool to cut videos. It has an easy procedure, and you can cut AVI videos in a few seconds.
Plus, you can use the app to add custom animations, effects, and many other exciting elements. You can share your makes on social media like TikTok, Instagram, and other platforms. Contrarily, the app itself is a community with millions of Funimate-users who share their creations daily. You can also join or watch videos from other creators to learn more about new techniques and trends in video editing.
Features
- Video trimming and splitting
- Animation and cropping
- Filters and AI effects
- Speed adjustment
- Keyframing and video merging
Pros
- Free Android application with several editing tools
- Easy trimming, splitting, and cropping
- Aspect ratio, border, and color customization
- Direct social media sharing
Cons
- Free users cannot use templates
- The free version stamps watermarks on each project
Part 5: Top 3 Free AVI Video Cutter on iPhone
No wonder iPhone’s camera captures high-quality videos. But the problem begins when there’s no free app to cut AVI videos. So if you’re recording great spots, but deep inside, you really want to remove some parts, then these 3 free AVI video cutters will work smoothly on your iPhone.
Cut, Trim, Split Video Editor
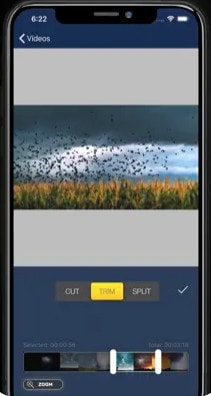
Download Cut, Trim, Split Video Editor on your iPhone to delete/cut unwanted portions of your video clips. The tool is also best for trimming iPhone-recorded clips without messing with the frames. Or, if you just want to split the video into multiple parts for your next WhatsApp status, this iPhone app can do that job for you.
The app supports multiple video file types, including MOV, MP4, AVI, MPEG, MPEG-2, and 3GPP
Features
- Easy trimming and cutting video clips
- Splitting big-sized videos into two smaller clips
- Import video from file-sharing platforms, like iCloud, using Wi-Fi
Pros
- Free app for fast video cutting and sharing
- Simple UI interface
Cons
- The free version shows advertisements
Splice - Video Editor & Maker
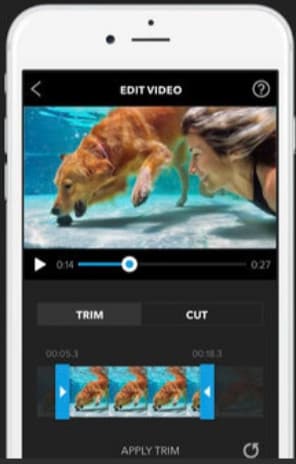
Splice is an extraordinary video editor that makes it easy to make fully customized and professional videos from your iPhone. The app is also best for video cutting. Besides, it has many interesting features, which you can use from your device.
Features
- Cutting, trimming, and cropping your videos
- Exposure, saturation, and exposure adjustment
- Slow and fast motion with speed ramping option
- Video masking and overlay
- Color correction and text overlays
Pros
- Free basic features, such as video cutting
- iTunes integration
- Supports AVI video input
- User-friendly application
- Access to the music library
- Quick and simple social sharing
Cons
- Output videos require high mobile storage space
Part 6: Top 3 Free AVI Video Cutter Online
Don’t want to install video cutters on your MAC, Windows, smartphone, or any other device? No problem! You can use online video cutters and trimmers to split, cut, or trim your clips for free.
However, the problem still exists in online tools, as not all web-based editors allow importing AVI files. So to save your time and energy, you can directly go to the following online AVI cutters to complete your tasks.
Kapwing
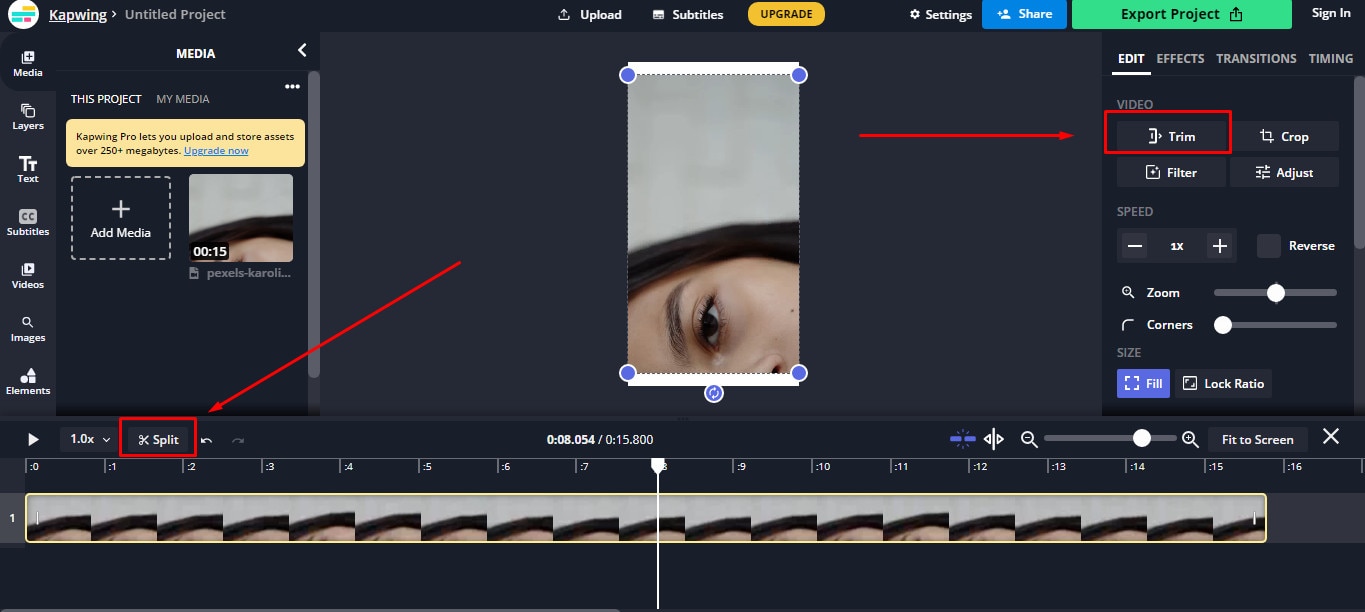
Kapwing is an online video editor best for casual creatives, such as Vloggers and YouTubers. You can use this web-based platform to cut your videos. Gladly, Kapwing supports all AVI incomings. You can upload your AVI video files to this platform and use its trim or split feature. To do that, you need to upload your AVI video and choose the “Trim” or “Split” tool to see the magic. Once done with the trimming process, you can explore Kapwing’s other incredible traits and apply them to your project.
Features
- Video splitting, trimming, and merging
- Audio capturing
- Speed adjustment
- Image and video library
- Text editing and overlay
- Auto-generated subtitles
- Several collaboration tools
- Video creation from scratch
- Templates, shapes, and emojis
- Simple drag-and-drop interface
- Video transitions, plugins, and elements
Pros
- Free online video trimmer
- User-friendly interface
- You can export 30-minutes long projects
- Allows you to export unlimited videos with a watermark
- One watermark-free video export is available each month
Cons
- Cannot export long videos with a free account
- Only 10 minutes transcription limit is available for free users
- You need to purchase a monthly or annual subscription to remove the watermark from multiple videos
Clideo
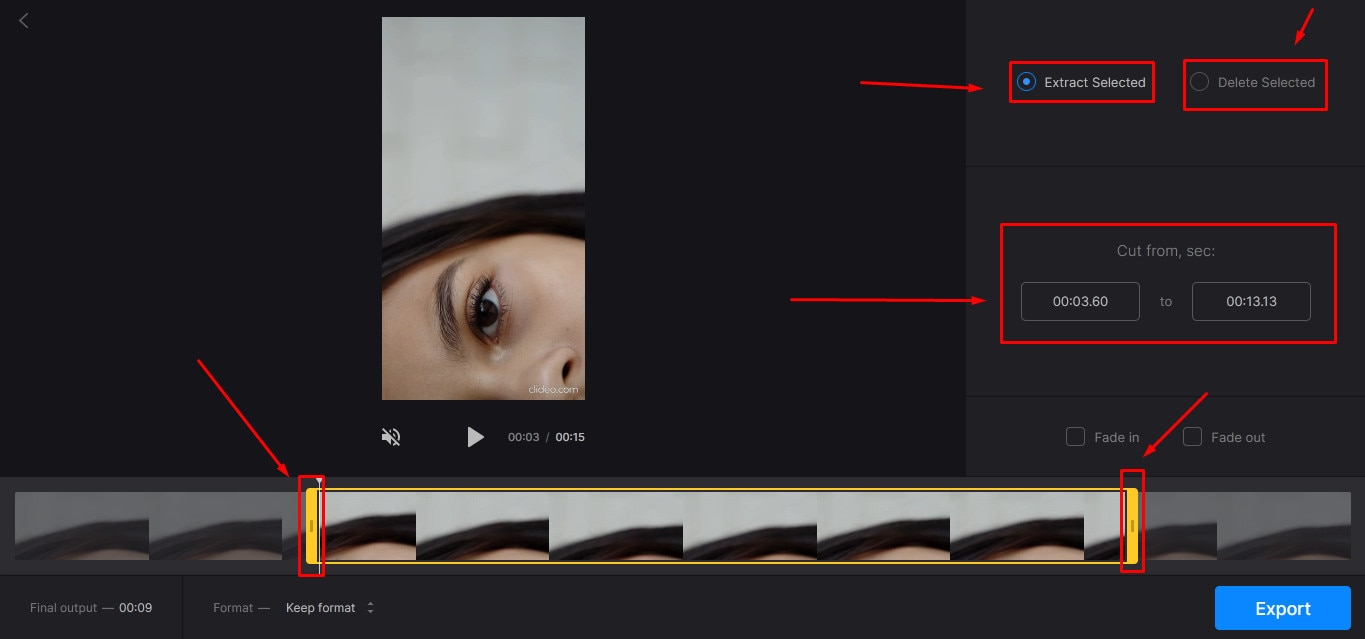
Clideo is not just a video cutter but an online solution to all your video editing problems. The tool is super popular, with 4 million+ users a month. And why not? This is one of those web-based platforms that allow AVI video files to be imported and exported without converting them into any other formats.
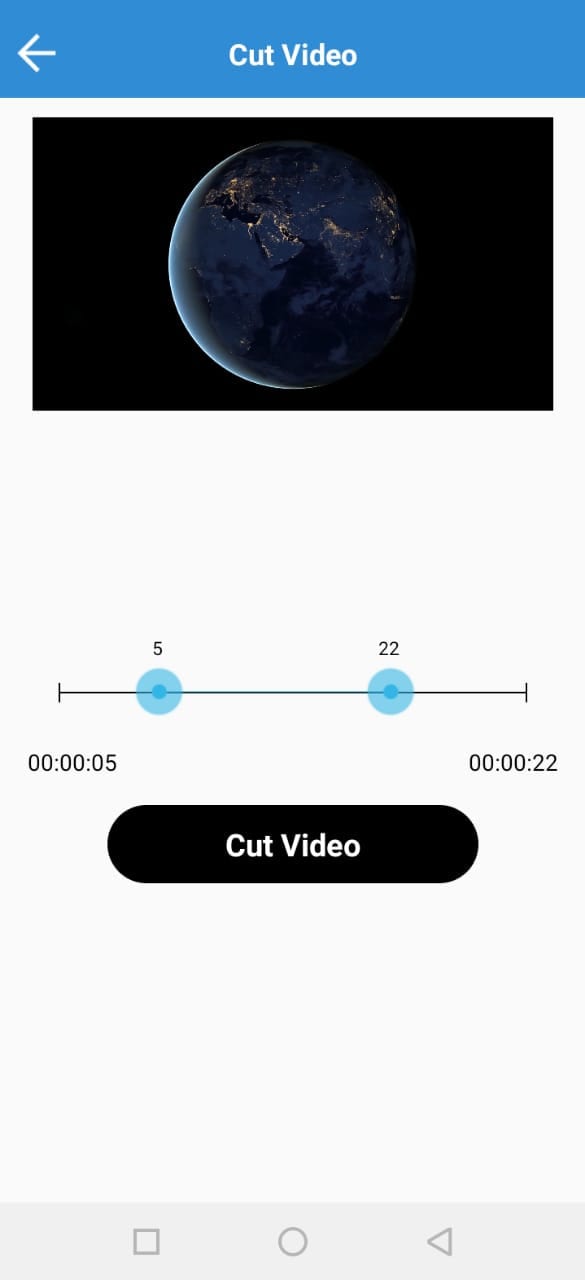
Nevertheless, if you’re only looking for video cutting options, this tool makes your life easy. Simply upload your video, and select the portion of it by setting start and end times. Choose whether you want to delete or extract the selected part from the clip, and hit the “Export” button.
And within a few moments, you can enjoy a trimmed video clip. And if you plan to be more creative, you can look for other Clideo features to make videos more fascinating.
Features
- Video combining and cutting
- Resize and crop clips
- Compress your videos
- Add text and subtitles
- Add music to your video files
- Filters and color correction tools
- Audio mute, cutting, and muting
- Video rotation, flipping, and speed adjustment
Pros
- Basic tools can be used for free
- Best for beginners and intermediate users
- Ideal for AVI videos and also supports other video formats
Cons
- You cannot use the free version regularly
Aspose
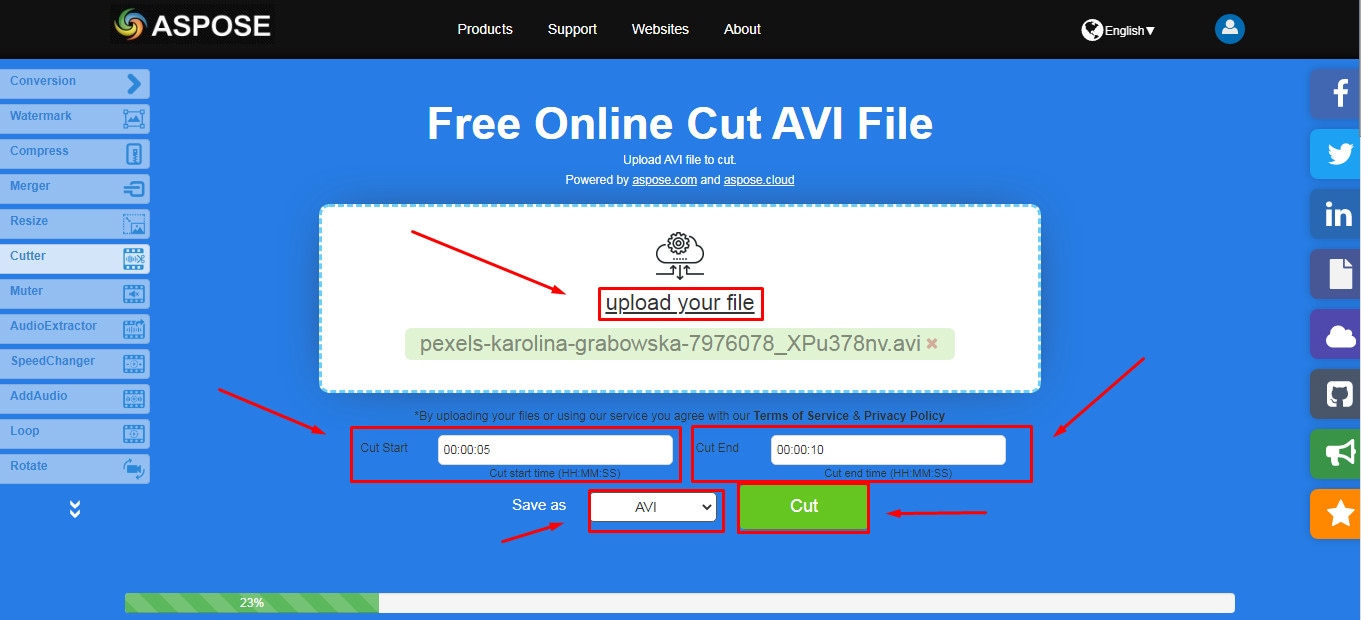
Aspose is a free web-based application to cut clips. You can use this tool on any operating system. It supports all major video file formats, including AVI, MKV, MOV, MP4, FLV, WMV, WEBM, and GIF. Additionally, you can use Aspose for various other reasons, such as audio extraction, video resizing, and more.
Features
- Video cutting and compressing
- Looping, rotation, and video merging
- Adding watermarks on videos
- Sound muting
- Speed change and audio addition
Pros
- Aspose is a free online tool
- It offers straightforward options to cut and edit videos
Cons
- No color correction option
- Slow video cutting process
- Lacks timeline and other valuable features
Part 7: Bottom Line
Tired of finding AVI cutters? Relax and try these top 16 AVI video cutters for Windows, MAC, iPhone, Android, and online. Almost all these tools are free to use and are extremely handy. On the other hand, if you want to cut and trim videos professionally, download Filmora and follow the step-by-step guide in this article for making clean cuts.
Part 8: FAQs
Q1. How do I trim an AVI video?
To trim an AVI video file, ensure that the software or tool you use supports AVI input. Generally, you need to upload or import a clip on the program, select the portion of the video, and apply the cut/trim feature to make it happen.
Q2. Which is the best online video cutter?
Kapwing and Clideo are the two best online video cutters you can use for free. Both web-based tools also allow you to cut your AVI videos.
Q3. Which is the best video cutter and joiner software?
Filmora, iMovie, and Kapwing are some of the best video cutters and joiner tools. These video editors are also free to use and come with different features.
Q4. How do I trim an AVI file in Windows 10?
Trimming an AVI video file in Windows 10 is very simple. Launch the Microsoft Photos (Photo App) application on your computer, add clip, and select the “Trim” tool to trim a specific video part.
Q5. How can I cut a video on my computer for free?
MAC and Windows users can download Filmora to cut videos for free. Filmora also offers a wide range of other features to make your clips exciting. Contrarily, Windows users can use the built-in Photo App in Windows 10 or download Gihosoft or Handbrake software to cut clips. Likewise, MAC users can download VideoPad, Xilisoft Video Cutter, or iMovie for free.
With the growing fame of video-sharing and social media applications like Twitter, Instagram, and TikTok, the demand for simple and fast video cutting and trimming tools has dramatically increased. Nowadays, you don’t have to play with complex video editing tools to produce high-quality videos.
Thanks to several user-friendly editing software to make things easy for everybody. However, finding the right programs to trim/cut videos is still challenging, especially in AVI format.
But, guess what? These top 16 AVI video cutters for Windows, MAC, Android, iPhone, and online will make video cutting and trimming fun, especially when you learn to do it using Filmora.
In this Article
Part 1: Best AVI Video Cutter to Trim/Cut AVI Video on Windows and MAC – Filmora Video Cutter [with steps}
Part 2: Top 3 Free AVI Video Cutter on Windows
Part 3: Top 3 Free AVI Video Cutter on MAC
Part 4: Top 3 Free AVI Video Cutter on Android
Part 5: Top 3 Free AVI Video Cutter on iPhone
Part 6: Top 3 Free AVI Video Cutter Online
Part 7: Bottom Line
Part 8: FAQs
Part 1: Best AVI Video Cutter to Trim/Cut AVI Video on Windows and MAC – Filmora Video Cutter [with steps]
Filmora by Wondershare is a star video editor with outstanding outcomes. Whether you have a MAC or Windows PC, you can download Filmora regardless of your operating system. The program best serves those who intend to make high-quality videos. The software provides editing support for all video formats, including AVI.
Although Filmora is an affordable editor with tons of audio and video editing options, you can still download the software for free and create projects if watermarks don’t bother you. Moreover, you can count this tool’s capabilities in cropping, resizing, and Chroma screen support. But that’s not the only sweet fruit.
In fact, Filmora is equipped with many jaw-dropping features, including preset templates, auto beat sync, split-screen, speed ramping, motion tracking, keyframing, creative transitions, titles, filters, and much more. And the best part is, you can learn and understand Filmora in no time. That’s why the program is loved and supported by all types of users.
So does Filmora helps cut and trim AVI videos? Yes! It does if you follow these steps correctly.
Step 1: Download Filmora Video Editor
First, download Filmora Video Editor by choosing your operating system, as seen in the screenshot below.
Run the setup and let it finish without any pause or break.
Step 2: Import Your Video to Filmora Video Editor
Importing your AVI video is a very simple process. Just click on the “Film Clip” icon.
It will open a new window screen on your computer to select the video from the directory. Find the clip you want to import and cut. Use your mouse to select it and click the “Open” button.
The video will be loaded in the “Media” folder of Filmora. The clip’s thumbnail should be visible to assure you have done everything correctly.
If you can see that, let’s go to the next step.
Step 3: Drag and Drop Video to Filmora’s Timeline
Select the video in the media folder by clicking over it once. Now, without leaving the hold of the left button of your mouse, slide the video down to the track in the timeline.
After that, a message will pop up, asking about your preference for the project settings. It is recommended to choose the “Match to Media” option unless you’re an experienced video editor who knows how to play with the resolution and frame rates.
You will see the video on the timeline with its preview on the “Preview Screen” on the right side of the interface.
Step 4: Cutting Your Video in Filmora
Here comes the core step you have been waiting for. But before you go any further, you need to know about the “Playhead.”
Playhead is an orange-reddish marker you can find on the timeline.
It has an important role in cutting your videos.
So, move the playhead to your desired frame and click on the “scissor” icon to make the “starting” cut.
As soon as you do it, you will see that the single clip is now divided into two parts similar to this image.
The “Red” marked area in the above screenshot ensures a gap between the clips on the timeline. The “Yellow” arrows confirm two separate clips of the same video.
Place the two clips together as seen in this “Green” area.
And place the playhead anywhere on the clip. And click on the “scissor” icon once again to make the “ending” cut (second cut).
If done correctly, there should be three clips now of the same video, as you can observe in this screenshot.
Again, the “Red” area in the above photo indicates the gap, and the “Yellow” area ensures a third segment of the video.
Note: The gaps you can see in the divided clips are made intentionally for understanding. Practically, Filmora doesn’t move the clip or make gaps in between after you have made the cuts.
Keep in mind that there are three clips on the timeline. Now, if you want to remove the second clip from the video, you need to select that portion first by clicking on it.
Then, right-click on the mouse and choose “Cut” from the menu.
Within a semi-second, the selected portion will be removed from the timeline. And you will be able to see the remaining parts of the video. Now, pull the second clip using your mouse and place it at the end of the first clip without leaving a gap in between.
Then, click the “Play” button under the preview screen to see the results.
You can see in the above two screenshots that there’s a jump between the scenes due to cuts, confirming that video has been cut significantly.
Step 5: Trimming Your Video in Filmora
Remember that cutting and trimming in Filmora are two different things. Trimming allows you to remove a particular video part from visibility without deleting the portion.
So feel free to skip this step if you’re happy learning the cutting technique. But if you’re interested in trimming, here’s how you do it.
Take your mouse cursor at the beginning or end of the clip you want to trim. Keep holding the clip’s corner and slide the mouse back or front to trim the part
Note: Since the trim tool doesn’t delete the video, the final project based on trimming will be of a larger size. Therefore, it is advised to cut videos rather than trimming for fast rendering, better results, and small video size.
Step 6: Save Project and Export Your Cut/Trimmed AVI Video
Choose “Save Project” from the “File” menu.
Select the directory to save the project, rename the new video, and click the “Save” button.
Click on the “Export” button to save the video in AVI or any other video format of your choice on your computer.
Part 2: Top 3 Free AVI Video Cutter on Windows
As a Windows user, finding an excellent video cutter is relatively easy. However, not all software permits importing AVI videos. In the same way, some video trimmers come at a price. So if you really don’t want to pay and enjoy cutting your AVI files, try using these three video cutting tools.
Microsoft Photos (Windows 10)
Microsoft Photos or Photo App is a free photo viewer and editor with your Windows 10. It offers incredible photo editing and enhancement along with different tools for organizing and editing videos in a very friendly way. Likewise, you can create drawings over the videos and add 3D effects and background music to your clips.
You can also trim AVI videos with Microsoft Photos quickly. All you need to do is open your clip with the Photo App, choose the “Trim” option, select a portion of the video you want to trim, and go ahead.
That’s it!
Features
- Quick video trimming
- Cool text effects
- 3D library and effects
- It has a clear interface
- You can find and tag people’s faces
- The program has 15+ filters for editing
- Motion tracking option for drawing on videos
- Allows you to view and organize your files easily
Pros
- Microsoft Photos is free for Windows users
- It automatically creates albums
- The program has a touch-friendly interface
- You can integrate your OneDrive with the software
Cons
- Lacks before and after view
- Not included in older Windows versions
- It doesn’t support selective focus or panorama stitching
Handbrake
Handbrake is best-known for its video transcoding traits. Unlike typical video editors, this open-source tool includes limited options to rip Blu-rays and DVDs. Moreover, you can mix the 5.1 soundtracks and convert them to stereo to make the audio compatible with your TV speakers.
But the exciting thing about Handbrake is that you can use this software on your macOS 10.13 or later versions to cut AVI videos for free. However, it’s a bit technical process, as there’s no timeline to help you trim or make cuts on the clips directly with the help of your mouse.
You are required to mention a time range (seconds, minutes, or hours) to keep a specific part of the video while the software removes the non-ranged parts of the clip. For instance, you have a video of 10 seconds. You start the range from 5 seconds and end it at 10 seconds. So, the first four seconds of the video will be cut from the entire clip.
Features
- Video cutting, cropping, and resizing
- Low-quality and old video restoration
- Video conversion from any format to MKV or MP4
Pros
- Handbrake is free
- You can convert batch videos with ease
- It supports MAC, Windows, and Linux OS
- Allows you to import video files in all major formats
- The software comes with various video conversion presets
Cons
- Handbrake is not a user-friendly tool
- The video file output is limited to two formats (MKV and MP4) only
Gihosoft Video Cutter
Gihosoft is a clean, free, lossless video cutter on your Windows PC. It’s a simple tool that helps you cut video files into various output formats. So be it AVI, MPEG, or any other file, with Gihosoft, everything becomes handy.
Another fascinating fact about this software is that it allows you to cut videos in three simple steps without losing the quality. So right after installing the program, you simply need to import your file, choose the start and end time, and click the “Cut” button to remove the part of the video.
Features
- Fast video and audio cutting
- Easy drag and drop audio/video files
- It supports most audio and video formats
Pros
- Free for both Windows and MAC operating systems
- The cutter saves video in original quality
Cons
- It does not include basic video editing features
Part 3: Top 3 Free AVI Video Cutter on MAC
Are you looking for a great AVI video cutter for your MAC? Sadly, you have limited product choices as compared to Windows users. But to ensure you don’t waste time looking for a suitable tool, here’s a list of three AVI video cutting programs you can use on your Macintosh.
iMovie
The first and foremost recommended software for free video cutting on MAC is Apple’s own tool, iMovie . It is a built-in program that comes with your system, so there is no need to spend extra on a video editor. iMovie allows you to browse and import most video files, including AVI, right from your computer. Also, this tool is equipped with multiple functions, such as audio editing, video quality enhancement, and much more.
This MAC’s video editor is ideal for beginners. Many home users and small business owners find this tool extremely simple, as they don’t like to be confused with complex features. So, if you want to make cuts to your video clips, start working on iMovie. And within a few clicks, you can trim or cut your videos for free.
Features
- Video cutting and trimming
- Cropping and rotation
- Effects and transitions
- Built-in themes
- HD and 4K video support
- Movie sharing
- Audio adjustments
- Chroma screen controls
- Character tracking
Pros
- Free to use for MAC users
- Clean timeline
- One-click video cutting and trimming
- Easy-to-remember keyboard shortcuts
- Direct share projects to your social media, like YouTube
Cons
- It takes a lot of time to export videos
- iMovie needs high HDD storage space
VideoPad by NCH
VideoPad by NCH is a beginner-level video editor with all the basic features. The software is specifically designed for home movie makers. That is why VideoPad is easy to understand and use.
VideoPad is entirely free of cost for non-commercial purposes, but it has limited features. On the other hand, if you want to enjoy full traits, you can purchase the tool.
VideoPad supports video files, including AVI, WMV, MPEG, MOV, MP4, ASF, and XviD. Likewise, you can also burn movies to Blu-ray, DVD, HD-DVD, or CD. And most importantly, you can easily cut or trim AVI videos on your MAC, as the software is available on both MAC and Windows systems.
Features
- Audio tools
- Video rotation
- Video sharing
- Visual effects
- Video transitions
- 3D Video editing
- Color correction
- Overlays and texts
- Video optimization
- Great plugin support
- Direct video uploading
- Multiple video resolutions
- Video cutting and trimming
- Files exportation to various devices
- Stereoscopic conversion from 2D to 3D
Pros
- You can use the basic tools for free
- Allows 360-degree video production
- It supports a wide range of video formats
- Compatible with MAC and Windows computers
Cons
- The auto speech feature performs poorly
- The free version has annoying notifications
Xilisoft Video Cutter
Xilisoft Video Cutter is the simplest tool to cut videos on MAC. This software has a straightforward option to cut the clip after importing it to the timeline. The program is fast and has a user-friendly interface.
Moreover, you can polish your videos by merging multiple clips or increasing the video quality once you’re done with the cutting process. At the same time, this video cutter allows you to import all video formats, including XviD, DivX, MOV, FLV, MP4, MPEG-4/, MKV, MPEG, WMV, and AVI.
Features
- Video joining
- Support multiple output video formats, including HD
Pros
- Easy video cutting and merging
- It doesn’t require a large storage space
- Extremely uncomplicated interface
- Real-time preview to make better cuts
- Available on both MAC and Windows systems
Cons
- The trial version is free to use but limits you from enjoying extra features
Part 4: Top 3 Free AVI Video Cutter on Android
After capturing nice videos with your Android mobile phone, you may need to cut unnecessary scenes to make your clips look professional. While there are numerous Android cutters, not all support the AVI format. So below, you will find the 3 best AVI video cutters for Android, which are free to use.
Quick – Video Editor & Maker
Quick – Video Editor & Maker is a free video editor with PRO results. Many photographers and vloggers love using this app to cut clips immediately. Furthermore, the application offers a wide range of options to assure you don’t have to look to any other tool to rotate or compress video. Quick – Video Editor & Maker lets you import videos in all major formats, including AVI, MPEG, WMA, and more.
Features
- Video cutting, fading, and rotation
- Speed control tools
- Conversion from video to GIF
Pros
- Free app
- Simple interface
Cons
- Lack of updates
- Some users complain about app crash
Funimate Video Editor & Maker
If you want to make some professional-grade video edits quickly, you are welcome to download and use Funimate Video Editor & Maker on your Android device. It’s a free tool to cut videos. It has an easy procedure, and you can cut AVI videos in a few seconds.
Plus, you can use the app to add custom animations, effects, and many other exciting elements. You can share your makes on social media like TikTok, Instagram, and other platforms. Contrarily, the app itself is a community with millions of Funimate-users who share their creations daily. You can also join or watch videos from other creators to learn more about new techniques and trends in video editing.
Features
- Video trimming and splitting
- Animation and cropping
- Filters and AI effects
- Speed adjustment
- Keyframing and video merging
Pros
- Free Android application with several editing tools
- Easy trimming, splitting, and cropping
- Aspect ratio, border, and color customization
- Direct social media sharing
Cons
- Free users cannot use templates
- The free version stamps watermarks on each project
Part 5: Top 3 Free AVI Video Cutter on iPhone
No wonder iPhone’s camera captures high-quality videos. But the problem begins when there’s no free app to cut AVI videos. So if you’re recording great spots, but deep inside, you really want to remove some parts, then these 3 free AVI video cutters will work smoothly on your iPhone.
Cut, Trim, Split Video Editor
Download Cut, Trim, Split Video Editor on your iPhone to delete/cut unwanted portions of your video clips. The tool is also best for trimming iPhone-recorded clips without messing with the frames. Or, if you just want to split the video into multiple parts for your next WhatsApp status, this iPhone app can do that job for you.
The app supports multiple video file types, including MOV, MP4, AVI, MPEG, MPEG-2, and 3GPP
Features
- Easy trimming and cutting video clips
- Splitting big-sized videos into two smaller clips
- Import video from file-sharing platforms, like iCloud, using Wi-Fi
Pros
- Free app for fast video cutting and sharing
- Simple UI interface
Cons
- The free version shows advertisements
Splice - Video Editor & Maker
Splice is an extraordinary video editor that makes it easy to make fully customized and professional videos from your iPhone. The app is also best for video cutting. Besides, it has many interesting features, which you can use from your device.
Features
- Cutting, trimming, and cropping your videos
- Exposure, saturation, and exposure adjustment
- Slow and fast motion with speed ramping option
- Video masking and overlay
- Color correction and text overlays
Pros
- Free basic features, such as video cutting
- iTunes integration
- Supports AVI video input
- User-friendly application
- Access to the music library
- Quick and simple social sharing
Cons
- Output videos require high mobile storage space
Part 6: Top 3 Free AVI Video Cutter Online
Don’t want to install video cutters on your MAC, Windows, smartphone, or any other device? No problem! You can use online video cutters and trimmers to split, cut, or trim your clips for free.
However, the problem still exists in online tools, as not all web-based editors allow importing AVI files. So to save your time and energy, you can directly go to the following online AVI cutters to complete your tasks.
Kapwing
Kapwing is an online video editor best for casual creatives, such as Vloggers and YouTubers. You can use this web-based platform to cut your videos. Gladly, Kapwing supports all AVI incomings. You can upload your AVI video files to this platform and use its trim or split feature. To do that, you need to upload your AVI video and choose the “Trim” or “Split” tool to see the magic. Once done with the trimming process, you can explore Kapwing’s other incredible traits and apply them to your project.
Features
- Video splitting, trimming, and merging
- Audio capturing
- Speed adjustment
- Image and video library
- Text editing and overlay
- Auto-generated subtitles
- Several collaboration tools
- Video creation from scratch
- Templates, shapes, and emojis
- Simple drag-and-drop interface
- Video transitions, plugins, and elements
Pros
- Free online video trimmer
- User-friendly interface
- You can export 30-minutes long projects
- Allows you to export unlimited videos with a watermark
- One watermark-free video export is available each month
Cons
- Cannot export long videos with a free account
- Only 10 minutes transcription limit is available for free users
- You need to purchase a monthly or annual subscription to remove the watermark from multiple videos
Clideo
Clideo is not just a video cutter but an online solution to all your video editing problems. The tool is super popular, with 4 million+ users a month. And why not? This is one of those web-based platforms that allow AVI video files to be imported and exported without converting them into any other formats.
Nevertheless, if you’re only looking for video cutting options, this tool makes your life easy. Simply upload your video, and select the portion of it by setting start and end times. Choose whether you want to delete or extract the selected part from the clip, and hit the “Export” button.
And within a few moments, you can enjoy a trimmed video clip. And if you plan to be more creative, you can look for other Clideo features to make videos more fascinating.
Features
- Video combining and cutting
- Resize and crop clips
- Compress your videos
- Add text and subtitles
- Add music to your video files
- Filters and color correction tools
- Audio mute, cutting, and muting
- Video rotation, flipping, and speed adjustment
Pros
- Basic tools can be used for free
- Best for beginners and intermediate users
- Ideal for AVI videos and also supports other video formats
Cons
- You cannot use the free version regularly
Aspose
Aspose is a free web-based application to cut clips. You can use this tool on any operating system. It supports all major video file formats, including AVI, MKV, MOV, MP4, FLV, WMV, WEBM, and GIF. Additionally, you can use Aspose for various other reasons, such as audio extraction, video resizing, and more.
Features
- Video cutting and compressing
- Looping, rotation, and video merging
- Adding watermarks on videos
- Sound muting
- Speed change and audio addition
Pros
- Aspose is a free online tool
- It offers straightforward options to cut and edit videos
Cons
- No color correction option
- Slow video cutting process
- Lacks timeline and other valuable features
Part 7: Bottom Line
Tired of finding AVI cutters? Relax and try these top 16 AVI video cutters for Windows, MAC, iPhone, Android, and online. Almost all these tools are free to use and are extremely handy. On the other hand, if you want to cut and trim videos professionally, download Filmora and follow the step-by-step guide in this article for making clean cuts.
Part 8: FAQs
Q1. How do I trim an AVI video?
To trim an AVI video file, ensure that the software or tool you use supports AVI input. Generally, you need to upload or import a clip on the program, select the portion of the video, and apply the cut/trim feature to make it happen.
Q2. Which is the best online video cutter?
Kapwing and Clideo are the two best online video cutters you can use for free. Both web-based tools also allow you to cut your AVI videos.
Q3. Which is the best video cutter and joiner software?
Filmora, iMovie, and Kapwing are some of the best video cutters and joiner tools. These video editors are also free to use and come with different features.
Q4. How do I trim an AVI file in Windows 10?
Trimming an AVI video file in Windows 10 is very simple. Launch the Microsoft Photos (Photo App) application on your computer, add clip, and select the “Trim” tool to trim a specific video part.
Q5. How can I cut a video on my computer for free?
MAC and Windows users can download Filmora to cut videos for free. Filmora also offers a wide range of other features to make your clips exciting. Contrarily, Windows users can use the built-in Photo App in Windows 10 or download Gihosoft or Handbrake software to cut clips. Likewise, MAC users can download VideoPad, Xilisoft Video Cutter, or iMovie for free.
Easily Flip Videos Online with These Web Apps
Wondering how you can flip videos online? There are numerous reasons why an individual may need to flip a video. It could be because the medium they are using to post a video requires a flipped version. There are times when we think we have recorded a video horizontally, but turns out it was recorded vertically - this is where video flipping software comes in handy and helps you out!
With this online video-editing tool, you can mirror a video from left to right or turn it upside down.
In this article, you can learn the key differences between flipping and mirroring a video, what are the best flip video online free tools, and how to flip a video using Filmora!
In this article
01 Differences Between Flip and Mirror
03 How to Flip Video with Filmora
Part 1: What’s the Difference Between Flip and Mirror?
Many people believe the flip feature and mirror function in a video editing tool is the same thing. However, that is not the case - there are numerous differences. The flip function allows individuals to vertically and horizontally change the outlook of a video. On the other hand, the mirror function allows one to make changes according to the mirror reflection.

Source Video

Video Flipped Horizontally

Mirrored Video
For instance, if a person is working from left to right - once the video is mirrored, it will show the person walking from right to left. So, the flip function changes the portrait and landscape layout of a video, while the mirror effect changes the axis.
Part 2: 5 Free Best Video Flipper Online
If you have the right tools, you can do just about anything with your videos! Below are some of the best flip videos online with free no watermark tools.
1. Kapwing.com
This online tool is a user-friendly video editor which enables individuals to flip, rotate, convert, resize, and do so much more with videos. You can edit a video from scratch and it is very easy! This tool can be used on your desktop as well as a laptop, so you do not need to worry about which device you are using.
To flip an image on this tool, all you need to do is upload the video you would like to flip, and then on the right-hand side of the screen, adjust the rotation settings. Select the degree to which you would like to rotate your videos to, and the system will automatically process your command.
2. https://online-video-cutter.com

Tired of installing countless video editing tools on your laptop? Then just switch to this online video cutter that allows you to switch videos to any angle you want. You can rotate videos to 270, 180, and 90 degrees. This software can be used on iOS devices as well as Android.
The process of flipping a file on this online tool is extremely fast and efficient. All you need to do is import the file you want to process by adding it through Google Drive/Dropbox/URL or by uploading it from the computer. Once the file has been imported, just select the Flip option. This online tool allows you to flip vertically and horizontally, so you can choose the right settings based on your need. After the video is flipped, click the Save button and this website will save it to your default downloader folder with file size displayed. However, keep in mind that this tool cannot process files that are larger than 500MB.
3. Ezgif.com

While this top-of-the-line tool is used to make gifs, Ezgif.com can also be used to rotate or flip a video. Apart from flipping a video, you can also mirror, resize, and cut videos as well through this tool - how great is that?!
If you are looking at Ezgif.com for flipping a video, you will be done with the task in less than ten seconds because all you have to do is upload the file, select flipping horizontally or vertically that you would like, and just save the video. Please note you can’t upload videos larger than 100MB size.
4. Video2Edit

Just as the name suggests, in this tool you can edit, flip, or rotate any video that you like on Video2Edit website . On its home page click Rotate video menu and then upload a video. You can use Dropbox, Google Drive, the direct URL to upload. Or, you can upload the video from the desktop directly.
This online tool allows you to set up the final video formats, the rotation angles, and the mirror and flip directions. You can choose to flip the video horizontally and vertically. However, if you want to a large video size at uploading, and get rid of the ads on the website, you may need to pay.
5. Clideo.com

The Clideo website features a lot of online tool tools, such as an online merger, online compressor, online resizer, and online video maker. Click the All tools button and then you will see all available tools, including the online video flipping tool.
Click the Flip video menu, and then choose the video file from your computer. You can also use the Google Drive and Dropbox link to upload. After the video is loaded, you can see the flip video interface which allows you to flip video vertically and horizontally, choose one according to your needs. Besides flipping video, you can also set up the video format as MP4 or others. Click Export to save the flipped video on your computer.
Part 3: How to Flip Videos with Filmora with One-Click on Windows and Mac?
While using online tools is far more convenient, they do have their downsides too!
Did you know that an online tool has an 80% more probability of getting hacked? That means any videos you upload to the online tool are at risk of being exposed to dangerous hackers. Additionally, in online tools, you have numerous restrictions in terms of file sizes, formats, and the options available. If you do not subscribe to the tool, then chances are that you will not be able to use all the functions of that tool! However, there is one solution. Wondershare Filmora! This application can be downloaded into your Windows and Mac devices!
For Win 7 or later (64-bit)
For macOS 10.12 or later
To make use of Filmora on Windows and Mac devices to flip a video, all you have to do is follow the steps outlined below.
First, import your video file to Filmora and drop it to the video timeline.

Once you have done that, double-click on the video and select Transform from the dropdown menu. Filmora provides 2 ways to flip, you can flip the video horizontally, which will act as mirror effects, or flip the video vertically.

Are You Ready to Flip Videos?
Flipping a video is extremely easy if you have the right tools. There are numerous online tools available in the market, however, each has its limitations. Due to this, downloading a video editing application for flipping videos is a more reliable option - Filmora is the go-to option!
03 How to Flip Video with Filmora
Part 1: What’s the Difference Between Flip and Mirror?
Many people believe the flip feature and mirror function in a video editing tool is the same thing. However, that is not the case - there are numerous differences. The flip function allows individuals to vertically and horizontally change the outlook of a video. On the other hand, the mirror function allows one to make changes according to the mirror reflection.
Source Video
Video Flipped Horizontally
Mirrored Video
For instance, if a person is working from left to right - once the video is mirrored, it will show the person walking from right to left. So, the flip function changes the portrait and landscape layout of a video, while the mirror effect changes the axis.
Part 2: 5 Free Best Video Flipper Online
If you have the right tools, you can do just about anything with your videos! Below are some of the best flip videos online with free no watermark tools.
1. Kapwing.com
This online tool is a user-friendly video editor which enables individuals to flip, rotate, convert, resize, and do so much more with videos. You can edit a video from scratch and it is very easy! This tool can be used on your desktop as well as a laptop, so you do not need to worry about which device you are using.
To flip an image on this tool, all you need to do is upload the video you would like to flip, and then on the right-hand side of the screen, adjust the rotation settings. Select the degree to which you would like to rotate your videos to, and the system will automatically process your command.
2. https://online-video-cutter.com
Tired of installing countless video editing tools on your laptop? Then just switch to this online video cutter that allows you to switch videos to any angle you want. You can rotate videos to 270, 180, and 90 degrees. This software can be used on iOS devices as well as Android.
The process of flipping a file on this online tool is extremely fast and efficient. All you need to do is import the file you want to process by adding it through Google Drive/Dropbox/URL or by uploading it from the computer. Once the file has been imported, just select the Flip option. This online tool allows you to flip vertically and horizontally, so you can choose the right settings based on your need. After the video is flipped, click the Save button and this website will save it to your default downloader folder with file size displayed. However, keep in mind that this tool cannot process files that are larger than 500MB.
3. Ezgif.com
While this top-of-the-line tool is used to make gifs, Ezgif.com can also be used to rotate or flip a video. Apart from flipping a video, you can also mirror, resize, and cut videos as well through this tool - how great is that?!
If you are looking at Ezgif.com for flipping a video, you will be done with the task in less than ten seconds because all you have to do is upload the file, select flipping horizontally or vertically that you would like, and just save the video. Please note you can’t upload videos larger than 100MB size.
4. Video2Edit
Just as the name suggests, in this tool you can edit, flip, or rotate any video that you like on Video2Edit website . On its home page click Rotate video menu and then upload a video. You can use Dropbox, Google Drive, the direct URL to upload. Or, you can upload the video from the desktop directly.
This online tool allows you to set up the final video formats, the rotation angles, and the mirror and flip directions. You can choose to flip the video horizontally and vertically. However, if you want to a large video size at uploading, and get rid of the ads on the website, you may need to pay.
5. Clideo.com
The Clideo website features a lot of online tool tools, such as an online merger, online compressor, online resizer, and online video maker. Click the All tools button and then you will see all available tools, including the online video flipping tool.
Click the Flip video menu, and then choose the video file from your computer. You can also use the Google Drive and Dropbox link to upload. After the video is loaded, you can see the flip video interface which allows you to flip video vertically and horizontally, choose one according to your needs. Besides flipping video, you can also set up the video format as MP4 or others. Click Export to save the flipped video on your computer.
Part 3: How to Flip Videos with Filmora with One-Click on Windows and Mac?
While using online tools is far more convenient, they do have their downsides too!
Did you know that an online tool has an 80% more probability of getting hacked? That means any videos you upload to the online tool are at risk of being exposed to dangerous hackers. Additionally, in online tools, you have numerous restrictions in terms of file sizes, formats, and the options available. If you do not subscribe to the tool, then chances are that you will not be able to use all the functions of that tool! However, there is one solution. Wondershare Filmora! This application can be downloaded into your Windows and Mac devices!
For Win 7 or later (64-bit)
For macOS 10.12 or later
To make use of Filmora on Windows and Mac devices to flip a video, all you have to do is follow the steps outlined below.
First, import your video file to Filmora and drop it to the video timeline.
Once you have done that, double-click on the video and select Transform from the dropdown menu. Filmora provides 2 ways to flip, you can flip the video horizontally, which will act as mirror effects, or flip the video vertically.
Are You Ready to Flip Videos?
Flipping a video is extremely easy if you have the right tools. There are numerous online tools available in the market, however, each has its limitations. Due to this, downloading a video editing application for flipping videos is a more reliable option - Filmora is the go-to option!
Need a Way to Convert Text to MP3? No Matter What Project You’re Working on, This Article Should Help You on Your Way
Super Tips on Converting Text to MP3
An easy yet powerful editor
Numerous effects to choose from
Detailed tutorials provided by the official channel
Text-to-Speech is an ingenious accessibility invention that has only grown more and more popular as AI has been thrown in the mix — making the converted speech sound more natural than ever!
As requested, in this article, we’ll be focusing on the subject of converting text to MP3 format (or, rather, a tangible file that you can use for projects!)
In this article
01 [What is TTS?](#Part 1)
02 [How to Turn on Text to Speech Converter?](#Part 2)
03 [Useful Tips on Converting Text to MP3](#Part 3)
Part 1 What is TTS?
What is Text-to-Speech? Text-to-Speech, also called TTS, as previously mentioned, is an accessibility invention. It was developed to help those with vision impairment or blindness — giving them the ability to have text read to them out loud to them (without requiring someone specifically read it out loud for them.
More recent development in TTS technology has allowed it to grow more useful outside of those parameters, however. Especially seeing as it is now possible to convert text to MP3 with natural voices.
01Why Use Text to Speech Converter?
Text-to-Speech human voice converters are popular with content creators, and thus, they are the ones who see the most use for them (in the commercial sense). After all, it’s easy enough to convert already created content (in the form of text) into an audio file that there’s no reason not to! Especially since it means that more people would have access to their content!

02Benefits of Free Online Text to Speech Readers
The benefit of FREE online text-to-speech human voice converters is exactly because they are free. Getting a live voice actor to convert text to MP3 for you is very expensive — since you’re paying not only for the voice-actors hours spent but also the use of the expensive equipment that they use for creating voiceovers.
In that regard, even PAID text-to-speech converters are easier on the budget. Making it the perfect solution for content creators who want to increase the accessibility of their content but do not have the time (to create the voiceovers themselves) or the money (to hire someone else to record it).

03Features of Text to Mp3 Converter
There are lots of text-to-speech converters out there. And, depending on what you’re looking for, you might find yourself longing for extra features later on down the line. That is why, when looking to convert text to MP3 we recommend considering the following:
● Converting Time: How fast does the converter work? Most text-to-speech converters work almost instantaneously! So, if the one you’re using currently is slow? It might be best to give it a pass over to the next candidate.
● Sound Quality: You should also test out whether or not the sound quality of the converted text to speech is good.
● Multi-Language Support: Since this is all for the sake of increasing accessibility, you should start thinking about how many languages your converter supports as well. You might not be able to use all of them or even want to. But, that extra function can be helpful for the future.
● Voice-Control Options: Does the converter offers you advanced voice controls? Your average converter usually offers speed and voice options, but you might find that a text-to-speech converter with more advanced options (i.e., tone, pitch, etc. controls) may help you get better quality content in the long run.

Part 2 How to Turn on Text to Speech Converter?
For the next part of this article, we’ll be teaching you how to actually get from text to speech (MP3) with the use of a TTS converter. Specifically, a FREEmium text-to-speech converter that you can use when you’re still on the trying-out stage! This part will include a tutorial and a short introduction:
014 Steps to Use and Convert Text to Speech Online Free Unlimited?
First, for the promised tutorial! Most text-to-human voice converters function much the same way. The main difference usually being on the number of features focused and the limitations imposed (for tools with FREEmium services that impose limits on the FREE version, like the tool we’ll be using for our example):
Step 1: Upload Text
First, upload the text that you want to convert into speech!
Most online converters offer a text box that you can use in order to copy & paste the text onto (like in the image below), while others offer an ‘upload’ feature that you can use to upload text from a document.

Step 2: Adjust Voice Reader!
Next, the main thing that you usually have to worry about is the voice options.
Most TTS converters at least offer the opportunity to choose what voice you want the text to be read in. Some, more advanced solutions, may offer voices in other languages, dialects, accents, etc. as well as voice control options (tone, pitch, etc.)

Step 3: Reader Controls!
Outside of voice options, most text-to-speech converters also offer the ability to control the general outcome of the converted text to speech.
More advanced tools will have multiple options on offer for this, but even the most basic ones at least offer a method for controlling the speed at which the text is read by the voice you’ve chosen!

Step 4: Convert Text to MP3!
Now is finally the time to convert text to MP3 format! Some TTS readers will not allow for this without you paying the premium price, but most will at least offer a limited MP3 conversion feature (usually one that limits the length of conversion or the quality).

02What is the Best Free Text to Speech Software?
To finish off this section, we introduce the tool we used for our examples! It’s the online text to human voice converter, NaturalReader (URL has been provided below!) You can use this tool either directly or on your desktop (a software version is available.) It is FREEmium software though. That means that, if you want to make use of all of its advanced features, you’ll need to pay a price!

Part 3 Useful Tips on Converting Text to MP3
The tutorial in the previous section was really more for the sake of ensuring that you have the basics down and that you are familiar with how these text-to-speech converters usually work. In this next part, we’ll be focusing on “super tips”
OR, tips that allow you to generally make the most of these text-to-human voice converters to the fullest!
Tip 1: Use AI Text-to-Speech!
Our first tip is to encourage you to take full advantage of AI text-to-speech functions. Artificial Intelligence allows the converted text to sound much nicer and much more like it was read by an actual human being — which enables you to create a very professional-sounding project without having to hire a voiceover actor/actress.

Tip 2: Language and Regions Settings!
If your content is available in multiple languages and you want to convert all of the different editions of said content, you’ll need to find a converter that supports all of those languages. You may also consider looking for regional support as well. For example, for basic English language, most TTS converters usually have “American” voices as well as “British” voices to support different accents despite them using the same text.

Tip 3: Pick an Appropriate Voice!
The voice you choose to read your text is also very important. Some premium text-to-human voice converters offer a great variety to choose from to give you options when it comes to what kind of voice you want to read your content.

Tip 4: Audio Settings!
This is a bit of a rare feature, but some TTS converters will allow you to adjust your audio before it converts your content from text to speech (MP3). Sometimes, this is as simple as allowing you to choose an audio format (as is shown in the image below), other times, it allows you to control the actual sound quality of the finished product.

Tip 5: Adjust Voice Speed!
Earlier, we emphasized the importance of choosing your voice reader carefully! Now, we focus on the subject of speed. Some voices are better when they are slowed down, others are better when sped up. Play around with these settings to see which way is more natural for your chosen voice!

Tip 6: Adjust Voice Pitch
To allow for even more flexibility when it comes to voice style, you’ll find that some TTS converters will allow you to adjust voice pitch! This is a helpful feature for when you’re looking for that particular voice type, as it will allow you to experiment more with the kind of sound you want your content to be known for.

Tip 7: Voice Effects Options!
Another advanced feature that you might run into (and should definitely take advantage of), is voice effects! This, again, will allow you to fully customize the type of voice that your content is known for. It’s also great for when you’re aiming for a more natural sound (if you’re patient enough in order to take full advantage of it!)

Tip 8: Use Advanced Video Editing!
Our last tip is not on the subject of using a TTS converter itself, but on the tool, you use in order to create your final project! For that, we recommend Wondershare Filmora Video Editor .
Filmora is a content creation tool that will allow you to expand your video editing capabilities with little to no effort. It’s highly intuitive and thus incredibly very easy to use — allowing you to create and perfect your content efficiently! It’s also, in this case, very good at ensuring that you can make full use of your carefully curated TTS MP3!

Wondershare Filmora - Best Video Editor for Mac/Windows
5,481,435 people have downloaded it.
Build unique custom animations without breaking a sweat.
Focus on creating epic stories and leave the details to Filmora’s auto features.
Start a creative adventure with drag & drop effects and endless possibilities.
Filmora simplifies advanced features to save you time and effort.
Filmora cuts out repetition so you can move on to your next creative breakthrough.

Key Takeaways from This Episode
● Text-to-Speech has only continued to grow popular with content creators as the technology of it improves — allowing for more natural sounding voices and endless customizations.
● Most of these text-to-speech converters work in much the same way. All you need to do is upload the text you want to convert, adjust the voice and sound settings as needed, and you’re done!
● Of course, there are some extra little tidbits that you might also want to know in order to enhance your converted text. Our general advice for that is to experiment to the fullest and make sure that you finish everything up with a high-quality video editor like Filmora to ensure that your finished project is as near to perfect as possible!
Text-to-Speech is an ingenious accessibility invention that has only grown more and more popular as AI has been thrown in the mix — making the converted speech sound more natural than ever!
As requested, in this article, we’ll be focusing on the subject of converting text to MP3 format (or, rather, a tangible file that you can use for projects!)
In this article
01 [What is TTS?](#Part 1)
02 [How to Turn on Text to Speech Converter?](#Part 2)
03 [Useful Tips on Converting Text to MP3](#Part 3)
Part 1 What is TTS?
What is Text-to-Speech? Text-to-Speech, also called TTS, as previously mentioned, is an accessibility invention. It was developed to help those with vision impairment or blindness — giving them the ability to have text read to them out loud to them (without requiring someone specifically read it out loud for them.
More recent development in TTS technology has allowed it to grow more useful outside of those parameters, however. Especially seeing as it is now possible to convert text to MP3 with natural voices.
01Why Use Text to Speech Converter?
Text-to-Speech human voice converters are popular with content creators, and thus, they are the ones who see the most use for them (in the commercial sense). After all, it’s easy enough to convert already created content (in the form of text) into an audio file that there’s no reason not to! Especially since it means that more people would have access to their content!
02Benefits of Free Online Text to Speech Readers
The benefit of FREE online text-to-speech human voice converters is exactly because they are free. Getting a live voice actor to convert text to MP3 for you is very expensive — since you’re paying not only for the voice-actors hours spent but also the use of the expensive equipment that they use for creating voiceovers.
In that regard, even PAID text-to-speech converters are easier on the budget. Making it the perfect solution for content creators who want to increase the accessibility of their content but do not have the time (to create the voiceovers themselves) or the money (to hire someone else to record it).
03Features of Text to Mp3 Converter
There are lots of text-to-speech converters out there. And, depending on what you’re looking for, you might find yourself longing for extra features later on down the line. That is why, when looking to convert text to MP3 we recommend considering the following:
● Converting Time: How fast does the converter work? Most text-to-speech converters work almost instantaneously! So, if the one you’re using currently is slow? It might be best to give it a pass over to the next candidate.
● Sound Quality: You should also test out whether or not the sound quality of the converted text to speech is good.
● Multi-Language Support: Since this is all for the sake of increasing accessibility, you should start thinking about how many languages your converter supports as well. You might not be able to use all of them or even want to. But, that extra function can be helpful for the future.
● Voice-Control Options: Does the converter offers you advanced voice controls? Your average converter usually offers speed and voice options, but you might find that a text-to-speech converter with more advanced options (i.e., tone, pitch, etc. controls) may help you get better quality content in the long run.
Part 2 How to Turn on Text to Speech Converter?
For the next part of this article, we’ll be teaching you how to actually get from text to speech (MP3) with the use of a TTS converter. Specifically, a FREEmium text-to-speech converter that you can use when you’re still on the trying-out stage! This part will include a tutorial and a short introduction:
014 Steps to Use and Convert Text to Speech Online Free Unlimited?
First, for the promised tutorial! Most text-to-human voice converters function much the same way. The main difference usually being on the number of features focused and the limitations imposed (for tools with FREEmium services that impose limits on the FREE version, like the tool we’ll be using for our example):
Step 1: Upload Text
First, upload the text that you want to convert into speech!
Most online converters offer a text box that you can use in order to copy & paste the text onto (like in the image below), while others offer an ‘upload’ feature that you can use to upload text from a document.
Step 2: Adjust Voice Reader!
Next, the main thing that you usually have to worry about is the voice options.
Most TTS converters at least offer the opportunity to choose what voice you want the text to be read in. Some, more advanced solutions, may offer voices in other languages, dialects, accents, etc. as well as voice control options (tone, pitch, etc.)
Step 3: Reader Controls!
Outside of voice options, most text-to-speech converters also offer the ability to control the general outcome of the converted text to speech.
More advanced tools will have multiple options on offer for this, but even the most basic ones at least offer a method for controlling the speed at which the text is read by the voice you’ve chosen!
Step 4: Convert Text to MP3!
Now is finally the time to convert text to MP3 format! Some TTS readers will not allow for this without you paying the premium price, but most will at least offer a limited MP3 conversion feature (usually one that limits the length of conversion or the quality).
02What is the Best Free Text to Speech Software?
To finish off this section, we introduce the tool we used for our examples! It’s the online text to human voice converter, NaturalReader (URL has been provided below!) You can use this tool either directly or on your desktop (a software version is available.) It is FREEmium software though. That means that, if you want to make use of all of its advanced features, you’ll need to pay a price!
Part 3 Useful Tips on Converting Text to MP3
The tutorial in the previous section was really more for the sake of ensuring that you have the basics down and that you are familiar with how these text-to-speech converters usually work. In this next part, we’ll be focusing on “super tips”
OR, tips that allow you to generally make the most of these text-to-human voice converters to the fullest!
Tip 1: Use AI Text-to-Speech!
Our first tip is to encourage you to take full advantage of AI text-to-speech functions. Artificial Intelligence allows the converted text to sound much nicer and much more like it was read by an actual human being — which enables you to create a very professional-sounding project without having to hire a voiceover actor/actress.
Tip 2: Language and Regions Settings!
If your content is available in multiple languages and you want to convert all of the different editions of said content, you’ll need to find a converter that supports all of those languages. You may also consider looking for regional support as well. For example, for basic English language, most TTS converters usually have “American” voices as well as “British” voices to support different accents despite them using the same text.
Tip 3: Pick an Appropriate Voice!
The voice you choose to read your text is also very important. Some premium text-to-human voice converters offer a great variety to choose from to give you options when it comes to what kind of voice you want to read your content.
Tip 4: Audio Settings!
This is a bit of a rare feature, but some TTS converters will allow you to adjust your audio before it converts your content from text to speech (MP3). Sometimes, this is as simple as allowing you to choose an audio format (as is shown in the image below), other times, it allows you to control the actual sound quality of the finished product.
Tip 5: Adjust Voice Speed!
Earlier, we emphasized the importance of choosing your voice reader carefully! Now, we focus on the subject of speed. Some voices are better when they are slowed down, others are better when sped up. Play around with these settings to see which way is more natural for your chosen voice!
Tip 6: Adjust Voice Pitch
To allow for even more flexibility when it comes to voice style, you’ll find that some TTS converters will allow you to adjust voice pitch! This is a helpful feature for when you’re looking for that particular voice type, as it will allow you to experiment more with the kind of sound you want your content to be known for.
Tip 7: Voice Effects Options!
Another advanced feature that you might run into (and should definitely take advantage of), is voice effects! This, again, will allow you to fully customize the type of voice that your content is known for. It’s also great for when you’re aiming for a more natural sound (if you’re patient enough in order to take full advantage of it!)
Tip 8: Use Advanced Video Editing!
Our last tip is not on the subject of using a TTS converter itself, but on the tool, you use in order to create your final project! For that, we recommend Wondershare Filmora Video Editor .
Filmora is a content creation tool that will allow you to expand your video editing capabilities with little to no effort. It’s highly intuitive and thus incredibly very easy to use — allowing you to create and perfect your content efficiently! It’s also, in this case, very good at ensuring that you can make full use of your carefully curated TTS MP3!
Wondershare Filmora - Best Video Editor for Mac/Windows
5,481,435 people have downloaded it.
Build unique custom animations without breaking a sweat.
Focus on creating epic stories and leave the details to Filmora’s auto features.
Start a creative adventure with drag & drop effects and endless possibilities.
Filmora simplifies advanced features to save you time and effort.
Filmora cuts out repetition so you can move on to your next creative breakthrough.
Key Takeaways from This Episode
● Text-to-Speech has only continued to grow popular with content creators as the technology of it improves — allowing for more natural sounding voices and endless customizations.
● Most of these text-to-speech converters work in much the same way. All you need to do is upload the text you want to convert, adjust the voice and sound settings as needed, and you’re done!
● Of course, there are some extra little tidbits that you might also want to know in order to enhance your converted text. Our general advice for that is to experiment to the fullest and make sure that you finish everything up with a high-quality video editor like Filmora to ensure that your finished project is as near to perfect as possible!
Also read:
- Make a Killer First Impression Best Gaming Intro Makers for Windows and Mac for 2024
- New In 2024, Streamline Your Workflow Best 4K Proxy Video Editing Software
- In 2024, Effortless Video Editing Best Alternatives to Traditional Joiners
- New Gaming Intro Design Tools Best Options for Windows and Mac for 2024
- Updated Image Dimensions Made Simple How to Use a Ratio Calculator for 2024
- In 2024, Home Movie Magic Simple yet Effective Video Editing Techniques
- New 2024 Approved Unlock Efficiency The Most Useful Adobe Premiere Shortcuts Revealed
- Updated Top Considerations for Selecting the Best Video to Audio Conversion Tool
- Updated 2024 Approved 14 Essential Vlog Video Editors for YouTube, TikTok, and More Free & Paid
- In 2024, Looking Beyond Final Cut Pro X 10 Top Video Editing Software Options
- New The Best Free Video Splitting Solutions Reviewed
- New 2024 Approved From the Heart A Beginners Guide to Making a Valentines Day Video for Your Loved One
- New Effortless Video Editing on Mac Introducing MKVtoolnix 2023 for 2024
- Updated Cutting AVI Files Made Easy Tips, Tricks, and Tools for Video Editing
- Updated In 2024, Video Success on LinkedIn The Ultimate Aspect Ratio Guide
- Updated In 2024, Blur Your Video for Free No Software Required
- Free and Fantastic The Best MP4 Video Editors
- New From Widescreen to Vertical The Easiest Way to Resize Your Videos for 2024
- Updated The Cream of the Crop Best iPhone Apps with In-Depth Reviews
- New Unlock the Power of DVD Creation A Beginners Guide to Movie Making Software
- New Maximize Your GoPro Experience A Quik Review and Top PC Video Editing Solutions for 2024
- Updated This Article Will Tell You some Adobe Premiere Tips for You to Edit Videos in a Better Way Using Adobe Premiere. Just Enjoy Adobe Premiere Video Editing
- Updated 2024 Approved Make Your WhatsApp Status Pop Best Video Makers (Free & Paid)
- New In 2024, Official 4 Best Ways to Get Filmora Discount Codes - 2022 Update
- New Cutting-Edge Video Editing Top 4K Software Solutions
- Updated Online Video Combination Made Easy Top 5 Free Tools
- In This Article, We Will Introduce You Vn Video Editor Pro Apk Download and Bring You some of Its Alternatives
- Updated In 2024, Experience the Thrill Top 10 Movie Trailer Apps for iOS
- New 2024 Approved FREE Best Video Special Effects Apps
- Updated In 2024, Highlight Reel Masters Best Video Editing Tools for Any Device
- Updated 2024 Approved Top-Rated Video Editors for Trimming on PC
- New 2024 Approved Best Free Online Video Editors for Merging Clips
- Unleash Creativity Top 10 Online Intro Maker Resources for 2024
- In 2024, Portrait Perfection The Best Video Editing Apps for iOS and Android
- Updated Capture Lifes Moments with Clarity Top Video Stabilizer Apps
- The Ultimate Guide to Choosing a Windows Movie Editor
- The Ultimate Guide to Soundcloud MP3 Conversion for 2024
- Updated Effortless Video Conversion Top 10 WebM to MP4 Tools
- Updated Boost Your Visibility LinkedIn Video Size and Aspect Ratio Tips for 2024
- Updated The Ultimate List Top 10 Free Online Video Editors with No Watermark for 2024
- In 2024, Create Engaging WhatsApp Status with These Best Apps
- Splice Video Editor Review Pros, Cons, and Everything in Between for 2024
- Updated How to Change the Aspect Ratio in Final Cut Pro, In 2024
- New Stop Motion Mastery Top 10 Software for Mac and PC Users for 2024
- Budget-Friendly Filmmaking Essentials 8 Must-Know Software
- Easy Guide to Asus ROG Phone 8 FRP Bypass With Best Methods
- How Can We Unlock Our Realme Narzo 60 Pro 5G Phone Screen?
- How to recover deleted photos from Android Gallery after format on 13 Ultra
- In 2024, Top 11 Free Apps to Check IMEI on Lava Blaze 2 Pro Phones
- Hard Resetting an Oppo A56s 5G Device Made Easy | Dr.fone
- Restore Missing App Icon on Itel P55 Step-by-Step Solutions | Dr.fone
- In 2024, How to Delete iCloud Account From Apple iPhone 7 without Password?
- Two Ways to Track My Boyfriends Xiaomi Redmi 12 5G without Him Knowing | Dr.fone
- How To Repair iPhone 6s System Issues? | Dr.fone
- In 2024, Top 10 Telegram Spy Tools On Apple iPhone 14 Pro for Parents | Dr.fone
- Title: Updated 2024 Approved Chromebook Video Editing Software Top Picks
- Author: Amelia
- Created at : 2024-04-29 19:42:07
- Updated at : 2024-04-30 19:42:07
- Link: https://ai-driven-video-production.techidaily.com/updated-2024-approved-chromebook-video-editing-software-top-picks/
- License: This work is licensed under CC BY-NC-SA 4.0.
