
:max_bytes(150000):strip_icc():format(webp)/GettyImages-1345967858-4e7ba42433504ee899e05ceb500f3b68.jpg)
Updated Which DVR Is King? TiVo and Comcast Go Head-to-Head in Our Expert Review for 2024
Which DVR Is King? TiVo and Comcast Go Head-to-Head in Our Expert Review
TiVo vs Comcast, Who Wins the DVR Battle?

Ollie Mattison
Mar 27, 2024• Proven solutions
Cable, satellite, over the air broadcast, streaming internet video – never before have we had so many choices of how to receive television programming. DVR, PVR, computer hard drive, external storage device; now we have choices in how to store programs for viewing later to consider as well. So what is true and what is hype when it comes to what’s the best device? Let’s peel back the layers and look at the information.
First, what is a DVR? A DVR, or digital video recorder, is a device that records video from a source for playback at another time. It often comes with a television programming guide included so you can easily locate shows you want to record. Most DVRs come with large capacity hard drives, though some have flash memory cards as their storage medium. There are a variety of types that range from small storage capacity and two tuners, up through several tuners and massive hard drive storage ability. You also can pause and rewind live TV, which is great when you want to create your own sports instant replays. Most DVRs also allow you to watch one program that was previously recorded while two others are recording, though some have greater capacity.
A TiVo is a particular kind of DVR that was first introduced in 1999. It requires a subscription to its own programming guide that can be purchased month to month, or as a “lifetime” subscription (that means the life of the TiVo, not your life, by the way). TiVos, like cable company DVRs, can record just one show or an entire season. TiVos have a smart feature which notices which shows you are watching and recommends similar ones to you based on how you rate current programs. It also uses these ratings to suggest shows to other viewers.
Let’s look at a few of the main features of both so you can do a comparison. We’ll look at five factors.
1. TiVo vs Comcast: Cost and rent versus own
With a Comcast DVR, you are renting it from the cable company at a cost of $10 to $16 a month, depending on your market. There are no upfront costs, and should the device fail, you can swap it at no cost at your local Comcast service center. Some folks have found that the new X1 boxes are prone to crashes, so that free swap is handy.
A TiVo is yours to keep as long as it lasts or as long as you want it, whichever comes first. It has an initial cost of between $200 and $600, depending on the model. Plus, you have the subscription cost on top of the unit price, which is $15 a month or $500 for a “lifetime” subscription, which TiVo may or may not give you partial credit for should your device fail and you need a new one. Like the Comcast DVRs, some TiVo boxes are less than stable. It’s the nature of electronics. TiVos also have advertising on them, which some Comcast channels do also, like MusicChoice, but not on all of them.
2. TiVo vs Comcast: Services available
With a DVR from Comcast, you can only record shows that are broadcast on one of Comcast’s channels or play shows that are loaded into its On Demand section. A TiVo can be connected to a number of sources, including cable via a cable card, and allow you to combine all of your viewing sources into the one box. It even connects to a high definition antenna.
The TiVo with cable card has access to all of the cable On Demand services, so in that sense it can replace all of the Comcast DVRs. However, the cable card is not free. It typically runs $1.50 per card per month, up to $2.50 per card on the Frontier system.
The menus are slightly different, as you can see below.

Comcast interface

TiVo interface
TiVos also recognize SD and HD as just different versions of the same show, instead of different channels like Comcast does, so you can set your DVR to just record HD. This makes it somewhat harder to just record HD on a TiVo.
Down the road, Comcast is planning the X2 system which would have cloud recording capacity, thus ending the need for a box in your house at all. TiVo has not yet announced such a plan.
3. TiVo vs Comcast: Connection to a network
TiVos can be connected to your home computer network, and the newest one, the Roamio, comes with built-in wifi, for total freedom of use. Because it’s on the network, you can stream shows from your computer through the TiVo box for later playback. It supports channels like Netflix, Hulu Plus, and Amazon Instant. You can also stream shows to your Apple portable devices and then take the shows with you on the plane or to the gym, or use the device as a remote control. (Android devices will have the same capacity soon.) The network capacity also means you can use your computer to control the TiVo box and view content wherever you are.
Some reviewers have also noted that the network set up is not as simple as it might be, and it requires some computer knowledge and ability. Unless you have a tech person nearby, novice computer users may not wish to set up the network.
The iPhone app remote screen looks like this:

A TiVo does have limitations of who can access which channels. For instance, it does not stream HBOGo, nor does it interface with Apple’s TV programming. For that you still need an AppleTV device.
Comcast boxes simply do not network well. They are designed to broadcast the cable signals through your TV, but not on a home network. They are often easier to connect, however, just requiring a cable from the box to be plugged into the TV.
4. TiVo vs Comcast: Recording capacity
The new TiVo, the Roamio, has as many as six tuners that can record at the same time with up to 150 hours of high definition programming. You’ll never have another scheduling conflict again!
TiVos have recording capacities that range from 75 to 450 hours, depending on whether it is standard definition or high definition, and which device you are using. You can choose from three models of the Roamio. The base model costs $200 and has 75 hours of capacity. The menu and features are more limited on this one than on the others. There is a middle model priced at $400 that has the same six tuners as the high-end one but can only hold 150 hours of recordings. Then the top tier model costs $600 and has 450 hours of recording capacity, all of it in high definition.
The Comcast X1 DVR has four tuners and it can record them simultaneously. You can watch a prerecorded program while it’s recording, too. It can hold 120 hours of HD or 600 hours of SD programming.
5. TiVo vs Comcast: User interface
The Comcast X1 DVR system has a voice-activated interface and a completely different look and layout than their standard system has.

The basic Comcast remote is a multi-function remote and capable of controlling all functions, but it does not have the ability to connect to a portable device like a tablet or a smartphone to have connectivity that way like a TiVo can through an app. The remote has to be line of sight in order to work.

The TiVo device menu is in standard definition, so for those who have a high definition set up, you may find this a bit distraction or fuzzy. It does come with apps for extending what the box can do, including games for kids.
Many reviewers liked the interface on the TiVo better than the grid used on the Comcast service. The TiVo programming guide allows you to delete channels you don’t watch so you’re only looking at the channels you like. Comcast’s guide covers every channel they offer, even ones that are not available on your tier of service.

With the TiVo Roamio, connecting to a tablet allows you to be in another room and still operate the “remote” for the TiVo DVR. Download the app onto your device and you’re ready to go.
TiVo’s device remote has a sleek layout called the “peanut”.

Summary
What it all comes down to is looking at how you use your TV, where you get your sources from, and what your budget is. Each device has its own set of things that are appealing, and its own drawbacks. For flexibility of being able to use multiple sources and devices, the TiVo is the clear winner. For cost in the long run, it’s almost a draw. For ease of connection to a TV, the Comcast box comes out on top. No matter which one you pick, you’ll never run out of great programs to watch.


Ollie Mattison
Ollie Mattison is a writer and a lover of all things video.
Follow @Ollie Mattison
Ollie Mattison
Mar 27, 2024• Proven solutions
Cable, satellite, over the air broadcast, streaming internet video – never before have we had so many choices of how to receive television programming. DVR, PVR, computer hard drive, external storage device; now we have choices in how to store programs for viewing later to consider as well. So what is true and what is hype when it comes to what’s the best device? Let’s peel back the layers and look at the information.
First, what is a DVR? A DVR, or digital video recorder, is a device that records video from a source for playback at another time. It often comes with a television programming guide included so you can easily locate shows you want to record. Most DVRs come with large capacity hard drives, though some have flash memory cards as their storage medium. There are a variety of types that range from small storage capacity and two tuners, up through several tuners and massive hard drive storage ability. You also can pause and rewind live TV, which is great when you want to create your own sports instant replays. Most DVRs also allow you to watch one program that was previously recorded while two others are recording, though some have greater capacity.
A TiVo is a particular kind of DVR that was first introduced in 1999. It requires a subscription to its own programming guide that can be purchased month to month, or as a “lifetime” subscription (that means the life of the TiVo, not your life, by the way). TiVos, like cable company DVRs, can record just one show or an entire season. TiVos have a smart feature which notices which shows you are watching and recommends similar ones to you based on how you rate current programs. It also uses these ratings to suggest shows to other viewers.
Let’s look at a few of the main features of both so you can do a comparison. We’ll look at five factors.
1. TiVo vs Comcast: Cost and rent versus own
With a Comcast DVR, you are renting it from the cable company at a cost of $10 to $16 a month, depending on your market. There are no upfront costs, and should the device fail, you can swap it at no cost at your local Comcast service center. Some folks have found that the new X1 boxes are prone to crashes, so that free swap is handy.
A TiVo is yours to keep as long as it lasts or as long as you want it, whichever comes first. It has an initial cost of between $200 and $600, depending on the model. Plus, you have the subscription cost on top of the unit price, which is $15 a month or $500 for a “lifetime” subscription, which TiVo may or may not give you partial credit for should your device fail and you need a new one. Like the Comcast DVRs, some TiVo boxes are less than stable. It’s the nature of electronics. TiVos also have advertising on them, which some Comcast channels do also, like MusicChoice, but not on all of them.
2. TiVo vs Comcast: Services available
With a DVR from Comcast, you can only record shows that are broadcast on one of Comcast’s channels or play shows that are loaded into its On Demand section. A TiVo can be connected to a number of sources, including cable via a cable card, and allow you to combine all of your viewing sources into the one box. It even connects to a high definition antenna.
The TiVo with cable card has access to all of the cable On Demand services, so in that sense it can replace all of the Comcast DVRs. However, the cable card is not free. It typically runs $1.50 per card per month, up to $2.50 per card on the Frontier system.
The menus are slightly different, as you can see below.
Comcast interface
TiVo interface
TiVos also recognize SD and HD as just different versions of the same show, instead of different channels like Comcast does, so you can set your DVR to just record HD. This makes it somewhat harder to just record HD on a TiVo.
Down the road, Comcast is planning the X2 system which would have cloud recording capacity, thus ending the need for a box in your house at all. TiVo has not yet announced such a plan.
3. TiVo vs Comcast: Connection to a network
TiVos can be connected to your home computer network, and the newest one, the Roamio, comes with built-in wifi, for total freedom of use. Because it’s on the network, you can stream shows from your computer through the TiVo box for later playback. It supports channels like Netflix, Hulu Plus, and Amazon Instant. You can also stream shows to your Apple portable devices and then take the shows with you on the plane or to the gym, or use the device as a remote control. (Android devices will have the same capacity soon.) The network capacity also means you can use your computer to control the TiVo box and view content wherever you are.
Some reviewers have also noted that the network set up is not as simple as it might be, and it requires some computer knowledge and ability. Unless you have a tech person nearby, novice computer users may not wish to set up the network.
The iPhone app remote screen looks like this:
A TiVo does have limitations of who can access which channels. For instance, it does not stream HBOGo, nor does it interface with Apple’s TV programming. For that you still need an AppleTV device.
Comcast boxes simply do not network well. They are designed to broadcast the cable signals through your TV, but not on a home network. They are often easier to connect, however, just requiring a cable from the box to be plugged into the TV.
4. TiVo vs Comcast: Recording capacity
The new TiVo, the Roamio, has as many as six tuners that can record at the same time with up to 150 hours of high definition programming. You’ll never have another scheduling conflict again!
TiVos have recording capacities that range from 75 to 450 hours, depending on whether it is standard definition or high definition, and which device you are using. You can choose from three models of the Roamio. The base model costs $200 and has 75 hours of capacity. The menu and features are more limited on this one than on the others. There is a middle model priced at $400 that has the same six tuners as the high-end one but can only hold 150 hours of recordings. Then the top tier model costs $600 and has 450 hours of recording capacity, all of it in high definition.
The Comcast X1 DVR has four tuners and it can record them simultaneously. You can watch a prerecorded program while it’s recording, too. It can hold 120 hours of HD or 600 hours of SD programming.
5. TiVo vs Comcast: User interface
The Comcast X1 DVR system has a voice-activated interface and a completely different look and layout than their standard system has.
The basic Comcast remote is a multi-function remote and capable of controlling all functions, but it does not have the ability to connect to a portable device like a tablet or a smartphone to have connectivity that way like a TiVo can through an app. The remote has to be line of sight in order to work.
The TiVo device menu is in standard definition, so for those who have a high definition set up, you may find this a bit distraction or fuzzy. It does come with apps for extending what the box can do, including games for kids.
Many reviewers liked the interface on the TiVo better than the grid used on the Comcast service. The TiVo programming guide allows you to delete channels you don’t watch so you’re only looking at the channels you like. Comcast’s guide covers every channel they offer, even ones that are not available on your tier of service.
With the TiVo Roamio, connecting to a tablet allows you to be in another room and still operate the “remote” for the TiVo DVR. Download the app onto your device and you’re ready to go.
TiVo’s device remote has a sleek layout called the “peanut”.
Summary
What it all comes down to is looking at how you use your TV, where you get your sources from, and what your budget is. Each device has its own set of things that are appealing, and its own drawbacks. For flexibility of being able to use multiple sources and devices, the TiVo is the clear winner. For cost in the long run, it’s almost a draw. For ease of connection to a TV, the Comcast box comes out on top. No matter which one you pick, you’ll never run out of great programs to watch.
Ollie Mattison
Ollie Mattison is a writer and a lover of all things video.
Follow @Ollie Mattison
From Bland to Grand: Enhancing Lower Thirds in Final Cut Pro X
What Makes the Best Lower Thirds in Final Cut Pro X?

Liza Brown
Oct 26, 2023• Proven solutions
The videos drop facts to audiences and educate the viewers. The video makers strive to offer a complete overview of the topic within a short duration. Graphics, elements, modules occupy the screen and excites the viewers. The advent of video editing innovations shifted the perspectives.
Here comes an enlightening discussion about the lower third modules in your videos. The tips and tricks associated with the making of this lower third element are available in the below content. Surf them carefully and learn the fabulous lower third templates to customize your videos to the next level.

Part1: What is the lower third?
Are you aware of lower third elements? If you are a newbie video designer, then this article ignites you with reliable facts about it. The lower third module is a graphical element that takes the lower position of a video.
It carries texts to educate the viewers related to the discussed topic in the video. It adds information to the existing content playing in the background. On a clear note, had you observed the news boards displayed at the bottom of the news channel? Yes, of course, most of you must be aware of this element flashing the current news.
You can also observe this lower third module during an interview session on your television. It displays the name of the interviewer and extra data about the session.
On a short note, you can define the lower third module as a piece of a graphical element that hangs at the bottom of the screen displaying related data in pace with the existing video content. You can create the lower third module using an incredible tool for your videos in no time. Identify the factors to work on to refine the lower third module appearance and performances.

Part2: What factors contribute to a good lower third?
While designing the lower third element for your video, you must keep an eye on few factors. Work on the below attributes to build a good lower third element. Always remember to keep it simple to obtain the desired outcomes.
- The harmony of hues
The color combinations of your lower third element play a vital factor. Choose the right mix of shades to attract the viewers. Based on the background, use a complementary color to fill your lower third module for a persuasive display. Ensure the combination of hues must not distract the viewers at any cost.
Try different color schemes with Green, Magenta, Orange, and Blue to create a mesmerizing display of the lower third element. You can also use a color picker tool to choose the right combination of colors that match perfectly with the background and typography.

- Motion effect
Thrill your audience by inserting movements with the lower third elements. When you add some motion effect to this module, it adds flavors to your video. Work on this feature in-depth and observe whether the lower third’s motion effect excites the audience. Customize the animation time, style, and the way it flashes on the screen.
Make the movements simple and do not add too many moves which distract the viewers. Decide how long the animation should play and align the texts and other related elements according to obtain a perfect look. With the perfect text movements, you can draw the attention of the viewers in no time.
- Fonts
The next crucial factor associated with the lower third element is fonts. Font size, the style creates an impact on the overall design of a lower third module.
If you concentrate on this attribute, you will surely end up with a professional design. Choose the font style and sine according to the background content. Do not overshadow the lower third element with the playing content, instead try to add value to it.
- Right timing of showing up
Now, you must sense the time for the module to turn up on the video. The timing factor contributes a lot to the perfect display of the lower third element.
Set the right time for the element to enter the screen. Decide the enter and exit timing attribute for this element to reach the audience in a better way.
- Logos and positions
Position the element at the perfect place on the screen to ensure its visibility. You can also insert your logos along with the texts to enhance your brand.
Proper alignment and the best coordinates on the screen make the lower third module shine better in your video. Proper placement of this element decides the impact on it.
![]()
Part3: How to make a lower third quickly in final cut pro X?
The Final Cut Pro X is a fabulous program to edit your videos professionally. Insert the desired elements and customize them quickly. To work on this platform, you do not require any special skills.
Click, drag, and drop appropriately to include the right elements at the perfect positions on the video. There is ample personalization options built-in with the Final Cut Pro X. It is high time to discover them for optimal utilization.
Features of Final Cut Pro X to design lower third module element
- It has a built-in title element to add the desired texts in the video
- Quick customization option to type in the relevant message on the screen.
- This app consist of a user-friendly interface and the controls are explicit for easy reach.
- Personalize the lower third element further using the ‘Generator’ option
- You can include animations for the lower third module to persuade the viewers.

In this section, you will learn to make a lower third element using a Final Cut Pro X tool. It is high to check out the steps in detail.
1Step 1: Download the tool
You can download the app and install them in your system. Launch the tool by double-tapping the tool icon.

2Step 2: Add the Title
In the home screen, import the video that requires the edits and then tap the ‘Titles’ tab at the left top of the screen. Click the ‘Build-in/Build-out’ option to custom the Title element. According to your needs, you can repeat it to insert the desired titles on the video screen.

3Step 3: Customize the Title
Now, you can edit the texts in the inserted titles and add animation to the element using the attributes under the ‘Generator’ tab. Modify the title’s textures, background, and positions using the relevant options displayed. Choose accordingly to personalize the title element based on your requirement.

Use the above instructions, insert the lower third element in your video effortlessly. Simple click and drag actions are sufficient to carry out the desired effects on the element.
For those who still need more guides about making lower thirds, this Filmora tutorial may help a lot.
Part 4: Where to find great lower thirds templates for final cut pro X?
You can find the best collections of lower third templates in the online space. Evanto Elements offers an incredible design structure for the lower third module to add value to your videos. They are unique and jaw-dropping. You can opt for this template, instead of creating from the scratch.
According to your needs, you can select the template, customize it, and insert them on your videos flawlessly. Evanto offers the lower third templates based on the video content. It has organized the templates based on the end-use. Check out few suggestions on the built-in templates for the lower third.
YouTube Lower Thirds
If you have a YouTube channel, then make use of this collection to add a lower third module for your video. Increase the followers by adding the perfect texts at the right time on the screen. Easy to use design and displays attractive appearances.
Pop Lower Thirds template
Colorful and yet attractive design from the Evanto elements. This design has a fresh and creative structure to convince the viewer’s needs. It has a high-end resolution with a duration control option.
Minimalistic collection
In this template group, you can find the design seems to be simple and minimal. It offers a lighter touch to your videos. The text overlays do not distract the viewers. Everything looks the same but still, you can feel the difference in it when you customize it according to your needs.
Conclusion
Thus, this article had given you enlightening discussion about the lower third elements. Insert this module optimally in your videos and obtain the desired outcomes. Enhance the design of the lower third element using the Final Cut Pro X app and feel the difference in your video.
Display the texts promptly to enlighten the audience. Connect the texts to the target audience without distracting them. Work on this challenging element using a professional app like the Final Cut Pro X program. Stay tuned with this article to discover the new horizons of video editing.
Liza Brown
Liza Brown is a writer and a lover of all things video.
Follow @Liza Brown
Liza Brown
Oct 26, 2023• Proven solutions
The videos drop facts to audiences and educate the viewers. The video makers strive to offer a complete overview of the topic within a short duration. Graphics, elements, modules occupy the screen and excites the viewers. The advent of video editing innovations shifted the perspectives.
Here comes an enlightening discussion about the lower third modules in your videos. The tips and tricks associated with the making of this lower third element are available in the below content. Surf them carefully and learn the fabulous lower third templates to customize your videos to the next level.
Part1: What is the lower third?
Are you aware of lower third elements? If you are a newbie video designer, then this article ignites you with reliable facts about it. The lower third module is a graphical element that takes the lower position of a video.
It carries texts to educate the viewers related to the discussed topic in the video. It adds information to the existing content playing in the background. On a clear note, had you observed the news boards displayed at the bottom of the news channel? Yes, of course, most of you must be aware of this element flashing the current news.
You can also observe this lower third module during an interview session on your television. It displays the name of the interviewer and extra data about the session.
On a short note, you can define the lower third module as a piece of a graphical element that hangs at the bottom of the screen displaying related data in pace with the existing video content. You can create the lower third module using an incredible tool for your videos in no time. Identify the factors to work on to refine the lower third module appearance and performances.
Part2: What factors contribute to a good lower third?
While designing the lower third element for your video, you must keep an eye on few factors. Work on the below attributes to build a good lower third element. Always remember to keep it simple to obtain the desired outcomes.
- The harmony of hues
The color combinations of your lower third element play a vital factor. Choose the right mix of shades to attract the viewers. Based on the background, use a complementary color to fill your lower third module for a persuasive display. Ensure the combination of hues must not distract the viewers at any cost.
Try different color schemes with Green, Magenta, Orange, and Blue to create a mesmerizing display of the lower third element. You can also use a color picker tool to choose the right combination of colors that match perfectly with the background and typography.
- Motion effect
Thrill your audience by inserting movements with the lower third elements. When you add some motion effect to this module, it adds flavors to your video. Work on this feature in-depth and observe whether the lower third’s motion effect excites the audience. Customize the animation time, style, and the way it flashes on the screen.
Make the movements simple and do not add too many moves which distract the viewers. Decide how long the animation should play and align the texts and other related elements according to obtain a perfect look. With the perfect text movements, you can draw the attention of the viewers in no time.
- Fonts
The next crucial factor associated with the lower third element is fonts. Font size, the style creates an impact on the overall design of a lower third module.
If you concentrate on this attribute, you will surely end up with a professional design. Choose the font style and sine according to the background content. Do not overshadow the lower third element with the playing content, instead try to add value to it.
- Right timing of showing up
Now, you must sense the time for the module to turn up on the video. The timing factor contributes a lot to the perfect display of the lower third element.
Set the right time for the element to enter the screen. Decide the enter and exit timing attribute for this element to reach the audience in a better way.
- Logos and positions
Position the element at the perfect place on the screen to ensure its visibility. You can also insert your logos along with the texts to enhance your brand.
Proper alignment and the best coordinates on the screen make the lower third module shine better in your video. Proper placement of this element decides the impact on it.
![]()
Part3: How to make a lower third quickly in final cut pro X?
The Final Cut Pro X is a fabulous program to edit your videos professionally. Insert the desired elements and customize them quickly. To work on this platform, you do not require any special skills.
Click, drag, and drop appropriately to include the right elements at the perfect positions on the video. There is ample personalization options built-in with the Final Cut Pro X. It is high time to discover them for optimal utilization.
Features of Final Cut Pro X to design lower third module element
- It has a built-in title element to add the desired texts in the video
- Quick customization option to type in the relevant message on the screen.
- This app consist of a user-friendly interface and the controls are explicit for easy reach.
- Personalize the lower third element further using the ‘Generator’ option
- You can include animations for the lower third module to persuade the viewers.
In this section, you will learn to make a lower third element using a Final Cut Pro X tool. It is high to check out the steps in detail.
1Step 1: Download the tool
You can download the app and install them in your system. Launch the tool by double-tapping the tool icon.
2Step 2: Add the Title
In the home screen, import the video that requires the edits and then tap the ‘Titles’ tab at the left top of the screen. Click the ‘Build-in/Build-out’ option to custom the Title element. According to your needs, you can repeat it to insert the desired titles on the video screen.
3Step 3: Customize the Title
Now, you can edit the texts in the inserted titles and add animation to the element using the attributes under the ‘Generator’ tab. Modify the title’s textures, background, and positions using the relevant options displayed. Choose accordingly to personalize the title element based on your requirement.
Use the above instructions, insert the lower third element in your video effortlessly. Simple click and drag actions are sufficient to carry out the desired effects on the element.
For those who still need more guides about making lower thirds, this Filmora tutorial may help a lot.
Part 4: Where to find great lower thirds templates for final cut pro X?
You can find the best collections of lower third templates in the online space. Evanto Elements offers an incredible design structure for the lower third module to add value to your videos. They are unique and jaw-dropping. You can opt for this template, instead of creating from the scratch.
According to your needs, you can select the template, customize it, and insert them on your videos flawlessly. Evanto offers the lower third templates based on the video content. It has organized the templates based on the end-use. Check out few suggestions on the built-in templates for the lower third.
YouTube Lower Thirds
If you have a YouTube channel, then make use of this collection to add a lower third module for your video. Increase the followers by adding the perfect texts at the right time on the screen. Easy to use design and displays attractive appearances.
Pop Lower Thirds template
Colorful and yet attractive design from the Evanto elements. This design has a fresh and creative structure to convince the viewer’s needs. It has a high-end resolution with a duration control option.
Minimalistic collection
In this template group, you can find the design seems to be simple and minimal. It offers a lighter touch to your videos. The text overlays do not distract the viewers. Everything looks the same but still, you can feel the difference in it when you customize it according to your needs.
Conclusion
Thus, this article had given you enlightening discussion about the lower third elements. Insert this module optimally in your videos and obtain the desired outcomes. Enhance the design of the lower third element using the Final Cut Pro X app and feel the difference in your video.
Display the texts promptly to enlighten the audience. Connect the texts to the target audience without distracting them. Work on this challenging element using a professional app like the Final Cut Pro X program. Stay tuned with this article to discover the new horizons of video editing.
Liza Brown
Liza Brown is a writer and a lover of all things video.
Follow @Liza Brown
Top-Rated Adobe Premiere Title Templates [Free] for Your Next Project
Top 20 Adobe Premiere Title/Intro Templates [Free Download]

Benjamin Arango
Mar 29, 2024• Proven solutions
One of the things that can make your output stand out from the crowd is the titles. Many people think creating eye-catching title effects is beyond them, but with Premiere Pro, you really couldn’t be more wrong.
As Premiere Pro doesn’t have built-in templates, the ability to import free Premiere Pro templates is a must. Anyone need to find a custom title style that suits the project and looks professional and carries impact.
The great thing is that there are many of these resources that are offered entirely free! If you don’t know how to add text/title to Adobe Premiere, here are steps to add text resources .
In this article, we will share with you 20 Free to download Title Templates for Premiere Pro.
- Part1: Top 15 Free Adobe Premiere Pro Title Templates
- Part2: Best 5 Premiere Pro Intro Templates Free Download
- Part3: How to Import and Customize Title Templates in Premiere
You may also like: 10 Free Star Wars Fonts to Make Your Video Amazing
Part 1: Top 15 Free Adobe Premiere Title Templates
Adding the finishing touches to a project, like creating the opening titles or end credits, is often not at the top of anyone’s priority list during the video editing process.
Nonetheless, making a unique opening sequence along with impressive animations in Adobe Premiere Pro can be a time-consuming endeavor, so instead of spending countless hours on producing a perfect combination of text and images, you can just download a title template from the Internet.
1 Premier Pro
Jarle Leirpoll runs this site, and it is a treasure trove of information, help, and advice on Premiere from a man who wrote the book (literally, it’s for sale on the site!) on Premiere.
His first title collection is consisting of 8 templates, including Lower Thirds templates, end credit template, and some special characters. However, it well worth a look around the site as there is plenty more free stuff including presets, and a whole range of tips and tricks to help with your editing.
Features:
- Free Premiere Pro templates to download
- Easy to import the title template to Premiere
- 100% ready to use
In case that you’re just a beginner of video editing software, you can start with Wondershare Filmora (Latest Filmora version 11) to add text to videos, which is powerful but easy-to-use for green hands. Download the Wondershare Filmora below.
There are hundreds of Text and Titles presets available in Filmora, which allows you to add titles, subtitles, scrolling end credits, lower 3d, and openers with ease. You can also apply some animation effects to the selected title presets.
Check the video below to find out how to add text to video with Wondershare Filmora.
Besides the built-in title presets, Wondershare Filmora (Latest Filmora version X) also provides more title templates in Filmstock , which offers lots of special effects templates.
Currently, there are Title Expansion Set, business title set, wedding title set, and lower third expansion set to download. Check the video below to watch the Title Expansion set templates.
Download Mac Version ](https://tools.techidaily.com/wondershare/filmora/download/ )
Learn more details about How to Add Text to Video with Filmora.
2 Richard Harrington
This is another site that offers templates for download but is also a great place to visit for ideas and information. Richard approaches Premiere from a photographer’s viewpoint, and so has a slightly different view on many topics that are well worth reading.
He has links to a sizable number of templates on Richard Harrington covering a range of styles and subjects, including DVD menus, animated text, and high-quality models. Still, his blog is updated regularly and often includes free downloads.
Features:
- Supports Adobe Premiere intro templates to use
- It includes various templates and presets on Windows and Mac
- More than title templates also has DVD menus and animated text
3 ProVideoCoalition
Another all-encompassing site has a huge amount of information and knowledge to be gained. The templates are just part of the story. They are available on Pro Video Coalition and include numerous files and even some free video content showing their implementation.
Also on this page are links to some other sites offering free content or advice on various aspects of Premiere, making it well worth a visit and definitely worth its place in this top 10.
Of particular interest on this site is the regularly updated news which focuses on the latest hardware and software announcements.
Features:
- Supports lower thirds for Adobe Premiere
- You can customize the Premiere Pro intro template free download
- You can create graphic elements
4 Coremelt
This is a commercial site that offers a wide variety of high-quality plugins and templates for several video editing platforms. However, we are on the lookout for that fabulous price of free here, so a little digging finds this page , here you will find ten templates from one of their best selling products offered entirely free.
All templates are quality professionally produced products and worth the visit alone. For anyone who is looking to take their editing output to the professional level, the commercial products on offer here are well worth a look, high quality, and a reasonable cost.
Features:
- It includes 3D text and motion graphics templates
- Free and safe download the Premiere template

5 Bestproaction
Another commercial site. This one has a range of free templates and presets to download for Premiere. Fourteen open items altogether can be downloaded. This site at least deserves a browse through their catalog after a download. The emphasis here is on low cost but high quality, useful templates, and plugins to suit any project.
Even for those of us with a limited budget, there may be something that catches the eye. It is an excellent site for browsing when looking for inspiration.
Features:
- Offers multimedia products like free Premiere Pro text, title templates
- Includes professional Premiere Pro template for videographers
- You can create graphic elements

6 FXFactory
This is another commercial site that has a smattering of very high-quality free downloads on offer, including a beautiful template for the original Star Wars movie style scrolling titles.
Again, it is worth browsing the catalog when you are on the site, but all the free products can be found here .
FX Factory has also created some great video tutorials on a variety of aspects of video production that are well worth a view when you are at the site.
Features:
- Free Premiere Pro effects templates to download
- Includes a step by step Premiere Pro tutorial
7 Creative Impatience
A fantastic site full of information, tips, and opinion on all aspects of video production, it’s a great place to spend some time, with the bonus of a bunch of free downloads for Premiere.
Of particular note are the tutorials, an excellent source of information and tricks that you may not have seen before, with their YouTube channel being a great source of free guidance for editors of any sort of experience.
Features:
- Apart from free Premiere Pro templates, you can also find blogs
- Easy steps to make Premiere Pro templates
- Safe and clean to use. All real
8Filmimpact
A commercial site is offering some great products at competitive prices. At first glance, this may not seem to be a useful place for our search for the free stuff.
However, all the products do have a free trial download, and as a bonus, the trial for pack one includes four free to use templates. They are quality products too, and well worth a look.

9 Style4Type
Style4Type is an exciting site regularly updated with new free templates as well as offering technical advice and having further templates available as commercial products.
And to the side is even a free download for a PDF file that walks you through installing and using the templates within Premiere once you have them.
There are already a lot of free templates on offer covering a wide variety of styles, but they are added to with regularity, so it is a site to bookmark for the future.
Features:
- Free title templates to use including texture templates
- Professional tools to better your video

10 Premiere Beat
Lots of information on this site as its been running for a decade, it is a website that imparts a wealth of knowledge along the way on not just video editing but music.
The pack includes 21 Premiere title templates to use. Another site that you will want to visit again and again.
Features:
- High-quality Premiere Pro templates to download
- A large number of Premiere templates to use
11 Clean Elegant Rotation Title
It is a clean title template without unnecessary parts. If you like simple titles, this one is best for you. You can customize in Premiere easily with a few clicks. For beginners, it also includes free tutorials to use.
Features:
- Simple and clean Premiere title templates
- Customizable in Premiere

12 Unfolding Titles
It is a clean title template with an unfolding effect. Each text has two unfolding effects, which are convenient to use with customization. It supports 4K and HD versions. In this pack, it wons 10 title formats. After importing Premiere, you can also change text size.
Features:
- 20 unfolding title effects
- Supports rendering your video
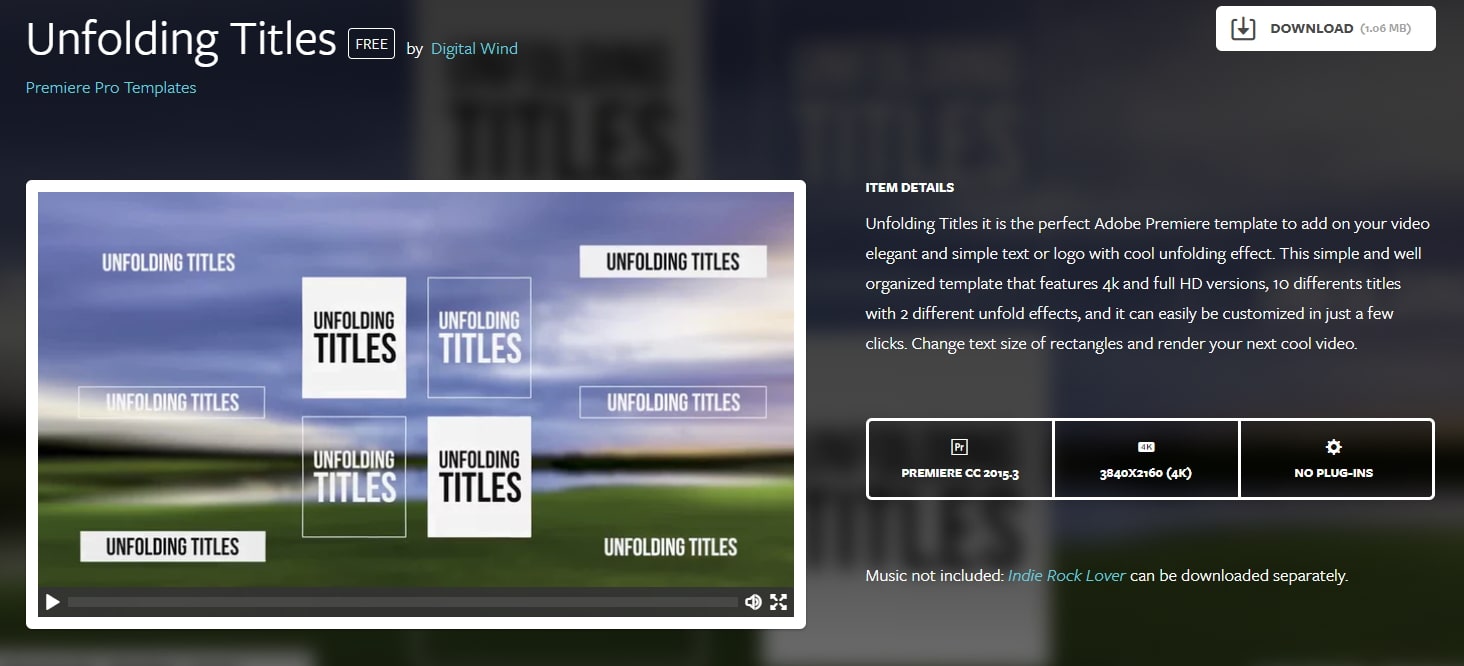
13 Orange83
These are five modern title packs for Premiere. With it, you don’t need to use After Effects as you can import them to edit. The best part is you can include your logo and other stuff you like.
Features:
- Include 5 title packs
- Modern and clean titles
14 Video Intro Templates - Premiere Pro intro template free download
It is a free download Premiere Pro intro template that you can add to your video. It is highly recommended to use promotion and commercial video.
This intro template can be adjusted after you import it to Premiere Pro. This Premiere Pro intro template is HD, so you don’t need to worry about the whole video quality.
Features:
- 1920X1080 (HD) is supported
- This intro template doesn’t include built-in music
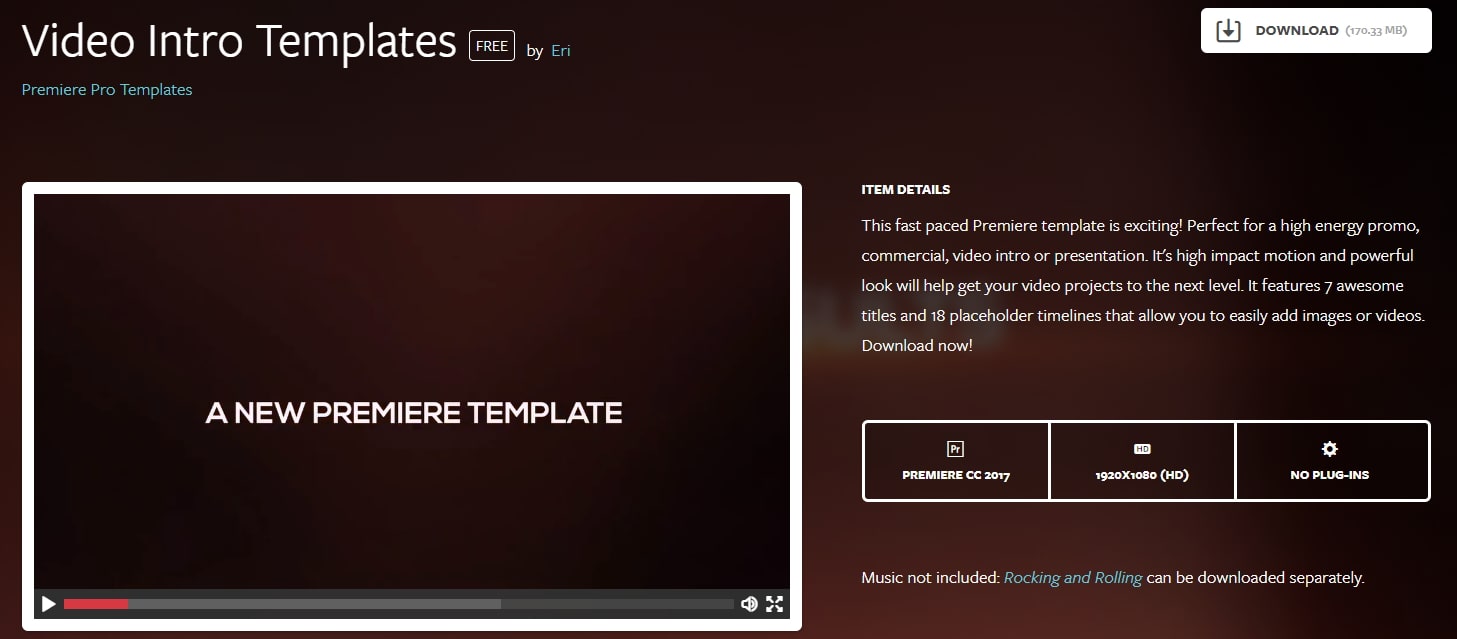
15 Elegant Promo - another Premiere Pro intro template free to use
It is intro template for Premiere Pro is modern and free to use. The whole style is young and energetic, which will give viewers a fresh new feeling. It includes 12 images and 26 text layers, and all of them are free to download.
You can use it for your presentation, promotional video, and product video. Besides, it doesn’t require a plug in to use this intro template in Premiere Pro.
Features:
- It includes animated intro elements.
- Use an HD intro template to make a popular video.

These are free templates, and they are enough to get anyone up and running with a new project. As said before, with the commercial enterprises that offer freebies, it’s always worth checking out their paid for output as well, you may not be in the market for it right now, but something may stick for a later time.
Part 2: Bonus: Best 5 Premiere Pro Intro Templates Free Download
Even though all websites we featured in this article offer some free intro templates for Adobe Premiere Pro. However, it is still a much better solution to buy a subscription plan on a platform if you are working on a large number of projects each month.
Let’s see which websites you can use to download the intro and title templates for Premiere Pro.
16. Motion Array
In addition to an impressive library of intro templates, Motion Array offers presets, sound effects, royalty-free music, and stock footage.
Furthermore, you can choose the software version to make sure that the templates you download can be used with the version of Adobe Premiere Pro you have installed on your computer.
The website provides you with powerful search tools, so you can select the resolution of the template, up to 8K, or choose which types of templates are going to be displayed.
Using the free subscription plan can limit your options since you’ll only be able to download free templates, and your upload storage will be limited to just 1GB.
The Pro subscription plan that can be purchased for $54 per month will grant you access to an almost endless selection of title templates as well as a huge selection of plugins for Adobe Premiere Pro.

17. Cinecom – Simple Intro for Premiere Pro
It is a designer pack that features ten pre-animated lower-thirds intro templates. You can change the duration of the font and color of the text in each template, and you can choose if you want to download a 1080 or the 4K version of the designer pack.
The templates are compatible with CS6, CC2013, CC2014, and CC2016 versions of the Premiere Pro. The Simple Titles pack can be easily installed, as you just have to drag and drop it into the software.
However, before you can download these title templates, you have to subscribe to Cinecom’s mailing list.
Even though this can be a bit inconvenient, it is very well worth the trouble since you’ll be able to transform or build upon the intro templates and use them freely in all videos you edit in Adobe Premiere Pro.
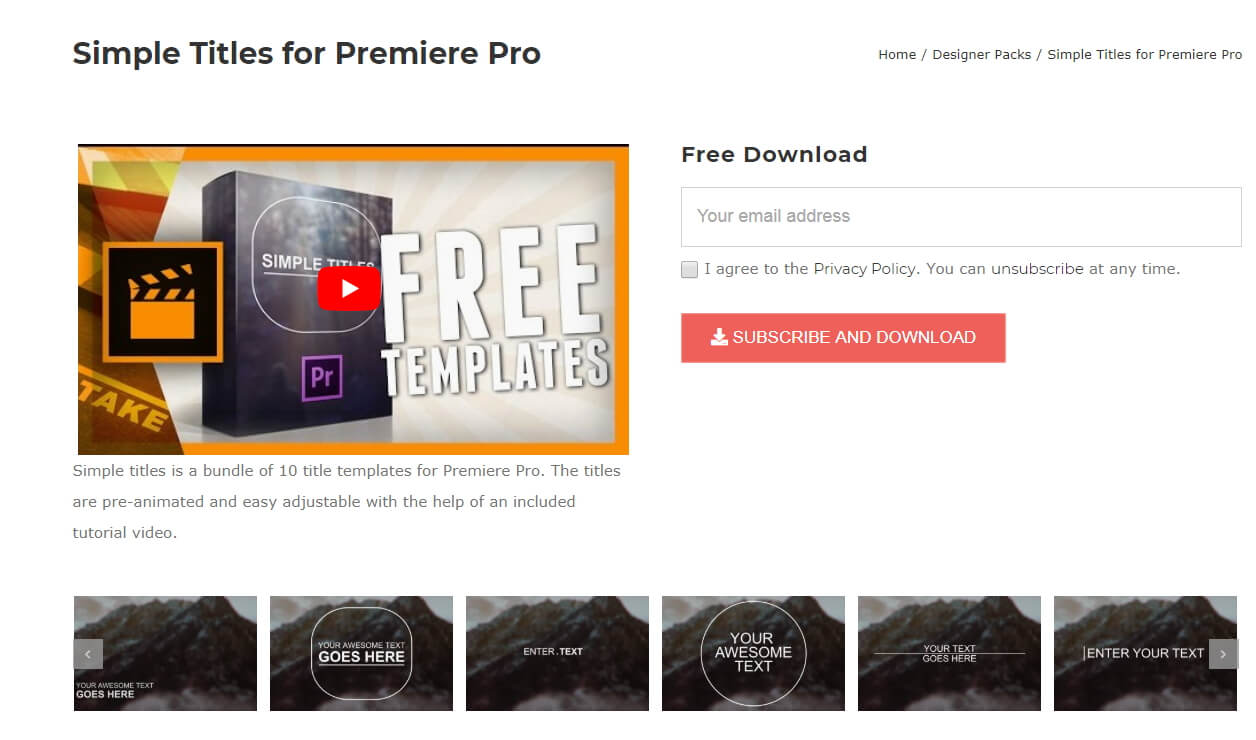
18. EnvatoElements
You can find much more than intro templates on the EnvatoElements platform since you can choose from 740.000 items you can use for anything from creating a WordPress website to preparing your next business presentation.
The Video Templates category alone features over 4000 items, including Logo Stings or Infographics assets.
There are nearly one hundred available intro templates for Adobe Premiere Pro, but downloading any of them requires you to create an account and purchase a subscription plan.
Prices start from $16.50 per month, and packages include virtually unlimited access to stock photos and videos, video templates, and much more. The EnvatoElements platform also offers assets that can be used with Final Cut Pro, Adobe After Effects or Apple Motion.

19. Videohive
Videohive is a part of the Envato Market platform that also features Web Themes and Templates, Code, Audio, or Graphic sections. It is free to use, but only a limited amount of assets can be downloaded for free.
To download an item, you must purchase it, and prices can range from $16 to $50 for a single title template.
Videohive is also a great source of title templates for Adobe After Effects, as it offers more than 5000 titles and intros that are compatible with this software.
Furthermore, you can download presets for both Premiere Pro and After Effects that can be used to create stop-motion animations, perform color correction, or make the footage look like it was captured with a VHS camera.

20. RocketStock
This option is best suited for video editors who want to create their intros because RocketStok’s Cinematic Style Library extends the scope of options provided by Premiere Pro.
Downloading all fonts except Helvetica Neue is free, but you must check which fonts you can use in commercial projects. You will have no trouble installing the fonts since you can just double-click on the font and follow the on-screen instructions.
Once you’ve installed all the fonts from the library, you can use them to replace the software’s default library. You just have to click on the Replace Style Library option that can be accessed from Premiere Pro’s Title Style tab.
If you don’t feel comfortable creating your titles or if you simply don’t have the time to create your own titles, the Free Cinematic Style Library is not the best choice for you.
On the other hand, Premiere Pro’s users who don’t often use title templates can benefit from downloading RocketStock’s intro library.

Part 3: How to Import and Customize Title Templates in Premiere
If you download the template, all the title templates support customization. You can change its size, font, color, and add 3D effects.
It is easy to import and use it to touch up your video. Check out the steps below to know how to import title templates quickly.
- Install the title template. Choose one template you like and download it to your PC. Remember to unzip it before importing it. Now install them.
- Import the title template. You just need to go to click Effects at the top. Then at right, you will find Presets in the effects section.
- Right-click on presets, and choose Import Presets. If the title template format is .mogrt, you need to open it in Essential Graphics Panel. At the bottom right corner, click the plus icon to import the title template and install it.
- Customize the title template. Once the title template is imported, drag it to the timeline. Click the Editing tab. Here you can customize colors, text, opacities, and positions. There are more options for you to explore.
- You can also copy and paste the title template to another place in the timeline. If you change one place of the pasted template, the original one will remain the same.
Note: each version of Premiere’s interface will look different, but the workflow is similar.
Conclusion
Using title templates can help you achieve a certain visual style faster, so you don’t have to spend a lot of time looking for a perfect background or animating the text.
The Internet provides almost unlimited video editing resources, but not all of these resources can be acquired for free.
Which website you will choose as a source of fresh title templates depends on how often you work on new projects in Adobe Premiere Pro.
If you want to make professional video editing and tired of Premiere, try Filmora! It includes various titles templates to use.
You can sync audio automatically, use detailed color correction to make your title and video like a movie. Download it now (FREE)!
Benjamin Arango
Benjamin Arango is a writer and a lover of all things video.
Follow @Benjamin Arango
Benjamin Arango
Mar 29, 2024• Proven solutions
One of the things that can make your output stand out from the crowd is the titles. Many people think creating eye-catching title effects is beyond them, but with Premiere Pro, you really couldn’t be more wrong.
As Premiere Pro doesn’t have built-in templates, the ability to import free Premiere Pro templates is a must. Anyone need to find a custom title style that suits the project and looks professional and carries impact.
The great thing is that there are many of these resources that are offered entirely free! If you don’t know how to add text/title to Adobe Premiere, here are steps to add text resources .
In this article, we will share with you 20 Free to download Title Templates for Premiere Pro.
- Part1: Top 15 Free Adobe Premiere Pro Title Templates
- Part2: Best 5 Premiere Pro Intro Templates Free Download
- Part3: How to Import and Customize Title Templates in Premiere
You may also like: 10 Free Star Wars Fonts to Make Your Video Amazing
Part 1: Top 15 Free Adobe Premiere Title Templates
Adding the finishing touches to a project, like creating the opening titles or end credits, is often not at the top of anyone’s priority list during the video editing process.
Nonetheless, making a unique opening sequence along with impressive animations in Adobe Premiere Pro can be a time-consuming endeavor, so instead of spending countless hours on producing a perfect combination of text and images, you can just download a title template from the Internet.
1 Premier Pro
Jarle Leirpoll runs this site, and it is a treasure trove of information, help, and advice on Premiere from a man who wrote the book (literally, it’s for sale on the site!) on Premiere.
His first title collection is consisting of 8 templates, including Lower Thirds templates, end credit template, and some special characters. However, it well worth a look around the site as there is plenty more free stuff including presets, and a whole range of tips and tricks to help with your editing.
Features:
- Free Premiere Pro templates to download
- Easy to import the title template to Premiere
- 100% ready to use
In case that you’re just a beginner of video editing software, you can start with Wondershare Filmora (Latest Filmora version 11) to add text to videos, which is powerful but easy-to-use for green hands. Download the Wondershare Filmora below.
There are hundreds of Text and Titles presets available in Filmora, which allows you to add titles, subtitles, scrolling end credits, lower 3d, and openers with ease. You can also apply some animation effects to the selected title presets.
Check the video below to find out how to add text to video with Wondershare Filmora.
Besides the built-in title presets, Wondershare Filmora (Latest Filmora version X) also provides more title templates in Filmstock , which offers lots of special effects templates.
Currently, there are Title Expansion Set, business title set, wedding title set, and lower third expansion set to download. Check the video below to watch the Title Expansion set templates.
Download Mac Version ](https://tools.techidaily.com/wondershare/filmora/download/ )
Learn more details about How to Add Text to Video with Filmora.
2 Richard Harrington
This is another site that offers templates for download but is also a great place to visit for ideas and information. Richard approaches Premiere from a photographer’s viewpoint, and so has a slightly different view on many topics that are well worth reading.
He has links to a sizable number of templates on Richard Harrington covering a range of styles and subjects, including DVD menus, animated text, and high-quality models. Still, his blog is updated regularly and often includes free downloads.
Features:
- Supports Adobe Premiere intro templates to use
- It includes various templates and presets on Windows and Mac
- More than title templates also has DVD menus and animated text
3 ProVideoCoalition
Another all-encompassing site has a huge amount of information and knowledge to be gained. The templates are just part of the story. They are available on Pro Video Coalition and include numerous files and even some free video content showing their implementation.
Also on this page are links to some other sites offering free content or advice on various aspects of Premiere, making it well worth a visit and definitely worth its place in this top 10.
Of particular interest on this site is the regularly updated news which focuses on the latest hardware and software announcements.
Features:
- Supports lower thirds for Adobe Premiere
- You can customize the Premiere Pro intro template free download
- You can create graphic elements
4 Coremelt
This is a commercial site that offers a wide variety of high-quality plugins and templates for several video editing platforms. However, we are on the lookout for that fabulous price of free here, so a little digging finds this page , here you will find ten templates from one of their best selling products offered entirely free.
All templates are quality professionally produced products and worth the visit alone. For anyone who is looking to take their editing output to the professional level, the commercial products on offer here are well worth a look, high quality, and a reasonable cost.
Features:
- It includes 3D text and motion graphics templates
- Free and safe download the Premiere template
5 Bestproaction
Another commercial site. This one has a range of free templates and presets to download for Premiere. Fourteen open items altogether can be downloaded. This site at least deserves a browse through their catalog after a download. The emphasis here is on low cost but high quality, useful templates, and plugins to suit any project.
Even for those of us with a limited budget, there may be something that catches the eye. It is an excellent site for browsing when looking for inspiration.
Features:
- Offers multimedia products like free Premiere Pro text, title templates
- Includes professional Premiere Pro template for videographers
- You can create graphic elements
6 FXFactory
This is another commercial site that has a smattering of very high-quality free downloads on offer, including a beautiful template for the original Star Wars movie style scrolling titles.
Again, it is worth browsing the catalog when you are on the site, but all the free products can be found here .
FX Factory has also created some great video tutorials on a variety of aspects of video production that are well worth a view when you are at the site.
Features:
- Free Premiere Pro effects templates to download
- Includes a step by step Premiere Pro tutorial
7 Creative Impatience
A fantastic site full of information, tips, and opinion on all aspects of video production, it’s a great place to spend some time, with the bonus of a bunch of free downloads for Premiere.
Of particular note are the tutorials, an excellent source of information and tricks that you may not have seen before, with their YouTube channel being a great source of free guidance for editors of any sort of experience.
Features:
- Apart from free Premiere Pro templates, you can also find blogs
- Easy steps to make Premiere Pro templates
- Safe and clean to use. All real
8Filmimpact
A commercial site is offering some great products at competitive prices. At first glance, this may not seem to be a useful place for our search for the free stuff.
However, all the products do have a free trial download, and as a bonus, the trial for pack one includes four free to use templates. They are quality products too, and well worth a look.
9 Style4Type
Style4Type is an exciting site regularly updated with new free templates as well as offering technical advice and having further templates available as commercial products.
And to the side is even a free download for a PDF file that walks you through installing and using the templates within Premiere once you have them.
There are already a lot of free templates on offer covering a wide variety of styles, but they are added to with regularity, so it is a site to bookmark for the future.
Features:
- Free title templates to use including texture templates
- Professional tools to better your video
10 Premiere Beat
Lots of information on this site as its been running for a decade, it is a website that imparts a wealth of knowledge along the way on not just video editing but music.
The pack includes 21 Premiere title templates to use. Another site that you will want to visit again and again.
Features:
- High-quality Premiere Pro templates to download
- A large number of Premiere templates to use
11 Clean Elegant Rotation Title
It is a clean title template without unnecessary parts. If you like simple titles, this one is best for you. You can customize in Premiere easily with a few clicks. For beginners, it also includes free tutorials to use.
Features:
- Simple and clean Premiere title templates
- Customizable in Premiere
12 Unfolding Titles
It is a clean title template with an unfolding effect. Each text has two unfolding effects, which are convenient to use with customization. It supports 4K and HD versions. In this pack, it wons 10 title formats. After importing Premiere, you can also change text size.
Features:
- 20 unfolding title effects
- Supports rendering your video
13 Orange83
These are five modern title packs for Premiere. With it, you don’t need to use After Effects as you can import them to edit. The best part is you can include your logo and other stuff you like.
Features:
- Include 5 title packs
- Modern and clean titles
14 Video Intro Templates - Premiere Pro intro template free download
It is a free download Premiere Pro intro template that you can add to your video. It is highly recommended to use promotion and commercial video.
This intro template can be adjusted after you import it to Premiere Pro. This Premiere Pro intro template is HD, so you don’t need to worry about the whole video quality.
Features:
- 1920X1080 (HD) is supported
- This intro template doesn’t include built-in music
15 Elegant Promo - another Premiere Pro intro template free to use
It is intro template for Premiere Pro is modern and free to use. The whole style is young and energetic, which will give viewers a fresh new feeling. It includes 12 images and 26 text layers, and all of them are free to download.
You can use it for your presentation, promotional video, and product video. Besides, it doesn’t require a plug in to use this intro template in Premiere Pro.
Features:
- It includes animated intro elements.
- Use an HD intro template to make a popular video.
These are free templates, and they are enough to get anyone up and running with a new project. As said before, with the commercial enterprises that offer freebies, it’s always worth checking out their paid for output as well, you may not be in the market for it right now, but something may stick for a later time.
Part 2: Bonus: Best 5 Premiere Pro Intro Templates Free Download
Even though all websites we featured in this article offer some free intro templates for Adobe Premiere Pro. However, it is still a much better solution to buy a subscription plan on a platform if you are working on a large number of projects each month.
Let’s see which websites you can use to download the intro and title templates for Premiere Pro.
16. Motion Array
In addition to an impressive library of intro templates, Motion Array offers presets, sound effects, royalty-free music, and stock footage.
Furthermore, you can choose the software version to make sure that the templates you download can be used with the version of Adobe Premiere Pro you have installed on your computer.
The website provides you with powerful search tools, so you can select the resolution of the template, up to 8K, or choose which types of templates are going to be displayed.
Using the free subscription plan can limit your options since you’ll only be able to download free templates, and your upload storage will be limited to just 1GB.
The Pro subscription plan that can be purchased for $54 per month will grant you access to an almost endless selection of title templates as well as a huge selection of plugins for Adobe Premiere Pro.
17. Cinecom – Simple Intro for Premiere Pro
It is a designer pack that features ten pre-animated lower-thirds intro templates. You can change the duration of the font and color of the text in each template, and you can choose if you want to download a 1080 or the 4K version of the designer pack.
The templates are compatible with CS6, CC2013, CC2014, and CC2016 versions of the Premiere Pro. The Simple Titles pack can be easily installed, as you just have to drag and drop it into the software.
However, before you can download these title templates, you have to subscribe to Cinecom’s mailing list.
Even though this can be a bit inconvenient, it is very well worth the trouble since you’ll be able to transform or build upon the intro templates and use them freely in all videos you edit in Adobe Premiere Pro.
18. EnvatoElements
You can find much more than intro templates on the EnvatoElements platform since you can choose from 740.000 items you can use for anything from creating a WordPress website to preparing your next business presentation.
The Video Templates category alone features over 4000 items, including Logo Stings or Infographics assets.
There are nearly one hundred available intro templates for Adobe Premiere Pro, but downloading any of them requires you to create an account and purchase a subscription plan.
Prices start from $16.50 per month, and packages include virtually unlimited access to stock photos and videos, video templates, and much more. The EnvatoElements platform also offers assets that can be used with Final Cut Pro, Adobe After Effects or Apple Motion.
19. Videohive
Videohive is a part of the Envato Market platform that also features Web Themes and Templates, Code, Audio, or Graphic sections. It is free to use, but only a limited amount of assets can be downloaded for free.
To download an item, you must purchase it, and prices can range from $16 to $50 for a single title template.
Videohive is also a great source of title templates for Adobe After Effects, as it offers more than 5000 titles and intros that are compatible with this software.
Furthermore, you can download presets for both Premiere Pro and After Effects that can be used to create stop-motion animations, perform color correction, or make the footage look like it was captured with a VHS camera.
20. RocketStock
This option is best suited for video editors who want to create their intros because RocketStok’s Cinematic Style Library extends the scope of options provided by Premiere Pro.
Downloading all fonts except Helvetica Neue is free, but you must check which fonts you can use in commercial projects. You will have no trouble installing the fonts since you can just double-click on the font and follow the on-screen instructions.
Once you’ve installed all the fonts from the library, you can use them to replace the software’s default library. You just have to click on the Replace Style Library option that can be accessed from Premiere Pro’s Title Style tab.
If you don’t feel comfortable creating your titles or if you simply don’t have the time to create your own titles, the Free Cinematic Style Library is not the best choice for you.
On the other hand, Premiere Pro’s users who don’t often use title templates can benefit from downloading RocketStock’s intro library.
Part 3: How to Import and Customize Title Templates in Premiere
If you download the template, all the title templates support customization. You can change its size, font, color, and add 3D effects.
It is easy to import and use it to touch up your video. Check out the steps below to know how to import title templates quickly.
- Install the title template. Choose one template you like and download it to your PC. Remember to unzip it before importing it. Now install them.
- Import the title template. You just need to go to click Effects at the top. Then at right, you will find Presets in the effects section.
- Right-click on presets, and choose Import Presets. If the title template format is .mogrt, you need to open it in Essential Graphics Panel. At the bottom right corner, click the plus icon to import the title template and install it.
- Customize the title template. Once the title template is imported, drag it to the timeline. Click the Editing tab. Here you can customize colors, text, opacities, and positions. There are more options for you to explore.
- You can also copy and paste the title template to another place in the timeline. If you change one place of the pasted template, the original one will remain the same.
Note: each version of Premiere’s interface will look different, but the workflow is similar.
Conclusion
Using title templates can help you achieve a certain visual style faster, so you don’t have to spend a lot of time looking for a perfect background or animating the text.
The Internet provides almost unlimited video editing resources, but not all of these resources can be acquired for free.
Which website you will choose as a source of fresh title templates depends on how often you work on new projects in Adobe Premiere Pro.
If you want to make professional video editing and tired of Premiere, try Filmora! It includes various titles templates to use.
You can sync audio automatically, use detailed color correction to make your title and video like a movie. Download it now (FREE)!
Benjamin Arango
Benjamin Arango is a writer and a lover of all things video.
Follow @Benjamin Arango
Picture-in-Picture Made Easy: A Beginner’s Guide to FCP Video Editing
How to Create a Picture-in-Picture Effect Using Final Cut Pro
Benjamin Arango
Mar 27, 2024• Proven solutions
Sometimes we need to show two videos together on the same screen to convey certain usage information. If you are searching for a tool to make this task possible then Final Cut Pro is the best choice for you.
This tool can help you to use the picture-in-picture effect with ease. However, the process for adding this effect cannot be completed within one r two steps.
The article below contains complete details about how to add PIP effects using Final Cut Pro. You will be glad to know that FCP also works with few integrated plugins that assist in the free picture in picture effect generation.
How to Create PIP Effect with FCP
If you are ready with two videos and now want to bring them to the same screen then prefer to follow these simple steps:
Step 1: Add Background video
The very first step that you need to follow for PIP effect generation using FCP is to bring your main or background video to the timeline as a primary storyline. Once you have created the primary storyline then all videos for the PIP effect will be added to it.

Step 2: Add PIP videos
It is time to choose the higher video clip so that the PIP effect can be applied. This task can be done either by using on-screen type controls available on the viewer or you can move ahead with transform controls available on the inspector.
Note that lower clips use to stay in the background in final results whereas upper clips will appear in the foreground. By default, both clips use to have 100% full screen with 100% opaque settings.

Step 3: Apply PIP effect
As now you have added both videos on-screen now you have to select the higher video and then click over the rectangular transform button that is available on the lower-left corner of viewer screen. As soon as you make this selection, the icon will turn into blue color, and naturally 8 dots will appear around the selected image or video. Use any one of these dots for scaling your selection in asymmetrical order.

Step 4: Adjust PIP Effect
- If you want to scale this image in a symmetrical fashion then simply drag the dot to the corner from the central position.
- Now hold the option key and drag one dot to the corner. It will help you to shrink as well as to enlarge the image even without affecting its actual aspect ratio.
- Users can keep on scaling this foreground image till the time they achieve essential size.
- Now click inside your selected image and start dragging it to reach a certain specific position. You can place it anywhere on a big screen.
Step 5: Follow precise Adjustment
Simply select the top clip and then hit Command + 4 to open the inspector. Now click on that blue show button over your FCP screen and it will provide you complete information about the transform category of available built-in effects. If you use inspector for this task then it can help you to get very precise results for scaling needs. It assists users to manage images with accurate position and size.

Step 6: Apply Cross- Dissolve
- Now choose the leading edge of effect and use Command + T. It will immediately apply the default cross-dissolve option for starting clip.
- You will be glad to know that the PIP effect does not restrict users to work just upon a single image rather it can be used to process as many pictures as your project needs and that can fit inside the frame.

Check this video tutorial to know more details:
Picture in Picture Plug-ins for Final Cut Pro
There are so many plug-ins available in the market for Final Cut Pro platform and all of them possess unique qualities along with impressive toolsets. No matter whether you are a beginner with the PIP effect or professional making high-end video projects, FCP plug-ins can make your task much easier with their intuitive controls.
1. Tokyo PiPintor
PiPintor Free is a specially designed picture-in-picture plugin that assists beginners with easy processing of the PIP effect over Final Cut Pro platform. It simply awakes the menu-driven animation power on your tool so that picture in picture effect can be completed without key-framing.
2. ProPIP
Those who need to enjoy a higher level of customizations are advised to work over ProPIP environment. This advanced tool assists users to showcase their abilities with full freedom for personalization.
ProPIP is the best choice for newscasting, commentaries, and many other applications. It helps in generating fine controls for initial as well as end position, rotation, and scaling effects along with easy-to-use media controls over the screen. ProPIP also provides personalized borders with endless opportunities to develop impressive projects on Final Cut Pro platform.
Benjamin Arango
Benjamin Arango is a writer and a lover of all things video.
Follow @Benjamin Arango
Benjamin Arango
Mar 27, 2024• Proven solutions
Sometimes we need to show two videos together on the same screen to convey certain usage information. If you are searching for a tool to make this task possible then Final Cut Pro is the best choice for you.
This tool can help you to use the picture-in-picture effect with ease. However, the process for adding this effect cannot be completed within one r two steps.
The article below contains complete details about how to add PIP effects using Final Cut Pro. You will be glad to know that FCP also works with few integrated plugins that assist in the free picture in picture effect generation.
How to Create PIP Effect with FCP
If you are ready with two videos and now want to bring them to the same screen then prefer to follow these simple steps:
Step 1: Add Background video
The very first step that you need to follow for PIP effect generation using FCP is to bring your main or background video to the timeline as a primary storyline. Once you have created the primary storyline then all videos for the PIP effect will be added to it.
Step 2: Add PIP videos
It is time to choose the higher video clip so that the PIP effect can be applied. This task can be done either by using on-screen type controls available on the viewer or you can move ahead with transform controls available on the inspector.
Note that lower clips use to stay in the background in final results whereas upper clips will appear in the foreground. By default, both clips use to have 100% full screen with 100% opaque settings.
Step 3: Apply PIP effect
As now you have added both videos on-screen now you have to select the higher video and then click over the rectangular transform button that is available on the lower-left corner of viewer screen. As soon as you make this selection, the icon will turn into blue color, and naturally 8 dots will appear around the selected image or video. Use any one of these dots for scaling your selection in asymmetrical order.
Step 4: Adjust PIP Effect
- If you want to scale this image in a symmetrical fashion then simply drag the dot to the corner from the central position.
- Now hold the option key and drag one dot to the corner. It will help you to shrink as well as to enlarge the image even without affecting its actual aspect ratio.
- Users can keep on scaling this foreground image till the time they achieve essential size.
- Now click inside your selected image and start dragging it to reach a certain specific position. You can place it anywhere on a big screen.
Step 5: Follow precise Adjustment
Simply select the top clip and then hit Command + 4 to open the inspector. Now click on that blue show button over your FCP screen and it will provide you complete information about the transform category of available built-in effects. If you use inspector for this task then it can help you to get very precise results for scaling needs. It assists users to manage images with accurate position and size.
Step 6: Apply Cross- Dissolve
- Now choose the leading edge of effect and use Command + T. It will immediately apply the default cross-dissolve option for starting clip.
- You will be glad to know that the PIP effect does not restrict users to work just upon a single image rather it can be used to process as many pictures as your project needs and that can fit inside the frame.
Check this video tutorial to know more details:
Picture in Picture Plug-ins for Final Cut Pro
There are so many plug-ins available in the market for Final Cut Pro platform and all of them possess unique qualities along with impressive toolsets. No matter whether you are a beginner with the PIP effect or professional making high-end video projects, FCP plug-ins can make your task much easier with their intuitive controls.
1. Tokyo PiPintor
PiPintor Free is a specially designed picture-in-picture plugin that assists beginners with easy processing of the PIP effect over Final Cut Pro platform. It simply awakes the menu-driven animation power on your tool so that picture in picture effect can be completed without key-framing.
2. ProPIP
Those who need to enjoy a higher level of customizations are advised to work over ProPIP environment. This advanced tool assists users to showcase their abilities with full freedom for personalization.
ProPIP is the best choice for newscasting, commentaries, and many other applications. It helps in generating fine controls for initial as well as end position, rotation, and scaling effects along with easy-to-use media controls over the screen. ProPIP also provides personalized borders with endless opportunities to develop impressive projects on Final Cut Pro platform.
Benjamin Arango
Benjamin Arango is a writer and a lover of all things video.
Follow @Benjamin Arango
Also read:
- Updated In 2024, Effortless Video Ratio Conversion A Quick Start
- New In 2024, S Best Free Video Editing Tools for 32-Bit Windows Users
- 2024 Approved Mac Video Editing Made Easy Install Lumafusion or Choose an Alternative
- Updated Splice Video Editor Review Does It Live Up to the Hype?
- 2024 Approved Easily Combine Photos and Videos Best Online Collage Generators
- Best MP4 Editor for Mavericks Unlock Professional Editing Features
- New The Smart Way to Choose a Video to Audio Converter Essential Features to Consider
- 2024 Approved The Ultimate List of Android Video Editing Apps for Beginners
- Updated In 2024, Video Dubbing Made Easy Top Software for PC (Free Download)
- Safe and Legal Ways to Get Filmora for Free (No Torrent Viruses)
- Updated In 2024, Insights From the Best OGG Conversion Tools
- Updated 2024 Approved Make a Lasting Impression Top 10 Free Animated Logo Makers
- New 2024 Approved How to Edit GoPro Video on Mac
- New Free Video Hosting Solutions 10 Best Options for Individuals and Businesses
- New No Watermark, No Cost Top 10 Online Video Editing Tools for 2024
- Updated In 2024, Online Lyric Video Generators Ranked
- New In 2024, Luckily There Are Several Alternative Apps that Allow You to Edit Your Footage From a Mobile Device; See Our Reviews Below
- Updated Learn to Edit Videos Like a Pro A Comprehensive Online Guide for 2024
- Chromebooks Best Android Video Editors for Creators
- New Say Goodbye to Typing Top Mac Speech Recognition Apps That Wont Break the Bank (Free & No Install)
- In 2024, Video Brightness Correction Top Tools for Desktop, Online, and Mobile
- New 2024 Approved Android Video Editing Made Easy Top 10 iMovie Alternatives
- Updated Frame Your Memories The Best Free and Paid Vignette Apps for Mobile
- New In 2024, Design Your Own Fake Faces with These Free Online Generators
- New The Best Free AVI Video Rotators for Windows, MAC, Android, and iPhone in Year
- Updated Best of the Best Top 10 Free 4K Video Converter Tools for 2024
- New 2024 Approved Move Over WMM Discover the Best Video Editors
- Updated 2024 Approved The Popularity of Video Content on Social Media Networks Has Been Soaring in the Last Couple of Years, and It Is only Reasonable to Expect This Trend to Continue. Thats the Reason Why in This Article
- In 2024, New Guide How To Check iCloud Activation Lock Status On Your iPhone 13 Pro Max
- Read This Guide to Find a Reliable Alternative to Fake GPS On Apple iPhone 7 | Dr.fone
- Pokemon Go Error 12 Failed to Detect Location On Honor 90? | Dr.fone
- How to Reset Apple ID and Apple Password From iPhone 13 Pro
- The Ultimate Guide to Get the Rare Candy on Pokemon Go Fire Red On Realme GT 5 Pro | Dr.fone
- 5 Solutions For Itel P40+ Unlock Without Password
- 2024 Approved Discover the Top Audio Converters for Your Music Library
- Planning to Use a Pokemon Go Joystick on Vivo Y02T? | Dr.fone
- In 2024, How to Reset a Poco C50 Phone that is Locked?
- The Ultimate Guide to Get the Rare Candy on Pokemon Go Fire Red On OnePlus Ace 3 | Dr.fone
- In 2024, Which Pokémon can Evolve with a Moon Stone For Lava Yuva 3? | Dr.fone
- A Step-by-Step Guide on Using ADB and Fastboot to Remove FRP Lock from your Vivo Y56 5G
- 2024 Approved Expolring Top 6 Best Alternatives to Clownfish Voice Changer
- Complete guide for recovering photos files on 90.
- 3uTools Virtual Location Not Working On Motorola Edge 40? Fix Now | Dr.fone
- Top 10 AirPlay Apps in Vivo T2 5G for Streaming | Dr.fone
- 8 Best Apps for Screen Mirroring Tecno Pop 7 Pro PC | Dr.fone
- How to Bypass Android Lock Screen Using Emergency Call On Realme GT 5?
- My Videos Arent Playing on Nokia C12 – What Can I Do? | Dr.fone
- 5 Hassle-Free Solutions to Fake Location on Find My Friends Of Realme C33 2023 | Dr.fone
- New 2024 Approved How to Create A GIF with Sound?
- A Guide Oppo Reno 11F 5G Wireless and Wired Screen Mirroring | Dr.fone
- In 2024, For People Wanting to Mock GPS on Realme GT 5 Devices | Dr.fone
- What to Do if Google Play Services Keeps Stopping on Samsung Galaxy S23+ | Dr.fone
- Updated Converting Like a Pro The Experts Guide to Wav Converter
- Why Apple Account Disabled On your iPhone 12 Pro Max? How to Fix
- New 10 Best Slow-Motion Cameras to Try for 2024
- Title: Updated Which DVR Is King? TiVo and Comcast Go Head-to-Head in Our Expert Review for 2024
- Author: Amelia
- Created at : 2024-04-29 19:59:23
- Updated at : 2024-04-30 19:59:23
- Link: https://ai-driven-video-production.techidaily.com/updated-which-dvr-is-king-tivo-and-comcast-go-head-to-head-in-our-expert-review-for-2024/
- License: This work is licensed under CC BY-NC-SA 4.0.
